Featured image for how to install cafe string lights
Image source: oclights.com
Transform your outdoor space into a cozy retreat by installing cafe string lights with secure, weather-resistant mounting hardware. Start by planning your layout, spacing hooks or anchors evenly along walls, fences, or poles, then connect the lights to a GFCI outlet for safety and easy control. With minimal tools and a few hours, you’ll create a warm, inviting ambiance perfect for entertaining or relaxing.
Key Takeaways
- Plan your layout first: Measure space and mark anchor points for even spacing.
- Use sturdy anchors: Install hooks, eye bolts, or poles to support light weight.
- Check bulb spacing: Ensure lights are close enough to avoid sagging or gaps.
- Weatherproof connections: Use outdoor-rated lights and seal plugs from moisture.
- Secure with clips: Attach lights every 12–18 inches for a taut, clean look.
- Test before hanging: Verify functionality to avoid reworking once installed.
📑 Table of Contents
How to Install Cafe String Lights for a Cozy Outdoor Ambiance
There’s something magical about stepping into a backyard, patio, or garden lit with soft, warm cafe string lights. Whether it’s a quiet evening with a book, a dinner party under the stars, or a romantic date night, the gentle glow of these lights transforms ordinary outdoor spaces into inviting retreats. I still remember the first time I strung up cafe lights in my backyard—what started as a simple DIY project turned into a nightly ritual. The transformation was instant: the space felt cozier, more intimate, and just… alive.
But let’s be real—installing cafe string lights isn’t always as simple as hanging a few bulbs and calling it a day. I’ve had my fair share of tangled wires, uneven spacing, and lights that sagged like a hammock in the middle of summer. After years of trial, error, and a few late-night YouTube binges, I’ve learned the tricks to getting it right. In this guide, I’ll walk you through everything you need to know—from choosing the right lights to planning your layout, installing them safely, and maintaining them for years of use. Whether you’re a first-timer or a seasoned DIYer, this guide will help you create a cozy outdoor ambiance that feels like a permanent vacation.
Choosing the Right Cafe String Lights
Types of Cafe String Lights
Before you start drilling holes or tying knots, it’s important to pick the right kind of lights. Not all string lights are created equal, and the type you choose will affect everything from durability to ambiance.
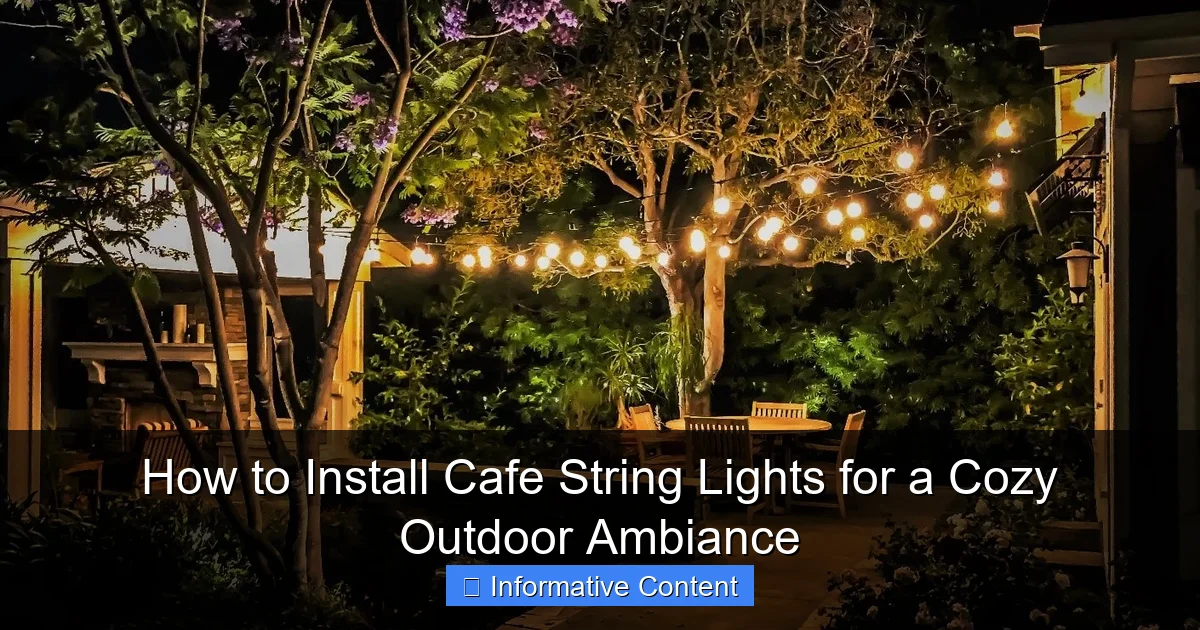
Visual guide about how to install cafe string lights
Image source: img.yardenvy.com
- LED Bulbs: These are energy-efficient, last up to 50,000 hours, and stay cool to the touch. They’re ideal for year-round use and come in warm white, soft white, and even color options. I prefer warm white for that classic “cafe” glow—think Parisian sidewalk bistro, not a neon sign.
- Incandescent Bulbs: These give off a warmer, more nostalgic light but use more energy and burn out faster. They’re also hotter, so not ideal for areas with kids or pets.
- Weather-Resistant (IP44 or higher): If your lights will be exposed to rain, snow, or humidity, make sure they’re rated for outdoor use. Look for IP44 (splash-proof) or IP65 (water-resistant) on the packaging.
- Shatterproof Bulbs: Especially useful if you’re hanging lights near a dining area or where people might bump into them. Plastic or polycarbonate bulbs are safer than glass.
For example, I once used indoor-rated lights on my covered porch—only to discover they shorted out after a heavy spring rain. Lesson learned: always check the weather rating!
Length and Spacing
Measure your space before buying. Measure the distance between your mounting points (trees, pergola posts, walls, etc.) and add 10–15% extra for sag and connections. Most cafe lights come in 24-, 48-, or 72-foot lengths, with bulbs spaced 12–24 inches apart.
- 24-foot strand: Great for small patios or tight corners.
- 48-foot strand: Ideal for most backyard layouts—enough to span a pergola or two trees.
- 72-foot strand: Best for large decks, gardens, or commercial spaces.
Tip: Buy one extra strand. You’ll likely need it for corners, loops, or if a bulb burns out (and you want to replace the whole section).
Plug-in vs. Solar-Powered
This is a big decision. Both have pros and cons.
- Plug-in lights: Brighter, more consistent, and easier to control with timers or smart plugs. But you’ll need access to an outdoor GFCI outlet (and possibly an extension cord).
- Solar-powered lights: Eco-friendly and no cords, but brightness varies with sunlight. They work best in sunny areas and may dim on cloudy days. I use solar in my front garden—it’s low-maintenance, but not as bright as my plug-in backyard setup.
Pro tip: If you go solar, place the panel where it gets 6+ hours of direct sunlight. I once installed a solar panel under a tree—big mistake. The lights barely lasted two hours at night.
Planning Your Layout for Maximum Impact
Assess Your Outdoor Space
Grab a tape measure and walk around your yard. Identify natural anchor points: trees, fence posts, pergola beams, eaves, or even sturdy furniture. Sketch a rough diagram showing where you want lights and how they’ll connect.
- Are you lighting a dining area, a lounge zone, or the entire backyard?
- Do you want a single line, a grid, or a crisscross pattern?
- Will the lights be visible from inside your home? (This affects bulb color and brightness.)
I once tried to hang lights across my entire backyard in a single straight line—only to realize the middle sagged so much it looked like a fishing net. Now I plan in zones: one for the dining table, another for the fire pit, and a third for the path.
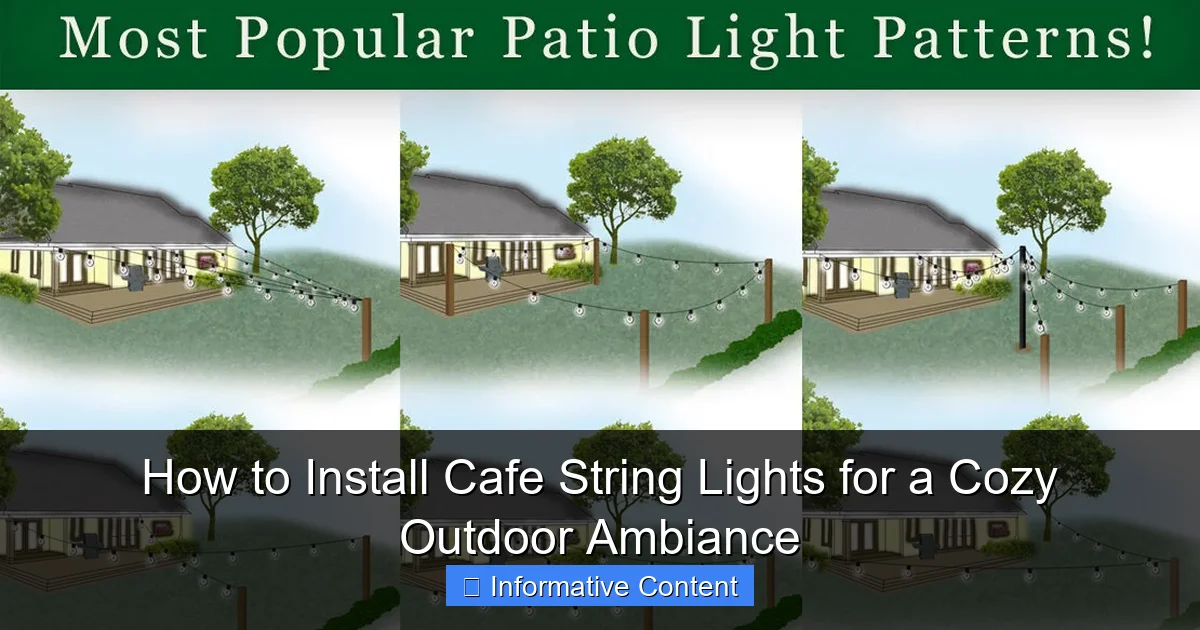
Create a Lighting Design
Think beyond straight lines. Here are a few popular layouts:
- Straight Line: Simple and classic. Best for patios or between two trees.
- Grid or Crisscross: Great for pergolas or large decks. Use multiple strands at right angles for a canopy effect.
- Loop or Zigzag: Adds visual interest. Hang lights in a wave pattern between posts or trees.
- Canopy (U-Shape or Diamond): Perfect for covering a dining area. Run lights from a central point (like a tree or pole) outward.
Example: On my pergola, I used a crisscross pattern with four 48-foot strands. I spaced the lines 3 feet apart to avoid overcrowding. The result? A warm, even glow that doesn’t blind anyone.
Account for Power Sources and Access
Nothing kills the mood like a dead strand because you forgot the outlet. Plan where each plug will go.
- Use outdoor-rated extension cords if needed (look for “SJTW” or “SJTO” ratings).
- Hide cords under rugs, behind furniture, or use cord clips to keep them tidy.
- If you’re using a timer or smart plug, place it in a dry, accessible spot.
Bonus: I use a smart outdoor outlet that I control with my phone. I can turn the lights on before guests arrive—even if I’m still at work. It’s a game-changer.
Tools and Materials You’ll Need
Essential Tools
You don’t need a full workshop, but a few tools make the job easier and safer.
- Measuring tape: For spacing and layout.
- Drill and drill bits: For installing hooks or anchors in wood or masonry.
- Stud finder (for walls): Helps locate secure points for heavy-duty hooks.
- Extension ladder: For high pergolas or eaves. (Always use a spotter!)
- Wire cutters/strippers: Only if you’re splicing wires (rare for pre-made strands).
- Zip ties or cord clips: For securing cords and preventing tangles.
I keep a “light kit” in my garage: a small toolbox with a drill, hooks, zip ties, and a spare strand. It saves time on every project.
Mounting Hardware
The right hardware ensures your lights stay up—and don’t damage your home.
- Cup hooks (for wood): Easy to install and remove. Use 1/2″ to 1″ size.
- Eye bolts (for heavy loads): Best for pergolas or if you’re hanging multiple strands.
- J-hooks or S-hooks: Great for metal fences or gutters.
- Concrete anchors (for masonry): Use with a hammer drill for brick or stone walls.
- Tree-friendly straps: If hanging from trees, use wide nylon straps (not wire or rope) to protect bark.
Warning: Never use nails or screws in trees—it invites pests and disease. I learned this the hard way when a tree started oozing sap after a DIY project gone wrong.
Safety Gear
Don’t skip this! Even simple jobs can be risky.
- Work gloves: Protect your hands from sharp hooks or splinters.
- Safety glasses: Especially when drilling or working overhead.
- Non-slip shoes: For ladder work.
- Voltage tester: If you’re working near electrical outlets.
Pro tip: Always turn off outdoor outlets before plugging in or unplugging lights. Better safe than sorry.
Step-by-Step Installation Guide
Step 1: Install Mounting Points
Start by marking where your hooks or anchors will go. Space them 3–6 feet apart, depending on the weight of your lights.
- For wood: Drill a pilot hole, then screw in cup hooks by hand. No need to over-tighten.
- For masonry: Use a hammer drill with a masonry bit, insert an anchor, then screw in the hook.
- For trees: Wrap a tree strap around the trunk (at least 10 feet high), then attach an S-hook or carabiner.
Tip: Use a level to keep hooks aligned. I once installed a line of hooks that sloped downward—by the time I finished, the lights looked like a waterfall.
Step 2: Hang the Lights
Now for the fun part! Unroll your lights and test them before hanging.
- Start at the power source (outlet) and work outward.
- Hook each end first, then add middle supports.
- Use zip ties or cord clips to secure the cord to hooks—this prevents strain on the bulbs.
- Allow a slight sag (about 6–12 inches) between hooks. Too tight = broken bulbs. Too loose = a droopy mess.
Example: On my 40-foot pergola, I used 11 hooks spaced 4 feet apart. I left 8 inches of sag between each—just enough to create a gentle curve.
Step 3: Connect Multiple Strands
If you need more than one strand, connect them end-to-end.
- Most cafe lights have male/female plugs. Just snap them together.
- Use outdoor-rated extension cords for long runs (e.g., from the outlet to the first strand).
- For corners or angles, use an outdoor-rated junction box or a waterproof connector.
Caution: Don’t exceed the maximum number of connectable strands (usually 3–5). Check the packaging—overloading can cause fires.
Step 4: Secure Cords and Test
Once everything’s up, tidy up the cords.
- Use cord clips to run cords along beams or walls.
- Hide excess cord behind furniture or in a cord cover.
- Plug in the lights and test. If a bulb doesn’t work, check the fuse (usually in the plug) or replace the bulb.
Pro tip: Keep a spare bulb or two on hand. I once spent an hour troubleshooting a dead strand—only to find a single burned-out bulb.
Maintaining and Troubleshooting Your Lights
Routine Maintenance
With proper care, your lights can last for years.
- Inspect monthly: Look for loose hooks, frayed cords, or broken bulbs.
- Clean bulbs: Wipe with a damp cloth (unplugged!). Dust and bugs can dull the glow.
- Check connections: Ensure plugs are snug and free of moisture.
- Trim vegetation: Keep branches and leaves away from lights to prevent damage and fire risk.
I do a quick check every time I use the lights. It takes 2 minutes and prevents bigger issues.
Common Problems and Fixes
| Problem | Cause | Solution |
|---|---|---|
| One bulb out, rest still on | LEDs are parallel-wired | Replace the bulb or use a bulb repair kit |
| Entire strand out | Blown fuse or loose connection | Check the fuse in the plug; tighten all connections |
| Lights flickering | Overloaded circuit or loose wire | Unplug other devices; check for damaged cords |
| Bulbs too bright/dim | Wrong bulb type or low voltage | Use warm white LEDs; check solar panel placement |
| Cords sagging | Hooks too far apart | Add more hooks or use stronger hardware |
Seasonal Storage Tips
If you live in a cold climate, consider storing lights in winter.
- Coil cords loosely (no tight loops) to prevent damage.
- Store in a dry, temperature-controlled space (e.g., garage or basement).
- Use a labeled bin to keep everything together.
Alternatively, leave them up if they’re rated for all seasons. Just add a protective cover during storms.
Final Thoughts: Creating Your Perfect Outdoor Oasis
Installing cafe string lights is more than just a DIY project—it’s an act of creating joy. Every time I step into my backyard at dusk, I’m reminded of the effort, the planning, and the little mistakes that led to something beautiful. The lights aren’t just for decoration; they’re a signal that it’s time to slow down, breathe, and enjoy the moment.
Whether you’re lighting a tiny balcony or a sprawling garden, the principles are the same: plan thoughtfully, install safely, and maintain regularly. Don’t be afraid to experiment—try a new pattern, swap bulb colors, or add a dimmer switch. Your space is unique, and your lighting should reflect that.
And remember: the goal isn’t perfection. It’s ambiance. It’s that warm, golden glow that makes a rainy evening feel cozy or a summer night feel magical. So grab your lights, gather your tools, and start creating. Your perfect outdoor retreat is just a few hooks away.
Frequently Asked Questions
How do I install cafe string lights without drilling holes?
Use adhesive hooks, tension rods, or wrap lights around existing structures like trees or railings. This method keeps your walls intact while creating a cozy ambiance.
What’s the best way to hang cafe string lights for a permanent setup?
For a durable installation, use eye hooks anchored into beams or walls, then connect the lights with zip ties or wire. Ensure the bulbs are spaced evenly for a polished look.
How far apart should I space cafe string lights for even lighting?
Space bulbs 12–18 inches apart for balanced coverage, depending on your string light model. Overlapping slightly can enhance brightness without creating dark spots.
Can I install cafe string lights in rainy climates?
Yes, but use weatherproof (IP65-rated) lights and seal connections with waterproof tape. Angle lights downward to prevent water pooling on bulbs.
How do I power cafe string lights if outlets aren’t nearby?
Use an outdoor extension cord or solar-powered string lights. For longer distances, consider a low-voltage transformer with a buried cable.
What tools do I need to install cafe string lights safely?
Basic tools include a ladder, measuring tape, hooks, zip ties, and a stud finder (for heavy setups). Always check for overhead power lines before starting.