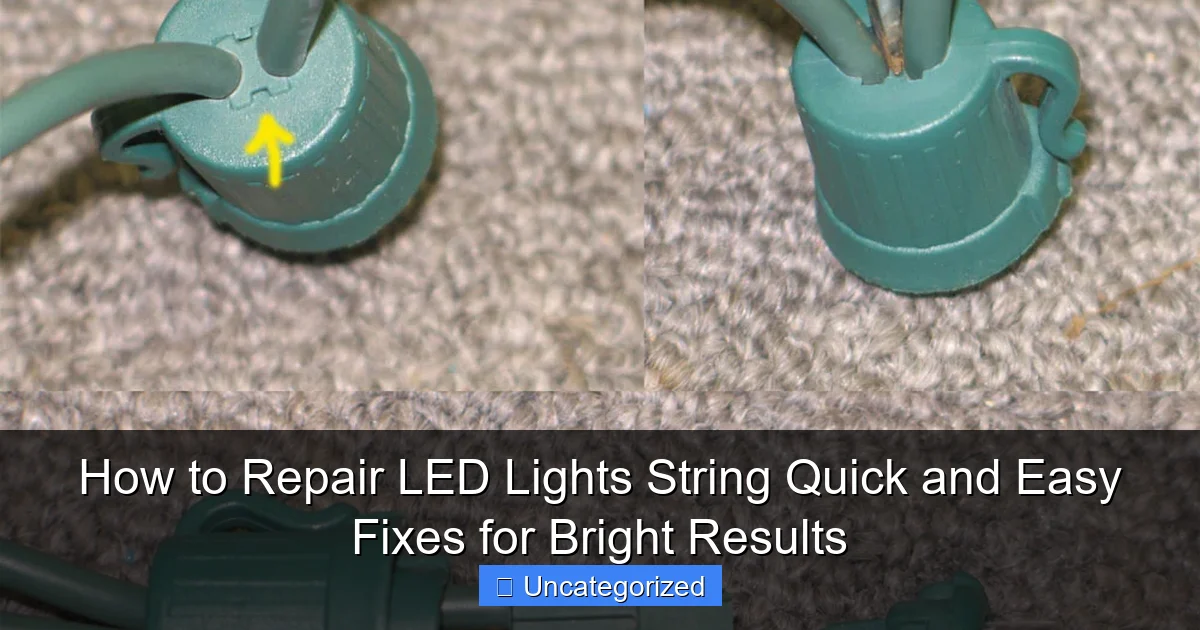
Featured image for how to repair led lights string
Image source: 4.bp.blogspot.com
Repairing LED light strings is often quick and simple—start by identifying the faulty bulb or broken connection using a multimeter or by visual inspection. Most issues, like flickering or partial outages, can be fixed by replacing damaged bulbs, re-soldering loose wires, or securing faulty plugs, saving you time and money. With basic tools and a little patience, you can restore your LED lights to full brightness in minutes.
“`html
How to Repair LED Lights String Quick and Easy Fixes for Bright Results
Key Takeaways
- Inspect bulbs first: Check for loose or damaged bulbs before other fixes.
- Replace faulty bulbs: Swap defective bulbs with working ones to restore light.
- Check wiring connections: Secure loose wires and fix frayed sections promptly.
- Test the power source: Ensure the outlet and adapter function correctly.
- Use a multimeter: Diagnose voltage issues to pinpoint electrical faults.
- Apply insulation tape: Seal exposed wires to prevent short circuits.
Why This Matters / Understanding the Problem
Few things ruin holiday cheer or cozy ambiance faster than a string of LED lights that won’t turn on. Whether it’s for Christmas, a wedding, or backyard patio lighting, a broken strand can feel like a mini crisis. The good news? Most LED light issues are fixable—no electrician required.
Learning how to repair LED lights string quick and easy fixes for bright results saves time, money, and the frustration of tossing out a perfectly good set. Unlike older incandescent strands, modern LED lights are more energy-efficient and durable, but they can still fail due to loose connections, damaged wires, or faulty bulbs.
Common signs of trouble include flickering, partial sections not lighting up, or the entire string staying dark. The root cause is often simple: a single dead bulb, a pinched wire, or a bad plug. With the right approach, you can diagnose and fix the problem in under 30 minutes. And that’s exactly what this guide will show you.
Instead of buying a new set every season, use this method to revive your lights and keep them shining bright. Plus, repairing LED strings is eco-friendly and helps reduce electronic waste. Ready to bring the sparkle back? Let’s get started.
What You Need
Before diving in, gather these tools and materials. You likely already have most of them at home. Having everything ready makes the process faster and less frustrating.
Visual guide about how to repair led lights string
Image source: marcled.com
- Multimeter (digital or analog) – Essential for checking voltage and continuity. A $10–$20 model works fine.
- Needle-nose pliers – For gently removing bulbs and bending wires.
- Wire cutters/strippers – For trimming damaged sections or splicing wires.
- Replacement LED bulbs – Match the wattage, color, and base type (usually T5 or T3.5) of your strand.
- Electrical tape – For insulating spliced wires.
- Heat shrink tubing (optional) – Better than tape for long-lasting wire repairs.
- Small Phillips screwdriver – For opening plugs or fuse compartments.
- Flashlight – Helps see inside dark sockets and under furniture.
- Magnifying glass (optional) – Useful for inspecting tiny solder points or micro-fractures.
Bonus tip: Take a clear photo of the entire string before starting. It helps you remember how bulbs are oriented or if any were loose.
Now that you’re equipped, let’s walk through the step-by-step process of how to repair LED lights string quick and easy fixes for bright results.
Step-by-Step Guide to How to Repair LED Lights String Quick and Easy Fixes for Bright Results
Step 1: Unplug and Inspect the Entire String
First, unplug the lights from any power source. Safety first! Never work on live electrical components.
Next, lay the string on a clean, flat surface—like a table or floor. Run your fingers along the wire, checking for:
- Visible kinks, cuts, or frayed insulation
- Bulbs that are loose, cracked, or missing
- Blackened or melted plastic near sockets or plugs
Look closely at the plug. Many LED strings have a small fuse compartment (usually a sliding cover). Check if the fuse is intact—a blown fuse is a common culprit.
If you find a damaged section, mark it with a piece of tape. This helps you remember where to focus later.
Pro tip: Gently wiggle each bulb while the string is plugged in (but only briefly and from a safe distance). If flickering occurs, that bulb or socket may be the problem.
Step 2: Test the Plug and Power Source
Plug the string into a known-working outlet. Try another device (like a phone charger) to confirm the outlet is live.
If the outlet works but the lights don’t, test the plug itself. Use your multimeter set to AC voltage (usually 250V range). Insert the probes into the plug’s prongs (carefully!).
You should see a reading close to your home’s voltage (110–120V in the US, 220–240V elsewhere). If there’s no reading, the plug or internal wiring is likely broken.
Also, check the fuse. Most LED plugs have a tiny 3–5 amp fuse. Use the multimeter’s continuity mode (beep function) to test it. No beep? Replace it with a matching fuse.
Warning: Never bypass a blown fuse. It’s a safety device. Use the correct amperage—too high a fuse can damage the lights or cause a fire.
Step 3: Identify the Problem Zone
Many LED strings use a series-parallel configuration. This means sections of bulbs are wired in series, but multiple sections run in parallel. If one bulb fails, it only affects its small group—not the whole string.
So, if only part of the lights are out, the issue is likely in that section. If the whole string is dark, check the plug, fuse, or main power wire.
To pinpoint the problem zone:
- Plug in the string and observe which sections light up.
- Use your finger or a small tool to gently press on each bulb in the dark section. Sometimes a loose bulb just needs reseating.
- Look for a shunt resistor—a tiny component inside some LED sockets that bypasses a dead bulb. If it’s damaged, the whole section stays dark.
If you’re still unsure, use the multimeter’s continuity mode to test each bulb socket. Touch one probe to the metal base and the other to the contact tab inside the socket. A beep means the socket is intact.
Step 4: Remove and Replace Faulty Bulbs
Once you’ve found a bad bulb, it’s time to replace it. Most LED bulbs are twist-locked or push-in style.
For twist-in bulbs:
- Hold the base of the bulb (not the glass) with needle-nose pliers.
- Gently twist counterclockwise until it loosens.
- Pull it straight out.
For push-in bulbs:
- Use the pliers to grip the base and wiggle it free.
- Don’t pull on the wires—this can damage internal connections.
Now, insert a new bulb. Make sure it’s the same type (color, brightness, base size). Push or twist it in firmly but gently.
Plug in the string and test. If the section now lights up, you’ve fixed it! If not, the socket or wiring may be damaged.
Pro tip: Keep a few spare bulbs from an old set or buy a small pack online. They’re cheap and save future headaches.
Step 5: Fix Damaged Wires and Sockets
If the wire is cut, frayed, or the socket is cracked, you’ll need to repair it. Here’s how:
For a cut or frayed wire:
- Cut out the damaged section with wire cutters.
- Strip about 1/2 inch of insulation from both ends.
- Twist the exposed wires together (same color to same color).
- Cover with electrical tape or slide on heat shrink tubing and shrink with a hair dryer.
For a cracked or loose socket:
- Cut the wire just before and after the socket.
- Strip the wires.
- Attach a new socket (available at hardware stores) using crimp connectors or soldering.
- Insulate all connections.
Always double-check polarity. The smooth wire (or silver-colored wire in some cases) is usually neutral; the ribbed or gold wire is hot. Mismatched connections can cause flickering or no light.
Test the repair by plugging in the string. If it works, you’ve just saved your lights!
Step 6: Test the Entire String and Secure Repairs
After any fix, run a full test. Plug in the string and walk along it, watching for:
- Consistent brightness across all bulbs
- No flickering or dimming
- All sections lighting up
If everything works, reinforce your repairs. Wrap electrical tape around splices or use zip ties to secure loose wires. This prevents future damage from bending or pulling.
For outdoor lights, consider using silicone sealant around outdoor-rated sockets to prevent moisture damage.
Pro tip: Label repaired sections with a small tag or colored tape. This helps if you need to troubleshoot again later.
Step 7: Store Properly to Prevent Future Damage
Even the best repairs won’t last if you store your lights wrong. Poor storage is a top reason LED strings fail next season.
Here’s how to store them safely:
- Use a dedicated storage reel or wrap the string around a cardboard piece (like a shoebox).
- Keep bulbs facing outward to avoid crushing.
- Store in a cool, dry place—away from heat, moisture, and pests.
- Never leave lights plugged in when stored.
For extra protection, use a plastic bin with a lid. Add silica gel packets to absorb moisture.
Proper storage is a key part of how to repair LED lights string quick and easy fixes for bright results—because prevention is the best repair.
Pro Tips & Common Mistakes to Avoid
Now that you know the steps, let’s cover some insider knowledge to make your repairs faster and more reliable.
Pro Tip #1: Use the “half-string test.” If the whole string is dark, plug in only the first half. If it lights, the problem is in the second half. Narrow down the issue faster.
Pro Tip #2: Buy a LED tester tool (around $10). It’s a small device that plugs into a socket and lights up if the circuit is complete. Great for checking bulbs without removing them.
Pro Tip #3: If multiple bulbs are out in a row, the issue is likely the first one in the series. Replace it, and the rest may come back.
Pro Tip #4: For outdoor lights, check the weatherproofing. Cracked seals or missing gaskets let in water, causing shorts. Replace seals or use silicone.
Common Mistakes to Avoid:
- Not unplugging first – Always disconnect power. Even low-voltage strings can cause shocks.
- Using mismatched bulbs – A different wattage or voltage can overload the circuit. Always match specs.
- Ignoring the plug – A corroded or loose plug is often the real problem, not the bulbs.
- Over-tightening bulbs – This cracks the socket or damages internal wires. Hand-tight is enough.
- Skipping the multimeter – Guessing leads to wasted time. Test, don’t assume.
Remember: Patience pays off. Take your time, and you’ll master how to repair LED lights string quick and easy fixes for bright results in no time.
FAQs About How to Repair LED Lights String Quick and Easy Fixes for Bright Results
Got questions? We’ve got answers. Here are the most common queries people have when fixing LED light strings.
Can I repair an LED string with a broken plug?
Yes! If the plug is cracked or the prongs are bent, you can replace it. Buy a matching plug (usually 2-prong or 3-prong) and splice it to the main wire. Strip the wires, connect them (hot to hot, neutral to neutral), and insulate. Test with a multimeter before use.
Why do LED lights go out in sections?
This usually means a bulb in that section has failed and isn’t bypassing the circuit. In series wiring, one dead bulb breaks the flow. Replacing it restores power to the rest. Also, check for a damaged shunt resistor in the socket.
Are all LED bulbs interchangeable?
No. Bulbs must match in voltage, wattage, base type, and color temperature. A 120V bulb won’t work on a 24V string. Check the label on your original bulbs or the packaging.
Can I use electrical tape instead of heat shrink?
Yes, but heat shrink is better. It creates a tighter, more durable seal. Tape can loosen over time, especially outdoors. If using tape, wrap it tightly and overlap by 50%.
What if my lights flicker but don’t stay on?
Flickering can be caused by:
- Loose bulbs (tighten them)
- Damaged wires (check for fraying)
- Bad plug (test with multimeter)
- Overloaded circuit (try a different outlet)
Start with the bulbs and work backward.
How long do LED light strings last?
Quality LED strings can last 50,000 hours (about 10 years with normal use). But poor storage, moisture, or physical damage shorten that. With proper care and repairs, you can extend their life significantly.
Can I repair solar-powered LED strings?
Yes, but the process is different. Focus on the battery, solar panel, and charge controller. Check if the battery holds a charge and if the panel is clean and unblocked. Wiring repairs are similar, but use low-voltage techniques.
Final Thoughts
Repairing LED light strings doesn’t require a degree in electrical engineering. With basic tools and a little patience, you can fix flickering, dead sections, or broken wires in under an hour.
By mastering how to repair LED lights string quick and easy fixes for bright results, you save money, reduce waste, and keep your lights shining for years. No more tossing out sets after one season—just grab your multimeter, pliers, and a few spare bulbs.
Start with the simplest checks: unplug, inspect, test the plug, and replace bulbs. Work your way to wire repairs only if needed. And remember: proper storage is just as important as the fix.
Next time your lights go dark, don’t panic. Pull out this guide, follow the steps, and bring back the glow. Your holidays, parties, and quiet evenings will thank you.
Now go fix those lights—and enjoy the bright results!
“`

