Featured image for how to string strips of led lights together
Image source: lightstec.com
Connecting LED light strips end-to-end is simple with compatible connectors or soldering—just align the polarity and secure the connection for a seamless glow. Always check voltage and amp requirements to avoid overloading the circuit, and use extension cables for longer runs without sacrificing brightness. With the right tools, you can create stunning, custom lighting displays that are both professional and energy-efficient.
How to String Strips of LED Lights Together for Stunning Displays
Key Takeaways
- Plan your layout: Measure and map light placement before installation.
- Use compatible strips: Ensure voltage and connector types match for seamless connections.
- Cut only at markers: Follow manufacturer guides to avoid damaging strips.
- Secure connections: Reinforce joints with solder or clips for reliability.
- Test before mounting: Verify functionality to troubleshoot issues early.
- Power properly: Use a single power source for strips over 16 feet.
Why This Matters / Understanding the Problem
You’ve seen them: glowing mantles, shimmering under-cabinet lighting, or dazzling holiday displays that look like they’re straight out of a magazine. The secret? Knowing how to string strips of LED lights together for stunning displays—without overloading circuits, creating fire hazards, or ending up with a tangled mess.
LED light strips are affordable, energy-efficient, and easy to install, but many people hesitate when they want to connect multiple strips. Why? Because they’re afraid of breaking the lights, overloading the power supply, or ruining the look with visible wires and connectors.
Whether you’re lighting up a bedroom, decorating for a party, or adding ambiance to your kitchen, connecting LED strips correctly ensures a clean, professional finish. This guide walks you through every step, from choosing the right tools to avoiding common pitfalls. By the end, you’ll confidently create seamless, eye-catching displays using your LED strips—safely and beautifully.
The key is understanding voltage, connectors, and layout. When you master how to string strips of LED lights together for stunning displays, you unlock endless creative possibilities—without the stress.
What You Need
Before you start, gather the right tools and materials. Having everything on hand prevents interruptions and ensures a smooth setup. Here’s your essential checklist:
Visual guide about how to string strips of led lights together
Image source: essenledstrip.com
- LED light strips (same voltage and color temperature—don’t mix 12V and 24V!)
- Power supply (rated for the total wattage of all connected strips)
- Connectors or solderless clips (L-shaped, T-shaped, straight, or corner connectors)
- Wire cutters or scissors (for trimming tape and wires)
- Measuring tape (to plan your layout precisely)
- Alcohol wipes or rubbing alcohol (to clean mounting surfaces)
- Double-sided mounting tape or adhesive clips (for secure installation)
- Optional but helpful: soldering iron and heat shrink tubing (for permanent, waterproof connections), extension wires, dimmer or remote control
Pro tip: Always match your LED strips’ voltage (usually 12V or 24V) to your power supply. Mismatched voltages can damage your lights or create dim spots. For example, two 12V strips need a 12V power source.
Also, check the wattage of each strip (usually printed on the back). Add them up and choose a power supply with at least 20% more wattage than your total load. For instance, if your strips total 30W, use a 36W+ power supply.
Step-by-Step Guide to How to String Strips of LED Lights Together for Stunning Displays
Step 1: Plan Your Layout and Measure the Space
Start by deciding where you want your lights. Common spots include under kitchen cabinets, along baseboards, behind TVs, around mirrors, or across ceiling edges.
Use a measuring tape to get exact lengths. Sketch a simple diagram showing where each strip will go and how they’ll connect. This helps you buy the right number of strips and connectors.
For example: If you’re lighting a 10-foot-long countertop, you might use three 3.28-foot (1-meter) strips with two connectors between them. Or, you could use a single long strip with an extension wire if the power source is on the opposite end.
Tip: Always leave 1–2 inches of extra strip beyond the measured space. This gives you room to cut cleanly at the designated cut marks (usually every 1–2 inches, marked by a scissor icon).
Also, note where the power supply will be located. Try to position it near the start or middle of your layout to minimize voltage drop (more on that later).
Step 2: Choose the Right Connection Method
There are three main ways to connect LED strips: solderless connectors, extension wires, and soldering. Each has pros and cons depending on your skill level and needs.
Solderless connectors are the easiest and safest for beginners. They snap onto the cut ends of strips and bridge the gap. Use L-shaped connectors for 90° corners, T-shaped for branching, and straight connectors for end-to-end runs.
Extension wires let you connect strips that aren’t in a straight line. For example, if your kitchen counter has a peninsula, use an extension wire to go around the corner and reconnect on the other side.
Soldering creates the most durable, waterproof connections—ideal for outdoor or high-moisture areas. But it requires tools and practice. If you’re new, stick with connectors unless you’re confident.
For most indoor projects, solderless connectors are the best choice. They’re quick, clean, and don’t require tools beyond a pair of scissors.
When choosing connectors, make sure they match your strip’s width (8mm, 10mm, or 12mm) and type (single-color, RGB, or RGBW). Mismatched connectors won’t work and can damage the strips.
Step 3: Cut the Strips at the Right Spots
LED strips have cut marks—usually small lines with a scissors icon or “cut here” text. Only cut at these points. Cutting elsewhere breaks the circuit and ruins the strip.
Use sharp scissors or wire cutters. Make a clean, straight cut. A jagged edge can make connectors hard to attach.
For example: If you need a 2-foot section but your strip is 3.28 feet, measure and cut at the nearest cut mark. Don’t try to trim in between—it won’t work.
Warning: Once a strip is cut, it can’t be reattached to its original power source. Always plan ahead and cut only what you need.
After cutting, inspect the copper pads (small metal squares) at the end. They should be clean and free of dust or adhesive residue. Wipe them with a dry cloth if needed.
Step 4: Attach the Connectors
Now it’s time to join the strips. For solderless connectors:
- Open the connector’s plastic cover.
- Align the cut end of the strip so the copper pads match the metal prongs inside.
- Push the strip in firmly until it clicks or sits flush.
- Close the cover securely. It should snap shut.
Repeat for the other strip. The connector should now bridge both ends, allowing power and data (for RGB strips) to flow through.
For L-shaped or corner connectors, follow the same process. Make sure the connector’s shape matches the turn you’re making. For example, use an L-connector for a right-angle turn along a wall-to-ceiling edge.
If using extension wires:
- Cut a piece of 4-conductor wire (for RGB) or 2-conductor (for single-color) to the needed length.
- Strip about 1/4 inch of insulation from each end.
- Attach one end to the first strip using a connector or solder.
- Attach the other end to the second strip.
For soldering: Tin the copper pads on both strips, apply solder to the wire ends, then join them. Use heat shrink tubing to insulate and protect the joint.
Tip: Test the connection with a battery or small power supply before installing. If the lights don’t turn on, double-check alignment and connection tightness.
Step 5: Mount the Strips Securely
Clean the mounting surface with alcohol wipes. Dust, grease, or moisture can prevent adhesive from sticking.
Peel the backing off the strip and press it firmly into place. Hold it for 10–15 seconds to ensure a strong bond. Don’t stretch the strip—it can damage internal circuits.
For long runs, use adhesive clips or mounting brackets every 12–18 inches. This prevents sagging and keeps the strip flat, which improves light diffusion.
For corners or tight spaces, bend the strip gently at the cut marks. Don’t fold it sharply—this can break the copper traces.
If using extension wires, route them behind furniture, under baseboards, or in wire channels to hide them. Use zip ties to secure loose wires.
For outdoor or bathroom use, apply a thin layer of silicone sealant over the connectors and cut ends to protect against moisture. Let it cure before powering on.
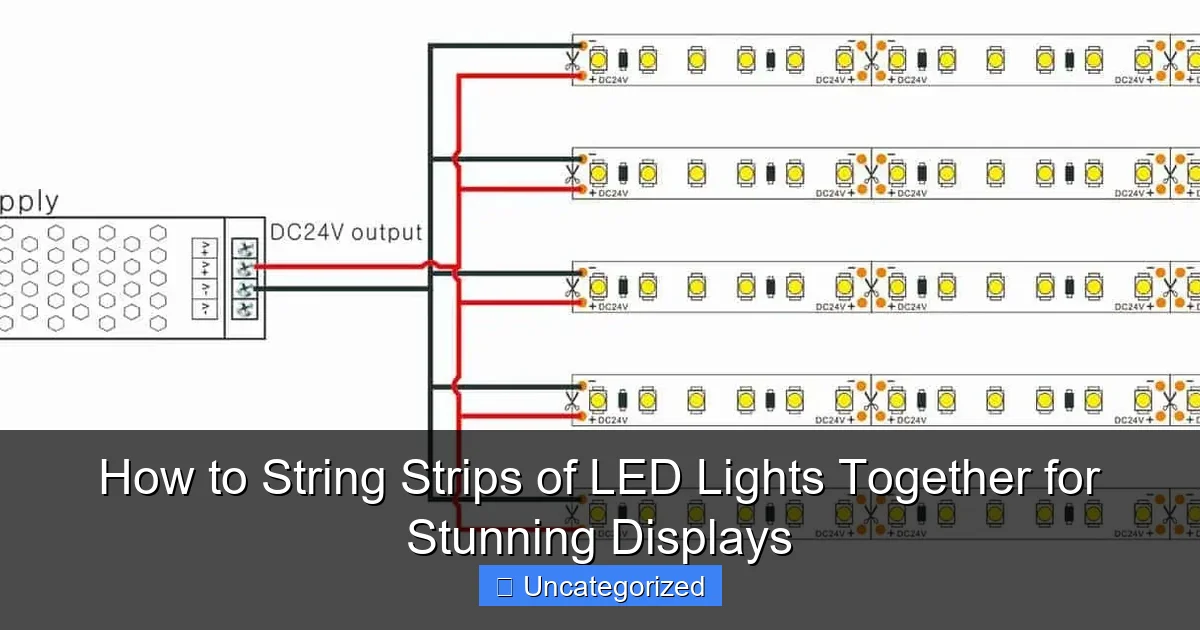
Step 6: Connect to the Power Supply
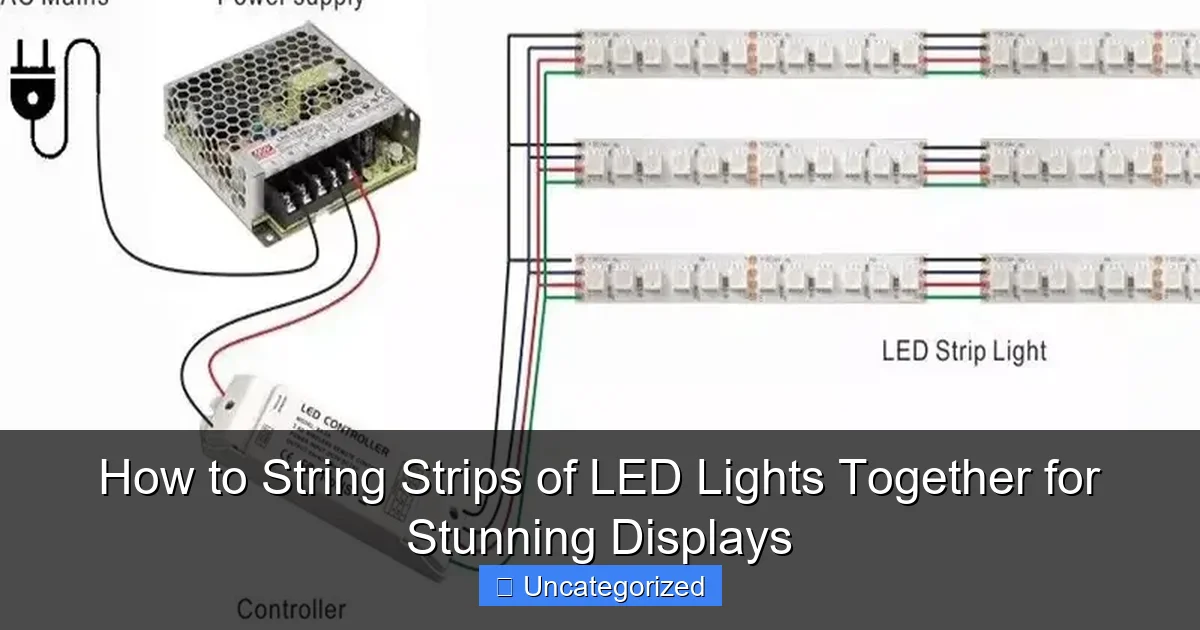
Now, attach the first strip to the power supply. Most strips come with a 2-pin (single-color) or 4-pin (RGB) connector that plugs directly into the power supply’s output.
If not, use a matching connector or solder the wires. Match the colors: red to positive (+), black to negative (–). For RGB strips, follow the manufacturer’s pinout (usually red, green, blue, and common).
Plug the power supply into an outlet. Turn it on. All connected strips should light up evenly.
Warning: Never plug in the power supply before all connections are secure. This can cause short circuits or damage the strips.
If the lights flicker or some sections stay dark, check for loose connectors, misaligned pads, or voltage drop (see Step 7).
Step 7: Prevent and Fix Voltage Drop
Voltage drop is a common issue when connecting long runs of LED strips. It causes the lights to get dimmer the farther they are from the power source.
For example: A 16-foot run of 12V strip might be bright at the start but dim at the end. This happens because the current weakens over distance.
To prevent voltage drop:
- Use a 24V system—24V strips suffer less voltage drop than 12V over the same distance.
- Power from both ends—connect the power supply to the middle of the run, or use two power sources (one at each end).
- Add injection points—run a wire from the power supply to a connector in the middle of the strip to “boost” the signal.
- Keep runs short—don’t exceed the manufacturer’s recommended length (usually 16–32 feet for 12V, longer for 24V).
If you already have dimming, try injecting power halfway. For example: Run a 2-conductor wire from the power supply to a T-connector in the middle of your strip. This feeds power to both directions.
For RGB strips, use 4-conductor injection wires to carry all color channels.
Step 8: Add Controls (Optional but Recommended)
For dynamic effects, add a controller. Most LED strips support:
- Remote controls—change colors, brightness, and modes (fade, strobe, etc.).
- Wall switches or dimmers—for simple on/off and brightness control.
- Smart controllers—sync with voice assistants (Alexa, Google Home) or apps for scheduling and music sync.
Connect the controller between the power supply and the first strip. Follow the manual’s wiring diagram.
For example: Plug the power supply into the controller’s input, then connect the controller’s output to the LED strip.
Now you can enjoy rainbow fades, slow pulses, or warm white for movie nights—all from your phone or remote.
Pro Tips & Common Mistakes to Avoid
Even small errors can ruin your display. Here’s how to avoid them and get pro-level results.
Pro Tip 1: Always test each strip and connector before mounting. It’s much easier to fix issues on the table than on the wall.
Pro Tip 2: Use a power supply with a built-in fuse. It protects against short circuits and overloads.
Pro Tip 3: For seamless looks, cut strips at 45° angles at corners and use corner connectors. This avoids sharp bends and light gaps.
Pro Tip 4: If you’re using RGB strips, label each connector with a marker (e.g., “R-G-B-+”) to avoid mix-ups.
Pro Tip 5: For outdoor displays, use IP65-rated strips (water-resistant) and seal all connections with silicone.
Common Mistakes to Avoid:
- Mixing voltages: Never connect 12V and 24V strips. It can burn out the lower-voltage strip.
- Overloading the power supply: If your strips total 40W, don’t use a 40W power supply. Use 50W or higher. Overloading causes overheating and failure.
- Ignoring cut marks: Cutting between pads breaks the circuit. Always cut only at designated points.
- Skipping surface prep: Dirty or oily surfaces cause strips to fall off. Clean with alcohol first.
- Using mismatched connectors: A 10mm connector won’t fit an 8mm strip. Check width before buying.
- Running strips in parallel without planning: If you branch strips, ensure the power supply can handle the total load.
Remember: how to string strips of LED lights together for stunning displays isn’t just about connecting wires—it’s about planning, precision, and patience.
FAQs About How to String Strips of LED Lights Together for Stunning Displays
Q1: Can I connect more than 10 feet of LED strips together?
Yes, but with limits. For 12V strips, most manufacturers recommend no more than 16–32 feet in a single run to avoid voltage drop. For longer runs, use 24V strips or inject power from multiple points. Always check your strip’s specs.
Q2: What if my strips don’t have cut marks?
Then they’re likely not designed to be cut. Some LED strips are continuous and meant for custom soldering. If yours has no cut marks, don’t cut it—use it as a single unit or buy cuttable strips instead.
Q3: Can I connect different colors or types of LED strips?
Not safely. Mixing single-color and RGB strips, or different color temperatures (e.g., 3000K and 5000K), causes uneven lighting and circuit issues. Always use strips of the same type, voltage, and color.
Q4: How do I hide the wires and connectors?
Use wire channels, baseboard raceways, or paintable conduit. For under-cabinet lighting, tuck wires behind the cabinet or use magnetic clips. For ceilings, run wires through crown molding or along beams. The goal is to make the lights the focus, not the wires.
Q5: Can I use a battery pack instead of a wall outlet?
Yes! Use a 12V or 24V battery pack with enough capacity (measured in mAh). A 5000mAh pack can power a 10W strip for about 5 hours. Great for temporary displays or camping.
Q6: Why do my lights flicker after connecting?
Flickering is usually caused by loose connectors, voltage drop, or a weak power supply. Check all connections, ensure the power supply is rated for your total wattage, and consider injecting power in the middle of long runs.
Q7: Can I connect LED strips to a smart home system?
Absolutely. Use a smart controller (like a Wi-Fi or Zigbee-enabled LED driver) that supports your home automation platform (Alexa, Google Home, HomeKit). You can then control brightness, color, and schedules with voice or app commands.
Final Thoughts
Now you know how to string strips of LED lights together for stunning displays—safely, cleanly, and with professional results. It’s not magic; it’s method. From planning your layout to preventing voltage drop, every step matters.
Start small: try a single run under your cabinets or behind your TV. Once you master the basics, expand to larger projects—like a glowing headboard, a party backdrop, or a holiday light display.
Remember: Use the right tools, match voltages, and test before installing. Don’t rush. A little extra time upfront saves hours of troubleshooting later.
With this guide, you’re ready to transform any space into a warm, inviting, or vibrant environment—using nothing but LED strips and a few clever connections.
So grab your strips, fire up the power supply, and let there be light. Your next stunning display starts now.

