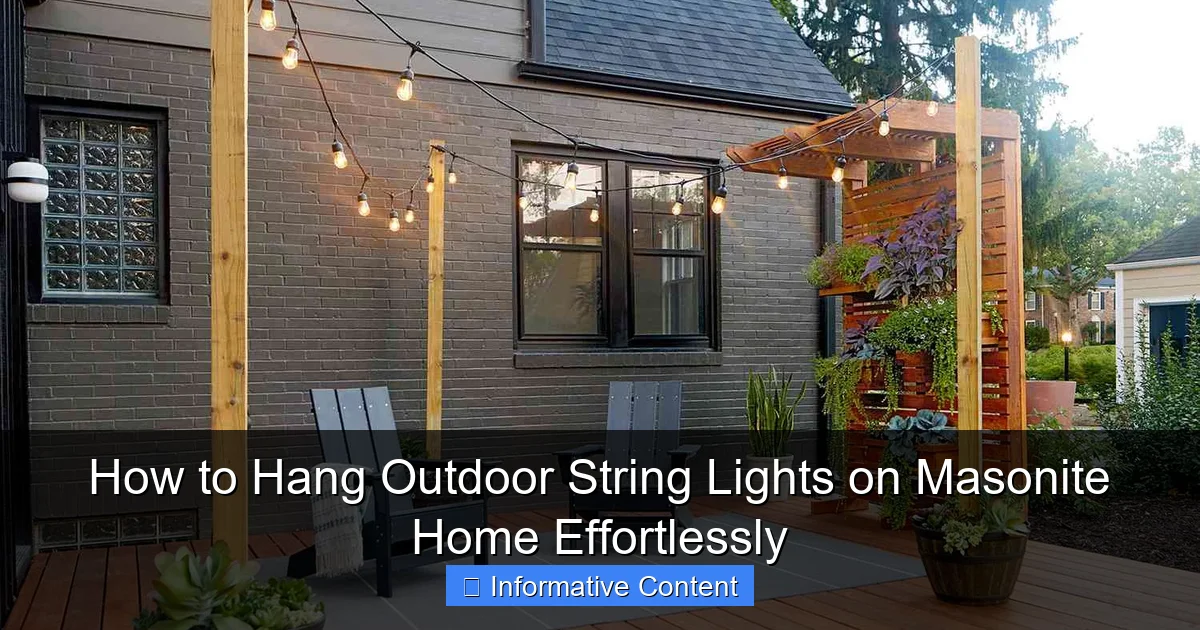
Featured image for how to hang outdoor string lights on masonite home
Image source: bhg.com
Hanging outdoor string lights on a Masonite home is simple and damage-free when you use adhesive-backed hooks or removable mounting clips designed for smooth surfaces. Clean the area thoroughly, plan your layout, and secure the lights at even intervals to create a polished, professional look. With the right tools, you can achieve a stunning ambiance without drilling or risking siding damage.
Key Takeaways
- Use removable adhesive hooks: Avoid drilling; secure lights firmly on Masonite surfaces.
- Measure spacing first: Plan light placement to ensure even, balanced coverage.
- Anchor lights with clips: Use weatherproof clips for extra grip on Masonite edges.
- Choose LED string lights: Opt for lightweight, energy-efficient options to reduce strain.
- Test before finalizing: Check brightness and fit before securing all fixtures.
- Weatherproof connections: Seal plugs and joints to prevent moisture damage.
📑 Table of Contents
- Why Hanging String Lights on a Masonite Home Is Worth the Effort
- Understanding Masonite Siding and Why It’s Different
- Step-by-Step Guide: How to Hang String Lights Without Damaging Masonite
- Best String Lights for Masonite Homes (And What to Avoid)
- Creative Ways to Hang Lights on Masonite (Beyond the Roofline)
- Maintenance, Safety, and Long-Term Care
- Data Table: Recommended Products for Hanging Lights on Masonite
- Final Thoughts: Light Up Your Masonite Home with Confidence
Why Hanging String Lights on a Masonite Home Is Worth the Effort
There’s something magical about stepping outside on a warm summer evening, the air soft with twilight, and being greeted by the gentle glow of outdoor string lights. Whether you’re hosting a backyard barbecue, enjoying a quiet night with your partner, or simply unwinding with a book on the porch, string lights can transform your outdoor space into a cozy, inviting retreat. But if your home has Masonite siding—a common exterior material known for its durability and wood-like appearance—you might be wondering how to hang those lights without causing damage or leaving behind unsightly holes.
Masonite, also known as hardboard siding, is a popular choice for many homeowners because it’s affordable, low-maintenance, and resists rot and insects. However, it’s also a bit more delicate than wood or stucco. It doesn’t take kindly to nails, screws, or aggressive adhesives. That’s why hanging outdoor string lights on a Masonite home requires a little more thought, care, and the right tools. But don’t worry—this isn’t a job that needs a contractor. With the right approach, you can hang outdoor string lights on Masonite home surfaces safely, securely, and beautifully. I’ve done it myself on my own home, and after a few trial runs, I’ve learned what works (and what definitely doesn’t).
Understanding Masonite Siding and Why It’s Different
What Exactly Is Masonite?
Masonite is a type of engineered wood made from wood fibers, heat, and pressure. It was invented in the early 20th century and became a go-to siding material in the 1970s and 80s due to its affordability and resistance to warping. Today, it’s still found on countless homes across North America. It looks like real wood, but it’s denser and more uniform. That’s great for durability, but it also means it can be more prone to chipping, cracking, or moisture damage if not properly maintained.
Visual guide about how to hang outdoor string lights on masonite home
Image source: houseilove.com
Why Traditional Methods Don’t Work
If you’ve ever tried to hang lights on stucco or wood, you might be tempted to just grab a hammer and some nails. But with Masonite, that’s a recipe for disaster. The material is relatively soft and can easily crack under pressure. Driving a nail or screw directly into Masonite can:
- Cause the surface to split or crumble
- Lead to moisture intrusion, which can cause rot behind the siding
- Create unsightly damage that’s hard to repair
Plus, Masonite expands and contracts slightly with temperature and humidity changes. That means rigid fasteners like screws can actually loosen over time, creating gaps where water can seep in. So, while it might seem faster to just “poke a hole and hang it,” you’re risking long-term damage to your home’s exterior.
The Good News: Gentle, Reversible Methods Exist
The key to hanging outdoor string lights on Masonite home surfaces is using methods that distribute weight, avoid puncturing the siding, and are easy to remove when the season changes. Think of it like hanging art in a rental—temporary, clean, and non-damaging. With the right approach, you can enjoy beautiful lighting all year without compromising your home’s integrity.
Step-by-Step Guide: How to Hang String Lights Without Damaging Masonite
Step 1: Plan Your Lighting Layout
Before you buy any hardware, sketch out where you want your lights to go. Do you want them draped along the roofline? Across the patio? In a zigzag pattern between posts? Measure the distance from start to finish. Most string lights come in 25- or 50-foot lengths, so plan accordingly. I once tried to stretch a 25-foot strand across a 30-foot patio—let’s just say it looked more like a sad, drooping line than a magical canopy.
Use painter’s tape to mock up the path on your wall. This helps you visualize the look and avoid last-minute changes. Pro tip: Add 10% extra length to your measurements for slack and loops. You don’t want to be short when you’re halfway up the ladder!
Step 2: Choose the Right Hanging Hardware
This is where most people go wrong. Instead of nails or screws, opt for Masonite-safe hanging solutions:
- Adhesive hooks with strong backing (3M Command Outdoor or similar): These are designed for outdoor use and can support up to 5 pounds per hook. They’re removable and leave no residue.
- Clip-on siding hooks (like Gutter Clips or Masonite Clips): These slide under the top edge of the siding panel without drilling. They’re perfect for rooflines or soffits.
- Removable outdoor mounting tape: Use it for flat surfaces like window trim or fascia boards. Just press firmly and let it cure for 24 hours before hanging.
- Zip ties with adhesive bases: Great for corners or tight spaces. Just make sure the adhesive is rated for outdoor use.
Avoid anything that requires drilling into the Masonite itself. Even small pilot holes can weaken the panel over time, especially in wet climates.
Step 3: Install Hooks or Clips Properly
Once you’ve chosen your hardware, it’s time to install. Here’s how:
- For adhesive hooks: Clean the surface with rubbing alcohol, let it dry, then press the hook on for 30 seconds. Wait 24 hours before hanging anything heavy.
- For clip-on hooks: Slide the top of the clip under the upper edge of the siding panel. It should snap into place. Don’t force it—if it’s too tight, try a smaller size.
- For zip tie mounts: Attach the base with adhesive, then thread the tie through. Trim the excess after hanging.
Space hooks every 18–24 inches for even support. If your lights have bulbs every 12 inches, go for 18-inch spacing to avoid sagging.
Step 4: Hang the Lights
Start at one end and work your way across. Don’t plug them in yet—just hang them loosely. Use the built-in loops or clips on the lights to attach to your hooks. If your lights don’t have loops, use small S-hooks or zip ties to secure them.
For a clean look, keep the lights taut but not stretched. A little sag is okay—it gives a more relaxed, romantic feel. Just make sure they’re not dragging on the ground or touching plants (which can be a fire hazard).
Step 5: Secure the Cord and Test
Once the lights are up, use additional clips or zip ties to secure the power cord along the wall. This keeps it tidy and reduces wind damage. Then, plug in and test. Look for dark spots or flickering bulbs. If a section isn’t lighting up, check the connections and replace any burnt-out bulbs.
Best String Lights for Masonite Homes (And What to Avoid)
Top Picks for Durability and Safety
Not all string lights are created equal. When choosing lights for your Masonite home, look for:
- LED bulbs: They last longer, use less energy, and stay cool to the touch (important for safety).
- Weatherproof rating (IP44 or higher): This means they’re protected against splashes and dust.
- Low-voltage options: Safer and less likely to overheat.
- Integrated hooks or clips: Makes hanging easier and reduces strain on the cord.
My personal favorite is the Brightown Outdoor LED String Lights. They’re 25 feet long, have 25 bulbs, and come with built-in loops. I’ve had them up for three seasons, and they still look brand new.
What to Avoid
- Incandescent lights: They get hot, which can melt adhesives or damage Masonite over time.
- Cheap plastic hooks: They crack in cold weather and don’t hold well.
- Non-weatherproof lights: Even if they’re labeled “outdoor,” check the IP rating. IP44 is the minimum you should accept.
Smart Lighting Options
If you want to take it up a notch, consider smart string lights. Brands like Twinkly or Philips Hue let you control colors, patterns, and brightness from your phone. They’re pricier, but they’re perfect for holidays or parties. Just make sure the power adapter is placed in a dry, covered spot.
Creative Ways to Hang Lights on Masonite (Beyond the Roofline)
Patio or Pergola Canopies
Transform your patio into a bistro-style oasis by creating a canopy. Use clip-on hooks along the edges of your pergola or attach adhesive hooks to the fascia. Drape the lights in a crisscross pattern or hang them in straight lines. For extra drama, use two layers—one close to the ceiling and another lower down.
Window and Door Framing
Frame your windows or front door with lights for a welcoming look. Use adhesive hooks on the trim (not the Masonite itself). This works especially well during holidays or special events. I do this every Christmas, and my neighbors always ask how I did it without damaging the house.
Stair Railings and Fences
If your Masonite home has a wooden fence or railing, you can use zip ties or cable clips to attach lights. For a seamless look, run the lights along the top rail or weave them through the balusters. Just make sure the cord isn’t a tripping hazard.
Hanging from Trees or Posts
Don’t limit yourself to the house! If you have trees or posts in your yard, use them as anchor points. Attach one end of the lights to a clip on the Masonite, then run them to a tree branch or post. Use a turnbuckle or bungee cord to keep tension. This creates a dynamic, floating effect.
Accent Lighting for Planters or Mailboxes
For a subtle touch, wrap lights around planters, mailboxes, or garden stakes. Use small adhesive hooks or zip ties to secure the cord. This adds charm without overwhelming the space.
Maintenance, Safety, and Long-Term Care
Regular Checks Are Key
Even the best-installed lights need maintenance. Check your setup every few months for:
- Loosened hooks or clips
- Frayed or damaged cords
- Water accumulation in sockets
- Signs of mold or mildew on the Masonite (especially near clips)
I do a quick inspection every spring and fall. It only takes 10 minutes, but it saves me from bigger problems later.
Seasonal Removal and Storage
At the end of the season (or after a storm), take the lights down. Gently remove adhesive hooks—most peel off with a little heat from a hair dryer. Store lights in a cool, dry place, preferably in their original box or a breathable bag. Coil them loosely to avoid kinks.
Safety First
- Always use outdoor-rated extension cords.
- Keep cords away from high-traffic areas to prevent tripping.
- Never overload a single outlet or power strip.
- Turn off lights during storms or high winds.
One winter, a strong gust knocked a loose strand into a planter, and the bulb broke. A small fire started—luckily, it was caught quickly. That’s why I now use timers and check the setup weekly in bad weather.
Protecting Your Masonite
Over time, moisture trapped by hooks or clips can lead to mildew or rot. To prevent this:
- Choose hooks with raised backs (to allow airflow).
- Wipe down the area under hooks once a year.
- Repaint or touch up any scratches on the Masonite.
Data Table: Recommended Products for Hanging Lights on Masonite
| Product | Type | Weight Capacity | Weather Resistance | Best For | Notes |
|---|---|---|---|---|---|
| 3M Command Outdoor Hooks | Adhesive | 5 lbs per hook | IP65 (water and dust resistant) | Flat surfaces, trim, fascia | Removable, no residue |
| Gutter Clip Hooks (by VELUX) | Clip-on | 3 lbs per clip | UV-resistant plastic | Rooflines, soffits, gutters | No drilling, easy install |
| Brightown LED String Lights | LED, 25 ft | N/A | IP44 | General outdoor use | Built-in loops, energy-efficient |
| Scotch Outdoor Mounting Tape | Adhesive tape | 3 lbs per 1″ x 6″ strip | Waterproof, UV-resistant | Flat surfaces, corners | Let cure 24 hours before use |
| Zip Tie Mounts (by Cable Matters) | Adhesive + zip tie | 4 lbs per mount | IP54 | Corners, tight spaces | Great for cord management |
Final Thoughts: Light Up Your Masonite Home with Confidence
Hanging outdoor string lights on a Masonite home doesn’t have to be stressful or damaging. With the right tools, a little planning, and some creativity, you can create a beautiful, safe, and long-lasting lighting display that enhances your outdoor living space. I’ve learned that the key is patience and gentleness—Masonite may look tough, but it responds best to care.
Start small. Try a simple run along your porch or a single strand across your patio. Once you see how easy and effective it is, you’ll be inspired to expand. And remember: the goal isn’t just to light up your yard—it’s to create moments. A quiet evening under the stars. A laughter-filled dinner with friends. A holiday glow that makes your neighbors smile.
So go ahead. Grab those lights, choose your favorite method, and hang outdoor string lights on Masonite home surfaces with confidence. Your home deserves to shine—literally and figuratively. And when you step outside that first night and see your hard work glowing softly in the dark, you’ll know it was worth every minute.
Frequently Asked Questions
How do I hang outdoor string lights on a Masonite home without damaging the siding?
Use adhesive hooks or removable mounting strips rated for outdoor use, as they provide a secure hold without drilling into the Masonite. Avoid nails or screws to prevent moisture damage or warping.
What are the best tools to hang outdoor string lights on Masonite siding?
Opt for no-drill solutions like outdoor-rated adhesive hooks, magnetic clips (if near metal), or tension rods for porches. For longer runs, consider installing a thin wooden ledger board above the siding to anchor lights.
Can I use nails or screws to hang string lights on a Masonite home?
It’s not recommended, as Masonite is prone to moisture damage and cracking. Instead, use weather-resistant hooks or clips designed for delicate surfaces to safely hang outdoor string lights on Masonite.
How do I plan the layout for string lights on a Masonite exterior?
Sketch a layout first, measuring distances between anchor points and ensuring even spacing. Use painter’s tape to temporarily mark hook positions, then adjust for symmetry before final installation.
Are there weatherproof hooks for hanging string lights on Masonite?
Yes, look for UV-resistant adhesive hooks or stainless steel clips labeled for outdoor use. These withstand rain, wind, and heat while protecting your Masonite home’s exterior.
How do I hide cords when hanging outdoor string lights on Masonite?
Route cords behind trim, gutters, or landscaping elements, using cord clips or conduit channels. For a seamless look, choose string lights with flat, low-profile plugs.

