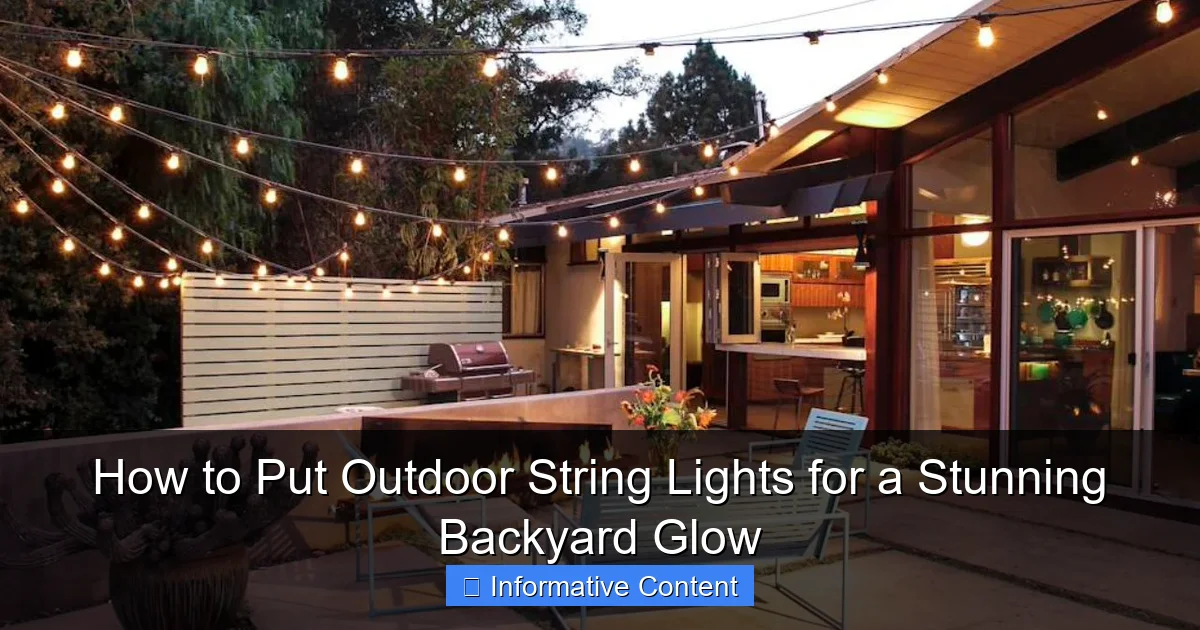
Featured image for how to put outdoor string lights
Image source: cdn.homedit.com
Transform your backyard into a captivating oasis by strategically hanging outdoor string lights along sturdy anchor points like trees, fences, or pergolas for balanced, radiant illumination. Ensure a professional look by spacing bulbs evenly, using weather-resistant fixtures, and connecting no more than three strands in a single circuit to maintain brightness and safety. With thoughtful placement and secure installation, you’ll achieve a stunning glow that elevates any outdoor space.
Key Takeaways
- Plan your layout first: Sketch light placement to avoid mid-project changes.
- Use sturdy anchors: Install hooks or poles rated for outdoor weight loads.
- Choose weatherproof lights: Ensure bulbs and cords are rated for outdoor use.
- Measure twice, install once: Confirm spacing and length before mounting.
- Test before securing: Power on lights to troubleshoot connections early.
- Hide cords creatively: Use clips or conduit for a clean, safe finish.
📑 Table of Contents
- How to Put Outdoor String Lights for a Stunning Backyard Glow
- 1. Planning Your Outdoor String Light Layout
- 2. Choosing the Right Outdoor String Lights
- 3. Installing Outdoor String Lights: Step-by-Step
- 4. Creative and Stylish Lighting Ideas
- 5. Maintaining and Storing Your Outdoor String Lights
- 6. Common Mistakes to Avoid (And How to Fix Them)
How to Put Outdoor String Lights for a Stunning Backyard Glow
Imagine stepping into your backyard on a warm summer evening. The sun has just dipped below the horizon, and instead of darkness, you’re greeted by a soft, warm glow that dances across your patio, trees, and fence. That’s the magic of outdoor string lights. They’re not just for holidays or special events—they can transform your outdoor space into a cozy, inviting sanctuary every night of the week.
I remember the first time I strung up lights in my own backyard. I had visions of a romantic, Pinterest-worthy oasis, but my first attempt looked more like a tangled mess. I’d underestimated the planning, overestimated my DIY skills, and ended up with a lopsided, flickering disaster. But after a few tries (and a few lessons learned), I discovered that hanging outdoor string lights isn’t just about aesthetics—it’s about creating a feeling. And with the right approach, anyone can achieve that dreamy, ambient glow without the frustration.
Whether you’re planning a dinner party, a quiet night under the stars, or just want to make your yard feel more welcoming, this guide will walk you through everything you need to know about how to put outdoor string lights. From choosing the right lights to securing them safely and stylishly, we’ll cover it all—no electrical degree required.
1. Planning Your Outdoor String Light Layout
Before you start drilling holes or climbing ladders, take a step back and think about your space. Planning is the most important step, and it’s where many people skip ahead too quickly. A well-planned layout ensures your lights look intentional, balanced, and functional—not like they were thrown up in a hurry.

Visual guide about how to put outdoor string lights
Image source: bhg.com
Assess Your Space and Purpose
Start by asking yourself: What do I want these lights for? Are they for ambiance during evening gatherings? To highlight a specific area like a dining table or fire pit? Or to illuminate a path for safety? Your goal will influence the type of lights, placement, and brightness you need.
- Entertaining: Focus on seating areas, dining spaces, and pathways. Use warm white or soft amber lights for a cozy feel.
- Safety: Install lights along walkways, stairs, or near pool edges. Consider brighter, more focused LED options.
- Aesthetic: Use lights to highlight trees, pergolas, or architectural features. Twinkling or color-changing lights can add a playful touch.
For example, in my backyard, I wanted to create a “dining under the stars” vibe. I mapped out the area around my patio table and chairs, then added lights to frame the space and guide guests from the back door to the seating area.
Sketch a Rough Layout
Grab a piece of paper or use a simple drawing app on your phone. Sketch your yard and mark where you want the lights to go. Include:
- Existing structures (trees, pergolas, fences, walls)
- Power source location (outlet, extension cord reach)
- Desired light patterns (zigzag, canopy, wrap, straight line)
- Obstacles (bushes, furniture, sprinklers)
Avoid overloading one area. Balance is key. If you have a pergola, don’t just string lights across the top—consider wrapping the posts or adding downward-facing strands for dimension.
Measure and Calculate
Measure the total length of your layout. Most outdoor string lights come in 25- or 50-foot strands. If your layout is 80 feet long, you’ll need at least two 50-foot strands (or three 25-foot ones), but always add 10-15% extra for slack and connections.
Also, check how many strands you can connect end-to-end. Some lights allow up to 480 watts or 8-10 strands, but cheaper models may only support 3-5. Overloading can cause dimming, flickering, or even damage.
2. Choosing the Right Outdoor String Lights
Not all string lights are created equal. The market is flooded with options, from cheap plastic bulbs to high-end, weatherproof LEDs. Picking the right ones depends on your budget, style, and how long you want them to last.
Types of Bulbs and Fixtures
Here’s a quick rundown of the most common types:
- LED String Lights: Energy-efficient, long-lasting (25,000+ hours), and cool to the touch. Ideal for year-round use. Look for IP65 or IP67 ratings for weather resistance.
- Incandescent String Lights: Warm, nostalgic glow but use more power and burn out faster. Better for seasonal use.
- Edison Bulb Strings: Vintage-style with exposed filaments. Great for rustic or industrial aesthetics. Choose weatherproof versions for outdoor use.
- Fairy Lights or Micro LEDs: Tiny, delicate bulbs. Perfect for wrapping trees or draping over railings. Often battery-powered, so no outlet needed.
- Solar-Powered String Lights: No wiring, eco-friendly, but less bright and may not last through cloudy days.
I learned the hard way that not all “weatherproof” lights are truly outdoor-ready. My first set was labeled “indoor/outdoor” but started flickering after one rainy season. Now I only buy lights with a clear IP65 or higher rating—this means they’re dust-tight and protected against water jets.
Color Temperature and Brightness
Color temperature is measured in Kelvins (K). Here’s what to know:
- 2700K–3000K: Warm white or soft yellow. Cozy, inviting. Best for dining and lounging.
- 4000K: Cool white. Brighter, more modern. Good for task lighting or pathways.
- RGB or Color-Changing: Fun for parties, but can feel gimmicky if overused. Use sparingly.
For most backyards, I recommend 2700K–3000K LEDs. They mimic candlelight and create a relaxed mood. Brightness (measured in lumens) should be 100–200 lumens per bulb for ambient lighting. Save higher lumens for safety zones.
Plug-In vs. Solar vs. Battery
- Plug-In: Most reliable, brightest, and longest-lasting. Requires access to an outdoor GFCI outlet.
- Solar: Great for remote areas, but performance drops in shade or winter. Use for decorative touches, not primary lighting.
- Battery: Flexible placement, but batteries need replacing. Ideal for small spaces or temporary setups.
Pro tip: If using plug-in lights, invest in a weatherproof extension cord and a timer or smart plug to automate on/off times.
3. Installing Outdoor String Lights: Step-by-Step
Now comes the fun part—actually putting up the lights! With your plan and lights ready, follow these steps for a secure, beautiful installation.
Step 1: Gather Your Tools
You’ll need:
- Outdoor string lights
- Measuring tape
- Drill and drill bits (for permanent mounts)
- Eye hooks, screw-in hooks, or zip ties
- Ladder (if working at height)
- Gloves (to protect your hands)
- Extension cord (if needed)
- Timer or smart plug (optional)
Step 2: Start at the Power Source
Always begin installing near the power outlet. This reduces the need for long extension cords and keeps connections tidy. If your outlet is indoors, use a weatherproof outlet cover or run a heavy-duty outdoor extension cord through a window or door (temporarily).
Never daisy-chain extension cords. It’s a fire hazard and can cause voltage drop, making lights dim.
Step 3: Mount the First Light
Secure the first bulb or socket to a hook, nail, or bracket near the power source. Don’t just tie the cord—use a proper fastener to prevent strain on the wiring.
For wood surfaces (fences, pergolas, trees), use eye screws or cup hooks. Drill a pilot hole first to avoid splitting the wood. For brick or stucco, use plastic wall anchors and screws.
Example: On my cedar fence, I used 1-inch cup hooks spaced every 2–3 feet. They’re barely visible and hold the lights securely, even in wind.
Step 4: String the Lights
Follow your layout plan. For straight lines (e.g., across a patio), stretch the lights taut but not tight—allow a little slack to prevent stress on the sockets.
For a canopy effect (like a “starry sky”), zigzag the lights between two anchor points. Use a zip tie or small hook every 2–3 feet to keep the pattern even.
When wrapping trees, use zip ties or soft rope instead of nails. Wrap loosely to avoid damaging the bark. Start at the top and spiral down for a natural look.
Pro tip: Test the lights as you go. Plug them in every 10–15 feet to catch a dead bulb or faulty connection early.
Step 5: Secure Connections and Ends
Use weatherproof caps on any open sockets (especially if you’re not connecting all strands). This prevents moisture from shorting the circuit.
For the final end, loop the cord through a hook and secure it with a zip tie or knot. Don’t let it dangle—it can pull on the last socket.
4. Creative and Stylish Lighting Ideas
Once you’ve mastered the basics, it’s time to get creative. The way you arrange your lights can make your backyard feel like a destination, not just a yard.
Create a Canopy Over Your Dining Area
String lights in a crisscross pattern above a patio table. Use a pergola, two posts, or tall trees as anchors. For extra magic, add sheer fabric or paper lanterns between the lights.
I did this for a friend’s 40th birthday party. We strung 40 feet of warm white LEDs across her pergola in a “web” pattern. The effect was like dining under a galaxy—everyone took photos!
Wrap Trees and Pillars
Wrap string lights around tree trunks, columns, or pillars in a spiral. Use a mix of light colors for a whimsical touch (e.g., white on the trunk, amber on branches).
For large trees, use a light-hanging pole or ask a friend to help. Wrap from the top down to avoid tangling.
Highlight a Fence or Wall
Install lights along a fence line or wall in a straight or wave pattern. Use clips or hooks to keep them flush. This creates a soft glow that defines the space and adds privacy.
Bonus: Add outdoor mirrors or reflective surfaces to bounce the light and make the yard feel larger.
Frame a Path or Staircase
Use lights to guide guests safely. String them along a railing, or place solar-powered stakes along a garden path. For steps, use LED step lights or string lights under the handrail.
I added lights to my backyard stairs after a guest tripped in the dark. Now they’re both safer and more inviting.
Mix Light Types
Combine string lights with other fixtures. Try:
- String lights + lanterns on tables
- String lights + fairy lights in planters
- String lights + LED candles in mason jars
The key is to layer the light—don’t rely on one source.
5. Maintaining and Storing Your Outdoor String Lights
Good lighting lasts longer with care. Here’s how to keep your lights shining year after year.
Regular Cleaning
Dust, pollen, and bird droppings can dim your lights. Every few months, turn them off and wipe bulbs with a soft, dry cloth. For stubborn grime, use a damp cloth (never spray directly on bulbs).
For solar lights, clean the solar panel monthly with soapy water and a soft brush.
Check for Damage
Inspect lights before each use. Look for:
- Frayed or exposed wires
- Cracked or missing bulbs
- Loose sockets
- Corroded connectors
Replace damaged strands immediately. Never repair with electrical tape—it’s not waterproof.
Winter Storage Tips
If you live in a cold climate, remove lights before winter. Moisture and ice can damage wires and sockets.
- Unplug and remove all lights.
- Coil cords loosely (no tight loops) to prevent tangling.
- Store in a dry, temperature-controlled area (e.g., garage or closet).
- Use labeled storage bins to keep strands organized.
I store mine in a clear plastic bin with silica gel packets to absorb moisture.
Extend Lifespan
- Use a timer to limit usage (e.g., 5 hours/night).
- Unplug during storms or high winds.
- Choose lights with replaceable bulbs (some have sealed sockets).
6. Common Mistakes to Avoid (And How to Fix Them)
Even seasoned DIYers make mistakes. Here are the most common ones—and how to avoid or fix them.
Mistake 1: Overloading the Circuit
Connecting too many strands can trip your breaker or damage the lights. Always check the manufacturer’s max connection limit.
Fix: Use a power strip with overload protection or split the load across multiple outlets.
Mistake 2: Using the Wrong Fasteners
Nails, screws, or zip ties can damage wires or pull sockets loose.
Fix: Use eye hooks, cup hooks, or specialized light clips. For trees, use soft rope or zip ties with a “loop” to reduce pressure.
Mistake 3: Ignoring Weatherproofing
Indoor lights or poor seals can fail in rain.
Fix: Only use IP65+ rated lights. Cover connections with silicone sealant or weatherproof caps.
Mistake 4: Poor Cord Management
Exposed cords are tripping hazards and look messy.
Fix: Use cord clips, conduit, or run cords behind furniture. For permanent setups, bury low-voltage cords (with conduit) or use a cord cover.
Mistake 5: Not Testing First
You won’t know if a bulb is dead until it’s up.
Fix: Test every strand before installation. Carry spare bulbs and a bulb tester.
Mistake 6: Overdoing It
Too many lights can feel chaotic, not cozy.
Fix: Start small. Add one strand, step back, and assess. You can always add more later.
| Light Type | Best For | Lifespan | Energy Use | Weather Rating |
|---|---|---|---|---|
| LED String Lights | Year-round, ambient lighting | 25,000+ hours | Low | IP65/IP67 |
| Incandescent | Seasonal, vintage look | 2,000–5,000 hours | High | IP44 (limited) |
| Solar | Remote areas, decoration | 5,000–10,000 hours | None (sun-powered) | IP65 |
| Battery Fairy Lights | Small spaces, temporary | 3,000–5,000 hours | Battery replacement | IP44–IP65 |
Putting up outdoor string lights isn’t just a DIY project—it’s an act of transformation. When done right, those little bulbs do more than illuminate a space. They create memories: laughter around a fire pit, quiet conversations under the stars, the joy of seeing your yard come alive at dusk.
From planning your layout to choosing the right lights and installing them safely, every step matters. But don’t stress about perfection. Even if your first attempt isn’t Pinterest-perfect, the glow will still feel magical. The key is to start simple, learn as you go, and let the lights grow with your space.
So grab a ladder, a cup of coffee, and your favorite playlist. String up those lights. Turn off the main switch. And step outside. That soft, golden glow? It’s not just light. It’s your backyard, reimagined.
Frequently Asked Questions
How do I install outdoor string lights without drilling holes?
Use adhesive hooks, zip ties, or wrap lights around existing structures like trees, fences, or railings. This method is ideal for renters or those who want a damage-free setup.
What’s the best way to hang outdoor string lights across a large backyard?
For wide spaces, run lights between sturdy anchor points like posts, trees, or pergolas using tension cables for support. Ensure bulbs are spaced evenly and avoid overstretching the strands to prevent sagging.
How to put outdoor string lights on a patio with no nearby power source?
Use solar-powered or battery-operated LED string lights, or extend a weatherproof outdoor-rated extension cord to the nearest outlet. Always check the cord’s wattage rating to match your lights’ requirements.
Can I leave outdoor string lights up year-round?
Only if the lights are labeled “all-weather” or “commercial-grade” and properly installed. Otherwise, remove them during harsh weather to extend lifespan and prevent damage.
How to hang outdoor string lights in a zigzag pattern?
Attach hooks or nails in a staggered grid across your desired area, then weave the lights back and forth between the points. Secure the cord lightly to avoid tension on bulb sockets.
What tools do I need to install outdoor string lights?
Common tools include a ladder, measuring tape, hooks/nails, zip ties, and a power drill (if permanent). For a quick setup, adhesive clips or existing structures may suffice for your outdoor string lights project.

