Featured image for how to shorten outdoor led string lights
Image source: i2.wp.com
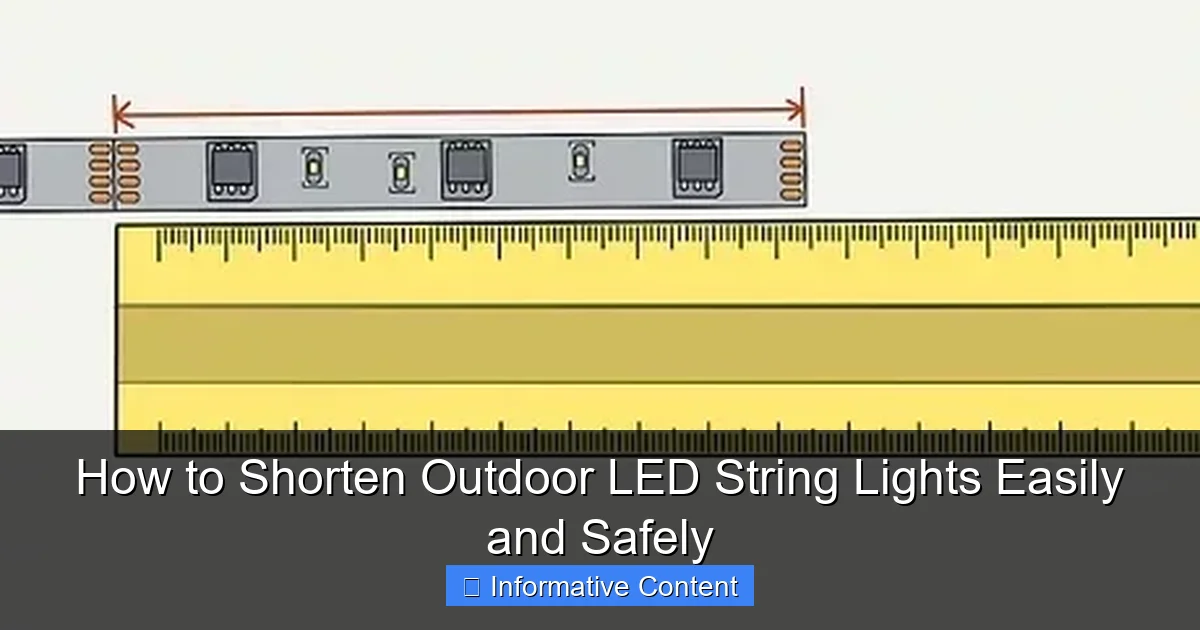
Shortening outdoor LED string lights is safe and simple when you cut only at designated cut points, usually marked every few inches along the wire. Always disconnect the lights from power and use a multimeter to confirm no voltage is present before trimming or splicing. For a secure, weatherproof connection, solder the wires and seal with heat-shrink tubing or waterproof connectors—never use electrical tape alone.
Key Takeaways
- Measure carefully: Always cut at marked points to avoid damage.
- Use proper tools: Wire cutters ensure clean, safe cuts without fraying.
- Seal connections: Waterproof tape prevents moisture damage post-cut.
- Test before installing: Verify functionality after shortening the lights.
- Check voltage: Ensure shortened length still matches power supply specs.
- Follow manufacturer guidelines: Some LEDs require special handling—read manuals first.
📑 Table of Contents
- Why You Might Need to Shorten Outdoor LED String Lights
- Understanding Your LED String Light Type
- Tools and Materials You’ll Need
- Step-by-Step Guide to Shortening LED String Lights
- Alternative Methods for Non-Cuttable Lights
- Safety Tips and Common Mistakes to Avoid
- Final Thoughts: Enjoy Your Perfectly Lit Outdoor Space
Why You Might Need to Shorten Outdoor LED String Lights
Let’s be honest—outdoor lighting can make or break your backyard vibes. Whether you’re stringing up lights for a summer BBQ, a holiday display, or just to enjoy a cozy evening under the stars, getting the length right is key. I learned this the hard way last year when I bought a 50-foot LED string light set for my 20-foot patio. The result? A tangled mess of excess wire that looked sloppy and even tripped up my dog, Luna, during her nightly zoomies. That’s when I realized: knowing how to shorten outdoor LED string lights isn’t just about aesthetics—it’s about safety, functionality, and saving money.
You might be thinking, “Wait, can I even cut LED string lights?” The short answer is yes—but only if they’re designed for it. Unlike traditional incandescent strands, many modern LED string lights come with cuttable sections or modular connectors that make shortening them a breeze. But there’s a right way and a wrong way to do it. Cut too much, and you could ruin the whole set. Cut in the wrong spot, and you might end up with a flickering mess. In this guide, I’ll walk you through everything I’ve learned (sometimes the hard way) about shortening outdoor LED string lights safely and easily—without turning your patio into a DIY disaster.
Understanding Your LED String Light Type
Cuttable vs. Non-Cuttable LED Lights
Before you grab the scissors or wire cutters, the first step is figuring out what kind of LED string lights you have. Not all are created equal, and this makes a big difference in whether—and how—you can shorten them.
Visual guide about how to shorten outdoor led string lights
Image source: res.cloudinary.com
- Cuttable LED String Lights: These are specifically designed with marked cutting points, usually every few feet. You’ll often see a small scissor icon or a dashed line on the wire. These are your safest bet for DIY shortening. Popular brands like GE, Twinkle Star, and Brightown offer models with this feature.
- Non-Cuttable (Sealed) LED String Lights: These have a single, continuous circuit with no designated cut points. Cutting them anywhere other than the plug end will likely damage the entire strand. These are common in cheaper or older models.
- Modular/Connectable LED Lights: These come in segments that plug together. You can simply unplug a section to shorten the total length. Think of them like LEGO for your patio—easy to customize.
For example, I recently upgraded to a set of Twinkle Star 33-foot LED string lights with 100 LEDs and clearly marked cut points every 3.3 feet. The manual even included a diagram showing where to cut. That kind of clarity? Pure gold. If your lights don’t have such markings, proceed with caution—or skip to the modular option.
Check the Manufacturer’s Instructions
Always, always read the manual or check the product page. I once ignored this step with a set labeled “weatherproof,” only to find out later that cutting them voided the warranty and could compromise waterproofing. Most reputable brands will tell you:
- Where the cut points are
- Whether the lights are dimmable or color-changing (some features can be lost if cut improperly)
- If the set is end-to-end connectable (so you can add more later)
Pro tip: If you’ve lost the manual, search for the model number online. I found a PDF for my lights on Amazon just by typing “Twinkle Star 33-foot LED manual” into Google. Saved me from a potential electrical mishap.
Tools and Materials You’ll Need
Essential Tools for the Job
You don’t need a full workshop to shorten LED string lights, but having the right tools makes the job faster, safer, and cleaner. Here’s what I keep in my DIY lighting kit:
- Precision wire cutters or heavy-duty scissors: Regular scissors might crush the wires. I use Klein Tools D2000-6—they’re affordable and cut through insulation like butter.
- Electrical tape: For sealing cut ends (if needed). I prefer 3M Super 33+ for outdoor use—it’s UV-resistant and stays sticky in rain.
- Heat-shrink tubing (optional but recommended): If you’re splicing wires or want a professional finish, heat-shrink tubing adds insulation and looks cleaner than tape. Use a heat gun or hair dryer to seal it.
- Multimeter (for advanced users): If you’re unsure about the circuit, a multimeter can test continuity after cutting. I keep a Klein Tools MM300 handy for peace of mind.
- Measuring tape: To mark the exact length you want. I once eyeballed it and ended up with lights that didn’t reach my pergola—lesson learned.
Optional but Helpful Extras
- Wire strippers: If you’re splicing or adding connectors, these make clean wire exposure easy.
- Weatherproof end caps: Some kits include these to seal the end of the cut strand. If yours doesn’t, you can buy them online (look for “LED string light end caps”).
- Gloves: Thin rubber gloves protect your hands from sharp wire ends—especially important if you’re working with older, frayed strands.
Real talk: I started with just scissors and tape. After my first attempt, I invested in a $15 wire cutter and never looked back. The difference in precision was night and day. Save yourself the frustration—buy the right tool once.
Step-by-Step Guide to Shortening LED String Lights
Step 1: Measure and Plan
Before you cut, measure twice, cut once. I use painter’s tape to mark the desired length on my patio floor or railing. For example, if my space is 25 feet, I’ll mark 25 feet on the ground, lay the lights along it, and see where the excess falls. This helps me visualize the final look.
Pro tip: Always leave a little extra (6–12 inches) for slack. If your lights are on a railing, you’ll need extra for wrapping around posts. I once cut mine flush and had to buy an extension cable—don’t be like me.
Step 2: Locate the Cut Point
Look for the scissor icon, dashed line, or “cut here” label on the wire. These are usually spaced every 3–5 feet. If there’s no mark, check the manual—some brands use a small dot or colored wire segment.
Example: My Twinkle Star lights have cut points every 3.3 feet. I wanted a 20-foot run, so I counted six cut points from the plug (6 × 3.3 = 19.8 feet). Close enough, with room to tuck the end.
Step 3: Cut the Wire
Use your wire cutters to snip straight across at the marked point. Avoid angled cuts—they can expose wires unevenly. I hold the cutters perpendicular to the wire for a clean break.
Caution: If your lights are still plugged in, unplug them first. Even “low voltage” LEDs can give a minor shock if mishandled.
Step 4: Seal the End
This step is critical for outdoor use. Water and electricity don’t mix, so you need to protect the cut end from rain and humidity.
- Option 1: Electrical tape: Wrap the end tightly in 3–4 layers of tape, extending 1–2 inches past the cut. Overlap each wrap by 50% for a waterproof seal.
- Option 2: Heat-shrink tubing: Slide a 1-inch piece of tubing over the end before cutting. After cutting, slide it back to cover the exposed wires and use a heat gun to shrink it.
- Option 3: End caps: If your kit includes them, snap one on. If not, buy universal caps online (search “LED string light end caps”).
I used tape for my first project, but switched to heat-shrink tubing after a rainy week made the tape peel. The tubing has held up perfectly for two years.
Step 5: Test the Lights
Plug in the shortened strand. If the lights don’t turn on, check for:
- Loose wires (re-tape or re-shrink)
- Cutting through a wire (oops—start over with a new section)
- Damaged LEDs (rare, but possible)
When in doubt, use a multimeter to test continuity. I tested my cut end and confirmed the circuit was intact—no flickering or dead zones.
Alternative Methods for Non-Cuttable Lights
Using Connectors and Adapters
What if your LED lights aren’t cuttable? Don’t panic. There are still safe ways to shorten them:
- Unplug modular sections: If your lights are connectable (e.g., “end-to-end”), simply detach the unwanted segment. My sister has a 40-foot set made of four 10-foot strands. She unplugged two for her 20-foot balcony.
- Use a plug-in splitter or extension: Buy a 1-foot or 3-foot extension cable. Plug it into the end of your lights, then plug the rest of the strand into the extension. Coil the excess behind a post or under a planter.
- Loop and secure excess: Create a “figure-8” loop with the extra wire and secure it with zip ties or clips. I use VELCRO® One-Wrap® straps—they’re reusable and don’t damage the wire.
Example: My neighbor has a 50-foot non-cuttable set on her porch. She loops the extra 15 feet behind a column and hides it with a potted plant. No one notices, and it’s safe from tripping hazards.
Creative Hiding Spots for Excess Wire
Sometimes, hiding the extra length is better than cutting. Try these tricks:
- Behind furniture: Tuck the excess behind a bench, table, or planter.
- Under outdoor rugs: If your patio has a rug, coil the wire under it (ensure it’s not a tripping hazard).
- Inside conduit or PVC pipe: For a clean look, run the extra wire through a white PVC pipe painted to match your railing.
- With decorative covers: Buy “cable raceways” (available at hardware stores) to hide the wire along a wall or railing.
I once used a fake rock cover for a power cord—it looked so natural, my guests thought it was part of the landscaping!
Safety Tips and Common Mistakes to Avoid
Electrical Safety First
Outdoor lighting deals with moisture, temperature swings, and physical stress. Safety isn’t optional—it’s essential.
- Always unplug before cutting. Even if the lights are “low voltage,” a shock is still possible.
- Use outdoor-rated products. Indoor LED lights aren’t waterproof. Look for “IP65” or “weatherproof” labels.
- Inspect wires for damage. Frayed or cracked insulation? Replace the strand. Don’t risk a short circuit.
- Use GFCI outlets. Ground Fault Circuit Interrupters shut off power if there’s a ground fault. Most outdoor outlets should have this feature.
Common Pitfalls (And How to Avoid Them)
Learn from my mistakes:
- Mistake: Cutting between LEDs. This breaks the circuit. Always cut at designated points.
- Mistake: Skipping the seal. I once taped my cut end but didn’t overlap enough. Rain seeped in, and the lights died in a week. Use 4+ layers of tape or heat-shrink.
- Mistake: Overloading circuits. If you’re adding more lights, check the wattage limit of your outlet. I once daisy-chained 5 strands and tripped the breaker. Most outdoor circuits handle 15–20 amps.
- Mistake: Ignoring the warranty. Cutting may void the warranty. If your lights are under warranty, contact the manufacturer first.
Data table: Common LED String Light Issues and Fixes
| Issue | Likely Cause | Quick Fix |
|---|---|---|
| Flickering lights | Loose connection or water damage | Re-tape cut end; check for exposed wires |
| Partial strand not working | Cut at wrong point | Use a multimeter to test continuity; replace if needed |
| Lights turn off in rain | Unsealed cut end | Apply heat-shrink tubing or extra tape |
| Tripped breaker | Overloaded circuit | Use fewer strands; check wattage |
Final Thoughts: Enjoy Your Perfectly Lit Outdoor Space
Shortening outdoor LED string lights doesn’t have to be scary or complicated. Whether you’re cutting a modular strand, unplugging a section, or creatively hiding the excess, the goal is the same: a clean, safe, and beautiful setup that enhances your outdoor living space. I’ve gone from tangled messes to a patio that feels like a cozy café—all thanks to understanding how to shorten outdoor LED string lights properly.
Remember, the key steps are: check your light type, use the right tools, cut at marked points, seal the end, and test. And if you’re ever unsure? Reach out to the manufacturer or consult a local electrician. There’s no shame in asking for help—especially when safety is on the line.
Now go enjoy those warm, twinkling lights. Whether it’s for a quiet night with a book or a lively backyard party, you’ve earned it. And next time you see someone struggling with a mile of extra wire? Share this guide. We’re all in this DIY journey together.
Frequently Asked Questions
How do I shorten outdoor LED string lights without damaging them?
To safely shorten your outdoor LED string lights, first unplug them and identify the cut points, usually marked by a scissor icon or connector. Use wire cutters to trim the excess, then seal the end with waterproof heat-shrink tubing to maintain weather resistance. Always follow the manufacturer’s instructions to avoid voiding the warranty.
Can I shorten LED string lights by removing individual bulbs?
No, removing individual bulbs won’t shorten the length of the strand and may damage the circuit. Instead, cut the wire at designated points to reduce the overall length while keeping the remaining lights functional. This method preserves the waterproofing and electrical integrity of the lights.
Where should I cut outdoor LED string lights to shorten them?
Look for the cut marks—often labeled with a scissor icon or “cut here”—on the wire, usually located between sections of lights. Cutting at these points ensures the remaining lights stay functional and waterproof. Never cut at random points, as this may disrupt the circuit or expose wires.
Is it safe to shorten outdoor LED string lights myself?
Yes, it’s safe if you follow the manufacturer’s guidelines and cut only at designated points. Ensure the lights are unplugged and use waterproof sealing methods (like heat-shrink tubing) to protect the exposed end. Avoid cutting near bulbs or connectors to prevent damage.
What tools do I need to shorten outdoor LED string lights?
You’ll need a pair of wire cutters, waterproof heat-shrink tubing (or silicone sealant), and a lighter or heat gun to seal the cut end. Some kits include end caps for a cleaner finish. Always double-check the cut points before trimming.
How do I waterproof the cut end after shortening LED string lights?
Slide heat-shrink tubing over the cut end and use a heat gun to seal it tightly, or apply waterproof silicone sealant for a secure, weatherproof closure. This step is crucial for outdoor LED string lights to prevent moisture damage and ensure longevity.

