Featured image for how to string attach outdoor string lights
Image source: loveourreallife.com
Plan your layout and measure the space carefully before hanging to ensure a safe, balanced display that enhances your outdoor area. Use durable, weather-resistant hardware like eye hooks, zip ties, or specialized light clips to securely attach string lights along eaves, railings, or trees—avoiding nails or staples that can damage wires or surfaces. This professional approach ensures a clean, long-lasting installation with minimal sagging or electrical risks.
Key Takeaways
- Plan your layout first: Measure and map light placement for balanced, professional results.
- Use durable hardware: Opt for weather-resistant hooks or clips to secure lights safely.
- Maintain proper tension: Keep wires taut but not overstretched to avoid sagging or damage.
- Check bulb spacing: Ensure even distribution for uniform brightness and visual appeal.
- Test before finalizing: Power on lights to confirm connections and placement before securing.
- Secure power cords: Route and hide cords discreetly to prevent tripping and weather exposure.
- Inspect seasonally: Check for wear, loose connections, or damage to ensure long-term safety.
📑 Table of Contents
- How to String Attach Outdoor String Lights Like a Pro
- Plan Your Layout: Start with a Vision (and a Tape Measure)
- Choose the Right Tools and Hardware
- Step-by-Step Installation: From Anchor to Ambiance
- Pro Tips for Longevity and Safety
- Creative Ideas and Common Mistakes to Avoid
- Data Table: Comparing Light Types and Hardware
- Conclusion: Light Up Your Life (Safely and Beautifully)
How to String Attach Outdoor String Lights Like a Pro
Picture this: It’s a warm summer evening, the sun has just dipped below the horizon, and your backyard is softly lit by a warm, golden glow. The kids are laughing, friends are sipping drinks, and the air feels just right. That magic? It’s not just the moment—it’s the outdoor string lights you carefully strung up. There’s something undeniably enchanting about twinkling lights weaving through trees, along fences, or over patios. But let’s be real: getting those lights up without tangles, sags, or a ladder-induced heart attack can feel like a DIY nightmare.
I’ve been there. I remember my first attempt—lights wrapped around a tree like a confused snake, one end dangling like a forgotten shoelace, and me, teetering on a wobbly stool, trying to tie a knot that wouldn’t unravel by morning. It looked more like a haunted house than a cozy oasis. But after years of trial, error, and a few “why did I think this was a good idea?” moments, I’ve learned how to attach outdoor string lights like a pro. And the best part? You don’t need a degree in engineering or a team of helpers. With the right tools, a little planning, and some practical tricks, you can create a stunning, professional-looking display that lasts season after season.
Plan Your Layout: Start with a Vision (and a Tape Measure)
Before you even touch a light strand, take a breath and plan. Rushing into stringing lights without a plan is like building a house without blueprints—it might stand, but it’ll probably lean a little (or a lot). Start by visualizing the space. Do you want a canopy over the patio? A zigzag pattern across the yard? Or maybe a simple border along the fence? The layout sets the tone for your entire setup.
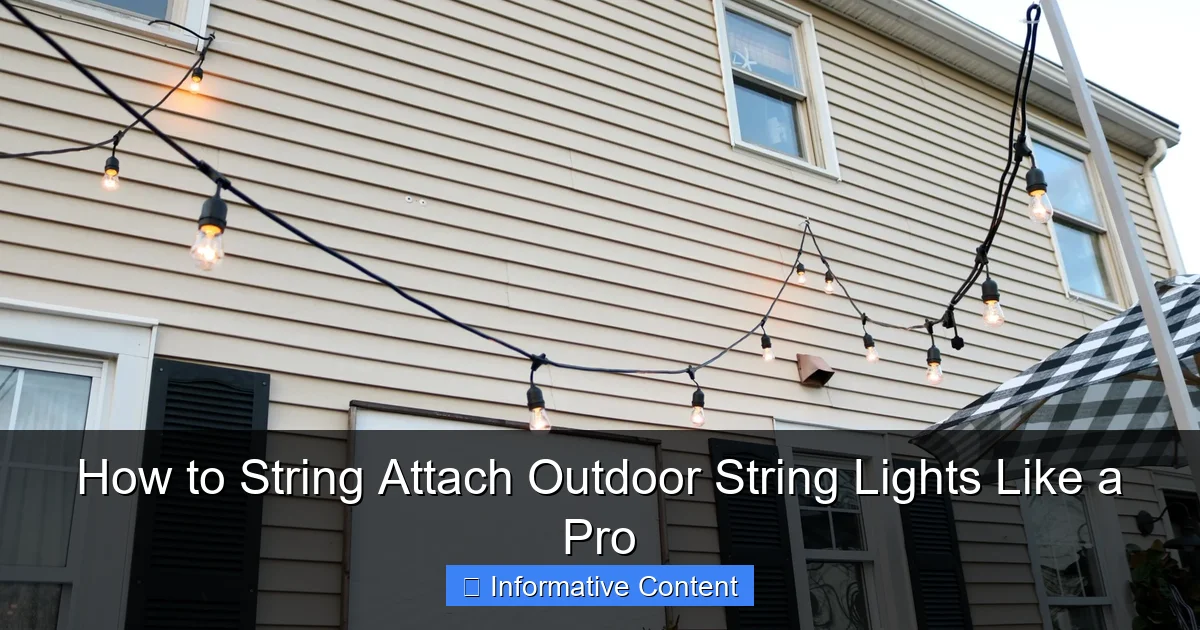
Visual guide about how to string attach outdoor string lights
Image source: nestingwithgrace.com
Sketch It Out
Grab a piece of paper or use a free app like SketchUp or even Google Draw. Sketch your yard or outdoor space, marking key features: trees, posts, eaves, railings, and any obstacles like windows or doors. Then, sketch your desired light path. Think about symmetry, flow, and how the lights will interact with the space. For example, if you’re stringing between two trees, measure the distance. If you’re going along a fence, note where posts are located. A quick sketch helps avoid “Oh no, I need 20 more feet of lights!” moments later.
Measure Twice, String Once
Measure the total length of your intended path. Add 10-15% extra for slack, curves, or unexpected obstacles. For example, if your path is 50 feet, get 57-58 feet of lights. Nothing’s worse than running out mid-install. Also, check the spacing between bulbs. Most outdoor string lights have bulbs every 6-12 inches. If you want a denser look, go for closer spacing. For a subtle glow, wider spacing works better.
Power Source Strategy
Here’s a pro tip: plan your power source first. Outdoor string lights need an outlet. If your nearest outdoor GFCI outlet is far away, you’ll need an outdoor-rated extension cord (look for “SJTW” or “SJOOW” on the label). But don’t just daisy-chain cords—this can overload circuits. Instead, use a single heavy-duty cord rated for outdoor use. Or, consider solar-powered lights if outlets are scarce. Solar is great for areas without power, but they’re less bright and may not last all night in cloudy weather.
Choose the Right Tools and Hardware
You wouldn’t build a deck with a butter knife, right? The same goes for attaching outdoor string lights. The right tools make the job safer, faster, and more durable. Skip the flimsy hooks and weak tape—those will fail when you need them most.
Anchors and Hooks: The Unsung Heroes
For most setups, you’ll need anchors to hold the lights securely. Here’s a quick rundown:
- Hook screws (eye screws): Ideal for wood surfaces like decks, fences, or pergolas. Drill a pilot hole, then screw in the hook. These hold well and are easy to remove.
- Ceiling hooks: Great for eaves or soffits. Use ones with a rubber tip to protect your roof and prevent slipping.
- Zip ties: Perfect for temporary setups or attaching to railings, trees, or metal poles. Use UV-resistant outdoor zip ties (they won’t degrade in sunlight). Pro tip: Use a zip tie gun for a snug, professional fit.
- Turnbuckles: If you’re creating a taut line (like between trees), a turnbuckle lets you tighten or loosen the line as needed. This prevents sagging in the middle.
Tools You’ll Need
Here’s a simple toolkit for most installations:
- Drill with drill bits (for pilot holes)
- Screwdriver (for hand-tightening hooks)
- Measuring tape
- Step ladder or extension pole (for high areas)
- Outdoor-rated zip ties (100+ pack)
- Turnbuckles (if needed)
- Outdoor extension cord (if needed)
- Work gloves (to protect your hands)
And don’t forget: always use outdoor-rated hardware. Indoor hooks and screws will rust and fail in a few weeks. Look for stainless steel or galvanized metal.
Special Cases: Trees and Metal
Attaching to trees? Use tree-friendly methods. Avoid nails or screws that can damage the bark. Instead, use:
- Tree straps: Made of soft nylon, these wrap around the trunk without harming the tree. They’re adjustable and reusable.
- Zip ties on branches: For smaller branches, use zip ties. But don’t over-tighten—you don’t want to girdle the branch.
For metal surfaces (like a metal fence or pergola), use magnetic hooks or metal zip ties. These won’t rust and grip securely.
Step-by-Step Installation: From Anchor to Ambiance
Now for the fun part: putting it all together. This is where your plan and tools come to life. Follow these steps for a smooth, professional installation.
Step 1: Install Anchors
Start by installing your anchors. If you’re using hook screws, drill pilot holes first—this prevents wood from splitting. For trees, wrap tree straps around the trunk at your desired height (usually 8-10 feet for a canopy effect). For fences or railings, attach zip ties or hooks every 6-8 feet.
Pro tip: Use a level to ensure anchors are aligned. Misaligned anchors = crooked lights.
Step 2: String the Lights
Now, unroll your lights and lay them out along the path. Start at the power source and work outward. This way, you avoid pulling the lights through tight spaces later. For long runs, consider using a light strand hanger (a small plastic or metal clip that holds the strand without damaging it).
If you’re creating a canopy (like between trees or posts), use a guide wire. Run a thin, strong wire (like paracord or steel cable) between the anchors first. Then, clip the lights to the wire using zip ties or light clips. This prevents sagging and keeps the lights taut.
Step 3: Secure the Lights
Once the lights are in place, secure them at each anchor point. For hooks, loop the light strand through the hook and tie a simple knot (like a figure-eight or loop knot). For zip ties, loop the tie through the light’s mounting hole (most have one) and around the anchor. Tighten just enough to hold—don’t crush the wires.
For a zigzag pattern (common for patios), attach lights to anchors on opposite sides, creating a “V” shape. Use turnbuckles at the ends to adjust tension.
Step 4: Test and Adjust
Before you celebrate, plug in the lights and test them. Look for:
- Even brightness (no dark spots)
- No sagging (use turnbuckles or add more anchors if needed)
- Secure connections (no loose ends)
Adjust as needed. It’s easier to tweak now than after everything’s set.
Step 5: Hide the Wires
Nobody likes a messy cord trail. To hide wires:
- Run cords along the edge of a deck or fence, then tuck them behind railings or under trim.
- Use cord covers (flexible plastic channels) to protect and conceal cords on the ground.
- For trees, run the cord up the trunk and clip it to branches with zip ties.
Pro Tips for Longevity and Safety
You’ve got the lights up—great! But to keep them shining for years, follow these pro tips.
Use GFCI Outlets (Seriously)
Outdoor outlets should be GFCI (Ground Fault Circuit Interrupter) protected. These outlets cut power if they detect a leak, preventing shocks and fires. If your outlet isn’t GFCI, install one or use a GFCI adapter. It’s a small step that could save your life.
Weatherproof Connections
Even “weatherproof” lights can fail if connections get wet. Use outdoor-rated electrical tape or weatherproof cord connectors to seal plug ends. For extra protection, hang plugs upside down (like a “U” shape) so water can’t pool in the connection.
Regular Maintenance
Check your lights monthly during the season. Look for:
- Loose anchors (tighten hooks or zip ties)
- Frayed wires (replace damaged strands)
- Corrosion (clean with a wire brush)
At the end of the season, take the lights down and store them in a dry place. Coil them loosely (never tight) to prevent kinking.
Light Placement Matters
Don’t place lights where they’ll be hit by sprinklers, foot traffic, or falling branches. Also, avoid direct sunlight for long periods—UV rays can fade bulbs and damage cords. If you must, use lights rated for full sun exposure.
Creative Ideas and Common Mistakes to Avoid
Now that you’ve got the basics, let’s talk creativity—and pitfalls to avoid.
Creative Layouts
- Canopy over a dining area: String lights in parallel lines between posts or trees, 8-10 feet high. Use turnbuckles for tension.
- Zigzag along a fence: Alternate anchors on the left and right side of the fence for a dynamic look.
- Starburst in a tree: Attach lights to a central anchor (like a hook at the top of a tree), then run strands to lower branches.
- Pathway lighting: String lights along both sides of a walkway, low to the ground (3-4 feet).
Common Mistakes (and How to Fix Them)
- Sagging in the middle: Add more anchors or use a guide wire. Turnbuckles are your friend here.
- Uneven spacing: Measure anchor points before installing. Use a tape measure or string as a guide.
- Overloading circuits: Check the wattage of your lights and extension cords. Don’t plug more than 80% of the cord’s capacity.
- Ignoring the weather: If a storm is coming, unplug the lights. Wind and rain can damage connections.
- Forgetting the power source: Always plan the outlet location first. No outlet? Consider solar or battery-powered lights.
Data Table: Comparing Light Types and Hardware
| Type | Best For | Pros | Cons | Hardware Needed |
|---|---|---|---|---|
| LED String Lights | Most outdoor setups | Energy-efficient, long-lasting, cool to touch | Can be pricier upfront | Hooks, zip ties, guide wire |
| Incandescent String Lights | Warm, vintage glow | Affordable, classic look | High energy use, shorter lifespan | Hooks, zip ties |
| Solar String Lights | Areas without outlets | No wiring, eco-friendly | Less bright, may not last all night | Tree straps, zip ties |
| Edison Bulb String Lights | Patios, pergolas | Stylish, warm light | Bulky, fragile | Hooks, turnbuckles |
| Net Lights | Trees, bushes | Covers large areas quickly | Less customizable | Zip ties, tree straps |
Remember, there’s no one-size-fits-all approach. Mix and match based on your space, style, and needs. The goal is to create a space that feels warm, inviting, and uniquely yours.
Conclusion: Light Up Your Life (Safely and Beautifully)
Stringing outdoor lights isn’t just about decoration—it’s about creating moments. It’s about that first sip of wine under the stars, the laughter of friends around a fire pit, or the quiet peace of a well-lit evening. And now, armed with these tips, you can do it like a pro. You’ve learned how to plan a layout, choose the right tools, install safely, and maintain your setup for years to come.
Don’t be afraid to experiment. Try a new pattern, test different bulb types, or add a dimmer for mood lighting. And if something goes wrong? That’s okay. Every pro was once a beginner with tangled lights and a wobbly ladder. The key is to start small, learn as you go, and enjoy the process.
So grab your lights, gather your tools, and step outside. Your perfect outdoor oasis is waiting—just a few well-placed strings away. And when the sun sets and your lights twinkle to life, take a moment to appreciate the magic you’ve created. You’ve earned it.
Frequently Asked Questions
How do I securely attach outdoor string lights without damaging my walls or roof?
Use removable adhesive hooks, gutter clips, or tension wires designed for outdoor use to avoid drilling holes. These methods provide a sturdy hold while protecting surfaces from damage, especially when installing on wood, stucco, or vinyl siding.
What’s the best way to string attach outdoor string lights in a large backyard?
For large spaces, use a combination of poles, trees, and existing structures to create anchor points. Run guide wires between points and attach the lights to them for even spacing and minimal sagging.
Can I attach outdoor string lights to trees without harming them?
Yes—use soft nylon straps or adjustable tree-friendly hooks to avoid damaging bark or branches. Avoid nails or wire, which can restrict growth and invite disease as the tree expands.
How do I ensure my outdoor string lights stay up through wind and rain?
Choose weather-resistant fixtures and secure them with durable, rust-proof hooks or zip ties. Double-knot connections and leave slight slack in the string to reduce tension during storms.
Do I need a professional to string attach outdoor string lights on a two-story house?
Not necessarily—use an extension ladder with stabilizers and a helper to safely reach high areas. For tricky setups (like steep roofs), hire a pro to ensure safety and proper installation.
How far apart should I space hooks when attaching outdoor string lights?
Space hooks every 2–4 feet for standard string lights, or 1–2 feet for heavier commercial-grade strands. This prevents sagging and keeps the lights taut, especially over long runs.

