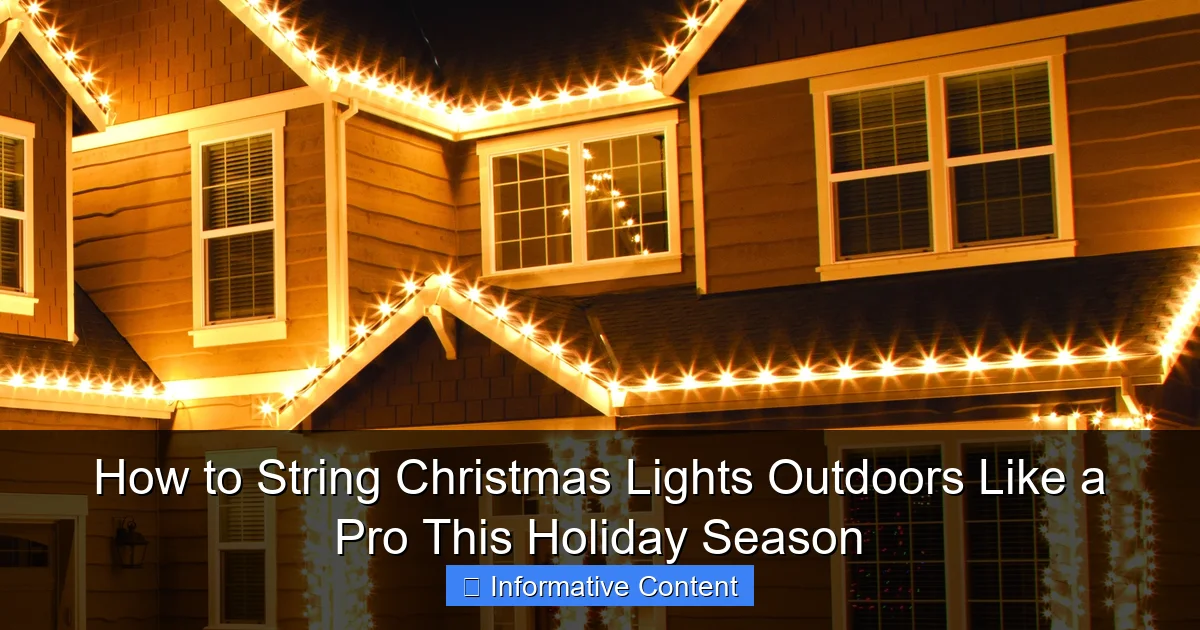
Featured image for how to string christmas lights outdoors
Image source: christmaslightsetc.com
Plan your layout and measure your space before hanging a single light to ensure even coverage and avoid overloading circuits. Use outdoor-rated lights and secure them with clips or hooks—never nails or staples— to protect wires and withstand winter weather for a safe, dazzling display.
Key Takeaways
- Plan your layout first: Sketch your design to avoid overbuying lights or uneven coverage.
- Use outdoor-rated lights: Ensure lights are UL-listed for safety and weather resistance.
- Secure with proper clips: Avoid nails; use gutter or shingle clips for damage-free hanging.
- Measure power needs: Limit to 3 strands per outlet to prevent circuit overloads.
- Test before hanging: Check for burnt-out bulbs or frayed wires to save time later.
- Layer for depth: Combine rooflines, trees, and pathways for professional-looking dimension.
📑 Table of Contents
- How to String Christmas Lights Outdoors Like a Pro This Holiday Season
- Step 1: Plan Your Outdoor Light Display
- Step 2: Choose the Right Christmas Lights for Outdoor Use
- Step 3: Gather Your Tools and Supplies
- Step 4: Install Your Lights Safely and Securely
- Step 5: Power Management and Automation
- Step 6: Maintain and Store Your Lights
- Final Thoughts: Light Up Your Home (and Your Heart)
How to String Christmas Lights Outdoors Like a Pro This Holiday Season
Every year, as the days grow shorter and the air turns crisp, I find myself standing in my driveway, staring at the bare roofline of my house. It’s like a blank canvas waiting for a masterpiece—except this masterpiece is made of twinkling lights, not paint. I remember my first attempt at hanging Christmas lights outdoors: tangled wires, a wobbly ladder, and a neighbor’s cat knocking over my extension cord mid-installation. It was a mess. But over the years, I’ve learned a thing or two—not just from YouTube tutorials, but from real-world trial, error, and the occasional ladder wobble.
Whether you’re decking out your home for the first time or upgrading your display, stringing Christmas lights outdoors doesn’t have to be a stressful chore. With the right tools, a little planning, and a dash of patience, you can transform your home into a winter wonderland that even the Grinch would admire. This guide will walk you through everything you need to know—from choosing the right lights to securing them safely—so you can hang your lights like a pro, without the drama or the dangling wires. Let’s make this holiday season bright, safe, and stress-free.
Step 1: Plan Your Outdoor Light Display
Start with a Vision (and a Sketch)
Before you grab the first strand of lights, take a moment to visualize your final display. Are you going for a classic look with white icicle lights along the roofline? A colorful, whimsical theme with animated figures? Or maybe a minimalist glow with warm LEDs around the windows and trees? Sketching a rough layout—either on paper or using a free tool like Canva or SketchUp Free—helps you see how everything fits together. I once skipped this step and ended up with lights clustered on one side of the house. It looked lopsided, like a lopsided snowman.
Visual guide about how to string christmas lights outdoors
Image source: png.pngtree.com
Pro tip: Take a photo of your house at night and use a photo editing app to overlay where you want the lights. This gives you a real-time preview without climbing a ladder.
Measure Your Spaces Accurately
Measure every area where you plan to hang lights: rooflines, gutters, windows, door frames, trees, and railings. Use a long tape measure or a measuring wheel for large distances. Write down the lengths—don’t rely on memory. For example:
- Front roofline: 28 feet
- Two side rooflines: 12 feet each
- Front windows: 4 feet x 3 windows
- Front door frame: 7 feet
- Two front trees: 15 feet of trunk coverage each
Once you have your measurements, add 10–15% extra to account for overlaps, curves, and unexpected gaps. You’d be surprised how fast that “just one more strand” adds up.
Consider Power Sources and Outlet Locations
Nothing ruins your holiday spirit like realizing you’re 10 feet short of an outdoor GFCI outlet. Map out where your outdoor power sources are located. If you don’t have enough outlets, consider:
- Using a heavy-duty outdoor extension cord (rated for 120V and at least 14-gauge wire)
- Installing a new GFCI outlet (if you’re comfortable with basic electrical work or can hire an electrician)
- Using solar-powered or battery-operated lights for areas far from power
Always plug lights into GFCI-protected outlets. These shut off automatically if there’s a short or water intrusion—critical for outdoor safety.
Step 2: Choose the Right Christmas Lights for Outdoor Use
LED vs. Incandescent: The Great Debate
Let’s settle this once and for all: LED lights are the best choice for outdoor displays. Here’s why:
- Energy-efficient: LEDs use up to 80% less energy than incandescent bulbs.
- Durable: They’re less likely to break if dropped or exposed to weather.
- Longer lifespan: A good LED strand can last 10,000–50,000 hours.
- Safer: LEDs run cooler, reducing fire risk.
Incandescent lights? They’re cheaper upfront, but they burn out faster, get hot (a hazard around dry leaves or flammable materials), and cost more to run. I used to use them—until I replaced 12 strands in one season. Never again.
Types of Outdoor Lights: Match the Light to the Location
Not all lights are created equal. Here’s a breakdown of common outdoor light types and where they shine (pun intended):
- Mini lights: Ideal for wrapping trees, shrubs, and outlining windows. Look for 5mm or 3mm LED mini lights—they’re bright but not overwhelming.
- Icicle lights: Perfect for rooflines and eaves. They mimic falling snow and add vertical interest. Choose ones with varying lengths for a more natural look.
- Net lights: A game-changer for shrubs and hedges. Drape them like a blanket—no wrapping required.
- Rope lights: Great for railings, fences, and outlining walkways. They’re flexible and easy to shape.
- Pathway lights: Use these along driveways or sidewalks for safety and ambiance.
- Animated or programmable lights: For the tech-savvy, these sync to music or create twinkling effects. Brands like Twinkly or Philips Hue offer app-controlled options.
Check for Outdoor Ratings and Safety Certifications
Always look for lights labeled “for outdoor use” with a UL (Underwriters Laboratories) or ETL certification. These mean the lights have passed rigorous safety tests for weather resistance and electrical safety. Avoid indoor-only lights—they’re not sealed against moisture and can short-circuit or become a fire hazard.
Step 3: Gather Your Tools and Supplies
Essential Tools for a Smooth Installation
You don’t need a full workshop, but a few key tools make the job safer and easier. Here’s my go-to kit:
- Stable ladder: A 6-foot or 8-foot extension ladder with non-slip feet. I use a Little Giant for multi-level homes.
- Light clips or hangers: Avoid nails and staples—they damage siding and create leaks. Use:
- Gutter hooks for rooflines
- Adhesive clips for vinyl or metal siding
- Tree wrap clips for wrapping trunks (they won’t harm bark)
- Extension cords and power strips: Outdoor-rated, with built-in GFCI protection.
- Work gloves: Protect your hands from sharp edges and cold metal.
- Measuring tape: For double-checking distances.
- Zip ties: For bundling excess cord or securing lights in tricky spots.
- Timer or smart plug: Automate your lights to turn on at sunset and off at bedtime.
Smart Add-Ons for Efficiency
These aren’t essential, but they’re lifesavers:
- Light tester: A $15 tool that checks if a strand is working. Saves you from climbing up to fix a dead bulb.
- Light storage reel: Keeps your lights tangle-free when not in use.
- Telescoping pole with light hook: Lets you hang lights on high areas without a ladder.
Step 4: Install Your Lights Safely and Securely
Hang Roofline and Gutter Lights
This is the trickiest part—but also the most impactful. Here’s how I do it:
- Start at the power source. Plug in your first strand and test it.
- Use gutter hooks every 12–18 inches. Slide them under the lip of the gutter, with the hook facing outward.
- For eaves without gutters, use adhesive clips (like Command Outdoor Hooks) or shingle clips that slide under shingles.
- For icicle lights, hang the top strand first, then drape the “icicles” down. Use a second set of clips at the bottom if needed.
- Never stretch lights tight. Leave a little slack to account for wind and temperature changes.
Pro tip: If you have a two-story home, consider hiring a professional for roofline lights. Falls are the #1 cause of holiday decorating injuries.
Wrap Trees and Shrubs
For trees:
- Start at the base and spiral upward, wrapping the trunk and major branches.
- Use tree wrap clips or zip ties every 18 inches to secure lights. Avoid wire—it can damage bark.
- For large trees, use a ladder or pole hook. Work in sections.
For shrubs:
- Drape net lights over the top—no wrapping needed.
- For smaller bushes, use mini lights and wrap gently. Think “hug,” not “choke.”
Remember: Trees expand and contract. Don’t wrap lights too tightly. I once used zip ties that were too snug—the tree grew, and I ended up with a ring of crushed bark. Oops.
Outline Windows, Doors, and Railings
For windows and doors:
- Use adhesive clips or magnetic clips (for metal frames).
- Follow the frame’s shape, leaving a 1–2 inch gap from glass to avoid heat buildup.
For railings:
- Use rope lights or mini lights with zip ties or clips.
- Secure every 12 inches. Check local fire codes—some areas prohibit lights on railings due to obstruction risks.
Test as You Go
After every 2–3 strands, plug in the lights and check for dead bulbs or loose connections. Fix issues immediately—it’s much harder to troubleshoot once everything is up.
Step 5: Power Management and Automation
Use a Timer or Smart Plug
Manually turning lights on/off every day is a hassle. Instead:
- Use a mechanical timer (set and forget) or a smart plug (control via app or voice).
- Program lights to turn on 30 minutes before sunset and off at 10 PM or midnight.
- For animated lights, use a smart plug with scheduling to sync with music or special events.
I use a TP-Link Kasa smart plug—it’s weather-resistant, works with Alexa, and has a sunset/sunrise feature.
Manage Cords and Avoid Overloads
Never daisy-chain more than three light strands unless the manufacturer says otherwise. Overloading can melt cords or trip breakers. Instead:
- Use multiple power sources (e.g., one outlet for roof lights, another for trees).
- Use power strips with surge protection for multiple strands.
- Bundle excess cord with zip ties and tuck it behind fixtures to avoid tripping hazards.
Check your home’s circuit capacity. Most outdoor outlets are on a 15-amp circuit. A single LED strand draws ~0.2 amps—so you can safely run 75 strands. But if you’re using incandescent or multiple high-wattage decorations, do the math.
Step 6: Maintain and Store Your Lights
Inspect and Clean Before Storage
After the holidays, don’t just toss lights in a box. Take time to:
- Unplug and test each strand. Replace any with burnt-out bulbs or frayed wires.
- Wipe lights with a dry cloth to remove dust, leaves, or bird droppings.
- Store in a cool, dry place (like a basement or closet). Avoid attics—extreme heat can melt plastic.
- Use a light storage reel or wrap strands around a piece of cardboard to prevent tangles.
Repair Common Issues
Most problems are fixable:
- One section not working: Use a light tester to find the dead bulb. Replace it (keep spare bulbs).
- Flickering lights: Check for loose connections. Tighten bulb bases or replace frayed cords.
- Water in sockets: Dry thoroughly before storage. For future use, seal sockets with electrical tape or silicone sealant.
Data Table: Recommended Outdoor Light Types & Best Uses
| Light Type | Best For | Pros | Cons |
|---|---|---|---|
| LED Mini Lights | Trees, shrubs, windows | Energy-efficient, long-lasting, cool to touch | May require more strands for large areas |
| Icicle Lights | Rooflines, eaves | Creates vertical drama, easy to install | Can look messy if not aligned |
| Net Lights | Hedges, shrubs | Quick to install, uniform coverage | Less flexible for irregular shapes |
| Rope Lights | Railings, walkways | Flexible, waterproof, low heat | Bulbs are fixed—can’t replace individual ones |
| Programmable RGB LEDs | Animated displays, color themes | Customizable, app-controlled, syncs to music | Expensive, requires tech setup |
Remember: The best lights are the ones that bring you joy—not just the most expensive or flashy. I once saw a house with a simple strand of warm white LEDs along the porch. It was elegant, cozy, and looked like it belonged in a Hallmark movie. Sometimes, less is more.
Final Thoughts: Light Up Your Home (and Your Heart)
Stringing Christmas lights outdoors isn’t just about aesthetics—it’s about creating moments. I’ll never forget the year my daughter, then 5, watched me hang the last strand and whispered, “Now our house is a castle.” That’s the magic of holiday lights: they turn ordinary homes into places of wonder, warmth, and connection.
This year, take your time. Plan carefully, choose quality lights, and prioritize safety. Don’t rush. Enjoy the process. Play some carols, sip hot cocoa, and let the glow of your hard work lift your spirits. And when the first night comes—when you plug in that timer and watch your home light up—take a moment to stand back, breathe, and smile. You did it. You strung your lights like a pro.
Happy holidays, and may your season be bright, safe, and full of joy. Now go get those lights up—your neighbors (and that nosy cat) are waiting to see what you’ve got.
Frequently Asked Questions
How do I safely string Christmas lights outdoors without damaging my home?
Use plastic clips or gutter hooks designed for outdoor lights to avoid nails or staples that can damage siding or roofing. Always follow the manufacturer’s instructions and check for frayed wires before installation to ensure safety.
What’s the best way to plan the layout when learning how to string Christmas lights outdoors?
Sketch your home’s outline and mark where lights will go (e.g., rooflines, windows, trees) to estimate bulb count and spacing. This helps prevent running out of lights or overloading circuits.
Can I use indoor Christmas lights for outdoor decorations?
No—only use lights rated for outdoor use, as they’re designed to withstand weather conditions like rain and snow. Look for the “UL Listed Outdoor” label to ensure safety and durability.
How do I avoid overloading circuits when hanging outdoor Christmas lights?
Check the wattage of your lights and never connect more than three standard strands in one circuit. Use a GFCI outlet and a timer to manage usage and reduce fire risks.
What are the best tools for how to string Christmas lights outdoors on tall roofs?
Use a sturdy extension ladder with stabilizers, a light-hanging pole, or hire a professional for hard-to-reach areas. Always have someone spot you for safety when working at heights.
How can I make my outdoor Christmas lights last longer?
Store lights in a cool, dry place off-season and inspect them yearly for damage. Use LED bulbs (they last longer and use less energy) and unplug them during severe weather.

