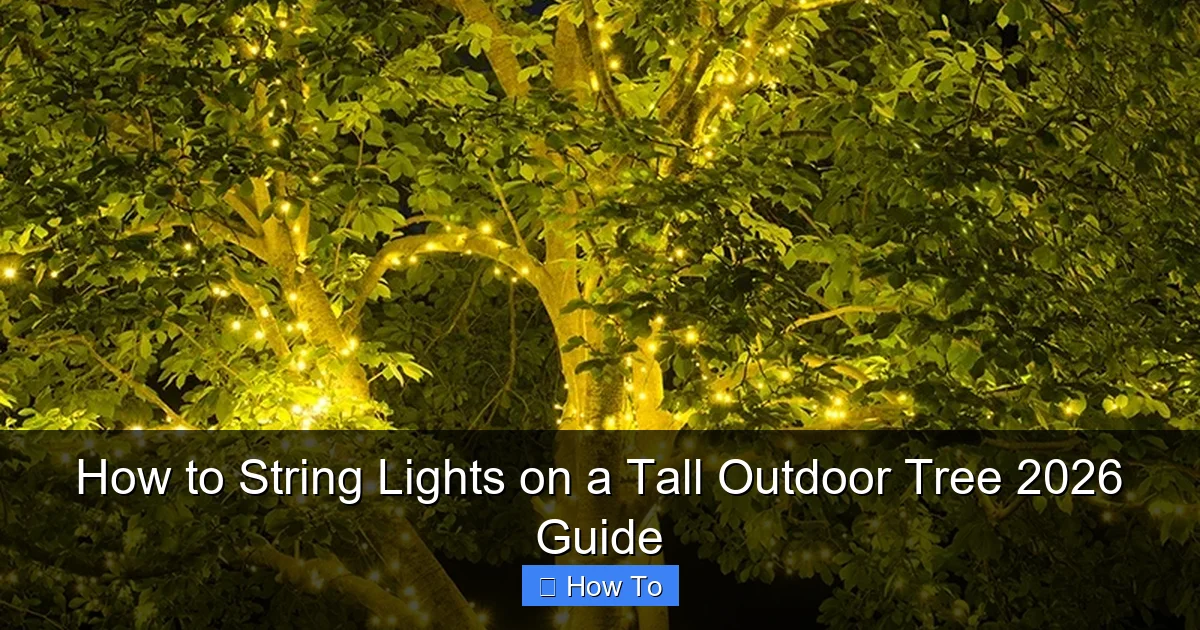
Featured image for how to string lights on a tall outdoor tree
Image source: yardenvy.com
Transform your tall outdoor tree into a stunning nighttime centerpiece by using a reliable extension pole with a hook attachment to safely hang string lights from the top down—eliminating the need for ladders. Follow a spiral wrapping pattern, securing lights at key branches for balanced, professional-looking illumination. This 2026-approved method ensures even coverage, durability, and dazzling curb appeal all season long.
“`html
How to String Lights on a Tall Outdoor Tree 2026 Guide
Key Takeaways
- Plan your layout first: Sketch light placement to avoid gaps or overloading.
- Use a sturdy ladder or pole: Ensure safe reach without damaging branches.
- Choose weatherproof lights: Opt for commercial-grade, outdoor-rated string lights.
- Secure lights with clips: Use non-damaging clips for easy, safe installation.
- Test lights before hanging: Check for dead bulbs or faulty connections early.
- Wrap lights evenly: Maintain consistent spacing for a professional look.
- Anchor the power source: Keep plugs dry and elevated to prevent hazards.
Why This Matters / Understanding the Problem
Picture this: It’s a crisp winter evening, and you’re sipping cocoa under a tree glowing like a scene from a holiday movie. Sounds magical, right? But if you’ve ever tried how to string lights on a tall outdoor tree 2026 guide, you know it’s not as simple as tossing lights into the branches.
Whether you’re prepping for the holidays, a backyard wedding, or just want year-round ambiance, tall trees pose unique challenges. The height makes reaching branches tricky, tangled cords can ruin the look, and weatherproofing is non-negotiable. But don’t worry—this guide shares my hard-earned tricks (and a few facepalm moments) to help you nail it.
By the end, you’ll know exactly how to create a stunning, safe, and durable display—without needing a cherry picker or a degree in engineering.
What You Need
Before you climb a ladder or untangle a knot of lights, gather these essentials. I’ve learned the hard way that skipping a single tool can turn your project into a weekend-long saga.
Visual guide about how to string lights on a tall outdoor tree
Image source: home-designing.com
- LED string lights (outdoor-rated, weatherproof, and preferably warm white for ambiance)
- Extension cords (outdoor, grounded, with GFCI protection)
- Light clips or zip ties (silicone-coated to avoid bark damage)
- Telescoping pole (10–15 ft, with a hook or clip attachment)
- Step ladder or extension ladder (stable, non-conductive)
- Work gloves (to protect your hands from rough bark and cold metal)
- Measuring tape (to estimate light length)
- Power timer or smart plug (optional, but a game-changer for automation)
- Extra fuses (for older light sets)
Pro tip: Buy 10–15% more lights than you think you need. Trees are wider and taller than they appear in daylight. I once miscalculated and had to run to the store at 9 PM on Christmas Eve. Not fun.
Step-by-Step Guide to How to String Lights on a Tall Outdoor Tree 2026 Guide
Step 1: Choose the Right Lights and Layout
Not all lights are created equal. For tall trees, I always opt for LED string lights—they’re energy-efficient, cool to the touch, and last 10x longer than incandescent. Look for IP44 or higher weatherproof ratings (they’ll survive rain, snow, and wind).
Decide on your layout before plugging anything in. Here are three popular styles:
- Vertical (column) style: Lights run straight up and down the trunk, then branch out horizontally. Great for spotlighting the tree’s height.
- Spiral style: Wrap lights around the trunk like a candy cane. Works well for symmetrical trees.
- Webbed style: Drape lights across branches to create a “floating net” effect. Best for wide canopies.
Warning: Avoid daisy-chaining more than 3–4 light strands. Overloading circuits can trip breakers or melt plugs. I learned this after my entire block lost power during a neighborhood light tour. Oops.
Step 2: Measure and Plan Your Path
Measure the tree height and canopy spread with a measuring tape. For spiral layouts, calculate the trunk’s circumference and multiply by the number of wraps (e.g., a 3 ft circumference trunk with 5 wraps needs 15 ft of lights).
Sketch a quick diagram (on paper or your phone) to visualize where lights will go. Mark power source locations—ideally, within 10 ft of the tree base to minimize extension cord use.
For tall trees (30+ ft), consider sectioning the project: Install lights from the bottom up, working in 10–15 ft zones. This reduces ladder fatigue and improves safety.
My trick: Use glow sticks (temporarily taped to branches) to test your layout at night. You’ll instantly see gaps or overkill areas.
Step 3: Secure the Power Source
Plug your first light strand into a GFCI outlet (ground fault circuit interrupter) to prevent shocks. If you don’t have one, buy a GFCI adapter—it’s $15 and could save your life.
Route the cord along the ground, using outdoor-rated cord covers or burying it under mulch (if safe). Never staple cords to trees—it damages bark and creates fire hazards.
Test the first strand before climbing. Nothing’s worse than hauling a dead set of lights up a ladder.
Step 4: Install Lights from the Base Up
Start at the trunk’s base. Use light clips (not nails!) to secure the first strand. Clip every 6–8 inches, keeping tension even to avoid sagging.
For spiral layouts, wrap lights clockwise (or counterclockwise) around the trunk. Keep wraps 6–12 inches apart—closer for dense trees, farther for open ones. Use your telescoping pole to reach higher sections.
When moving to branches, clip lights to the underside of limbs. This hides cords and prevents rainwater from pooling in sockets.
Common mistake: Over-tightening clips. I once crushed a socket by squeezing too hard, leaving a dark spot in my display. Clip snugly, but don’t crush.
Step 5: Work Your Way Up (Safely!)
For trees over 20 ft, use a telescoping pole with a hook attachment. Feed the light strand through the hook, then extend the pole to reach high branches. Gently “throw” the strand over limbs (like fishing), then pull it into place.
If the pole isn’t enough, use a step ladder. Place it on level ground, with someone spotting you. Never stand on the top two rungs—I’ve seen too many ladder falls.
For very tall trees (40+ ft), consider a drone with a hook (yes, really). I rented one last year to hang lights on a 50 ft pine. It took 15 minutes—and zero ladder time.
Safety first: Always have a spotter. And if it’s windy, wait for calm weather. I learned this after a gust sent my ladder crashing into my neighbor’s car.
Step 6: Connect Strands and Test
When linking multiple strands, use outdoor-rated extension cords with waterproof seals. Avoid plugging into the end of a strand—use the side outlet to reduce stress on the socket.
After connecting, test the entire setup. If some sections don’t light, check for:
- Loose plugs
- Blown fuses (replace with extras)
- Damaged wires (look for fraying)
Use a light tester ($10 at hardware stores) to pinpoint faults. It’s worth every penny.
Step 7: Weatherproof and Automate
Protect connections with electrical tape or weatherproof cord connectors. I wrap plugs with tape and tuck them into a small plastic bag (secured with a zip tie).
Add a timer to turn lights on at dusk and off at 11 PM. For smart homes, use a Wi-Fi plug to control lights from your phone. My favorite: “Alexa, turn on the tree lights.”
For extra durability, spray connections with dielectric grease (prevents corrosion).
Pro Tips & Common Mistakes to Avoid
After 10 years of stringing lights on everything from maples to palms, here’s my hard-won advice:
- Clip, don’t staple: Nails damage trees and create fire risks. Use silicone clips—they grip bark without harming it.
- Go LED, not incandescent: LEDs use 80% less energy and won’t melt snow. Plus, they’re safer around kids and pets.
- Use the right ladder: For uneven ground, a ladder stabilizer or ladder leveler prevents wobbles.
- Check local codes: Some areas require permits for outdoor electrical work. When in doubt, call an electrician.
- Store lights properly: Wind them around a cardboard rectangle (not a ball!) to prevent tangles. Label each set by tree/location.
My biggest lesson: Don’t rush. I once tried to install 1,000 lights in one night. By 2 AM, I was exhausted, the lights were crooked, and my dog was howling. Take breaks. Do it right.
Common mistakes to dodge:
- Overloading circuits: A single outlet can typically handle 800–1,500 watts. Check your lights’ wattage and stay under the limit.
- Ignoring wind: Secure lights with extra clips in storm-prone areas. Loose strands can whip branches and break.
- Using indoor lights: Outdoor-rated lights have thicker insulation and UV-resistant plastic. Indoor lights will short-circuit in rain.
- Skipping a plan: Without a layout, lights look haphazard. Sketch it first.
FAQs About How to String Lights on a Tall Outdoor Tree 2026 Guide
Q: Can I use regular zip ties to attach lights?
A: Technically yes, but they can cut into bark and leave permanent scars. I switched to silicone-coated clips after noticing gouges on my oak. They’re gentler and reusable.
Q: How do I reach the top of a 40-foot tree?
A: For extreme heights, rent a bucket lift (from $100/day) or use a drone with a hook. My neighbor used a drone last year—it was fast, safe, and oddly fun to watch.
Q: Are solar-powered lights a good option?
A: For short trees (under 20 ft), yes. But for tall trees, solar lights often lack brightness and battery life. I mix solar fairy lights (for accents) with plug-in LEDs (for structure).
Q: What if my lights flicker or go out?
A: First, check the fuse (replace it). Then inspect connections for water damage. If one bulb is out, it can kill the whole strand—replace it or use a light tester to find the fault.
Q: How long will outdoor lights last?
A: Quality LEDs last 25,000–50,000 hours (5–10 years). Incandescent lights? 1,000–2,000 hours (1–2 seasons). Invest in LEDs—they’re cheaper long-term.
Q: Can I leave lights up year-round?
A: Only if they’re rated for continuous outdoor use. I take mine down after winter to prevent UV damage and animal nests. Store them in a dry place.
Q: What’s the best time to install lights?
A: Install when the tree is bare (late fall or winter). You’ll see the structure clearly, and there’s no risk of damaging leaves. Plus, it’s easier to climb.
Final Thoughts
Stringing lights on a tall outdoor tree isn’t just about decoration—it’s about creating a moment. Whether it’s a holiday glow, a summer party vibe, or just a little everyday magic, the right approach makes all the difference.
Remember: Safety first, plan second, and patience third. Use the how to string lights on a tall outdoor tree 2026 guide as your roadmap, but trust your instincts. Every tree is different, and that’s the beauty of it.
So grab your ladder, call a friend (spotters are lifesavers), and start with one strand. Before you know it, you’ll have a tree that stops traffic. And hey—save me a cup of cocoa under the glow. I’ll be there in spirit.
Happy lighting!
“`

