Featured image for hanging string lights by a privet fence
Image source: static.vecteezy.com
Transform your outdoor space into a magical retreat by hanging string lights along a privet fence—effortless ambiance with maximum impact. Choose weather-resistant, warm-white LEDs and secure them with discreet hooks or zip ties to highlight the fence’s natural texture without damaging the hedge. The result? A captivating glow that elevates evening gatherings and adds enchantment to any backyard.
Key Takeaways
- Plan your layout: Sketch light placement for balanced, even coverage along the privet fence.
- Use durable clips: Opt for weather-resistant clips to securely attach lights without damaging hedges.
- Choose warm LEDs: Select warm white or amber LEDs for a cozy, inviting glow.
- Test before hanging: Check all bulbs and connections prior to installation to avoid rework.
- Space evenly: Maintain consistent spacing between bulbs for a professional, polished look.
- Secure power source: Keep outlets protected and cords tucked safely to prevent tripping hazards.
📑 Table of Contents
- Transform Your Backyard with Hanging String Lights by a Privet Fence
- Why a Privet Fence is the Perfect Canvas for String Lights
- Choosing the Right String Lights for Your Privet Fence
- Creative Ways to Hang String Lights on a Privet Fence
- Step-by-Step Installation Guide
- Maintenance and Long-Term Care
- Data Table: Recommended String Lights for Privet Fences
- Conclusion: Your Backyard Awaits
Transform Your Backyard with Hanging String Lights by a Privet Fence
There’s something undeniably magical about stepping into a backyard at night, only to be greeted by the warm, twinkling glow of string lights nestled among the leaves of a privet fence. It’s not just about adding light; it’s about creating an atmosphere—a place where laughter lingers a little longer, conversations deepen, and the world outside fades away. Whether you’re hosting a summer soirée, enjoying a quiet evening with your partner, or simply unwinding after a long day, hanging string lights by a privet fence can transform an ordinary outdoor space into a dreamy retreat.
I discovered this little slice of backyard magic a few years ago when I decided to spruce up my neglected garden. My privet fence, which had always been a bit of a plain backdrop, suddenly became the star of the show once I added some simple string lights. The transformation was immediate and profound. The soft glow highlighted the lush green foliage, casting delicate shadows and making the whole area feel cozy and inviting. Since then, I’ve experimented with different styles, placements, and techniques, and I’m excited to share everything I’ve learned to help you create your own enchanting evening oasis.
Why a Privet Fence is the Perfect Canvas for String Lights
At first glance, a privet fence might seem like just another part of your landscape—a green wall separating your yard from the neighbors. But when you start thinking about it as a living canvas, the possibilities open up. Privet hedges are dense, evergreen (in most varieties), and grow in a uniform, structured shape, making them ideal for showcasing string lights in a way that feels intentional and beautiful.
Visual guide about hanging string lights by a privet fence
Image source: static.vecteezy.com
The Natural Texture and Color of Privet
Privet leaves are small, glossy, and dark green, creating a rich backdrop that contrasts beautifully with the warm or cool glow of lights. Unlike a bare wood or metal fence, the texture of the privet adds depth and dimension. The lights don’t just hang—they nestle into the foliage, creating a soft, organic glow rather than a harsh spotlight effect. This natural integration is key to achieving that “magical” feel.
For example, I once tried the same string lights on a chain-link fence, and while they were visible, they felt exposed and industrial. On the privet, the same lights looked like fireflies caught in a velvet net. The difference was night and day—literally.
Structural Advantages for Hanging
Privet hedges are typically trimmed to a consistent height and width, which makes planning your light placement much easier. You don’t have to worry about uneven surfaces or awkward angles. The dense growth also provides natural anchor points—branches and stems that can support clips, ties, or even small hooks without damaging the plant.
One of my favorite tricks? I use clear plastic plant clips (the kind used for training vines) to secure the lights to the outer layer of leaves. They’re nearly invisible during the day and hold the lights securely without harming the privet. Over time, the lights almost seem to grow with the hedge.
Seasonal Flexibility
Most privet varieties are evergreen or semi-evergreen, meaning they retain their leaves year-round in milder climates. This makes them perfect for year-round lighting, whether you want cozy winter ambiance or summer garden parties. Even in colder regions, deciduous privets like Ligustrum vulgare still offer a structured form in winter, allowing lights to create dramatic silhouettes against the bare branches.
Pro tip: If you’re in a colder zone, opt for LED string lights. They’re more energy-efficient, safer around moisture, and less likely to overheat—especially important when the privet might be covered in frost or snow.
Choosing the Right String Lights for Your Privet Fence
Not all string lights are created equal. The type you choose will dramatically affect both the look and longevity of your display. After testing dozens of options over the years, I’ve learned that the best lights for a privet fence balance aesthetics, durability, and ease of installation.
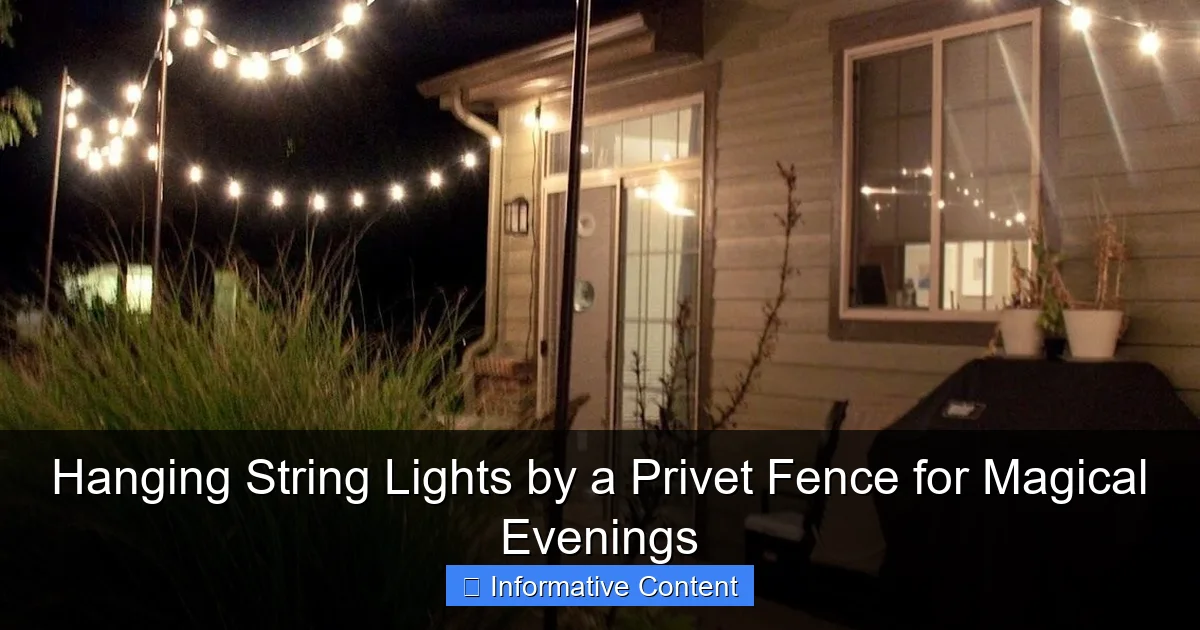
Visual guide about hanging string lights by a privet fence
Image source: themprojects.com
Bulb Type: LED vs. Incandescent
LEDs are the clear winner here. They last up to 25,000 hours (compared to 1,000–2,000 for incandescent), use less energy, and generate minimal heat. This is crucial when lights are in close contact with leaves—incandescent bulbs can scorch foliage or even become a fire hazard if left on for long periods.
I once made the mistake of using incandescent fairy lights on a hot summer night. By morning, a few leaves near the bulbs had turned brown. Never again. Now I only use LEDs, especially warm white or soft yellow tones that mimic candlelight.
Light Color and Temperature
Color temperature is measured in Kelvin (K). For a cozy, inviting glow, aim for 2200K–2700K (warm white). Cool white (4000K–5000K) feels more modern and clinical—great for task lighting, but less romantic for evening ambiance.
I prefer warm white or “amber” LEDs. They cast a golden hue that makes skin tones look better and enhances the green of the privet. Some brands even offer “candle flicker” modes, which simulate the gentle movement of real flames—perfect for intimate gatherings.
Length, Spacing, and Connectability
Measure your fence before buying. A 10-foot section of privet might need 20–30 feet of lights depending on your pattern (more on that below). Look for lights with 12–18 inches between bulbs—too close and it feels cluttered; too far and you lose the “glow” effect.
Also, consider whether you can connect multiple strands. If your fence is long, you’ll want end-to-end connectors so you can daisy-chain lights without needing multiple outlets. Some sets even have Bluetooth or remote controls—great for adjusting brightness or turning them on from the porch.
Weather Resistance and Durability
Check the IP (Ingress Protection) rating. For outdoor use, you want at least IP44 (splash-proof) or IP65 (dust- and jet-proof). Look for UV-resistant wires and waterproof connectors—privet hedges can trap moisture, especially after rain or morning dew.
My go-to brand is Brightown. Their 50-foot warm white LED strings are IP65-rated, come with 12 spare bulbs, and have a 3-year warranty. They’ve survived two winters and countless storms without a single bulb going out.
Creative Ways to Hang String Lights on a Privet Fence
Once you’ve chosen your lights, it’s time to get creative. The way you hang them can turn a simple setup into a work of art. Here are my favorite techniques, from classic to whimsical.
The Classic “Drape” Method
The easiest and most elegant approach. Drape the lights over the top of the fence, letting them hang down in gentle curves. Use plant clips or zip ties every 12–18 inches to secure them without piercing the wires.
For a fuller look, weave the lights into the top layer of leaves, creating a “crown” effect. This works especially well if your privet is well-trimmed and dense. I like to leave a slight “dip” in the center of each section—it mimics the natural arch of a garden arbor.
Vertical “Rain” Pattern
Instead of horizontal lines, hang the lights vertically from the top of the fence to the ground. Use small hooks or adhesive clips to anchor the top end, then let the strands cascade down like glowing rain.
This works beautifully if you have a tall privet (6+ feet). The vertical lines draw the eye upward, making the space feel taller and more dramatic. I once did this for a friend’s birthday party, and guests said it felt like walking into a forest glade.
Geometric Designs: Squares, Triangles, or Zigzags
For a modern touch, create patterns using multiple strands. Use small nails or removable hooks to mark corners, then run lights between them. A simple square grid can look surprisingly chic, especially with cool white LEDs.
I tried a zigzag pattern once—alternating upward and downward diagonals. It gave the fence a dynamic, almost kinetic feel. Just be careful not to overload the privet with too many anchor points. I used 3M outdoor command hooks, which held strong but peeled off cleanly when I took them down.
“Fairy Web” or “Starburst” Effect
Attach one end of the light strand to the center of the fence, then run individual bulbs outward in all directions—like a spiderweb or sunburst. Secure each “ray” with a clip or tie.
This is perfect for highlighting a specific area, like a seating nook or a garden sculpture. I used this technique to frame a small water feature, and the lights reflected beautifully in the rippling water.
Combination Techniques
Don’t be afraid to mix methods! I often combine a horizontal drape at the top with vertical “rain” strands spaced every 3 feet. The result is layered depth—like a glowing curtain with subtle movement.
For holiday seasons, I add red and green lights in a zigzag pattern over the existing warm white base. It feels festive without clashing with the everyday look.
Step-by-Step Installation Guide
Now that you’ve got your lights and design in mind, let’s walk through the installation process. I’ll share my tried-and-true method, including safety tips and time-saving tricks.
Step 1: Plan Your Layout
Sketch your fence on paper, noting outlets, corners, and any obstacles (like gates or planters). Decide where each light strand will start and end. If using multiple strands, plan your connections so you don’t have to run extension cords across the yard.
I use painter’s tape to mark anchor points on the fence. It’s removable and won’t leave residue on the leaves.
Step 2: Prepare the Privet
Trim any overgrown branches or dead leaves. This isn’t just about aesthetics—clearing the area reduces fire risk and ensures lights aren’t blocked by foliage. Use hand shears, not electric trimmers, to avoid nicking the lights later.
Pro tip: Water the privet the day before. Hydrated plants are more flexible and less likely to snap when you’re attaching clips.
Step 3: Install Anchors (If Needed)
For patterns that require fixed points (like zigzags), install small hooks, nails, or adhesive clips. I prefer clear plastic plant clips—they’re cheap, reusable, and blend into the leaves.
If your privet is on a wood or metal frame, you can screw in small eye hooks. Just don’t over-tighten—privet wood is brittle and can crack.
Step 4: Hang the Lights
Start at the power source and work outward. Unroll the lights as you go, avoiding tangles. Use clips or ties to secure the lights every 12–18 inches. For draping styles, leave some slack for natural movement.
Never pull the lights too tight—this can stress the wires or damage the privet. Think “gentle embrace,” not “tight grip.”
Step 5: Test and Adjust
Plug in the lights and walk around the yard. Look for dark spots, overly bright areas, or bulbs that are too exposed. Adjust clips or add extra strands as needed.
I always leave the lights on for 30 minutes to check for overheating or flickering. If a bulb is too hot to touch, replace it immediately.
Step 6: Secure the Power Supply
Use a GFCI outlet for safety, and cover all outdoor connections with waterproof covers. If running cords across the yard, use cord covers or bury them shallowly (at least 2 inches deep).
For a cleaner look, I use a smart plug connected to a timer. The lights turn on at dusk and off at 11 PM—no manual switching needed.
Maintenance and Long-Term Care
Good news: once installed, privet fence lights require minimal upkeep. But a little care goes a long way in preserving their magic.
Seasonal Trimming
Trim your privet 2–3 times a year, but avoid cutting near the lights. I wait until the lights are off and unplugged, then use shears to shape around the strands. This keeps the hedge tidy without risking wire damage.
If the privet grows over the lights, gently push the branches aside rather than cutting. The leaves will eventually conform to the light pattern.
Cleaning and Storage
Wipe down bulbs and wires with a damp cloth if they get dusty. For winter, I leave the lights up but turn them off. In spring, I inspect each strand for frayed wires or dead bulbs. I store them in labeled bins with silica gel packets to prevent moisture damage.
Never leave incandescent lights on during heavy rain or snow. LEDs are safer, but it’s still good practice to turn them off in extreme weather.
Upgrades and Refreshes
After 2–3 years, consider upgrading. Newer LEDs are brighter, more efficient, and offer features like app control or color-changing modes. I recently switched to a set with a “sunset” mode—lights slowly dim from bright to soft glow, mimicking the evening sky.
You can also refresh the look by adding fairy lights inside the privet or layering in paper lanterns. Just keep the overall design balanced—too many elements can feel chaotic.
Data Table: Recommended String Lights for Privet Fences
| Brand & Model | Bulb Type | Color Temp | Length | IP Rating | Connectable? | Best For |
|---|---|---|---|---|---|---|
| Brightown 50ft Warm White | LED | 2700K | 50 ft | IP65 | Yes (up to 3 strands) | Classic drape, year-round use |
| Minetom 33ft Candle Flicker | LED | 2200K | 33 ft | IP44 | No | Romantic ambiance, small fences |
| Twinkle Star 100ft RGB | LED | Color-changing | 100 ft | IP65 | Yes (remote control) | Holiday decor, parties |
| Joomer 66ft Solar-Powered | LED | 3000K | 66 ft | IP65 | No | Eco-friendly, off-grid areas |
| Philips Hue Outdoor | LED | 2200K–6500K | 33 ft | IP65 | Yes (app control) | Smart homes, color control |
Conclusion: Your Backyard Awaits
Hanging string lights by a privet fence isn’t just about adding light—it’s about crafting moments. It’s the way the glow catches your child’s smile during a late-night story, the soft shimmer as you sip wine under the stars, or the quiet comfort of knowing your yard is a place of peace and beauty.
From choosing the right lights to mastering creative patterns, the process is as rewarding as the result. And the best part? It’s accessible to anyone. You don’t need a professional landscaper or a massive budget. Just a little time, some thoughtful planning, and a willingness to experiment.
So grab a strand of warm white LEDs, a few plant clips, and step into your privet-lined yard. Turn off the overhead lights, plug in your strings, and watch as the ordinary becomes extraordinary. The magic isn’t in the lights—it’s in the way they make you feel. And that, my friend, is worth every penny and every minute spent.
Frequently Asked Questions
How do I hang string lights by a privet fence without damaging the hedge?
Use non-invasive methods like garden stakes, shepherd’s hooks, or zip ties with protective padding to secure the lights. Avoid driving nails or screws into the privet to prevent harming its growth.
What type of string lights work best for a privet fence setup?
Weather-resistant LED string lights are ideal for hanging string lights by a privet fence due to their durability and energy efficiency. Choose warm white or soft amber tones to enhance the natural ambiance.
Can I leave the lights up year-round near my privet hedge?
Only if the lights are rated for permanent outdoor use and your privet is healthy and well-trimmed. Regularly check for wire fraying or overheating to ensure safety.
How do I power string lights along a long privet fence?
Use an outdoor-rated extension cord connected to a GFCI outlet for safety. For longer runs, consider solar-powered lights or a low-voltage transformer to reduce voltage drop.
What’s the best spacing for hanging string lights by a privet fence?
Space lights 12–18 inches apart for even illumination without overcrowding. Adjust based on the privet’s height and your desired brightness level.
How do I hide the wires when installing string lights on a privet fence?
Tuck wires behind foliage or use green-colored zip ties to blend them into the hedge. For a cleaner look, run cords along the fence base or under mulch.

