Featured image for string lights on block fence
Image source: image.shutterstock.com
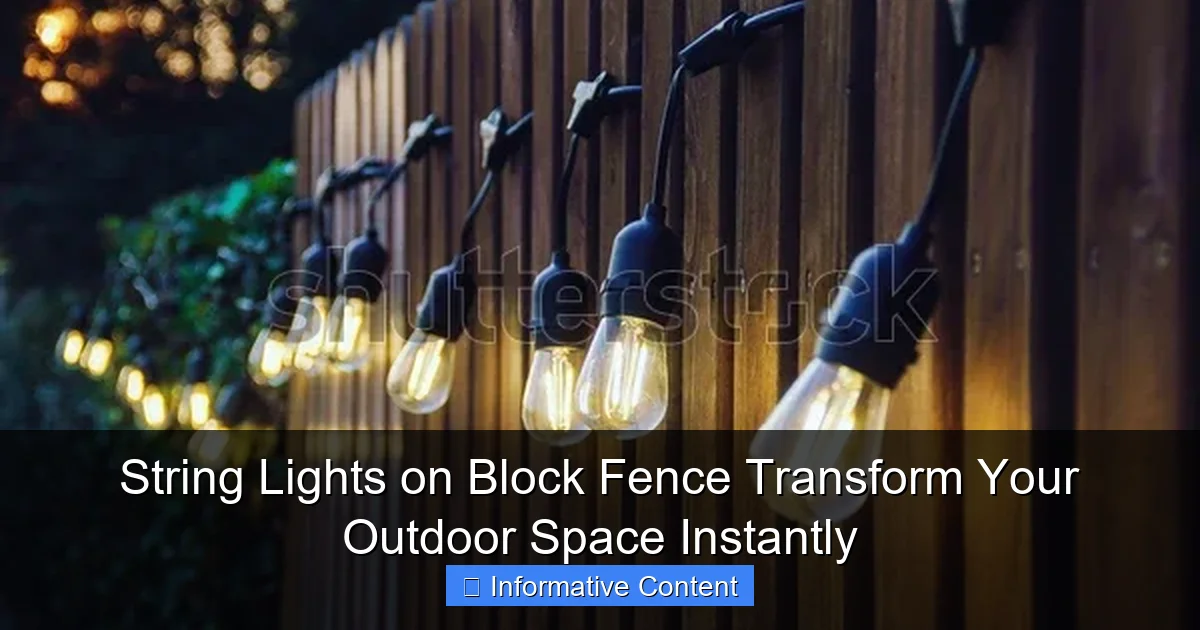
String lights on block fences instantly elevate your outdoor ambiance by combining modern style with effortless installation. Weather-resistant and versatile, these lights add a warm, inviting glow to patios, backyards, or pool areas—perfect for entertaining or cozy nights. Transform a plain block fence into a stunning focal point with minimal effort and maximum impact.
Key Takeaways
- Transform block fences instantly with string lights for ambiance.
- Choose weatherproof lights to ensure durability outdoors.
- Use adhesive hooks for easy, damage-free installation.
- Layer lights creatively to add depth and visual interest.
- Opt for warm white LEDs for a cozy, inviting glow.
- Timer features save energy and simplify daily use.
📑 Table of Contents
- Why String Lights on Block Fence Are the Ultimate Outdoor Upgrade
- Choosing the Right String Lights for Your Block Fence
- How to Install String Lights on a Block Fence (Step-by-Step)
- Creative Ways to Style String Lights on a Block Fence
- Weatherproofing and Maintenance Tips
- Real Examples: How Homeowners Transformed Their Yards
- Final Thoughts: Light Up Your Life (Literally)
Why String Lights on Block Fence Are the Ultimate Outdoor Upgrade
Imagine stepping into your backyard after sunset, and instead of a dim, shadowy space, you’re greeted by a warm, inviting glow that wraps around your block fence like a hug. That’s the magic of string lights on block fence—a simple yet transformative addition that can elevate your outdoor area from basic to breathtaking in no time. Whether you’re hosting a summer barbecue, enjoying a quiet evening with a book, or just want to make your home feel cozier, these lights add instant charm and ambiance. And the best part? You don’t need to be an electrician or a DIY pro to pull it off.
Block fences—common in suburban and urban homes—are sturdy, durable, and often a bit… plain. They’re built for privacy and security, but let’s be honest: they’re not exactly the most exciting part of your outdoor decor. That’s where string lights come in. They’re like jewelry for your fence, turning a functional structure into a focal point. I remember when my neighbor first installed them along her block fence. I walked by one evening and was stunned. The whole yard looked like it belonged in a magazine. I asked her, “How much did this cost?” Her reply? “Less than a dinner out, and it took me two hours.” That’s the power of string lights on block fence: affordable, easy, and high-impact.
Choosing the Right String Lights for Your Block Fence
Before you start draping lights everywhere, it’s important to pick the right type. Not all string lights are created equal, and your block fence has unique needs. Let’s break it down.
Visual guide about string lights on block fence
Image source: freecadplan.com
Types of String Lights: LED vs. Incandescent
You’ve probably seen both kinds at the store or online. Here’s the quick rundown:
- LED string lights: Energy-efficient, long-lasting (up to 25,000+ hours), and cooler to the touch. They’re perfect for year-round use and come in a variety of colors, brightness levels, and even smart options (like app-controlled or color-changing).
- Incandescent string lights: These give off a warm, traditional glow—think classic holiday lights. But they use more energy, burn out faster, and can get hot. Not ideal for long-term outdoor use.
For a block fence, I’d always recommend LED. They’re safer, cheaper to run, and handle weather better. Plus, many are rated for outdoor use (look for IP44 or higher).
Bulb Shape and Spacing
Here’s where personal taste comes in. Do you want a soft, diffused glow or a more sparkly, starry effect?
- Globe bulbs: Round, soft light. Great for a cozy, romantic feel. Think “backyard date night.”
- Edison-style bulbs: Vintage, exposed filament. Adds a rustic, industrial vibe. Popular in modern farmhouse decor.
- Mini bulbs: Tiny, closely spaced. Creates a “twinkle” effect—ideal for a fairy-tale look.
- Bulb spacing: Closer spacing (every 3–4 inches) gives a denser glow. Wider spacing (6+ inches) is more subtle and easier to install.
I went with globe bulbs spaced every 4 inches on my own fence. It’s bright enough to see, but not so bright that it feels like a parking lot. My kids love it, and my husband says it “makes the yard feel like a resort.”
Length and Power Source
Measure your fence before buying! A 25-foot strand might sound long, but if you’re wrapping or zigzagging, you’ll need more. As a rule of thumb, add 20–30% extra length for creative layouts.
Power options:
- Plug-in: Best if you have an outdoor outlet nearby. Reliable and bright, but limited by cord length.
- Solar-powered: No cords! Great for remote areas, but brightness can vary. Make sure the solar panel gets 6+ hours of sun.
- Battery-operated: Portable and flexible, but you’ll need to replace batteries often. Good for temporary setups.
How to Install String Lights on a Block Fence (Step-by-Step)
Now for the fun part: putting them up! Don’t worry—this isn’t rocket science. With a few basic tools and a little patience, you can have your block fence glowing in under a few hours.
Visual guide about string lights on block fence
Image source: azrockdepot.com
Tools and Materials You’ll Need
- Measuring tape
- String lights (with outdoor rating)
- Outdoor-rated clips, hooks, or adhesive mounts (more on these below)
- Extension cords (if using plug-in lights)
- Timer or smart plug (optional but highly recommended)
- Ladder (if your fence is tall)
Pro tip: Buy a few extra clips. They’re cheap and easy to lose.
Step 1: Plan Your Layout
Before you start, decide how you want the lights to flow. Here are a few popular options:
- Straight line: Simple and clean. Run the lights along the top or middle of the fence.
- Zigzag: Create a dynamic, crisscross pattern. Great for visual interest.
- Weave: Alternate between the front and back of the fence (if accessible). Adds depth.
- Canopy effect: Hang lights from the top of the fence to a nearby tree, pergola, or post. Creates a “roof” of light.
I tried the zigzag on my fence, and it instantly made the space feel larger and more dynamic. My dog even started chasing the shadows!
Step 2: Secure the Lights
This is where many people go wrong. Taping, tying, or nailing lights can damage the fence or the lights themselves. Here’s how to do it right:
- Use outdoor-rated clips: These are designed to grip the fence without scratching. Look for ones with rubber padding.
- Adhesive hooks: If your fence has a smooth surface (like stucco or painted block), heavy-duty outdoor adhesive hooks work great. Just make sure they’re rated for your climate.
- Twist ties (for temporary setups): Okay for a weekend party, but not durable long-term.
- Never use nails or staples: They can crack the block and damage the light wires.
Attach the clips every 12–18 inches. Start at the power source and work outward, leaving a little slack in the cord to avoid tension.
Step 3: Connect and Test
If you’re using multiple strands, connect them with outdoor-rated connectors. Plug in the lights and test them before finalizing the layout. Fix any dim or dead bulbs right away.
Bonus tip: Use a timer or smart plug to automate the lights. Set them to turn on at dusk and off at 11 PM. No more fumbling with switches!
Creative Ways to Style String Lights on a Block Fence
Once you’ve got the basics down, it’s time to get creative. String lights are incredibly versatile—they can set the mood, highlight features, or even become art.
Highlight Outdoor Features
Use lights to draw attention to your favorite parts of the yard:
- Wrap around planters or pots: Adds a glow to your container garden.
- Frame a seating area: Hang lights above your patio or fire pit. It creates a “room” within the yard.
- Accent a water feature: If you have a fountain or small pond, string lights nearby make it magical at night.
My friend Sarah has a small koi pond. She ran a strand of warm white lights along the block fence behind it. At night, the fish look like they’re swimming through stars.
Create Themed Zones
Use different colors or styles to define areas:
- Warm white: Cozy, inviting. Great for dining or lounging.
- Cool white or blue: Crisp and modern. Perfect for a poolside area.
- Color-changing: Fun for parties or holidays. Kids love this!
- Fairy lights in jars: Hang mason jars with mini lights on hooks. Rustic and charming.
DIY Light Art
Feeling crafty? Try these ideas:
- Geometric shapes: Use clips to form triangles, diamonds, or waves on the fence.
- Words or initials: Spell out “HOME” or your family name with lights. (Tip: Use a stencil first.)
- Shadow play: Hang lights behind a trellis with vines. The shadows add depth.
I once saw a neighbor spell “WELCOME” across their block fence for a party. It was simple but so effective. Guests said they felt like they were walking into a private resort.
Weatherproofing and Maintenance Tips
Outdoor lights face rain, wind, sun, and critters. A little care goes a long way in keeping them looking great and working safely.
Choose the Right Materials
- Look for “outdoor rated” or “weatherproof” on the packaging. This means the lights can handle rain and humidity.
- Check the IP rating: IP44 or higher is ideal. It means protection from splashing water and dust.
- Use UV-resistant clips and cords: Sunlight can make plastic brittle over time.
Protect the Connections
Water and electricity don’t mix. Here’s how to keep connections dry:
- Use outdoor-rated extension cords with sealed connectors.
- Elevate plugs: Don’t let them sit on wet ground. Use a small plastic container or cord organizer.
- Apply dielectric grease to plug contacts (optional but smart).
Seasonal Care
- Inspect before each season: Check for frayed wires, broken bulbs, or loose clips.
- Clean gently: Wipe bulbs with a dry cloth. Avoid water or harsh cleaners.
- Store carefully: If you take them down, coil them loosely and store in a dry place.
I learned the hard way: last winter, a storm knocked over a loose strand. One bulb broke, and water got in. The whole section died. Now I check everything in spring and fall.
Real Examples: How Homeowners Transformed Their Yards
Sometimes, seeing is believing. Let’s look at how real people used string lights on block fence to create stunning outdoor spaces.
Example 1: The Cozy Backyard Lounge
Location: Suburban California
- Fence: 6 ft stucco block
- Lights: 50 ft warm white globe LED, spaced 4 inches
- Layout: Straight line along the top, with a zigzag section over the seating area
- Result: The owner says it “feels like an outdoor living room.” They use it for evening coffee and movie nights.
Example 2: The Urban Oasis
Location: Chicago apartment complex
- Fence: Concrete block shared with neighbors
- Lights: Solar-powered mini LEDs with a timer
- Layout: Weaved through climbing ivy on the fence
- Result: The lights make the ivy glow at night, turning a plain wall into a green “living art” piece.
Example 3: The Party-Ready Patio
Location: Texas backyard
- Fence: Painted block
- Lights: Color-changing LED strands (controlled by app)
- Layout: Canopy from fence to pergola
- Result: The owner uses different colors for holidays and events. Kids love the “disco mode.”
| Project | Fence Type | Light Type | Cost (Est.) | Time to Install |
|---|---|---|---|---|
| Cozy Lounge | Stucco block | Warm white globe LED | $40 | 2.5 hours |
| Urban Oasis | Concrete block | Solar mini LEDs | $35 | 1.5 hours |
| Party Patio | Painted block | Color-changing LED | $60 | 3 hours |
Final Thoughts: Light Up Your Life (Literally)
Adding string lights on block fence isn’t just about looks—it’s about creating a space where you love to be. Whether you want a quiet retreat, a party-ready yard, or just a little extra sparkle, these lights deliver. They’re affordable, easy to install, and endlessly customizable. And unlike big renovations, you can see the results the same night.
My advice? Start simple. Buy a 25-foot strand, pick a spot, and try it out. Once you see how it transforms your space, you’ll be hooked. Maybe you’ll add more lights, try a new layout, or experiment with colors. That’s the beauty of this upgrade—it grows with you.
So go ahead: grab those lights, grab a friend (or a glass of wine), and spend an evening under the stars—or at least under the glow of your own backyard magic. Your block fence is waiting to shine.
Frequently Asked Questions
How do I hang string lights on a block fence without drilling holes?
Use adhesive hooks, removable mounting strips, or tension rods designed for outdoor use to secure string lights on a block fence without permanent damage. These options are sturdy, weather-resistant, and easy to reposition. Ensure the surface is clean and dry before installation for optimal hold.
Can I use string lights on a block fence year-round?
Yes, but choose commercial-grade, weatherproof string lights with UV-resistant cords and LED bulbs for durability. Check manufacturer guidelines for temperature and weather ratings to ensure they withstand seasonal changes.
What’s the best way to power string lights on a block fence?
Use outdoor-rated extension cords or solar-powered lights to avoid tripping hazards. For a cleaner look, consider low-voltage LED string lights on a block fence connected to a GFCI outlet for safety.
Are there specific string lights designed for block fences?
While no lights are exclusively for block fences, opt for models with adjustable clips, rubberized grips, or flexible wires that conform to uneven surfaces. Look for “heavy-duty” or “outdoor-rated” labels for best results.
How can I hide the wires when installing string lights on a block fence?
Route cords behind fence caps, use decorative conduit covers, or tuck them under planters or railings for a neat appearance. For a seamless look, select string lights with thin, dark-colored wires.
Do string lights on a block fence require special maintenance?
Wipe down lights and connections seasonally with a dry cloth to remove dust and debris. Inspect for frayed wires or loose bulbs, and store indoors during extreme weather if not rated for year-round use.

