Featured image for how to string outdoor globe lights along fence
Image source: thumbs.dreamstime.com
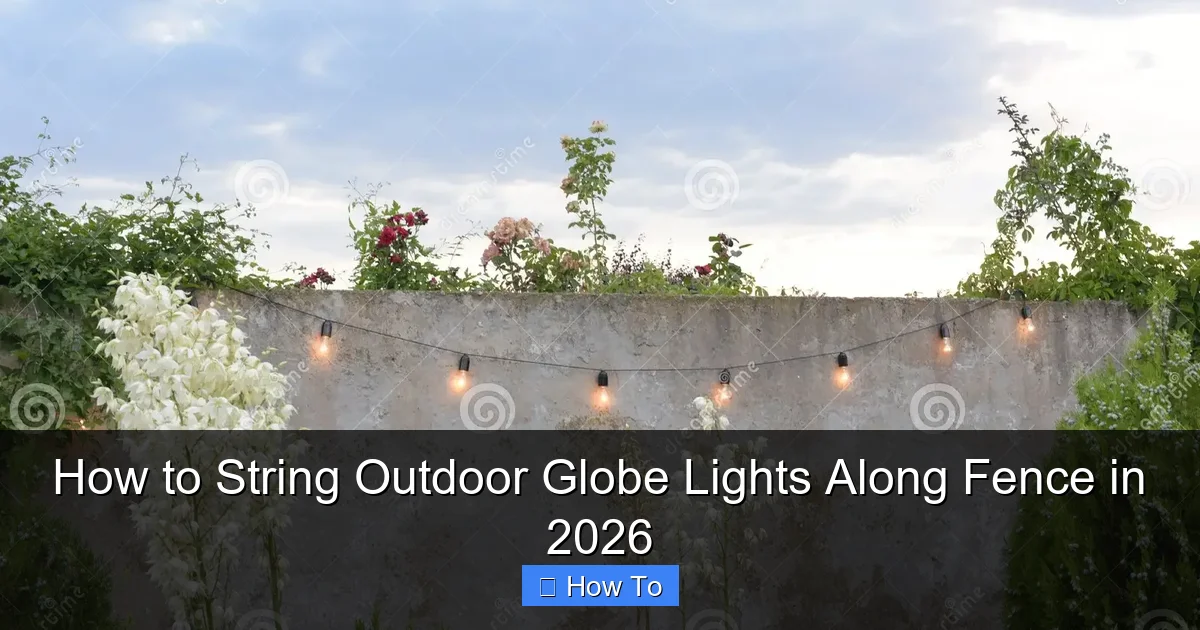
Transform your backyard into a glowing oasis in 2026 by securely stringing outdoor globe lights along your fence using durable, weather-resistant clips or hooks designed for long-term outdoor use. Plan your layout first—space bulbs evenly and measure cord length to avoid mid-installation shortages—then connect to a GFCI-protected outlet for safety and reliability. This simple upgrade adds instant ambiance and extends your outdoor living well into the night.
How to String Outdoor Globe Lights Along Fence in 2026
Key Takeaways
- Plan spacing first: Measure and mark light positions evenly along the fence line.
- Use weatherproof clips: Secure lights with UV-resistant, fence-safe mounting clips.
- Check power source: Ensure outdoor-rated extension cords reach all light strands safely.
- Test before hanging: Verify all bulbs work before installing on the fence.
- Angle for visibility: Position globes outward for optimal ambient lighting effect.
- Secure connections: Seal plug joints with waterproof covers to prevent moisture damage.
Why This Matters / Understanding the Problem
Let’s be honest—there’s something magical about stepping into your backyard at night and being greeted by soft, glowing lights strung along your fence. It feels like a cozy outdoor living room, a place where memories are made. But if you’ve ever tried to how to string outdoor globe lights along fence in 2026, you know it’s not as simple as just hanging a few bulbs and calling it a day.
Maybe you’ve tangled cords, sagged lines, or worse—lights that flicker out halfway through the season. I’ve been there. Last summer, I spent two evenings untangling a mess of lights only to realize one strand had a faulty connection. Frustrating, right?
The truth is, stringing outdoor globe lights along a fence in 2026 isn’t just about aesthetics—it’s about durability, safety, and smart planning. With weather-resistant tech, smart lighting options, and new mounting solutions, this year is the perfect time to do it right. And that’s exactly what we’re going to cover: a clear, step-by-step guide to help you how to string outdoor globe lights along fence in 2026—without the headaches.
Whether you’re lighting up a small patio or a long backyard fence, this guide will walk you through everything: from picking the right lights to ensuring they stay up through wind, rain, and seasonal changes.
Pro Insight: The best time to install? Late spring or early summer. You avoid winter damage and get to enjoy the lights all season long. Plus, you’ll spot any issues before guests arrive.
What You Need
Before you start, gather your gear. Trust me, having everything ready makes the whole process smoother—and less likely to end with a ladder in the grass and a half-hung string of lights.

Visual guide about how to string outdoor globe lights along fence
Image source: img.yardenvy.com
- Outdoor-rated globe string lights – Look for IP65 or higher weatherproof rating. These are built to handle rain, UV exposure, and temperature swings.
- Fence clips or hooks – Choose ones that match your fence material (wood, vinyl, metal). I prefer screw-in hooks for wood and clip-on mounts for vinyl.
- Measuring tape – For spacing and planning.
- Drill (if needed) – For installing permanent hooks on wood or metal.
- Zip ties or outdoor-rated cable clips – For managing cords and securing connections.
- Extension cords (outdoor-rated, GFCI-protected) – Safety first. GFCI prevents shocks and tripping hazards.
- Ladder (stable, non-slip) – Especially for tall fences.
- Smart plug or timer (optional) – For automated on/off. A game-changer for forgetful folks like me.
- Marker or chalk – To mark hook positions.
- Power source nearby – Ideally within 6–10 feet of your starting point.
Warning: Never use indoor string lights outdoors. They aren’t rated for moisture or temperature changes—and can be a fire hazard.
Pro tip: Buy lights with connectable ends so you can link multiple strands without extra power sources. Just make sure you don’t exceed the manufacturer’s max connection limit (usually 3–5 strands).
Step-by-Step Guide to How to String Outdoor Globe Lights Along Fence in 2026
Step 1: Plan Your Layout and Measure the Fence
Before you even touch a light, take a walk around your fence with a measuring tape. Measure the total linear feet where you want the lights. This helps you buy the right number of strands.
Now, decide on your lighting pattern:
- Straight line: Along the top rail or mid-fence for a classic look.
- Zigzag: For a more playful, dynamic feel—great for entertaining.
- Double strand: One at the top, one at the bottom for depth.
- Curved or arched: If your fence has a gate or corner, you can curve the lights for a softer look.
Use chalk or a marker to lightly sketch your plan on the fence. I like to mark every 12–16 inches—this gives consistent spacing and prevents sagging.
Pro Insight: Avoid placing hooks directly at fence joints. The wood is weaker there, and hooks can loosen over time. Go 2–3 inches in from each post.
This step is crucial for how to string outdoor globe lights along fence in 2026 the right way—because planning saves you from redoing work later.
Step 2: Choose the Right Mounting Method for Your Fence Type
Not all fences are the same. And trust me, the wrong hook can ruin your lights—or your fence.
- Wooden fences: Use screw-in cup hooks or eye screws. They hold well and are easy to remove. Drill a pilot hole first to avoid splitting the wood.
- Vinyl or PVC fences: Use clip-on plastic mounts or adhesive-backed hooks. Avoid nails or screws—they can crack the vinyl. I love the Command Outdoor Light Clips—they’re removable and leave no marks.
- Metal fences (chain link, wrought iron): Use S-hooks or bungee cords with hooks. They grip the metal without damaging the finish.
- Composite or aluminum: Similar to vinyl—use non-penetrating clips. Adhesive hooks with outdoor-rated backing work great.
Install your hooks or clips now, following your layout marks. For straight lines, keep them evenly spaced. For zigzags, alternate sides at 12–18 inch intervals.
Warning: Don’t over-tighten hooks on wood. You risk cracking the post. Hand-tight is usually enough.
Step 3: Test Your Lights Before Hanging
Here’s a step most people skip—and regret later. Always test your lights before installing them.
Unroll each strand and plug it in. Check every bulb. Look for flickering, dimming, or dark sections. If a strand fails, return it or replace the bulb (if replaceable).
Pro tip: Use a light tester pen to pinpoint bad bulbs or frayed wires. It saves hours of troubleshooting.
Also, check the cord length between the plug and the first bulb. If it’s short (under 2 feet), you may need an extension cord or to start from a different spot.
This step is especially important when you’re learning how to string outdoor globe lights along fence in 2026—because you don’t want to realize halfway through that a strand is dead.
Step 4: Start Hanging—Begin at the Power Source
Always start at the closest hook to your power outlet. This reduces cord tension and makes it easier to manage the plug.
Here’s how I do it:
- Hang the first bulb or socket on the starting hook.
- Let the cord hang loosely—don’t pull it tight yet.
- Move to the next hook and gently drape the light strand over it.
- Continue along the line, letting the lights hang in a gentle “U” shape between hooks.
- Don’t stretch the cord. Let it hang with 2–4 inches of slack between hooks.
For zigzag patterns: Alternate sides, but keep the slack even. You don’t want one side tighter than the other.
Pro Insight: If your lights have bulbs that face downward, angle the strand so the bulbs point toward the ground. This creates better ambient lighting and protects bulbs from rain.
Step 5: Connect Multiple Strands (If Needed)
Most globe light sets have connectable ends—a male plug on one end, a female socket on the other.
To connect:
- Unplug all strands.
- Align the male plug with the female socket and push together firmly.
- Secure the connection with a zip tie or outdoor-rated connector cap to keep it dry.
- Hang the connected strand as usual.
But here’s the catch: don’t exceed the max connection limit. Most manufacturers say 3–5 strands max. Exceeding this can overload the circuit and cause bulbs to dim or fail.
If your fence is longer, use multiple power sources—or a power distributor box with multiple outlets.
Step 6: Secure the Cord and Manage the Plug
This is where many installations go wrong. Loose cords = tripping hazards and tangled messes.
- Use outdoor zip ties or cable clips to secure the plug and excess cord to a fence post or nearby structure.
- Coil extra cord neatly and tuck it behind a hook or under a planter.
- If the plug is near the ground, place it in a weatherproof outlet box or plastic bag with a rubber band to keep water out.
For long runs, use a cord cover or bury the cord slightly in mulch (not soil) to hide it and protect it.
Warning: Never bury cords in soil. Moisture can corrode wires. Use a conduit if you need to run cords underground.
Step 7: Add Smart Controls (Optional but Recommended)
In 2026, smart lighting isn’t just cool—it’s practical. I use a smart plug with a timer so my lights turn on at sunset and off at 10 PM. No more forgetting to switch them off.
- Plug your extension cord into a GFCI-protected outdoor outlet.
- Connect the smart plug to the outlet.
- Plug your lights into the smart plug.
- Set a schedule via app (Google Home, Alexa, or manufacturer app).
Some globe lights come with built-in smart features—like color change, dimming, or motion sensors. If you’re going all-in, these are worth the upgrade.
This step transforms how to string outdoor globe lights along fence in 2026 from a one-time chore into a seamless, automated experience.
Step 8: Inspect and Adjust for Tension and Safety
Once all lights are up, step back and look at the whole setup.
- Check for sagging. If a section dips more than 6 inches, add a hook in the middle.
- Look for twisted cords. Gently untwist and re-secure.
- Ensure all connections are dry and secure.
- Verify that no bulbs are touching the ground or plants—this can cause short circuits.
Turn the lights on at night. Walk around and observe. Do the bulbs shine evenly? Is the glow where you want it?
Make small adjustments now—before the season really gets going.
Pro Tips & Common Mistakes to Avoid
After stringing lights on my fence for the past five summers, I’ve learned a few hard truths. Here are the real-world tips I wish I knew sooner.
Pro Tip 1: Buy one extra strand. You’ll always need it—either for a mistake, a longer run, or a backup. Better to have it and not need it.
Pro Tip 2: Use LED globe lights. They’re brighter, last longer, and use 75% less energy than incandescent. Plus, they don’t get hot—safer around kids and pets.
Pro Tip 3: Label your strands. Use masking tape to write “Front,” “Left,” or “Back” on each plug. Makes removal and storage way easier.
Pro Tip 4: Install lights 6–8 inches below the fence top. This hides the cord and prevents wind from catching the bulbs.
Common Mistakes to Avoid:
- Overloading circuits: Don’t plug more than 3–5 strands into one outlet. Use a power strip with surge protection if needed.
- Ignoring weatherproofing: Even “outdoor” lights can fail if connections aren’t protected. Use silicone sealant or waterproof caps.
- Stretching cords too tight: This pulls on the sockets and can break internal wires. Always allow slack.
- Using indoor-rated extension cords: They aren’t UV-resistant and can crack in sunlight. Always use outdoor-rated cords.
- Not testing before hanging: I’ve wasted hours hanging a dead strand. Test first. Always.
And one personal lesson: Don’t rush the process. I once tried to string 100 feet of lights in an hour. The result? Sagging, tangled, and uneven. Take your time. Enjoy the process. It’s part of the magic.
FAQs About How to String Outdoor Globe Lights Along Fence in 2026
Let’s tackle the questions I get most often from friends and neighbors.
Can I leave outdoor globe lights up year-round?
Most outdoor-rated globe lights are designed for seasonal use. While they can handle rain and snow, prolonged exposure to extreme cold, UV, and wind can shorten their lifespan.
I recommend removing them in late fall and storing them in a dry, cool place. If you must leave them up, choose commercial-grade or heavy-duty LED lights and check them monthly for damage.
How do I hide the cord and plug?
Great question. The plug is the ugliest part—but also the most important.
- Use a weatherproof outlet cover (like a dome cover) to hide the plug.
- Place a potted plant, bench, or outdoor rug nearby to camouflage it.
- Run the cord along the fence base and cover it with mulch or landscape fabric.
- Use a cord cover strip (like a rubber channel) to protect and hide it.
Smart tip: Use a right-angle plug to reduce cord bulk.
What if my fence is uneven or has gaps?
No problem. Use adjustable hooks or zip ties to secure lights to posts or rails. For gaps, you can:
- Skip a hook and let the light span the gap (if less than 2 feet).
- Use a support wire (thin, coated steel) stretched between posts and hang lights on that.
- For wide gaps, use a floating mount—like a small wooden dowel between posts with hooks on both ends.
Can I use solar-powered globe lights?
Yes—but with caveats. Solar lights are great for off-grid areas, but:
- They’re less bright than plug-in models.
- They need 6+ hours of direct sun to charge fully.
- They don’t last as long at night—usually 4–6 hours.
I use solar lights for accent paths, but stick with plug-in for fence lighting. They’re more reliable and brighter.
How do I fix a flickering or dark section?
First, check the connections—are they snug and dry? Loosen and reseat them.
Next, test each bulb. Some globe lights have replaceable bulbs—swap out the bad one.
If the whole strand flickers, it might be a faulty plug or internal break. Use a continuity tester or replace the strand.
And remember: never use frayed or damaged cords. It’s a fire hazard.
Are there smart globe lights I can control with my phone?
Absolutely. Brands like Philips Hue, LIFX, and Govee offer smart globe lights that connect to Wi-Fi or Bluetooth.
You can:
- Change colors remotely.
- Set schedules and scenes.
- Sync with music or voice commands.
Just make sure they’re outdoor-rated and have a weatherproof housing. Some require a hub, so check compatibility.
How do I remove and store lights safely?
At the end of the season:
- Unplug and remove all hooks.
- Coil each strand loosely (use the “over-under” method to prevent tangles).
- Store in a plastic bin with desiccant packs to prevent moisture.
- Label the bin “2026 Outdoor Globe Lights.”
- Keep in a dry, temperature-controlled area (like a garage or closet).
This makes next year’s setup way easier.
Final Thoughts
Learning how to string outdoor globe lights along fence in 2026 isn’t just about hanging lights—it’s about creating a space where you want to spend time. A place where dinner feels like a celebration, where kids laugh under the glow, and where quiet evenings feel magical.
Take your time. Plan your layout. Use the right tools. Test your lights. And don’t be afraid to adjust as you go.
Remember: the best installations aren’t perfect—they’re thoughtful. They’re safe, durable, and beautiful. They’re built to last, not just impress.
So grab your hooks, your lights, and your ladder. Start at the power source. Work methodically. And when you flip that switch for the first time and see your fence come alive with soft, golden light—you’ll know it was worth every minute.
And hey, if you run into a snag? That’s okay. We all do. The key is to keep going. Because the glow at the end—literally and figuratively—is always worth it.
Now go light up your world. Your fence—and your future self—will thank you.

