Featured image for how to hang lights patio string
Image source: cdn.christmaslightsetc.com
Transform your outdoor space in 2026 with perfectly hung patio string lights using proven techniques that ensure a safe, stylish, and weather-resistant setup. Plan your layout, use durable mounting hardware, and maintain even spacing for a professional look that enhances ambiance and lasts all season.
“`html
How to Hang Lights Patio String Like a Pro in 2026
Key Takeaways
- Plan your layout: Sketch the area to optimize spacing and coverage.
- Use proper hardware: Install hooks or anchors for secure, long-lasting support.
- Measure carefully: Account for bulb spacing and extension cords before buying.
- Weatherproof connections: Seal plugs and joints to protect against rain and wind.
- Test before hanging: Check all bulbs and wiring to avoid mid-project failures.
- Angle lights downward: Direct illumination toward seating for best ambiance.
Why This Matters / Understanding the Problem
Let’s be honest—nothing ruins a cozy backyard vibe faster than poorly hung patio string lights. You know the scene: tangled wires, lopsided bulbs, and that one section sagging like a deflated balloon. I’ve been there. Last summer, I spent an entire evening wrestling with lights that looked more like a spider’s breakfast than a charming outdoor glow.
But here’s the good news: how to hang lights patio string like a pro in 2026 isn’t rocket science. With the right approach, you can transform your patio, deck, or garden into a warm, inviting space that feels straight out of a magazine. Whether you’re hosting a BBQ, a date night, or just enjoying a quiet evening, well-placed lights make all the difference.
The key? Planning, the right tools, and a few pro tricks most DIY guides skip. And don’t worry—no engineering degree required. I’ll walk you through every step, from measuring to the final twinkle.
What You Need
Before you start, gather these essentials. Trust me, skipping this step leads to frustration (and maybe a trip to the hardware store at midnight). Here’s your checklist:
Visual guide about how to hang lights patio string
Image source: thecreativityexchange.com
- Patio string lights: Choose weatherproof, LED bulbs (they last longer and use less energy).
- Measuring tape: For spacing and layout planning.
- Drill and anchors/screws (if attaching to wood or brick) or adhesive hooks (for renters or delicate surfaces).
- Zip ties or clips: For securing wires without damaging surfaces.
- Extension cords and timers: To avoid outlet overloads and automate on/off times.
- Ladder: For hard-to-reach areas.
- Helper (optional): A second set of hands makes this way easier.
Pro tip: Buy 10–20% more lights than your initial estimate. You’ll need extra for corners, overlaps, and that “just a little more glow” moment.
Step-by-Step Guide to How to Hang Lights Patio String Like a Pro in 2026
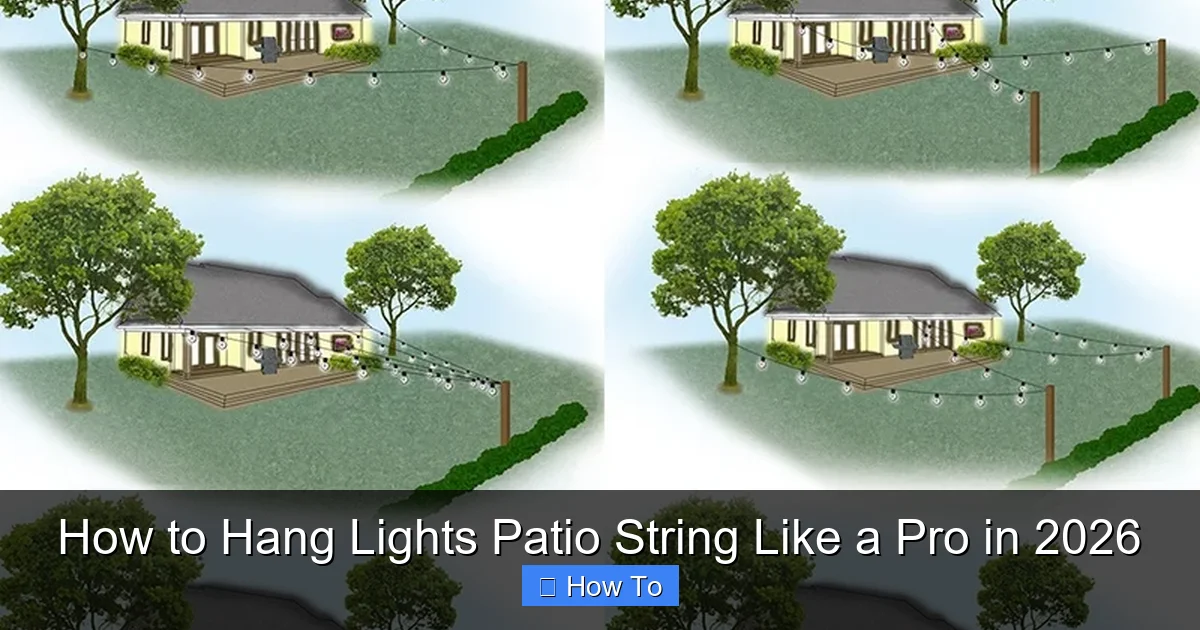
Step 1: Plan Your Layout (The Secret to Success)
Before touching a single light, map your space. I learned this the hard way—once, I hung lights only to realize they cast shadows where I wanted to eat. Oops.
- Sketch your patio: Note trees, railings, rooflines, and furniture. Where will people sit? Walk? Dine?
- Decide the pattern:
- Grid: Lights crisscross overhead (great for large patios).
- Perimeter: Lights along railings, fences, or roof edges (ideal for small spaces).
- Zigzag: Diagonal lines between posts (adds visual interest).
- Measure the distance: Use your tape to calculate how many lights you need. For example, if your patio is 12 feet wide, a grid pattern might need 3–4 horizontal runs spaced 2–3 feet apart.
💡 Warning: Avoid running lights directly over dining tables or seating areas. You want ambiance, not blinding glare.
Step 2: Test Your Lights & Outlets
Nothing kills the mood like a string that doesn’t light up. Before installation:
- Plug in all lights: Check for dead bulbs or frayed wires. Replace faulty strands.
- Map your outlets: Identify where extension cords will run. Use GFCI-protected outdoor outlets to prevent shocks.
- Test the circuit: Don’t overload a single outlet. Most LED strings draw ~1 amp, but check the label. A 15-amp circuit can handle ~10–15 strands.
I once tried powering 20 strands from one outlet—my breaker tripped mid-party. Not my finest moment.
Step 3: Install Mounting Points
Now, secure your lights’ anchor points. The method depends on your surface:
- Wooden posts or beams: Use stainless steel screws (they resist rust). Drill pilot holes first to prevent splitting.
- Brick or stucco: Use plastic anchors and screws. Tap anchors into drilled holes, then screw in hooks.
- Metal railings: Use magnetic hooks or zip ties (if removable).
- Renters or delicate surfaces: Use adhesive outdoor-rated hooks (like 3M Command Strips for Outdoors). They hold up to 5 lbs and leave no residue.
💡 Pro tip: Space hooks every 12–24 inches. Too far apart = sagging lights. Too close = cluttered look.
Step 4: Hang the Lights (Without Losing Your Mind)
Time to string the lights! Follow these steps:
- Start at the power source: Leave 3–6 feet of cord near the outlet. This gives you flexibility to plug in later.
- Attach the first hook: Secure the light strand’s loop or hook to your mounting point.
- Work outward: Drape the strand to the next hook. Don’t pull tight—leave a slight sag (like a catenary curve). This prevents stress on the wires and looks natural.
- Use zip ties for extra support: In windy areas, add ties halfway between hooks to prevent flapping.
- Connect multiple strands: Use outdoor-rated extension cords. Avoid daisy-chaining more than 3 strands (check the manufacturer’s limit).
💡 Warning: Never staple or nail into the light cords. This damages insulation and creates fire hazards. Use clips or ties instead.
Step 5: Secure Cables & Hide Wires
Messy cords ruin the vibe. Here’s how to keep things tidy:
- Run extension cords along edges: Tuck them behind railings, under furniture, or against walls.
- Use cable clips: Adhesive or screw-in clips keep cords flush with surfaces.
- Hide with planters or rugs: Place large plants or outdoor rugs over cords (only if they’re flat and safe to cover).
- Label cords: Use colored tape or tags to identify which switch controls which lights.
My trick? I painted my extension cords to match the fence. No one notices them now!
Step 6: Add Timers & Smart Controls
Want lights to turn on at sunset without lifting a finger? Add automation:
- Timer plugs: Set on/off times (e.g., 6 PM–11 PM).
- Smart plugs: Control lights via phone or voice assistant (Alexa, Google Home).
- Motion sensors: Great for security—lights turn on when someone approaches.
I use a smart plug synced with my phone. When I say, “Alexa, patio lights on,” it feels like magic.
Step 7: Final Check & Adjustments
Before celebrating, do a final walkthrough:
- Check for sagging: Adjust hooks or add support if needed.
- Test all bulbs: Replace any that flicker or stay dark.
- Trim excess zip ties: Use scissors to cut sharp ends.
- Take a photo: Capture your work from multiple angles. This helps spot issues you might miss in person.
💡 Pro tip: Stand back and view your lights at night. If they look uneven, tweak the sag or spacing. It’s easier to adjust now than later!
Pro Tips & Common Mistakes to Avoid
After 10+ years of hanging patio lights (and fixing my own blunders), here’s what I’ve learned:
- Don’t skip the layout sketch: A 5-minute sketch saves hours of rework. I use graph paper or a free app like MagicPlan.
- Weatherproof everything: Use outdoor-rated lights, cords, and timers. Indoor-rated gear fails fast in rain or humidity.
- Buy extra lights: You’ll need spares for repairs or future expansions. Store them in labeled bins.
- Respect weight limits: Heavy bulbs (like Edison-style) need stronger anchors. Adhesive hooks often can’t handle them.
- Think about maintenance: Hang lights so you can reach bulbs easily. If they’re 20 feet up, use a ladder or pole tool.
- Avoid “light pollution”: Point bulbs downward to reduce glare. Shield them with lanterns or globes if needed.
💡 Common mistake: Overloading circuits. If your lights dim or flicker, you’ve exceeded the outlet’s capacity. Split strands across multiple circuits.
One last thing: how to hang lights patio string like a pro in 2026 isn’t about perfection. It’s about creating a space that feels like you. If a strand sags a little? Call it “rustic charm.”
FAQs About How to Hang Lights Patio String Like a Pro in 2026
Q: Can I hang patio string lights on a rental property?
A: Absolutely! Use adhesive hooks (like 3M Outdoor Command Strips) or tension rods. Avoid drilling holes—your landlord will thank you. Just check your lease first.
Q: How do I hang lights without drilling into brick?
A: Try magnetic hooks (if you have metal flashing) or adhesive outdoor hooks. For a temporary fix, use zip ties around railings or planters.
Q: What’s the best way to store lights in winter?
A: Remove bulbs, coil strands loosely, and store in breathable bags (not plastic). Label each strand by location (e.g., “deck east side”). I keep mine in labeled bins in my shed.
Q: How far apart should I space the lights?
A: For ambient lighting, space strands 2–3 feet apart. For brighter areas (like a dining table), go 1–2 feet. Adjust based on bulb brightness—dimmer LEDs need closer spacing.
Q: Can I connect multiple light strands?
A: Yes, but don’t exceed the manufacturer’s limit (usually 3–5 strands). Use outdoor-rated extension cords, and avoid daisy-chaining in wet areas.
Q: What if my lights keep blowing fuses?
A: You’re overloading the circuit. Unplug some strands or use a separate outlet. If the problem persists, consult an electrician.
Q: Are solar string lights worth it?
A: For low-light areas, yes. But solar lights are dimmer and may not last all night. I use them for accent lighting (like along a path) and plug-in lights for main areas.
Final Thoughts
Hanging patio string lights doesn’t have to be a headache. By planning your layout, using the right tools, and following these steps, you’ll create a space that feels warm, inviting, and uniquely yours. Remember: how to hang lights patio string like a pro in 2026 is less about perfection and more about joy. A little sag? A slightly uneven strand? That’s character.
So grab your lights, call a friend, and start hanging. When you’re done, pour yourself a drink, sit back, and admire the glow. You’ve earned it. And if you hit a snag? That’s okay. Even pros make mistakes—we just learn from them. Happy lighting!
“`

