Featured image for how to hang patio string lights
Image source: sengerson.com
Hanging patio string lights in 2026 is easier than ever with modern, damage-free mounting solutions and smart spacing techniques. Whether you’re securing lights to eaves, fences, or freestanding poles, using adjustable hooks, zip ties, or tension cables ensures a safe, professional look without drilling or sagging—perfect for creating a cozy, inviting outdoor ambiance in minutes.
“`html
How to Hang Patio String Lights in 2026 Easy Guide
Key Takeaways
- Plan your layout first: Measure space and mark anchor points before installing.
- Use weatherproof lights: Choose LED or commercial-grade for durability in all conditions.
- Install secure anchors: Use hooks, screws, or zip ties rated for outdoor weight loads.
- Maintain proper tension: Avoid sagging by spacing supports every 2–3 feet.
- Hide cords safely: Tuck wires along beams or under trim for a clean look.
- Test before finalizing: Check connections and brightness prior to full installation.
- Add a timer: Automate on/off times to save energy and extend bulb life.
Why This Matters / Understanding the Problem
Remember that one summer night when you tried to set up string lights for a backyard BBQ, only to end up tangled in a web of wires, frustrated, and half-lit? Yeah, I’ve been there. You’re not alone. Lighting up your patio isn’t just about aesthetics—it’s about creating a warm, inviting space where stories are shared, laughter echoes, and memories are made.
But here’s the thing: how to hang patio string lights in 2026 easy guide isn’t just about plugging in a few bulbs. It’s about doing it safely, beautifully, and in a way that lasts. Whether you’re upgrading your current setup or starting from scratch, this guide walks you through the process with real-world tips, no fluff, and zero jargon.
By 2026, outdoor lighting tech has evolved—think solar-powered LEDs, smart timers, and weather-resistant designs. But the core challenge remains: how do you hang them without looking like a DIY disaster? Let’s fix that.
What You Need
Before you start, gather these essentials. Trust me, skipping this step leads to mid-project runs to the hardware store—annoying and avoidable.
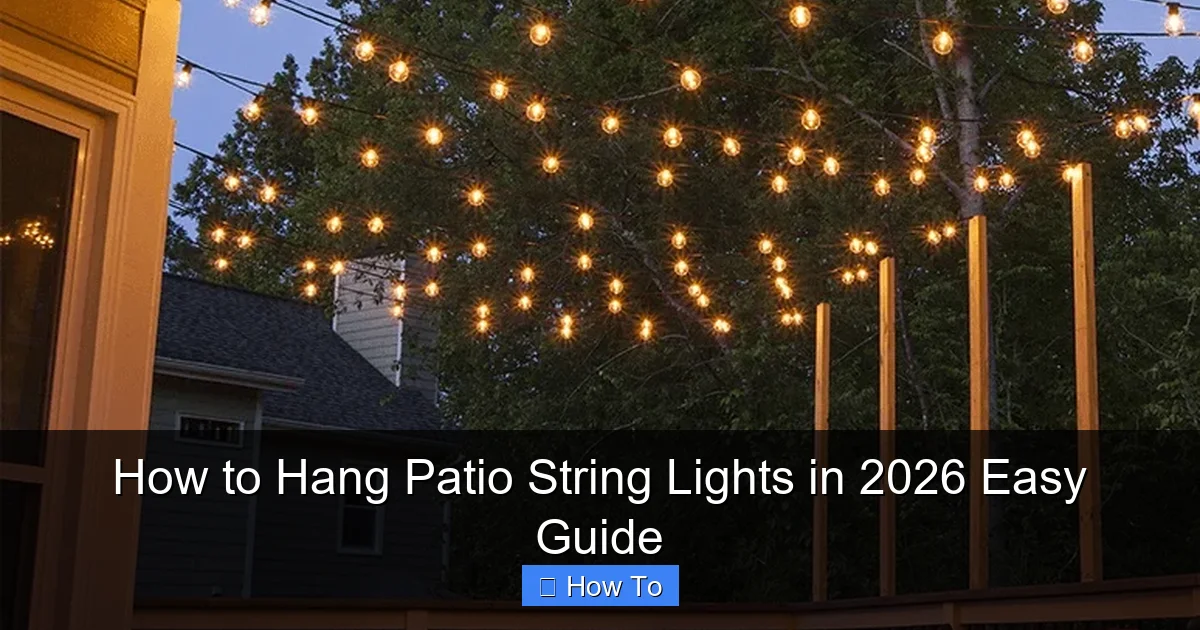
Visual guide about how to hang patio string lights
Image source: kanglight.com
- Patio string lights (LED, solar, or plug-in—choose based on your power source and weather exposure)
- Measuring tape (a 25-foot tape is ideal)
- Drill and drill bits (if mounting on wood, stucco, or brick)
- Hooks or eye screws (stainless steel or galvanized to resist rust)
- Zip ties (UV-resistant for outdoor use)
- Ladder (a stable, non-slip step ladder or extension ladder)
- Level (to keep your lines straight—your OCD self will thank you)
- Weatherproof extension cords or GFCI outlet (if using plug-in lights)
- Timer or smart plug (optional, but a game-changer for convenience)
- String light clips or adhesive hooks (for renters or surfaces you can’t drill into)
Pro insight: I once used regular zip ties on my deck. Within two months, they cracked from UV exposure. Now I only use UV-resistant ones—they last 3x longer.
This guide covers how to hang patio string lights in 2026 easy guide for both permanent and temporary setups, so whether you own your home or rent, you’re covered.
Step-by-Step Guide to How to Hang Patio String Lights in 2026 Easy Guide
Step 1: Plan Your Layout (Sketch It Out)
Grab a notepad or use your phone to sketch your patio. Don’t worry—you don’t need to be Picasso. Just draw the shape of your space and mark where you want the lights: along the pergola, between trees, across railings, or in a zigzag pattern.
Ask yourself:
- Where do people gather most? (Dining table, lounge area, fire pit)
- What’s the distance between anchor points?
- Will the lights drape slightly, or do you want a taut line?
Warning: Don’t skip the sketch. I once hung lights without planning—ended up with a lopsided “V” that looked like a sad frown. A 5-minute sketch saves 30 minutes of redo.
For a balanced look, aim for 6–8 feet between anchor points. If you’re going between two trees, measure the distance and add 10% extra length for a gentle sag—this prevents tension damage.
This step is the foundation of how to hang patio string lights in 2026 easy guide—get it right, and the rest flows smoothly.
Step 2: Choose Your Mounting Method
Your mounting method depends on your patio type and whether you can drill. Here are the top options:
- Drill-in hooks: Best for wood, stucco, or brick. Use stainless steel eye screws or cup hooks. They’re strong and nearly invisible.
- Adhesive hooks: Great for renters or smooth surfaces like glass or metal. Look for outdoor-rated, weatherproof versions (3M makes solid ones).
- Zip ties: Ideal for railings, pergolas, or trees. Use UV-resistant ties and avoid over-tightening—they can cut bark or damage wood.
- String light clips: Specialty clips that attach to gutters, soffits, or eaves. No drilling needed—perfect for quick setups.
Real talk: I used adhesive hooks on my stucco wall once. They held for two weeks, then fell off in a storm. Lesson learned: match the hook to the surface and weather conditions.
For permanent installations, drilling is the gold standard. But if you’re unsure, test a small area first. This is a key part of how to hang patio string lights in 2026 easy guide—choosing the right mount prevents mid-season failures.
Step 3: Install Your Anchor Points
Now it’s time to install your hooks, clips, or zip tie mounts. Follow these steps:
- Measure and mark: Use your sketch to place marks every 6–8 feet. Use a level to ensure alignment.
- Drill pilot holes: For wood, drill a small pilot hole first. For stucco or brick, use a masonry bit. This prevents splitting or cracking.
- Screw in hooks: Insert eye screws or cup hooks by hand, then use a screwdriver or wrench to tighten. Don’t over-tighten—snug is enough.
- Attach adhesive hooks: Clean the surface with rubbing alcohol, let dry, then press the hook firmly for 30 seconds. Wait 1 hour before hanging lights.
- Secure zip ties: For railings or trees, loop the tie around the post and pull tight. Trim excess with scissors.
Pro tip: If you’re drilling into stucco, go slow. Use a hammer drill if you have one—it cuts through easier. And wear safety goggles. I learned that the hard way.
Double-check each anchor point with a tug. You don’t want a surprise collapse during your next gathering. This step is crucial for a safe, long-lasting setup in how to hang patio string lights in 2026 easy guide.
Step 4: Hang the Lights
Now for the fun part—hanging the lights! Start from one end and work your way across.
- Unpack and test: Plug in the lights before hanging. Check for dead bulbs or frayed wires. I once hung a 20-foot strand only to find half were out. Ugh.
- Attach to first anchor: Hook the first bulb or loop onto the first anchor point.
- Work across: Drape the lights from one anchor to the next. For a taut line, pull slightly—but not so much that the cord stretches or the bulbs strain.
- Use zip ties for support: If the span is long (over 10 feet), add a zip tie halfway to prevent sagging. Use clear, UV-resistant ties to keep it discreet.
- Secure the end: Hook the last bulb or loop onto the final anchor.
Warning: Don’t hang lights directly on gutters or downspouts—they can trap water and cause rust or leaks. Use clips that attach to the roof’s edge instead.
For a zigzag or crisscross pattern, start in the center and work outward. Use a ladder with a helper if needed. Safety first! This method is a standout in how to hang patio string lights in 2026 easy guide for creating visual interest.
Step 5: Connect to Power and Test
Now, connect your lights to a power source. Here’s how:
- Plug-in lights: Use a weatherproof GFCI outlet. Run an outdoor-rated extension cord along the ground (tuck it under furniture or use cord covers).
- Solar lights: Place the solar panel in direct sunlight. Angle it toward the sun (south-facing in the Northern Hemisphere). Most need 6–8 hours of sun to charge fully.
- Smart lights: Pair with a smart plug or hub. Set schedules via an app—great for hands-free ambiance.
Real-life example: My solar lights died every night by 9 PM. I realized the panel was under a tree. Once I moved it to full sun, they lasted until midnight. Location matters!
Turn on the lights and walk around. Check for:
- Uneven sagging
- Flickering bulbs
- Overheating (rare, but check after 1 hour)
Make adjustments as needed. This step ensures your how to hang patio string lights in 2026 easy guide delivers reliable, beautiful lighting.
Step 6: Secure and Weatherproof
To make your lights last, add a few finishing touches:
- Use zip ties to bundle excess cord: Keep it tidy and prevent tripping.
- Seal plug connections: Use electrical tape or a weatherproof cover to prevent moisture.
- Add a drip loop: Before connecting to the outlet, make a small loop in the cord below the plug. This prevents water from running down the cord into the socket.
- Install a timer: A simple mechanical timer or smart plug turns lights on at dusk and off at bedtime—no more forgetting to switch them off.
Pro tip: I use a smart plug with Alexa. I say, “Turn on patio lights,” and boom—instant ambiance. Worth every penny.
For renters or temporary setups, skip drilling and use adhesive hooks or zip ties. This keeps your how to hang patio string lights in 2026 easy guide flexible and damage-free.
Step 7: Maintain and Store (When Needed)
Even the best setups need care. Here’s how to maintain your lights:
- Clean bulbs: Wipe with a dry cloth to remove dust and bugs.
- Inspect cords: Look for fraying, cracking, or exposed wires. Replace damaged strands.
- Remove seasonally: If you live in a snowy area, take down lights in winter. Store in a cool, dry place.
- Replace bulbs: Keep spare bulbs on hand. LED bulbs last 25,000+ hours—but they’re not immortal.
Warning: Never store wet lights. Moisture causes mold and short circuits. I once left a damp strand in a bag—it was toast by spring.
For solar lights, clean the panel monthly with a damp cloth. This keeps them charging efficiently. This final step ensures your how to hang patio string lights in 2026 easy guide stays functional year after year.
Pro Tips & Common Mistakes to Avoid
Pro tip 1: Buy lights with replaceable bulbs. I once had to toss a whole strand because one bulb died. Now I only buy modular ones.
Pro tip 2: Use a light dimmer or smart plug with brightness control. Bright lights are great for parties, but dimmer ones set a romantic mood.
Pro tip 3: For a “canopy” effect, hang lights in parallel lines with 12–18 inches between each. It looks like a starry sky.
Common mistake 1: Overloading circuits. Don’t plug too many strands into one outlet. Check the wattage rating on your lights and outlet.
Common mistake 2: Ignoring local codes. Some areas require permits for permanent outdoor wiring. When in doubt, consult an electrician.
Common mistake 3: Using indoor-rated lights outdoors. They’ll fail in rain or humidity. Always check the IP rating (look for IP44 or higher).
These insights come from years of trial, error, and backyard bonfires. Avoid these pitfalls, and your how to hang patio string lights in 2026 easy guide will shine brighter and last longer.
FAQs About How to Hang Patio String Lights in 2026 Easy Guide
Q: Can I hang string lights on a balcony or apartment patio?
A: Absolutely! Use adhesive hooks, zip ties, or tension rods. No drilling needed. Just avoid blocking fire exits or violating lease terms. This makes how to hang patio string lights in 2026 easy guide perfect for renters.
Q: How high should I hang the lights?
A: Aim for 7–8 feet above the ground. This keeps them out of head-bump range while providing ambient light. For pergolas, hang them 1–2 feet below the roof.
Q: Can I connect multiple strands?
A: Yes, but check the manufacturer’s limit. Most allow 3–5 strands. Never exceed the wattage of your outlet or extension cord.
Q: What if I don’t have an outdoor outlet?
A: Use solar-powered lights or a battery-operated strand. Or, run a weatherproof extension cord from an indoor outlet through a window (temporarily). For a permanent fix, hire an electrician to install an outdoor GFCI outlet.
Q: How do I hang lights between trees?
A: Use zip ties or tree-safe straps. Avoid wire or metal that can girdle the tree. Leave a 2-inch gap around the trunk for growth. This is a popular method in how to hang patio string lights in 2026 easy guide for natural, organic lighting.
Q: Can I leave lights up year-round?
A: Only if they’re rated for all-weather use (look for “outdoor-rated” or IP44+). In snowy climates, take them down in winter to prevent damage. Store in a dry place.
Q: What’s the best spacing for a zigzag pattern?
A: Start with 3-foot diagonals, then adjust. Too tight looks cluttered; too wide looks sparse. Step back and eyeball it—your gut is usually right.
Final Thoughts
Hanging patio string lights isn’t rocket science—but it’s not a 5-minute job either. It’s a blend of planning, patience, and a little creativity. By following this how to hang patio string lights in 2026 easy guide, you’ll create a space that feels warm, safe, and uniquely yours.
Remember: the best setup is one that works for your lifestyle. Whether you’re lighting a tiny balcony or a sprawling backyard, the goal is to make your outdoor space a place you love to be.
So grab your tools, sketch your layout, and start hanging. And when those lights glow for the first time? Sit back, pour a drink, and enjoy the magic. You’ve earned it.
Now go light up your life—one bulb at a time.
“`

