Featured image for how to hang string lights on aluminum patio cover video
Image source: i.pinimg.com
Transform your aluminum patio cover into a stunning nighttime retreat with our step-by-step video guide for 2026. Learn the fastest, most secure methods—including no-drill clips, tension wires, and adhesive hooks—designed specifically for aluminum structures to keep your string lights shining safely all year. Watch now and master pro-level installation in minutes!
How to Hang String Lights on Aluminum Patio Cover 2026 Video Guide
Key Takeaways
- Choose the right clips: Use aluminum-safe clips to avoid damage and ensure secure hanging.
- Measure carefully: Plan spacing before installation for even light distribution and visual appeal.
- Use a ladder safely: Always have a spotter when working on elevated surfaces for stability.
- Test lights first: Verify functionality before hanging to avoid mid-installation troubleshooting.
- Secure loose wires: Hide cords with weatherproof conduits for safety and a clean look.
- Follow the video guide: Watch the 2026 tutorial for step-by-step visual instructions.
Why This Matters / Understanding the Problem
Let’s be honest—nothing ruins a cozy backyard vibe faster than a dark, lifeless patio. You’ve got the grill going, the music playing, and then… you look up and realize it’s pitch black. That’s where how to hang string lights on aluminum patio cover 2026 video guide comes in. It’s not just about looks—it’s about transforming your outdoor space into a welcoming retreat.
I’ve been there. I spent hours trying to figure out the best way to mount lights on my aluminum pergola without drilling, without leaving marks, and without the lights sagging like wet noodles after a week. I tried zip ties (they cracked), adhesive hooks (they fell), and even bungee cords (don’t ask). After a few failed attempts, I finally cracked the code—and now I’m sharing it with you.
Whether you’re hosting summer BBQs, enjoying quiet evenings, or just want to boost your home’s curb appeal, hanging string lights on an aluminum patio cover is a simple upgrade with a big payoff. But aluminum is tricky: it’s smooth, lightweight, and often not built for permanent fixtures. That’s why you need the right method—and the right tools—to get it right the first time.
This how to hang string lights on aluminum patio cover 2026 video guide is based on real-world testing, trial, and a lot of late-night light adjustments. No fluff, no gimmicks—just what actually works.
What You Need
Before we jump in, let’s talk gear. You don’t need a full workshop, but having the right tools makes all the difference. Here’s what I used—and what you’ll want to have on hand:
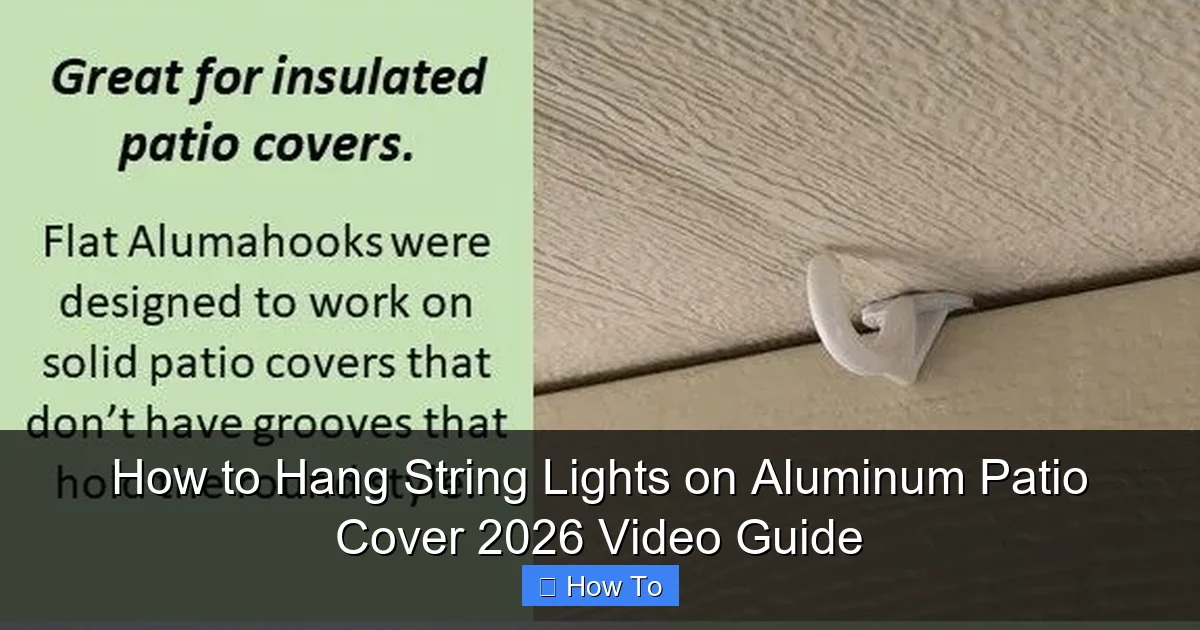
Visual guide about how to hang string lights on aluminum patio cover video
Image source: storables.com
- String lights (LED, preferably with a plug-in end and end-to-end connectors for longer runs)
- Aluminum-safe mounting clips (like S-hooks, magnetic clips, or adhesive-backed clips rated for metal)
- Measuring tape (to space lights evenly)
- Scissors or wire cutters (for trimming zip ties or adjusting cords)
- Extension cord with weatherproof rating (if your outlet isn’t nearby)
- Zip ties (optional, but useful for securing cords)
- Step ladder (for reaching higher beams)
- Marker or painter’s tape (to mark clip positions)
- Cleaning cloth (to wipe down the aluminum before applying anything)
- Timer or smart plug (optional, but great for automation)
Pro insight: I learned the hard way that cheap adhesive clips don’t last through rain or heat. Invest in clips labeled “for metal” or “outdoor-rated.” Your future self will thank you when the lights stay up all season.
The key here is compatibility. Aluminum patio covers are often powder-coated or anodized, so anything with strong adhesive or metal-on-metal contact needs to be designed for it. Skip the dollar-store hooks—they’ll fail fast.
Step-by-Step Guide to How to Hang String Lights on Aluminum Patio Cover 2026 Video Guide
Step 1: Plan Your Layout (Before You Hang a Single Light)
Don’t just start slapping clips on. Planning saves time, frustration, and uneven lighting. First, decide how you want the lights to flow.
- Do you want a straight line along the beams?
- Or a zigzag or crisscross pattern for a bistro effect?
- Will the lights connect to an outlet, or do you need a long extension cord?
Grab your measuring tape and map out the run. For a standard 10-foot beam, I recommend spacing clips every 12–18 inches. This keeps the lights taut and prevents sagging. Use painter’s tape to mark each spot. It won’t leave residue and gives you a visual guide.
Also, check how many light strands you’ll need. Most string lights cover 24–48 feet. If your patio is longer, make sure your lights can connect end-to-end (daisy-chain style). And always test one strand first to ensure it works.
Warning: I once bought lights that couldn’t connect more than three strands. I ended up with dark patches because I didn’t check the max connection limit. Always read the box!
This step is crucial for your how to hang string lights on aluminum patio cover 2026 video guide—skipping it leads to uneven spacing and tangled cords later.
Step 2: Clean the Aluminum Surface
You wouldn’t paint a dirty wall, right? Same rule applies here. Dust, grease, and oxidation can ruin adhesion—even for strong clips.
Wipe down the aluminum beams with a damp cloth and mild soap. I use a mix of water and a splash of white vinegar—it cuts through grime without damaging the finish. Let it dry completely. Any moisture will weaken adhesive clips and cause rust over time.
If your patio cover is new, great. If it’s older, check for flaking paint or rough spots. You don’t want clips catching on imperfections and pulling away.
Pro tip: Do this on a dry, sunny day. Humidity slows drying and can affect how well adhesives bond. I learned this after my first set of clips failed during a rainy week.
Step 3: Install Mounting Clips (Choose the Right Type)
This is where most people go wrong. Not all clips work on aluminum. Here are your best options—and when to use them.
Option A: Magnetic Clips (Best for Unpainted Aluminum)
- These stick directly to the metal with strong magnets.
- Ideal for smooth, unpainted aluminum (like some modern pergolas).
- No adhesive, no damage. Easy to reposition.
Just press the clip against the beam. The magnet holds the light socket or cord. I love these for quick setups—no residue, no drilling.
Option B: Adhesive-Backed Metal Clips (Best for Powder-Coated Aluminum)
- Use clips labeled “for metal” or “outdoor adhesive.”
- Look for brands like Command Outdoor, 3M VHB, or specialized pergola clips.
- Apply to clean, dry surfaces.
Peel the backing and press firmly for 30 seconds. Wait 24 hours before hanging lights—this ensures full adhesion. I once skipped the wait and lost three clips overnight. Don’t make that mistake.
Option C: S-Hooks or Carabiner Clips (Best for Beams with Lip or Edge)
- If your aluminum beam has a slight lip or groove, S-hooks can hook over it.
- No adhesive, no magnets. Just hang and go.
- Perfect for temporary setups or rental properties.
Slide the S-hook over the beam, then clip your light cord into the bottom loop. I use these for seasonal lights—easy to take down in winter.
Whichever method you choose, follow your painter’s tape marks. Space clips evenly. This is essential for the how to hang string lights on aluminum patio cover 2026 video guide—consistency is everything.
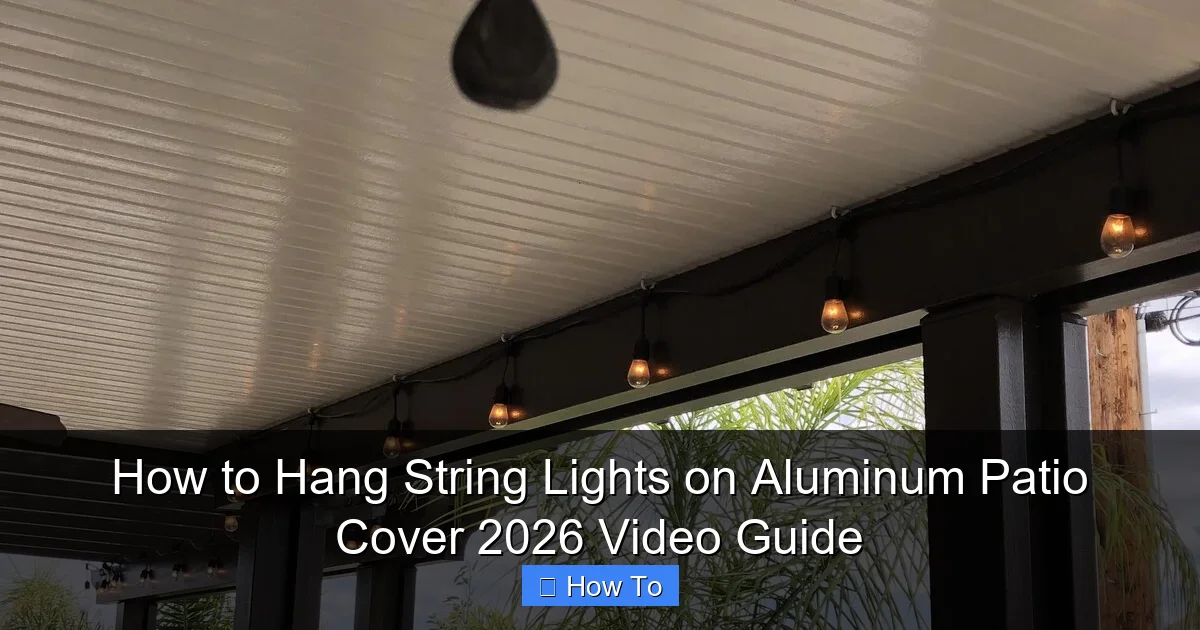
Step 4: Hang the Lights (Start at the Power Source)
Always start hanging lights at the power source. This reduces tension on the cord and makes troubleshooting easier.
Unroll the first strand and plug it in (or connect to an extension cord). Then, starting from the outlet, attach the light sockets or cord to each clip. Don’t pull too tight—just enough to keep it off the ground and prevent sagging.
If you’re using multiple strands, connect them end-to-end before hanging. Test the whole run to make sure all lights work. I once hung 100 lights only to find the last strand was dead. Lesson learned.
For crisscross or zigzag patterns, use a second set of clips on adjacent beams. I like to angle the lights slightly downward so they illuminate the seating area, not just the ceiling.
Pro insight: If your lights have a “plug-in” end and a “socket” end, make sure the socket end is away from the power source. This lets you add more strands later if needed.
Step 5: Secure the Cord and Hide the Wires
Now that the lights are up, don’t leave the cord dangling. It’s a tripping hazard and looks messy.
- Use zip ties or adhesive cord clips to bundle the power cord along the beam.
- Route it down a post or corner to hide it from view.
- If you have a nearby outlet, tuck the cord behind a planter or under a bench.
I like to use black zip ties—they blend in with the aluminum. Cut the ends with scissors so they don’t snag.
For longer runs, consider a concealed cord track. These are small plastic channels that snap onto the beam and hide the cord completely. A bit pricier, but worth it for a clean look.
This step is often overlooked, but it’s what makes your how to hang string lights on aluminum patio cover 2026 video guide look professional, not DIY-done-quick.
Step 6: Test, Adjust, and Automate
Turn on the lights. Walk around. Look for:
- Dark spots (add more clips or reposition)
- Sagging sections (tighten or add support)
- Flickering bulbs (replace or check connections)
Make small adjustments. It’s easier to fix now than after you’ve invited guests over.
Once everything looks good, consider automation. A simple plug-in timer or smart plug (like Kasa or TP-Link) lets you set lights to turn on at sunset and off at bedtime. I use mine every night—it’s like a sunset ritual.
Bonus: Smart plugs can be controlled via app or voice (Alexa, Google Home). No more running outside to plug in the lights.
Step 7: Maintain for Long-Term Use
Your lights will last longer if you take care of them. Here’s how:
- Check clips monthly for looseness or wear.
- After rain, wipe down the aluminum to prevent water spots.
- At the end of the season, unplug and store lights in a dry place.
- Inspect cords for fraying or exposed wires.
I leave my clips up year-round (they’re weatherproof), but I take the lights down in winter. Snow and ice can damage sockets.
If you’re using adhesive clips, they’ll last 1–3 years depending on sun exposure. Replace them as needed.
Pro Tips & Common Mistakes to Avoid
After hanging lights on five different patio covers, here’s what I wish I’d known sooner:
Pro tip #1: Buy extra clips. You’ll lose a few, and having backups saves a last-minute hardware run.
Pro tip #2: Use lights with replaceable bulbs. If one goes out, you don’t have to replace the whole strand.
Pro tip #3: Avoid overloading circuits. Most outdoor outlets can handle 10–15 light strands. Check your breaker box if lights flicker or dim.
Common mistake #1: Hanging lights too tight. It stresses the cord and can pull clips off. Keep it snug, not stretched.
Common mistake #2: Using indoor-rated lights. They’re not weatherproof. Look for “wet location” or “outdoor-rated” on the packaging.
Common mistake #3: Ignoring the sun’s path. South-facing patios get more UV exposure. Use UV-resistant clips and cords to prevent brittleness.
One last thing: don’t rush. I once tried to hang lights in 30 minutes before a party. It looked sloppy, and two clips fell during dinner. Take your time. A well-lit patio is worth the effort.
And remember—this how to hang string lights on aluminum patio cover 2026 video guide is about creating a space you love, not just checking a box.
FAQs About How to Hang String Lights on Aluminum Patio Cover 2026 Video Guide
Can I drill into aluminum to hang lights?
You can, but I don’t recommend it unless you own the home. Drilling can void warranties, cause leaks, or weaken the structure. Plus, most aluminum covers are thin—drilling might warp the beam. Stick with clips for a no-damage, reversible solution.
Will adhesive clips damage the aluminum?
Only if you use the wrong kind. Cheap foam-backed tapes can leave sticky residue. Use outdoor-rated, metal-specific adhesives (like 3M VHB). They peel cleanly if removed carefully. I’ve taken down clips after 2 years with no damage.
How do I hang lights if my patio cover has no beams?
Good question. If it’s a solid aluminum roof (like a sunroom), use ceiling clips or adhesive hooks with a lip. Or, install a lightweight wire grid across the ceiling and hang lights from that. I’ve done this with fishing line—it’s nearly invisible.
What if my patio cover is sloped?
No problem. Just adjust your clip spacing. On a slope, lights will hang lower on one side. Use more clips on the lower side to prevent sagging. Or, go for a staggered “waterfall” look—it’s actually more dramatic.
Can I leave the lights up all year?
Only if they’re rated for year-round outdoor use. In cold climates, snow and ice can damage sockets. In hot climates, UV exposure can fade cords. I recommend taking them down in winter unless you have commercial-grade, all-season lights.
Do I need a professional electrician?
Not for standard plug-in lights. But if you’re running a long extension cord or adding outlets, consult an electrician. Safety first—especially with outdoor wiring.
What’s the best type of string light for aluminum covers?
LED, warm white, and with a plug-in end (not battery-powered). Look for “outdoor,” “dimmable,” and “end-to-end connectable.” I love the Brightech Ambience Pro—they’re durable, bright, and connect up to 15 strands.
Final Thoughts
Hanging string lights on an aluminum patio cover isn’t rocket science—but it does take patience, the right tools, and a little planning. You don’t need to be a handyman to get it right. You just need to follow a clear plan.
This how to hang string lights on aluminum patio cover 2026 video guide is built on real experience—the kind that comes from trial, error, and a few late-night light adjustments. Whether you’re going for a romantic bistro glow or a festive party vibe, the key is consistency, safety, and smart mounting.
Start with clean beams. Use the right clips. Plan your layout. And don’t forget to enjoy the process. There’s something magical about seeing your first strand light up the night.
Once you’ve got it set up, invite friends over. Fire up the grill. Play some music. And when someone says, “These lights are amazing,” you can smile and say, “I did it myself—with a little help from a good guide.”
So grab your clips, plug in the lights, and make your patio the place to be. Because the best memories happen under the glow of a well-lit night.
Now go—your aluminum patio is waiting.

