Featured image for how to put up patio string lights
Image source: thespruce.com
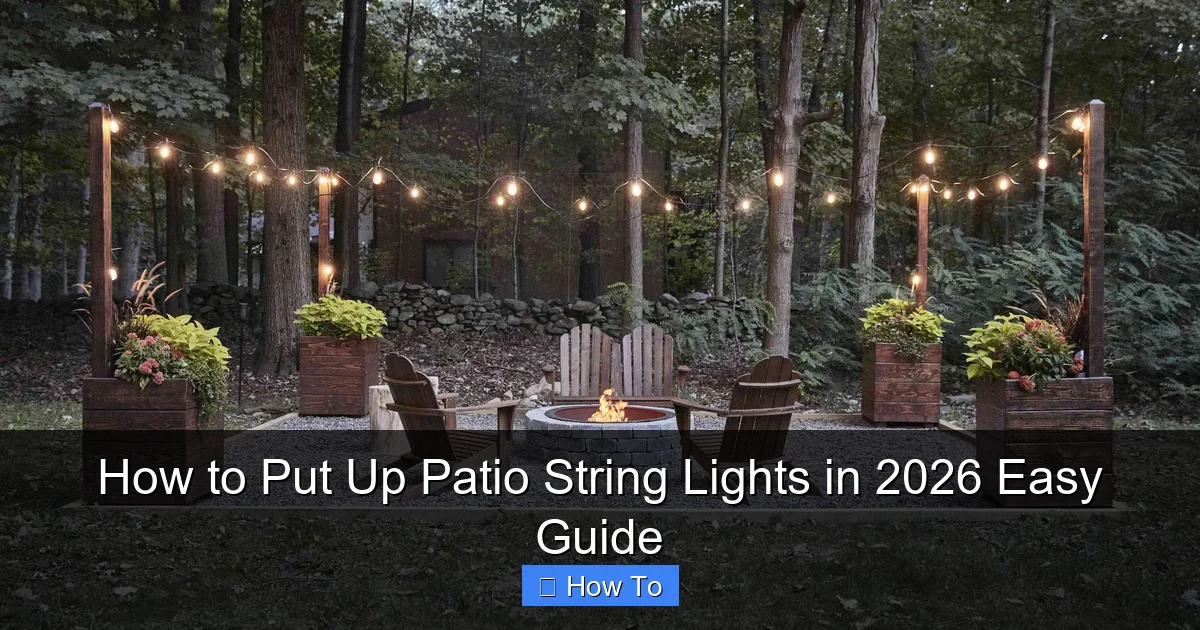
Transform your patio into a magical nighttime retreat by securely mounting string lights along railings, posts, or overhead beams using weather-resistant hooks or zip ties. This simple 2026 guide walks you through measuring, spacing, and connecting lights safely—no electrician needed—for a stunning, ambient glow all season long. With the right tools and a few minutes, you’ll create an inviting outdoor oasis perfect for entertaining or relaxing.
How to Put Up Patio String Lights in 2026 Easy Guide
Key Takeaways
- Plan your layout first: Measure space and mark anchor points for even light distribution.
- Use weatherproof lights: Choose UL-rated or outdoor-grade string lights for durability.
- Install sturdy anchors: Secure hooks, eye bolts, or cables to withstand wind and weight.
- Keep spacing consistent: Maintain 2-3 feet between bulbs to prevent sagging or tangles.
- Test before finalizing: Check connections and brightness before securing all fixtures permanently.
- Use timers or smart plugs: Automate on/off cycles to save energy and enhance convenience.
Why This Matters / Understanding the Problem
You’ve got a beautiful patio. Maybe it’s where you sip your morning coffee, grill on weekends, or host friends for late-night laughs. But when the sun goes down, the vibe fades. The space feels cold, dark, and disconnected.
That’s where patio string lights come in.
They’re not just for Christmas or weddings. In 2026, more people are using string lights year-round to transform outdoor spaces into cozy, inviting extensions of their homes. And the best part? You don’t need an electrician or a contractor. You can do it yourself—safely and beautifully—with just a few tools and a little know-how.
Whether you’re lighting up a small balcony or a sprawling backyard, this How to Put Up Patio String Lights in 2026 Easy Guide will walk you through every step. No fluff. No overpriced “smart” systems you don’t need. Just real, practical advice from someone who’s done it—more than once.
I’ve learned the hard way: tangled cords, sagging wires, and lights that die after one season. But over the years, I’ve refined a simple, durable method that works in almost any outdoor setup. And I’ll share it all with you.
So if you’re tired of dark evenings and want to create a warm, welcoming glow, you’re in the right place. Let’s light up your patio—literally.
What You Need
Before you start, let’s talk tools and materials. You don’t need a full hardware store haul. Just a few essentials. Here’s what I always keep on hand when setting up string lights:
Visual guide about how to put up patio string lights
Image source: storables.com
- Outdoor-rated string lights (LED, weatherproof, with a long cord)
- Weather-resistant extension cords (if needed)
- Mounting hardware (screws, hooks, zip ties, or adhesive clips)
- Measuring tape (to plan spacing and length)
- Drill with masonry or wood bits (if attaching to concrete, stucco, or wood)
- Ladder (if mounting high up)
- Outdoor-rated cable clips or zip ties (to secure wires without damaging surfaces)
- GFCI outlet or outdoor-rated power source (safety first!)
- Timer or smart plug (optional, but great for automatic lighting)
Pro tip: Buy 10–20% more lights than you think you need. It’s easier to trim than to scramble for an extra strand mid-install.
And don’t forget: Check local codes if you’re running power across a driveway or using heavy-duty transformers. Some areas have rules about outdoor electrical work. Better safe than sorry.
Step-by-Step Guide to How to Put Up Patio String Lights in 2026 Easy Guide
Step 1: Plan Your Layout (Measure Twice, Hang Once)
This is where most people skip ahead. But planning saves you time, money, and frustration.
Start by sketching your patio or outdoor area. Include:
- Where the power source is (outlet, timer, etc.)
- Where you want the lights to go (eaves, trees, pergola, railings)
- Obstacles (furniture, plants, windows)
Now, measure the distance between each mounting point. For example:
- From the back wall to the pergola beam: 12 feet
- From pergola to tree: 15 feet
- Back to the house: 10 feet
Add up the total. Then, add 10% for slack. This gives you the total length of lights you’ll need.
For a 37-foot span, I’d buy a 40-foot strand—or two 20-foot strands with a connector. Avoid daisy-chaining more than 2–3 strands unless your lights are rated for it. Overloading can cause flickering or burnouts.
Also, decide on the hanging style:
- Straight line: Simple, clean, great for pergolas or railings.
- Crisscross (X pattern): Cozy, bistro-style, ideal for larger patios.
- Zigzag: Dynamic, draws the eye, works well with trees or uneven structures.
- Canopy: Lights draped overhead like a tent—perfect for dining areas.
Use painter’s tape to mark mounting points. This lets you “test” the layout before drilling. I once skipped this step and ended up with lights that blocked my sliding door. Lesson learned.
Warning: Never hang lights directly on gutters or downspouts. They’re not built to hold weight and can break or pull away. Use fascia boards or eaves instead.
Step 2: Choose the Right Mounting Method
Not all surfaces are created equal. The way you attach your lights depends on what you’re hanging them from.
Here’s what works best for each:
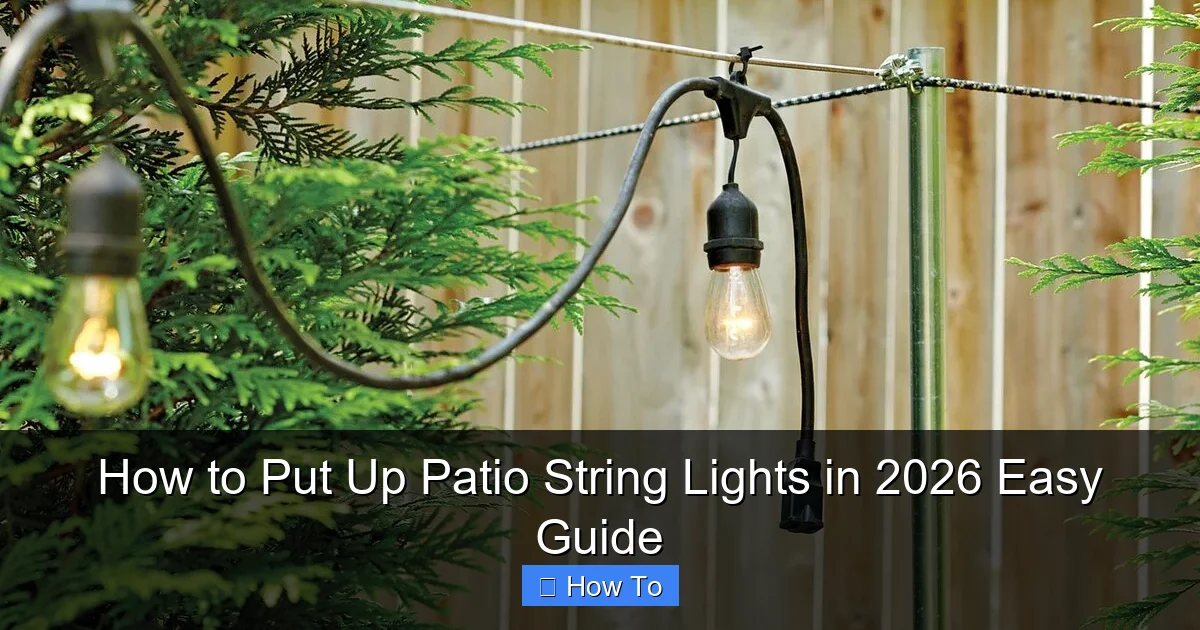
- Wood (fences, pergolas, decks): Use stainless steel cup hooks or screws with eyelets. They’re sturdy and easy to remove. I like #6 cup hooks—they hold up to 10 lbs and don’t rust.
- Concrete, stucco, or brick: Use plastic anchors with screws. Drill a pilot hole, insert the anchor, then screw in the hook. Avoid adhesive hooks here—they’ll fall off in heat or rain.
- Metal (railing, awning): Use zip ties or magnetic clips. Zip ties are cheap and weatherproof. Magnetic clips are great for steel railings—no drilling needed.
- Trees: Use tree-friendly zip ties or nylon straps. Never use nails or screws. They damage the bark and can kill the tree over time. Wrap the strap loosely so it doesn’t cut into growing wood.
- Adhesive clips: Only for smooth, clean surfaces like vinyl siding or glass. Use outdoor-rated clips (look for “weatherproof” on the package). They work great for short-term setups or renters.
I once used regular zip ties on a tree. They were too tight. A year later, the tree had grown around them, and I had to cut them off carefully. Now I use wide, flexible straps—they expand as the tree grows.
For long-term setups, I prefer permanent hardware. For renters or seasonal use, go with removable options. Either way, avoid stapling or nailing lights to wood. It damages the cord and creates a fire hazard.
Step 3: Install Mounting Points (Go Slow, Stay Safe)
Now it’s time to install the hooks, clips, or anchors. But before you drill, do this:
- Check for electrical wires, pipes, or gas lines. If you’re drilling into a wall, use a stud finder with a live wire detector.
- Wear safety glasses. Dust and debris are real.
- Use a level to keep everything straight. Crooked lights look messy.
For wood surfaces:
- Mark each spot with a pencil.
- Pre-drill a small pilot hole (slightly smaller than the screw).
- Twist in the cup hook or screw. Don’t over-tighten—it can strip the wood.
For masonry or stucco:
- Use a masonry bit to drill a hole (match the anchor size).
- Blow out dust with your mouth or compressed air.
- Tap in the plastic anchor with a hammer.
- Screw in the hook or eyelet.
For railings or metal:
- Wrap zip ties around the railing, then loop the light strand through the tie’s head.
- For magnetic clips, just snap them on. They work best on flat, clean metal.
For adhesive clips:
- Clean the surface with rubbing alcohol.
- Let it dry.
- Press the clip firmly for 30 seconds.
- Wait 24 hours before hanging lights—this gives the adhesive time to bond.
Pro tip: Install all mounting points before hanging lights. It’s easier to adjust spacing when nothing’s in place yet.
Step 4: Hang the Lights (Start at the Power Source)
Here’s the golden rule: Always start at the power source.
Why? Because the plug end needs to reach the outlet. If you start at the far end, you might run out of slack—or worse, have to unplug and re-hang everything.
Here’s how I do it:
- Unroll the lights and lay them out on the ground. Untangle any knots.
- Plug in the first strand (but don’t turn it on yet).
- Walk the lights along the path, looping them over each hook or clip.
- Use zip ties or cable clips to secure the cord between hooks. This prevents sagging and keeps it neat.
- For long spans, add a middle support. A single zip tie around a beam or tree can make a big difference.
- If using multiple strands, connect them at a junction. Use outdoor-rated connectors or weatherproof wire nuts. Cover with electrical tape or a silicone sleeve.
I like to leave a little slack at each hook—about 2–3 inches. This lets the lights move slightly in the wind without pulling out.
For crisscross or zigzag patterns, use a guide rope first. Tie a lightweight string between the two ends, then drape the lights over it. Once it’s perfect, transfer the lights to the hooks.
And if you’re doing a canopy, hang a central support (like a pole or tree branch) and drape lights from it to the edges. Use swag hooks or ceiling hooks for a floating effect.
Warning: Don’t stretch the lights too tight. They’ll sag over time, especially in summer heat. A little droop is normal—and even charming.
Step 5: Secure and Conceal the Wires
Ugly, dangling cords ruin the look. And they’re a tripping hazard.
Here’s how to keep them tidy:
- Use cable clips or zip ties every 12–18 inches. Space them evenly so the cord doesn’t sag.
- Run wires along edges (baseboards, railings, eaves) instead of across open spaces.
- Paint zip ties to match the surface. I use a small brush and outdoor spray paint. It’s subtle but makes a huge difference.
- Use raceways or conduit for exposed runs. These are plastic channels that hide the cord. Great for concrete or stucco.
- For ground-level cords, use cord covers or bury them shallowly (at least 6 inches deep). But only if they’re outdoor-rated and you’re not in a frost zone.
I once left cords dangling from my pergola. My dog chewed through one. Cost me $80 to replace the strand. Now I zip-tie everything and use raceways near the ground.
And remember: Never run cords under furniture or rugs. Heat builds up, and it’s a fire risk.
Step 6: Test and Adjust
Now the fun part: plug it in!
Turn on the lights and check for:
- Flickering bulbs
- Dead sections
- Overheating connectors
- Uneven spacing
If a section isn’t lighting, it’s usually a loose connection or a blown fuse. Most LED strands have replaceable fuses in the plug. Check the manual.
Adjust the spacing with zip ties. If it looks too sparse, add more clips. Too tight? Loosen a few.
And don’t forget to test it at night. Lighting changes in the dark. What looked perfect in daylight might be too dim or too bright.
I like to sit in my patio chair and just… enjoy it. If I feel relaxed, it’s working.
Step 7: Set Up a Timer or Smart Plug
This is the secret to effortless ambiance.
Instead of manually turning lights on and off, use a timer or smart plug.
- Mechanical timer: Plug it into the outlet, then plug your lights into the timer. Set it for sunset to 10 PM, for example. Cheap and reliable.
- Smart plug: Connect to Wi-Fi and control with your phone or voice (Alexa, Google Home). I use mine to turn on lights 30 minutes before sunset. It’s magic.
Bonus: Some smart plugs have energy monitoring. You can see how much power your lights use. Most LED strands use less than 10 watts—about $1 per year to run!
I set mine to turn off at 11 PM. No more forgetting to unplug.
Pro Tips & Common Mistakes to Avoid
After years of trial and error, here’s what I wish I’d known from the start:
Tip #1: Buy lights with replaceable bulbs. Some cheap strands have bulbs soldered in. If one goes out, the whole section dies. I learned this after a storm knocked out one bulb—and half my lights.
Tip #2: Use warm white (2700K–3000K) for patios. Cool white (4000K+) feels clinical. Warm white feels cozy and inviting. It’s like candlelight.
Tip #3: Don’t overdo it. A few well-placed strands are better than a tangled web. I once hung 100 feet of lights. It looked like a carnival. Now I stick to 30–50 feet max.
Tip #4: Check the IP rating. IP65 or higher means it’s dustproof and water-resistant. IP44 is okay for covered patios, but not for open yards.
Common Mistake: Not using a GFCI outlet. Outdoor circuits need Ground Fault Circuit Interrupter protection. It cuts power if there’s a short. It’s the #1 safety rule. I had a near-miss when a cord got wet. The GFCI saved the day.
Common Mistake: Hanging lights in direct sunlight. UV rays degrade plastic cords. If you can’t avoid it, use lights with UV-resistant coating—or cover them with a pergola or awning.
Common Mistake: Forgetting to leave an exit path. Don’t block doors, windows, or walkways. Lights should enhance your space, not trap you.
FAQs About How to Put Up Patio String Lights in 2026 Easy Guide
Q: Can I leave patio string lights up all year?
Yes—if they’re outdoor-rated and properly installed. But I recommend taking them down before winter in areas with heavy snow or ice. Wind and moisture can damage connections. Store them in a dry place.
Q: How high should I hang the lights?
Aim for 7–8 feet above the ground. This keeps them out of the way but still visible. For pergolas, hang them 2–3 feet below the top beam. For trees, drape them so they clear your head by at least 6 inches.
Q: What if my patio has no nearby outlet?
Use a long extension cord (outdoor-rated, 14-gauge or thicker). Run it along the ground or through a raceway. Or consider solar-powered lights. They charge during the day and turn on at dusk. Just make sure they get 6+ hours of sun.
Q: Can I connect different brands of string lights?
Generally, no. Voltage, plug style, and bulb type vary. Mixing brands can cause flickering or damage. Stick to one brand and model for daisy-chaining.
Q: How do I prevent sagging?
Use supports every 4–6 feet. Zip ties around beams, trees, or poles work great. For long runs, add a middle hook. And don’t over-tighten—let the lights hang naturally.
Q: Are adhesive hooks strong enough?
For light strands (under 10 lbs), yes. But only on smooth, clean, dry surfaces. Avoid stucco, brick, or painted wood. I use them for renters or seasonal setups. For permanent installs, use screws or anchors.
Q: What’s the best time to install them?
Spring or early summer. The weather is mild, and you can test them before the busy season. But really, any dry day works. Just avoid windy or rainy days—safety first.
Final Thoughts
Putting up patio string lights isn’t just about lighting. It’s about creating a feeling. A moment. A place where you want to linger.
This How to Put Up Patio String Lights in 2026 Easy Guide is your roadmap to that feeling. No fancy tools. No expensive contractors. Just smart planning, the right hardware, and a little patience.
Start small. One strand. One hook. One evening under the glow.
Then add more. Tweak the spacing. Try a new pattern.
The goal isn’t perfection. It’s your space—warm, welcoming, and uniquely yours.
So grab your lights, your drill, and your favorite drink. The sun’s setting. And your patio’s waiting.
Now go light it up.

