Featured image for covered patio string lights
Image source: drivenbydecor.com
Transform your covered patio into a magical retreat instantly with weather-resistant string lights that deliver ambiance, style, and function in one simple upgrade. Perfect for year-round entertaining or quiet evenings, these energy-efficient LED lights offer customizable brightness, easy installation, and a range of designs—from vintage Edison bulbs to sleek modern filaments—to match any outdoor aesthetic.
Key Takeaways
- Instant ambiance: String lights create a cozy, inviting patio vibe in minutes.
- Weather-resistant: Choose durable, covered lights for year-round outdoor use.
- Easy installation: Hang with hooks, zip ties, or existing structures—no wiring needed.
- Energy-efficient: Opt for LED bulbs to save power and reduce costs.
- Customizable: Mix lengths, colors, and styles to match your outdoor decor.
- Smart features: Use app-controlled lights for adjustable brightness and scheduling.
📑 Table of Contents
- The Magic of Covered Patio String Lights
- Why Covered Patio String Lights Are a Game-Changer
- Types of Covered Patio String Lights: Finding the Right Fit
- How to Install Covered Patio String Lights Like a Pro
- Creative Ideas to Elevate Your Covered Patio Lighting
- Maintenance and Care: Keeping Your Lights Looking Great
- Choosing the Best Covered Patio String Lights: A Comparison
- Final Thoughts: Your Patio, Your Oasis
The Magic of Covered Patio String Lights
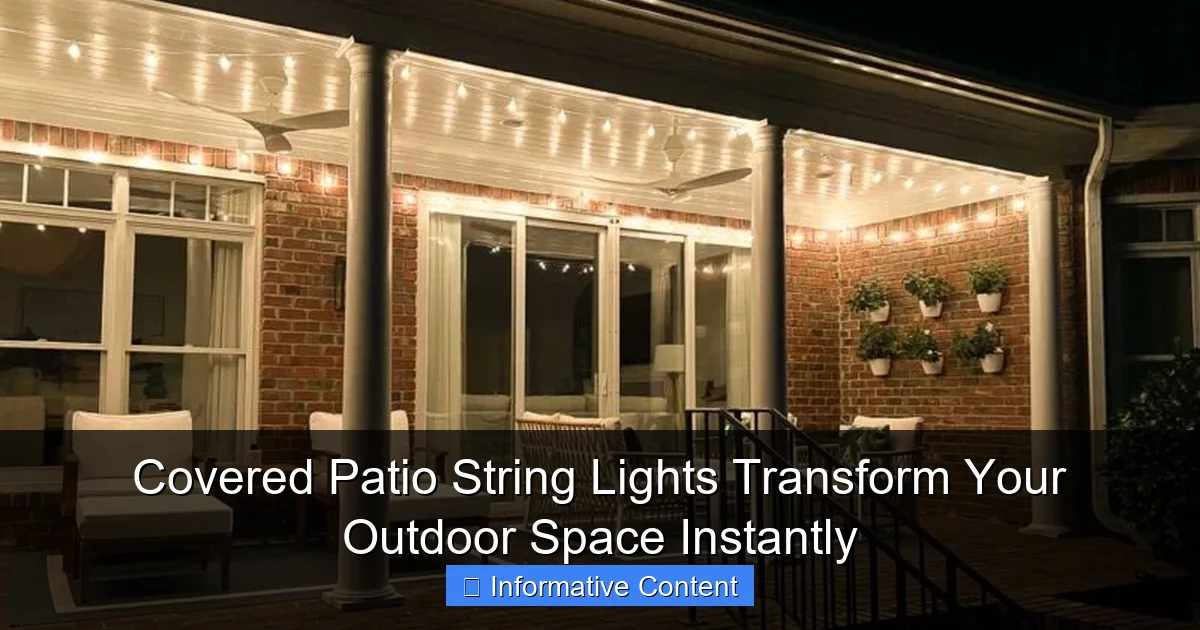
Imagine this: You’re sitting on your patio after a long day, a cool breeze rustling through the trees, the sun setting behind the hills, and your space glowing with a warm, golden light. That’s the magic of covered patio string lights. They don’t just illuminate your outdoor area—they transform it into a cozy, inviting retreat where you want to spend every evening. Whether you’re hosting a dinner party, enjoying a quiet cup of coffee in the morning, or reading a book with a glass of wine, these lights add a touch of charm and elegance that makes every moment feel special.
But here’s the thing—not all covered patio string lights are created equal. Some are too bright, others too dim. Some last for years, while others burn out after a few uses. Some are easy to install, and others… well, let’s just say you might need a degree in engineering. The key is to find the right balance of style, durability, and functionality. And that’s exactly what we’re going to explore in this guide. From the different types available to how to install them, and even some creative ideas to elevate your outdoor space, we’ll cover it all. So, if you’re ready to turn your patio into the oasis you’ve always dreamed of, let’s get started.
Why Covered Patio String Lights Are a Game-Changer
Creating Ambiance and Mood
Let’s start with the obvious: covered patio string lights are all about ambiance. They create a soft, diffused glow that’s perfect for relaxing, entertaining, or just enjoying the outdoors. Unlike harsh overhead lights, string lights give off a warm, inviting light that makes your patio feel like an extension of your home. Think of it as the difference between a candlelit dinner and a fluorescent-lit cafeteria. One feels cozy and intimate; the other feels clinical and uninspiring.

Visual guide about covered patio string lights
Image source: drivenbydecor.com
And it’s not just about the light itself—it’s about how it interacts with your surroundings. The way the light dances on the leaves of your plants, casts shadows on the walls, or reflects off a glass table can turn your patio into a living piece of art. For example, I once had a set of warm white Edison bulb string lights strung along my pergola, and the way they lit up the vines growing on it made it feel like a secret garden. It was magical.
Versatility in Design
One of the best things about covered patio string lights is their versatility. You can use them in so many different ways to suit your space and style. Whether you have a small balcony, a sprawling backyard, or a covered porch, there’s a setup that will work for you. Here are a few ideas:
- Overhead Canopy: String lights along the ceiling or roof of your covered patio to create a canopy effect. This works especially well if you have a pergola or awning. It gives the space a “room-like” feel without the need for walls.
- Along the Edges: Hang them along the edges of your patio, like a frame. This is great for defining the space and making it feel more intimate.
- Wrapped Around Trees or Posts: If you have trees or posts in your yard, wrap the lights around them for a whimsical, fairy-tale vibe.
- Hanging from Hooks: Use hooks to create a zigzag pattern across your patio. This adds visual interest and breaks up large, empty spaces.
- On Railings or Fences: String them along railings or fences for a more subtle, ambient glow. This is perfect if you want to keep the light low-key but still want that cozy feel.
The best part? You can mix and match these ideas to create a look that’s uniquely yours. And because covered patio string lights come in so many styles—from vintage Edison bulbs to modern LED clusters—you can find the perfect match for your aesthetic.
Energy Efficiency and Durability
Another major advantage of covered patio string lights is their energy efficiency and durability. Most modern string lights use LED bulbs, which are much more energy-efficient than traditional incandescent bulbs. They use up to 80% less energy, last up to 25 times longer, and generate far less heat. This means you can leave them on for hours without worrying about your electricity bill or the risk of overheating.
And when it comes to durability, covered patio string lights are designed to withstand the elements. Look for lights with weatherproof or waterproof ratings (like IP44 or IP65) to ensure they can handle rain, wind, and even snow. Some are even UV-resistant, which means they won’t fade or degrade in direct sunlight. This is especially important if you live in a place with harsh weather or if your patio gets a lot of sun.
For example, I have a set of solar-powered string lights on my covered porch. They charge during the day and automatically turn on at dusk, so I never have to worry about plugging them in. And because they’re weatherproof, I don’t have to take them down when it rains. It’s the little things like this that make covered patio string lights such a practical and convenient choice.
Types of Covered Patio String Lights: Finding the Right Fit
LED vs. Incandescent: The Great Debate
When it comes to covered patio string lights, one of the first decisions you’ll need to make is whether to go with LED or incandescent bulbs. Both have their pros and cons, and the right choice depends on your needs and preferences.
- LED String Lights: These are the clear winner in terms of energy efficiency, longevity, and durability. They’re brighter, last longer, and generate less heat. They’re also available in a wide range of colors and styles, from warm white to multicolored. However, they can be a bit more expensive upfront, though the long-term savings on energy and replacement costs usually make up for it.
- Incandescent String Lights: These give off a warm, classic glow that many people love. They’re often cheaper upfront and have a nostalgic, vintage feel. However, they use more energy, burn out faster, and can get quite hot. They’re also less durable, especially in outdoor environments.
So, which should you choose? If you’re looking for a long-term investment that’s practical and efficient, go with LED. But if you’re after that cozy, vintage vibe and don’t mind replacing bulbs occasionally, incandescent might be the way to go. Personally, I prefer LED—especially for covered patios where you’ll be spending a lot of time. The energy savings and durability are worth the extra cost.
Solar-Powered vs. Plug-In: Convenience vs. Reliability
Another important decision is whether to go with solar-powered or plug-in string lights. Both have their strengths, and the right choice depends on your setup and priorities.
- Solar-Powered String Lights: These are incredibly convenient. They charge during the day and automatically turn on at night, so you don’t need to worry about cords or outlets. They’re also eco-friendly and can save you money on electricity. However, they can be less reliable in areas with limited sunlight or during cloudy days. And if the solar panel isn’t positioned correctly, they might not charge fully.
- Plug-In String Lights: These are more reliable and consistent. They provide a steady source of light regardless of weather conditions, and you can control them with a timer or smart plug. However, they require access to an outdoor outlet, which can be a limitation if your patio is far from the house. They also add to your electricity bill, though the cost is usually minimal with LED bulbs.
For example, I have both types on my patio. I use solar-powered lights for the areas that get plenty of sun, like the railing and the pergola. But for the darker corners and the main seating area, I use plug-in lights with a timer. This way, I get the best of both worlds—convenience where I can and reliability where I need it.
Bulb Types and Styles: From Classic to Modern
Once you’ve decided on the power source, it’s time to think about the bulb type and style. This is where you can really let your personality shine.
- Edison Bulbs: These have a vintage, industrial look with exposed filaments. They’re perfect for a rustic or boho-chic vibe. They give off a warm, golden light that’s great for cozy gatherings.
- Mini Lights: These are small, classic bulbs that are often used for holiday decorations. They’re great for a subtle, twinkling effect and work well in clusters or along railings.
- Globe Lights: These are round, often larger bulbs that provide a soft, diffused glow. They’re modern and elegant, perfect for a minimalist or contemporary patio.
- Fairy Lights: These are tiny, delicate bulbs that create a magical, ethereal effect. They’re often used in jars, trees, or along the edges of the patio for a whimsical touch.
- Smart Bulbs: These are high-tech options that can change color, dim, or sync with music. They’re great for parties or if you want to create different moods throughout the evening. Some can even be controlled via an app or voice assistant.
When choosing a style, think about the overall look you want to achieve. Do you want something classic and cozy? Modern and sleek? Whimsical and fun? The right bulb type can make all the difference. For example, I have a mix of Edison bulbs and mini lights on my patio. The Edison bulbs are strung overhead for a warm, ambient glow, while the mini lights are wrapped around the railing for a subtle, twinkling effect. It’s the perfect balance of cozy and festive.
How to Install Covered Patio String Lights Like a Pro
Planning Your Layout: Measure Twice, Install Once
Before you start hanging your lights, take the time to plan your layout. This will save you a lot of headaches (and potential damage) down the road. Start by measuring the area where you want to install the lights. Use a measuring tape to get the exact dimensions, and mark the spots where you’ll need hooks, nails, or clips.
Next, sketch out a rough design on paper or use a digital tool to visualize how the lights will look. Consider things like:
- Where will the lights start and end?
- How will they connect to power (outlet, solar panel, etc.)?
- Do you want a straight line, a zigzag pattern, or a canopy effect?
- Are there any obstacles (like trees, furniture, or railings) that might interfere?
For example, when I installed my string lights, I first measured the perimeter of my pergola and marked the spots where I wanted to place the hooks. I also made sure to leave enough slack at the corners so the lights wouldn’t be too tight. It took a bit of time, but it was worth it—the final result was perfectly balanced and secure.
Choosing the Right Hardware: Hooks, Clips, and More
The hardware you use to install your lights is just as important as the lights themselves. The wrong hardware can damage your patio, create a safety hazard, or cause the lights to sag or fall. Here are some tips:
- Hooks and Nails: Use hooks or nails that are appropriate for your patio material (wood, concrete, metal, etc.). For wood, small cup hooks or eye screws work well. For concrete, you might need anchors or adhesive hooks.
- Clips and Ties: Use clips or zip ties to secure the lights to railings, fences, or trees. Make sure they’re weatherproof and won’t damage the surface.
- Adhesive Hooks: These are great for temporary setups or if you don’t want to drill holes. Just make sure they’re rated for outdoor use and can hold the weight of the lights.
- Extension Cords: If you’re using plug-in lights, use outdoor-rated extension cords and make sure they’re long enough to reach the outlet without stretching.
Pro tip: Always use hardware that’s designed for outdoor use. Indoor hooks or clips might not hold up to rain, wind, or sun, and could cause your lights to fall or create a hazard.
Installation Tips: From Safety to Aesthetics
Now that you have your plan and hardware, it’s time to install the lights. Here are some tips to make the process smooth and safe:
- Start at the Power Source: If you’re using plug-in lights, start by connecting them to the outlet or timer. This ensures you don’t run out of cord before reaching the end.
- Work in Sections: Hang the lights in manageable sections, starting from one end and working your way to the other. This makes it easier to adjust the tension and avoid tangles.
- Leave Some Slack: Don’t pull the lights too tight—leave a little slack so they can move with the wind. This also prevents stress on the wires and connections.
- Test as You Go: Plug in the lights periodically to make sure they’re working. This way, you can catch any issues early and avoid having to take everything down.
- Secure the Ends: Make sure the last bulb or connector is securely fastened. Loose ends can create a tripping hazard or cause the lights to sag.
For example, when I installed my lights, I started at the outlet and worked my way across the pergola. I used small hooks every 12 inches and left a little slack between each section. I also tested the lights after every few hooks to make sure they were working. It took about an hour, but the result was worth it—a perfectly lit, secure, and beautiful patio.
Creative Ideas to Elevate Your Covered Patio Lighting
Layering Lights for Depth and Dimension
One of the best ways to make your covered patio lighting feel more dynamic is to layer different types of lights. This creates depth, dimension, and a more interesting visual experience. Here are a few ideas:
- Overhead + Accent: Combine overhead string lights with accent lights, like lanterns, fairy lights, or spotlights. For example, hang string lights overhead and place lanterns on the table or floor for a layered glow.
- Warm + Cool: Mix warm white lights with cool white or colored lights for contrast. For example, use warm lights for the main seating area and cool lights for the edges or plants.
- Static + Twinkling: Use static lights for the main area and twinkling lights for the edges or decorations. This adds movement and interest without overwhelming the space.
For example, I have a mix of warm white Edison bulbs overhead and twinkling mini lights wrapped around the railing. The combination creates a cozy yet festive vibe that’s perfect for both relaxing and entertaining.
Using Lights to Define Zones
If your covered patio is large, you can use string lights to define different zones—like a dining area, a lounge area, and a bar area. This makes the space feel more organized and functional. Here’s how:
- Dining Area: Hang lights directly above the dining table to create a focused, intimate space. Use warmer lights for a cozy feel.
- Lounge Area: String lights along the edges or overhead to create a relaxed, ambient glow. You can also add floor lamps or lanterns for extra light.
- Bar Area: Use brighter or colored lights to highlight the bar. For example, blue or green lights can create a fun, party-like vibe.
For example, my patio has a dining table on one side and a lounge area with a sofa on the other. I use brighter lights above the dining table and softer lights around the lounge area. This way, each zone feels distinct but still connected.
Adding Decor and Personal Touches
Finally, don’t forget to add decor and personal touches to your covered patio lighting. This is where you can really make the space feel like yours. Here are a few ideas:
- String Lights in Jars: Place fairy lights in glass jars or vases for a magical, whimsical touch. You can use different colored jars for a fun pop of color.
- Hanging Plants: String lights around hanging plants or vines for a natural, organic look. The light will highlight the plants and create a beautiful, textured effect.
- Personalized Signs: Hang a small sign or banner with your family name or a fun message. You can even use string lights to outline the sign for extra sparkle.
- Themed Lights: Use lights that match a specific theme, like nautical, boho, or rustic. For example, blue and white lights can create a beachy vibe, while copper and gold lights can add a touch of glamour.
For example, I have a set of fairy lights in mason jars on my patio table, along with a small sign that says “Good Vibes Only.” It’s simple, but it makes the space feel warm, inviting, and uniquely mine.
Maintenance and Care: Keeping Your Lights Looking Great
Cleaning and Storage Tips
To keep your covered patio string lights looking their best, it’s important to clean them regularly and store them properly when not in use. Here are some tips:
- Clean the Bulbs: Wipe down the bulbs with a soft, dry cloth to remove dust and dirt. Avoid using water or cleaning solutions, as these can damage the bulbs or wiring.
- Check for Damage: Inspect the wires, connectors, and bulbs for any signs of wear or damage. Replace any broken bulbs or frayed wires immediately to prevent safety hazards.
- Store Properly: When not in use, store the lights in a dry, cool place. Wrap them around a cardboard tube or use a storage reel to prevent tangles. You can also use a plastic container or bag to protect them from dust and moisture.
For example, I clean my string lights once a month and store them in a plastic container with a lid. This keeps them in good condition and makes it easy to set them up again when needed.
Troubleshooting Common Issues
Even the best-covered patio string lights can have issues from time to time. Here are some common problems and how to fix them:
- Flickering or Dim Lights: This could be due to loose connections, damaged wires, or low power. Check all connections and replace any damaged parts. If it’s a solar-powered light, make sure the panel is clean and positioned correctly.
- Burned-Out Bulbs: Replace any burned-out bulbs with the same type and wattage. If multiple bulbs are out, it might be a wiring issue—check for loose connections or damaged wires.
- Water Damage: If the lights are exposed to rain or moisture, make sure they’re properly sealed and rated for outdoor use. If water gets into the wiring, unplug them immediately and let them dry completely before using again.
- Tangled Lights: To avoid tangles, wrap the lights around a storage reel or cardboard tube when not in use. If they’re already tangled, gently untangle them by starting at one end and working your way through.
For example, I once had a set of lights that kept flickering. I checked the connections and found a loose wire, which I secured with electrical tape. It was a simple fix, but it made a big difference.
Choosing the Best Covered Patio String Lights: A Comparison
| Feature | LED String Lights | Incandescent String Lights | Solar-Powered String Lights | Plug-In String Lights |
|---|---|---|---|---|
| Energy Efficiency | High (up to 80% less energy) | Low (uses more energy) | High (uses solar energy) | Medium (depends on bulb type) |
| Lifespan | Up to 25,000 hours | Up to 1,000 hours | Up to 10,000 hours | Up to 25,000 hours (LED) |
| Durability | High (weatherproof, UV-resistant) | Medium (less durable in outdoor conditions) | Medium (depends on solar panel quality) | High (weatherproof, UV-resistant) |
| Cost | Higher upfront, lower long-term | Lower upfront, higher long-term | Medium to high | Medium (depends on bulb type) |
| Best For | Long-term use, energy savings | Vintage vibe, occasional use | Convenience, eco-friendly | Reliability, consistent power |
This table gives you a quick comparison of the different types of covered patio string lights. As you can see, LED lights are the most efficient and durable, while incandescent lights are cheaper upfront but less practical for long-term use. Solar-powered lights are great for convenience, while plug-in lights offer reliability. Choose the one that best fits your needs and lifestyle.
Final Thoughts: Your Patio, Your Oasis
At the end of the day, covered patio string lights are more than just a source of light—they’re a way to create a space that feels like home. Whether you’re relaxing with a book, hosting a dinner party, or just enjoying a quiet evening, the right lighting can make all the difference. It sets the mood, defines the space, and adds a touch of magic that makes your patio feel special.
But remember, it’s not just about the lights themselves. It’s about how you use them. Take the time to plan your layout, choose the right hardware, and add personal touches that reflect your style. And don’t forget to maintain them—clean them regularly, store them properly, and troubleshoot any issues as they arise. With a little care, your covered patio string lights can last for years and continue to bring joy to your outdoor space.
So, go ahead—transform your patio into the oasis you’ve always dreamed of. String up those lights, grab a drink, and enjoy the glow. Because when it comes to creating a space that feels like home, sometimes all it takes is a little light.
Frequently Asked Questions
What are the best covered patio string lights for year-round use?
Durable, weather-resistant covered patio string lights with shatterproof bulbs and waterproof seals are ideal for year-round outdoor use. Look for UL-listed or IP65-rated lights for added safety and longevity in rain or snow.
How do I install covered patio string lights without damaging my roof or pergola?
Use removable hooks, adhesive clips, or zip ties designed for outdoor use to hang lights without nails or screws. For a secure hold, attach hardware to structural beams or use heavy-duty outdoor tape.
Can covered patio string lights handle heavy rain or snow?
Yes, high-quality covered patio string lights with waterproof coatings and sealed sockets can withstand rain, snow, and humidity. Always check the IP rating (IP65 or higher) for optimal weather resistance.
Are LED covered patio string lights energy-efficient?
Absolutely! LED covered patio string lights use up to 80% less energy than incandescent bulbs and last 10–20 times longer, saving money on electricity and replacements.
What’s the ideal spacing for string lights on a covered patio?
Space lights 6–12 inches apart for even illumination, adjusting based on bulb brightness and patio size. Overlapping strands slightly can create a warm, layered glow without dark spots.
Can I connect multiple sets of covered patio string lights together?
Yes, many models allow end-to-end connections, but check the manufacturer’s limit (often 3–5 sets) to avoid overloading circuits. Use a timer or dimmer for added control.

