Featured image for hanging string lights on alumawood patio
Image source: patiocovered.com
Transform your Alumawood patio into a captivating retreat by securely hanging string lights using non-invasive clips or adhesive hooks designed for metal surfaces. Ensure even spacing and a balanced drape by measuring your layout first and connecting lights to a nearby power source with outdoor-rated extension cords. With the right tools and a strategic plan, you’ll achieve a professional, ambient glow that enhances any evening gathering.
Key Takeaways
- Plan your layout first: Sketch light placement to avoid uneven spacing or gaps.
- Use removable hooks: Protect your Alumawood with adhesive or tension-based hardware.
- Check power access: Ensure outlets are nearby or use battery-powered lights.
- Secure wires safely: Tuck cords to prevent tripping and weather damage.
- Test before finalizing: Turn on lights to adjust brightness and positioning.
- Choose weatherproof lights: Opt for LED or commercial-grade for longevity.
📑 Table of Contents
- Why Hanging String Lights on Your Alumawood Patio is a Game-Changer
- Understanding Alumawood: What Makes It Different?
- Choosing the Right String Lights for Your Alumawood Patio
- Non-Invasive Mounting Methods That Actually Work
- Step-by-Step Installation Guide (With Real-World Tips)
- Common Mistakes to Avoid (And How to Fix Them)
- Data Table: Recommended Products for Alumawood String Lights
- Final Thoughts: Creating Your Perfect Outdoor Oasis
Why Hanging String Lights on Your Alumawood Patio is a Game-Changer
There’s something magical about stepping outside at dusk and being greeted by a warm, glowing canopy of string lights. Whether you’re hosting a summer BBQ, enjoying a quiet evening with a book, or celebrating a special occasion, the right lighting transforms your alumawood patio into an inviting retreat. But let’s be honest—hanging string lights on an alumawood patio isn’t as simple as draping them over a tree or nailing them into wood. Alumawood, with its durable, aluminum-based construction, presents unique challenges. It’s sleek, weather-resistant, and low-maintenance—but it’s also non-porous and can’t be drilled into like traditional wood. That’s where many homeowners get stuck, frustrated, or worse—end up with a half-finished project and a patio full of dangling wires.
I’ve been there. A few years ago, I spent an entire weekend trying to rig up lights on my alumawood patio using nails, screws, and even tape (don’t ask). The result? Lights that sagged, flickered, and eventually fell during a light breeze. It was disheartening. But after a lot of trial, error, and research, I cracked the code. Now, my patio is a glowing oasis every night. In this guide, I’ll walk you through everything you need to know to hang string lights on an alumawood patio—safely, securely, and with style. From choosing the right lights to avoiding common pitfalls, this is your go-to resource for creating the perfect ambiance.
Understanding Alumawood: What Makes It Different?
Before you start hanging anything, it helps to understand what alumawood actually is. Alumawood is a hybrid material made from a combination of aluminum and a wood-like composite coating. It’s designed to mimic the look and texture of real wood—complete with grain patterns and warm tones—but with the durability and weather resistance of metal. That makes it a popular choice for patio covers, pergolas, and outdoor structures. But those same qualities that make alumawood great also make it tricky for mounting lights.
Visual guide about hanging string lights on alumawood patio
Image source: i.pinimg.com
Why Alumawood Can’t Be Drilled Like Wood
Unlike real wood, alumawood isn’t meant to be punctured. The outer layer is a thin composite coating over a solid aluminum core. If you drill into it:
- You risk cracking or chipping the coating, which can lead to moisture intrusion and long-term damage.
- The aluminum core can be tough to drill through without the right tools, and even then, you might compromise the structural integrity of the beam.
- Many alumawood manufacturers void warranties if you modify the material with screws or nails.
So, drilling is out. But that doesn’t mean you’re out of options. In fact, there are several clever, non-invasive ways to hang your lights—many of which I’ve tested on my own patio.
Benefits of Alumawood for Outdoor Lighting
Despite the challenges, alumawood is actually a fantastic base for string lights. Here’s why:
- Weather Resistance: It won’t rot, warp, or rust, so your lights stay secure year-round.
- Smooth Surface: The finish is ideal for using adhesive-based mounts or clips without damaging the material.
- Clean Aesthetic: The minimalist design of alumawood frames lets your lights take center stage.
Once you learn how to work with the material instead of against it, you’ll see why so many homeowners love this setup.
Choosing the Right String Lights for Your Alumawood Patio
Not all string lights are created equal—especially when it comes to outdoor use and long-term durability. Before you start hanging, take the time to pick the right type. Trust me, skipping this step can lead to flickering, shorted wires, or lights that barely last a season.
LED vs. Incandescent: Which Is Better?
For outdoor use, LED string lights are almost always the better choice. Here’s why:
- Energy Efficiency: LEDs use up to 80% less energy than incandescent bulbs.
- Heat Output: They stay cool, reducing the risk of melting plastic clips or damaging the alumawood finish.
- Lifespan: Quality LEDs can last 25,000–50,000 hours—that’s 5–10 years with regular use.
- Weather Resistance: Most outdoor-rated LEDs are IP44 or higher, meaning they can handle rain and dust.
Incandescent lights, while warm and nostalgic, are less efficient, hotter, and more prone to burnout. Save them for indoor or temporary setups.
Bulb Shape, Color, and Spacing Matter
Think about the ambiance you want to create:
- Globe bulbs offer a soft, diffused glow—great for cozy, intimate settings.
- Edison-style bulbs have a vintage look with exposed filaments—perfect for a rustic or industrial vibe.
- Mini bulbs create a twinkling effect and are ideal for outlining or wrapping.
Color temperature also plays a role. Warm white (2700K–3000K) mimics candlelight and feels inviting. Cool white (4000K+) feels more modern and clinical—better for task lighting than ambiance.
Spacing is another key factor. Standard spacing is 6–12 inches between bulbs. Closer spacing creates a denser glow; wider spacing feels more open and airy. For a full canopy effect, I recommend 6-inch spacing. For a more minimal look, go with 12 inches.
Length and Power Source: Plan Your Layout
Measure your patio carefully. Most string lights come in 24- to 48-foot lengths. You’ll likely need multiple strands. Use this simple formula:
Total linear feet needed = (Patio perimeter) + (Additional for loops or swags)
For example, a 12’ x 16’ patio has a perimeter of 56 feet. Add 10–20 feet for gentle swags, and you’re looking at 66–76 feet total. Buy a few extra feet—better to have too much than not enough.
Also, consider power. Will you use extension cords? Are there outdoor outlets nearby? Solar-powered lights are a great option if outlets are scarce, but they may not be as bright or reliable in cloudy climates.
Non-Invasive Mounting Methods That Actually Work
This is where most people get stuck. You can’t drill, so how do you hang the lights? The good news: there are several effective, non-damaging methods. I’ve tested them all, and here are the ones that truly work.
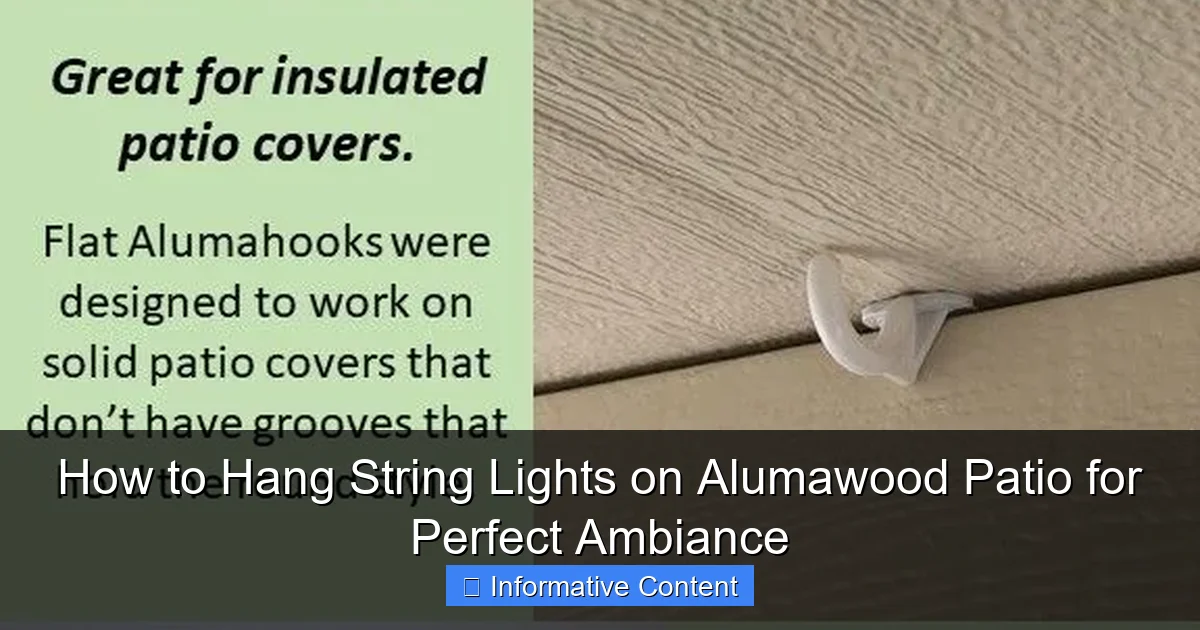
Adhesive Hooks and Clips (The Unsung Heroes)
High-quality outdoor adhesive hooks are my go-to for alumawood patios. Look for brands like 3M Command, which offer:
- Waterproof, UV-resistant adhesive strips
- Weight ratings of 0.5–1 lb per hook (perfect for string lights)
- Removable without residue or damage
How to use them:
- Clean the alumawood surface with isopropyl alcohol to remove dust and oils.
- Attach the adhesive strip to the hook, then press firmly onto the beam for 30 seconds.
- Wait at least 1 hour before hanging lights—this ensures maximum adhesion.
- Space hooks every 12–18 inches along the perimeter.
Pro tip: Use clear adhesive hooks for a nearly invisible look. They blend right into the alumawood finish.
Aluminum Channel Tracks (For a Professional Look)
If you want a seamless, built-in look, consider aluminum channel tracks. These are U-shaped channels that screw into the support beams underneath (not the alumawood cover), allowing you to snap in LED strip lights or string light clips.
Benefits:
- Creates a continuous, uniform glow
- Protects lights from weather and wind
- Looks custom and high-end
The catch? You’ll need to access the underside of the patio cover, which might require a ladder and some basic DIY skills. But the result is worth it.
Clamp-On Hangers and Grip Hooks
For a quick, no-tools solution, try clamp-on hangers. These metal or plastic clamps grip the edge of the alumawood beam without adhesive or screws. They’re especially useful if your alumawood has a lip or overhang.
Best for:
- Temporary or seasonal lighting
- Patios with exposed beam edges
- Quick setups for parties or holidays
Just make sure the clamps are wide enough to fit the beam thickness (usually 2–4 inches). I’ve used the “Grip Clip” brand successfully on my own patio.
Zip Ties and Cable Clips (The Budget-Friendly Option)
Sometimes, simple is best. Use UV-resistant zip ties or adhesive cable clips to secure lights to the beams. This works best with lightweight mini lights or LED strips.
Tips:
- Use black or gray zip ties to blend in with the alumawood.
- Don’t overtighten—you could damage the light wires.
- For a neater look, cut the zip tie tails flush with the clip.
This method isn’t as elegant as adhesive hooks, but it’s fast, cheap, and surprisingly effective.
Step-by-Step Installation Guide (With Real-World Tips)
Now that you’ve got your lights and mounting tools, let’s put it all together. This step-by-step guide walks you through the process, with tips I’ve learned from years of trial and error.
Step 1: Plan Your Layout (Sketch It Out!)
Grab a piece of paper or use a free app like SketchUp Free. Sketch your patio and mark:
- Where the lights will go (perimeter, swags, crisscross patterns)
- Power source locations
- Where you’ll place hooks or clips
I once skipped this step and ended up with lights that were too short and had to rework the whole setup. Don’t make my mistake.
Step 2: Install Mounting Points
Start at one corner and work your way around. Use a tape measure to space your hooks evenly. For a clean look, I recommend:
- Hooks every 12–18 inches on straight runs
- Extra hooks at corners to prevent sagging
- One central hook for swags or loops
Press each adhesive hook firmly for 30 seconds. Let them cure for at least an hour before hanging lights.
Step 3: Hang the Lights (Start at the Power Source)
Always begin at the power source. This ensures you don’t run out of wire before reaching the outlet. Drape the lights over the hooks, creating gentle swags between each point.
Swag Tip: A 2–3 inch drop between hooks looks natural. Too much sag looks sloppy; too little looks stiff.
Step 4: Connect Multiple Strands
If you’re using more than one strand, connect them with outdoor-rated extension cords or end-to-end connectors. Make sure all connections are:
- Off the ground (to avoid water damage)
- Secured with zip ties or clips
- Protected from rain (use a small waterproof cover or tape)
Step 5: Test and Adjust
Turn on the lights. Walk around and check for:
- Flickering or dim bulbs
- Sagging sections
- Exposed wires
Adjust hooks or add more if needed. It’s much easier to fix now than after everything’s set.
Common Mistakes to Avoid (And How to Fix Them)
Even with the best plan, things can go wrong. Here are the most common mistakes—and how to avoid or fix them.
Mistake 1: Using Indoor Lights Outdoors
Indoor string lights aren’t rated for moisture or temperature changes. They’ll corrode, flicker, or fail within months.
Solution: Only use outdoor-rated lights with a minimum IP44 rating.
Mistake 2: Overloading Circuits
Too many lights on one outlet can trip the breaker or cause overheating.
Solution: Use a circuit calculator. Most outdoor outlets can handle 1,500–1,800 watts. LED strands use about 10–20 watts per 24 feet. If in doubt, use a dedicated outdoor GFCI outlet.
Mistake 3: Ignoring Wind and Weather
Loose lights can whip around in the wind, damaging hooks or the alumawood.
Solution: Secure all loose ends with zip ties. Add extra hooks in windy areas. Use weatherproof tape on connections.
Mistake 4: Poor Cable Management
Visible cords ruin the ambiance.
Solution: Run extension cords along beams using adhesive clips. Tuck them behind plants or furniture. Use cord covers for ground-level cables.
Data Table: Recommended Products for Alumawood String Lights
| Product Type | Recommended Brand/Model | Weight Capacity | Weather Resistance | Best For |
|---|---|---|---|---|
| Adhesive Hooks | 3M Command Outdoor Hooks | 0.75 lb per hook | IP54, UV-resistant | Long-term, invisible mounting |
| String Lights | Brightech Ambience Pro | 24 ft, 15 bulbs | IP65, shatterproof | Durable, warm white glow |
| Clamp Hangers | Grip Clip Aluminum Clamp | 1 lb | Weatherproof metal | Quick, no-adhesive setup |
| Extension Cord | Southwire 50-ft Outdoor | 13A, 1625W | Water-resistant jacket | Safe power extension |
| Aluminum Channel | AluLED Pro 6-ft Track | Supports 50 ft of lights | Anodized aluminum | Professional, built-in look |
Final Thoughts: Creating Your Perfect Outdoor Oasis
Hanging string lights on an alumawood patio isn’t just about adding light—it’s about creating a mood, a feeling, a space where memories are made. It’s the difference between stepping outside and wanting to step outside. With the right lights, the right tools, and a little patience, you can turn your patio into a glowing sanctuary.
Remember: work with the alumawood, not against it. Use non-invasive methods, choose quality outdoor-rated lights, and plan your layout carefully. Don’t rush it. Take the time to test, adjust, and refine. And most importantly, enjoy the process. I still smile every time I flip the switch and see that warm glow spread across my patio.
Whether you’re going for cozy, romantic, or festive, the key to perfect ambiance is consistency, safety, and a touch of personal style. So grab your lights, your hooks, and a ladder—and let’s get glowing. Your alumawood patio is waiting.
Frequently Asked Questions
How do I hang string lights on an Alumawood patio without damaging the material?
Use non-invasive methods like adhesive hooks, magnetic clips, or zip ties designed for outdoor use. These options securely hold string lights while protecting the Alumawood’s finish from scratches or drilling.
What’s the best way to plan the layout for string lights on an Alumawood patio?
Measure your patio’s dimensions and sketch a layout that highlights key areas like seating or dining spaces. Use removable painter’s tape to test placements before installing hardware for a balanced, ambient glow.
Can I use solar-powered string lights for my Alumawood patio?
Yes! Solar-powered string lights are ideal for Alumawood patios, as they require no wiring and blend seamlessly with the structure. Ensure the solar panel gets direct sunlight for optimal performance.
How do I hide the wires when hanging string lights on an Alumawood patio?
Route wires through built-in channels or under the Alumawood beams, or use decorative cord covers to match the patio’s aesthetic. This keeps the setup tidy and safe while maintaining the ambiance.
Are there specific hooks or clips for hanging string lights on Alumawood?
Look for vinyl-coated S-hooks, aluminum-rated adhesive clips, or stainless steel hooks to avoid corrosion. These are designed to grip Alumawood’s smooth surface without causing damage.
How do I secure string lights on an Alumawood patio in windy conditions?
Use double-sided outdoor tape or heavy-duty zip ties to anchor lights at multiple points. For added stability, install a guide wire or thin cable along the planned path to distribute tension evenly.

