Featured image for string lights patio diy
Image source: i2.wp.com
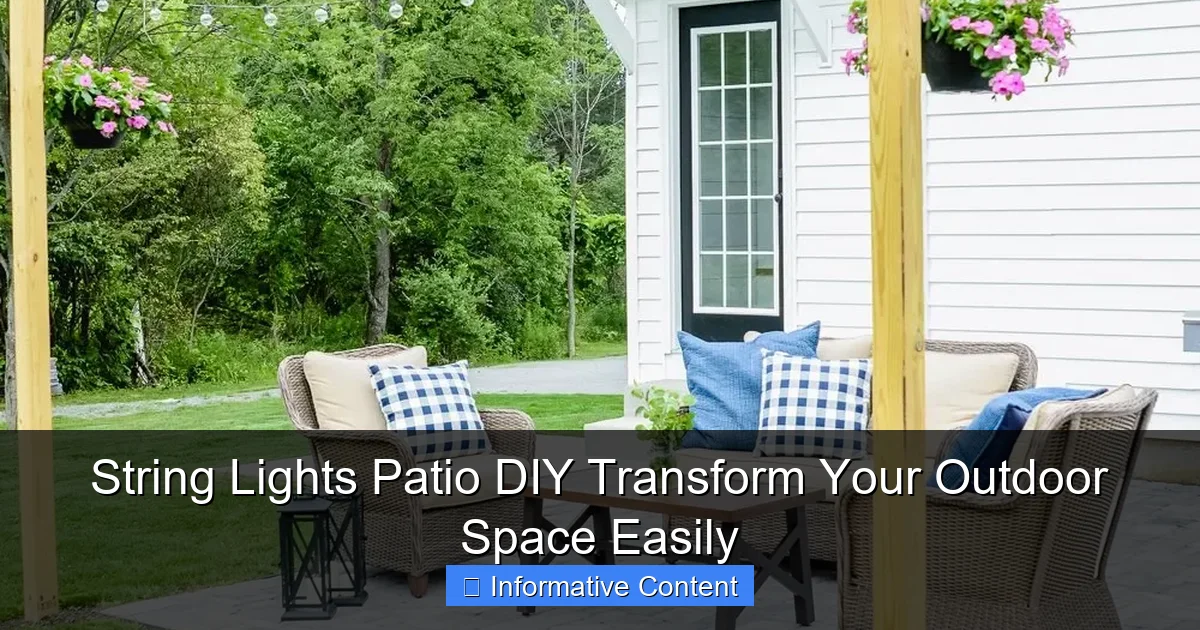
Transform your patio into a magical retreat with simple, stylish DIY string lights—an affordable and effortless upgrade that enhances ambiance and extends outdoor enjoyment. With endless layout options and easy installation, you can create a custom glow that perfectly fits your space, whether wrapping trees, outlining railings, or draping overhead for a canopy effect.
Key Takeaways
- Plan your layout first: Measure space and sketch light placement for balanced coverage.
- Choose weatherproof lights: Opt for durable, outdoor-rated string lights to withstand elements.
- Use existing structures: Hang lights on fences, pergolas, or trees to minimize installation effort.
- Add dimmers or timers: Control ambiance and energy use with smart or manual options.
- Layer lighting for depth: Combine string lights with lanterns or candles for a cozy glow.
- Secure with proper hardware: Use hooks, clips, or zip ties to prevent sagging or damage.
📑 Table of Contents
- Why String Lights Are the Secret to a Cozy Outdoor Retreat
- Choosing the Right String Lights for Your Patio
- Planning Your Layout: Design Tips for Maximum Impact
- Installation Tools and Materials: What You’ll Actually Need
- Step-by-Step Installation: A Beginner-Friendly Guide
- Maintenance, Safety, and Troubleshooting
- Data Table: String Lights Comparison Guide
- Final Thoughts: Light Up Your Life—One Bulb at a Time
Why String Lights Are the Secret to a Cozy Outdoor Retreat
There’s something magical about stepping onto your patio after sunset, greeted by a soft, twinkling glow that transforms the space into a personal oasis. String lights aren’t just decorations—they’re mood setters. Whether you’re hosting a backyard barbecue, enjoying a quiet evening with a book, or sharing stories under the stars, the right lighting can make your outdoor area feel warm, inviting, and alive. And the best part? You don’t need to be an electrician or a professional decorator to pull it off. With a few tools, some planning, and a touch of creativity, string lights patio DIY projects are one of the easiest and most rewarding ways to elevate your home’s exterior.
I remember my first attempt at hanging string lights. I had a vision: a romantic canopy over my small concrete patio, like something out of a travel magazine. But I ended up with tangled wires, uneven heights, and a string that barely lit up half the space. After a few trial-and-error rounds (and a lot of YouTube tutorials), I finally cracked the code. Now, my patio feels like an extension of my living room—just with better air and more stars. If you’re looking to create a similar transformation, this guide will walk you through everything you need to know, from choosing the right lights to avoiding common pitfalls. Whether you have a sprawling backyard or a tiny balcony, string lights patio DIY is within your reach.
Choosing the Right String Lights for Your Patio
Before you start hammering hooks into your walls or drilling into your deck, it’s crucial to pick the right type of string lights. Not all lights are created equal, and the wrong choice can leave you with a flickering mess or a setup that doesn’t last through the summer. Let’s break down the key factors to consider.
Visual guide about string lights patio diy
Image source: goodshomedesign.com
Types of String Lights: LED vs. Incandescent
When shopping for patio lighting, you’ll likely encounter two main types: LED and incandescent.
- LED String Lights: These are the modern favorite. They’re energy-efficient, last up to 25,000 hours (some even more), and generate very little heat. That means they’re safer around kids, pets, and flammable materials. Plus, they come in a wide range of colors, including warm white, cool white, multicolor, and even color-changing options with remote controls. The downside? They’re usually a bit more expensive upfront.
- Incandescent String Lights: These give off a classic, warm glow that many people associate with nostalgic outdoor lighting. They’re cheaper initially and often have a more “vintage” look. However, they burn out faster (around 1,000 hours), use more electricity, and can get hot—making them less ideal for extended use or enclosed spaces.
Pro tip: For most string lights patio DIY projects, LED is the smarter long-term investment. You’ll save on energy bills and replacement bulbs, and they’re safer for year-round use.
Bulb Shape and Spacing
String lights come in various bulb styles—globe, Edison, lantern, and mini bulbs—each creating a different ambiance.
- Globe lights: Round, diffused bulbs that spread light evenly. Great for a soft, ambient glow. Perfect for dining areas or lounging zones.
- Edison bulbs: Exposed filament bulbs with a vintage, industrial look. These cast a warm, golden light and are ideal for patios with a rustic or boho aesthetic.
- Mini bulbs: Tiny, closely spaced bulbs that create a delicate, starry-night effect. Best for wrapping around railings, trees, or pergolas.
- Lantern-style: Larger, decorative bulbs that resemble lanterns. These are statement pieces and work well as focal points.
Spacing matters too. Lights with bulbs spaced 6–12 inches apart provide even coverage, while 24-inch spacing creates a more dramatic, spotlight effect. For a full canopy, go with closer spacing.
Weather Resistance and Outdoor Rating
This is non-negotiable. Your lights must be rated for outdoor use. Look for an IP rating (Ingress Protection). For patios, IP44 or higher is ideal—this means they’re protected against splashing water and small debris. If your patio is exposed to heavy rain or snow, go for IP65 or IP67. Always check the packaging for “outdoor use” or “weatherproof” labels.
Power Source: Plug-In vs. Battery vs. Solar
How you power your lights affects both convenience and design.
- Plug-in: Most reliable. You’ll need an outdoor-rated extension cord and a GFCI outlet. Best for permanent setups.
- Battery-powered: Great for small spaces or rentals. No cords! But batteries need replacing, and brightness can fade over time.
- Solar-powered: Eco-friendly and easy to install. Just place the solar panel in direct sunlight. However, they may not shine as brightly on cloudy days or during winter.
Real talk: I once used solar lights for a summer party. They looked amazing… until a sudden thunderstorm rolled in and the clouds blocked the sun. The lights dimmed halfway through dinner. Lesson learned: always have a backup plan.
Planning Your Layout: Design Tips for Maximum Impact
You’ve picked your lights—now it’s time to plan where they’ll go. A well-thought-out layout can turn a simple string of lights into a breathtaking design feature. Here’s how to do it right.
Assess Your Space and Define Zones
Start by sketching a rough layout of your patio. Identify key areas: dining, lounging, grilling, entryway, etc. Each zone can have its own lighting “personality.” For example:
- Dining area: A canopy of globe lights for even illumination.
- Conversation nook: String lights wrapped around a pergola or draped between trees for intimacy.
- Pathway: Mini lights along railings or steps for safety and charm.
Pro tip: Use masking tape or chalk to mark where you’ll hang lights. This helps you visualize spacing and avoid overloading one area.
Common Layout Patterns (With Examples)
Here are five popular string lights patio DIY patterns, each with its own vibe:
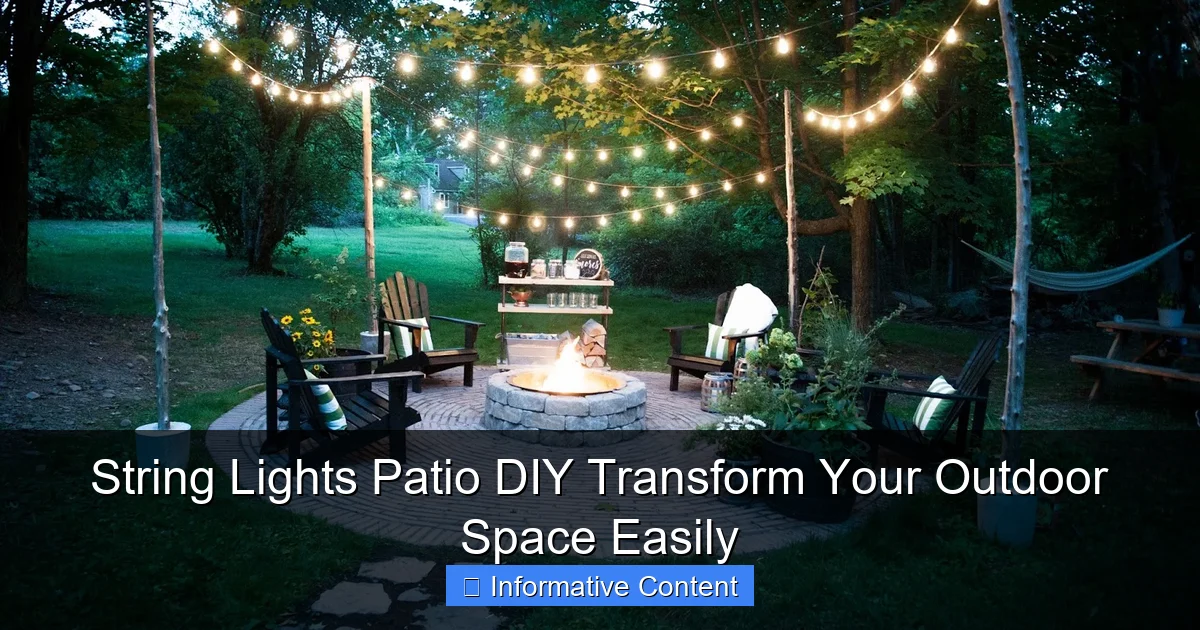
- Canopy Grid: Create a “ceiling” of lights by running parallel strings across the patio, anchored to posts, walls, or trees. Ideal for rectangular spaces. Use 3–5 strings, spaced 2–3 feet apart.
- Zig-Zag or Criss-Cross: Hang lights diagonally between two anchor points. This adds visual interest and works well under pergolas or between trees.
- Hanging Loops (or “U” Shapes): Drape lights in gentle loops from one point to another. Great for creating a romantic, floating effect. Use S-hooks or zip ties to adjust sag.
- Wrapped Trees or Columns: Wrap lights around tree trunks, fence posts, or pillars. Use spiral or criss-cross patterns for depth.
- Railings and Fences: Line railings, fences, or deck edges with mini lights. Adds safety and charm without blocking views.
I used the “canopy grid” for my patio. I anchored lights to my house’s eaves and a wooden post on the opposite side. The result? A cozy, intimate space that feels like a secret garden at night.
Calculating How Many Lights You Need
Measure the total length of your layout (in feet). Then:
- For a canopy: Multiply length by number of strings (e.g., 10 ft x 4 strings = 40 ft).
- For wrapped trees: Estimate 1–2 ft of lights per inch of tree diameter.
- For railings: Measure the railing’s length and add 10–20% extra for draping or loops.
Always buy 10–15% more lights than you think you need. Cuts, mistakes, and extra loops happen!
Installation Tools and Materials: What You’ll Actually Need
Now for the fun part—getting your hands dirty. But don’t rush in without the right tools. Here’s a checklist to avoid last-minute hardware store trips.
Essential Tools and Hardware
- Measuring tape: For precise spacing and length.
- Drill and masonry bits (if needed): For concrete or brick walls.
- Stud finder (for walls): Helps locate secure anchor points.
- Level: Keeps lights straight (nobody wants a lopsided canopy).
- Ladder or step stool: Safety first!
- Pliers and wire cutters: For cutting zip ties or adjusting hooks.
- Extension cords (outdoor-rated, GFCI-protected): Use only UL-listed cords with proper grounding.
Anchoring Options: Hooks, Clips, and More
How you attach lights depends on your patio’s surface. Here are the most common methods:
- Ceiling hooks (for eaves, rafters, or pergolas): Use screw-in hooks for wood, or toggle bolts for drywall. Spacing: 3–6 feet apart.
- Adhesive clips (for smooth surfaces): Great for glass doors or metal railings. Use outdoor-rated clips (e.g., 3M Command Outdoor).
- Zip ties: For railings, fences, or trees. Use UV-resistant ties so they don’t crack in the sun.
- Masonry anchors (for brick or concrete): Use plastic anchors and screws. Drill pilot holes first.
- Ground stakes (for solar panels): Keep solar lights in direct sun.
Pro tip: Avoid nails or staples—they can damage wires and create fire hazards. Always use UL-listed hardware.
Extension Cord Safety
Never daisy-chain extension cords. Use one long cord instead of multiple short ones. Keep cords off the ground (use cord covers or clips) to prevent tripping and water damage. And always plug into a GFCI outlet—it cuts power instantly if there’s a short circuit.
Step-by-Step Installation: A Beginner-Friendly Guide
Ready to hang those lights? Follow these steps for a stress-free setup.
Step 1: Mark Your Anchor Points
Use chalk or painter’s tape to mark where hooks, clips, or anchors will go. For a canopy, mark parallel lines across the patio. For a zig-zag, mark diagonal points. Double-check spacing with your measuring tape.
Step 2: Install Anchors and Hooks
Drill pilot holes if needed. Screw in hooks or insert anchors. For railings, attach clips or zip ties. Test each anchor by pulling gently—it should feel secure.
Step 3: Test the Lights Before Hanging
Plug in the lights and check for dead bulbs or flickering. Replace any faulty bulbs. This saves you the hassle of troubleshooting once they’re up.
Step 4: Hang the Lights
- For canopies: Start at one end. Attach the first hook, then stretch the string to the next hook. Use S-hooks or carabiners for easy adjustments.
- For loops: Let the lights drape naturally between hooks. Adjust sag with zip ties or clips.
- For wrapped trees: Start at the base. Wrap upward in a spiral, overlapping bulbs slightly.
Work slowly. Don’t pull too tight—this can break wires or pull hooks loose.
Step 5: Secure Cords and Hide Wires
Use cord clips or conduit to keep extension cords tidy. Tuck wires behind plants, railings, or along edges. For a cleaner look, paint cords to match the wall or railing.
Step 6: Final Check and Adjust
Turn on the lights. Step back and assess. Adjust hooks, clips, or sag as needed. Make sure cords are out of foot traffic areas.
Maintenance, Safety, and Troubleshooting
Your lights are up—congrats! But to keep them shining bright, a little maintenance goes a long way.
Seasonal Care
- Winter: If you live in a snowy area, consider removing lights. Heavy snow can damage wires and hooks. If leaving them up, check after storms for ice buildup.
- Summer: Clean bulbs with a damp cloth to remove dust and pollen. Check for frayed wires or loose connections.
Common Issues and Fixes
- Flickering lights: Often caused by a loose bulb or faulty connection. Tighten bulbs and check all plugs.
- Half the string is out: A single dead bulb can kill a whole section. Replace the bulb or use a light keeper tool to fix tiny wire breaks.
- Lights won’t turn on: Check the outlet, extension cord, and fuse (if applicable). Test with another device.
- Sagging wires: Add extra hooks or clips to support the weight.
Safety Reminders
- Never use indoor lights outdoors.
- Don’t overload circuits. Most outdoor outlets handle 1,500–2,000 watts. Check your light’s wattage.
- Turn off lights during storms or high winds.
- Keep cords away from pools, sprinklers, and wet areas.
When to Replace vs. Repair
If a string is more than 5–7 years old and keeps failing, it’s time to replace it. Older lights may have degraded wires or outdated safety features. But if it’s just a few dead bulbs, save money and fix it!
Data Table: String Lights Comparison Guide
| Feature | LED String Lights | Incandescent String Lights | Solar String Lights | Battery-Powered |
|---|---|---|---|---|
| Lifespan | 25,000+ hours | 1,000–2,000 hours | 10,000–15,000 hours (panel) | 50–100 hours (per set) |
| Energy Use | Low (5–10W per 20 ft) | High (50–100W per 20 ft) | Zero (solar-powered) | Low (but frequent battery changes) |
| Weather Resistance | IP44–IP67 | IP44 | IP65 (lights), IP44 (panel) | IP44–IP65 |
| Best For | Permanent setups, all climates | Short-term events, vintage look | Sunny areas, eco-friendly | Small spaces, rentals |
| Cost (20 ft) | $20–$50 | $10–$25 | $30–$70 | $15–$40 |
Final Thoughts: Light Up Your Life—One Bulb at a Time
There’s a reason string lights patio DIY projects are so popular. They’re affordable, customizable, and instantly transform a dull outdoor space into a magical retreat. You don’t need a huge budget or fancy tools—just a little patience and a spark of creativity. Whether you’re going for a rustic, romantic, or modern look, the right lighting can make your patio feel like an extension of your home.
Remember, the goal isn’t perfection. It’s about creating a space where you love to spend time. Maybe your lights aren’t perfectly straight. Maybe one section flickers when it rains. That’s okay. What matters is the laughter shared under that glow, the quiet moments with a glass of wine, and the way the stars feel a little closer when your patio is lit just right.
So grab your tools, pick your favorite lights, and start stringing. Your dream patio is just a few bulbs away. And when you flip that switch and see your space come alive? That’s the best part of all.
Frequently Asked Questions
How do I install string lights patio DIY without damaging my outdoor space?
Use adhesive hooks, removable clips, or existing structures like fences and railings to hang your string lights patio DIY setup without nails or drilling. This ensures a damage-free installation that’s easy to adjust or remove later.
What type of string lights work best for a DIY patio project?
LED string lights are ideal for a string lights patio DIY project due to their energy efficiency, durability, and weather resistance. Opt for commercial-grade or outdoor-rated bulbs to ensure longevity in various weather conditions.
Can I connect multiple string lights for a larger patio area?
Yes, many outdoor string lights are designed to be connectable, allowing you to extend coverage across your patio. Always check the manufacturer’s guidelines to avoid overloading circuits and ensure safe operation.
How do I power my string lights patio DIY setup if there’s no nearby outlet?
Use solar-powered string lights or a weatherproof extension cord to reach distant outlets safely. For a seamless look, consider burying the cord in a protective conduit or using battery-operated lights for flexibility.
What are some creative ways to hang string lights for a unique patio vibe?
Try zigzag patterns, canopy-style draping, or wrapping around trees and pergolas for a customized look. A string lights patio DIY approach lets you experiment with heights and layouts to match your style.
How do I maintain and store my patio string lights after the season?
Clean bulbs with a dry cloth, check for damaged wires, and store them in a cool, dry place using a reel or storage bag. Proper care extends the life of your string lights patio DIY investment for years to come.

