Featured image for can i cut my led string lights
Image source: unitopledstrip.com
Yes, you can cut your LED string lights—but only at designated cut points to avoid damaging the circuit. Always check the manufacturer’s guidelines and use sharp scissors or wire cutters for a clean, safe trim. Never cut between LEDs or outside marked areas, as this can cause permanent failure or electrical hazards.
Key Takeaways
- Check manufacturer guidelines: Always verify if your LED lights are designed to be cut.
- Locate cutting points: Only trim at marked solderless or designated cut lines.
- Use sharp tools: Clean cuts with scissors or wire cutters prevent damage.
- Insulate after cutting: Seal ends with silicone or caps to avoid shorts.
- Test before reinstalling: Ensure functionality post-trim with a quick power check.
- Avoid cutting waterproof strips: Trimming voids waterproofing and may cause failure.
📑 Table of Contents
- Understanding LED String Lights: How They Work
- Can You Cut LED String Lights? The Definitive Answer
- Step-by-Step Guide: How to Safely Cut Cuttable LED String Lights
- Common Mistakes to Avoid When Cutting LED Lights
- Data: Cuttable vs. Non-Cuttable LED String Lights
- Alternatives to Cutting: Creative Solutions for Custom Lengths
- Conclusion: Cut with Confidence—Or Choose Alternatives
Understanding LED String Lights: How They Work
LED string lights have become a staple in home decor, holiday displays, and outdoor ambiance. Their energy efficiency, low heat output, and long lifespan make them a favorite for both casual users and professional designers. However, one common question that arises is: Can I cut my LED string lights? While it might seem like a simple DIY task, the answer depends on several factors, including the type of LED string lights, their construction, and whether they’re designed to be cut. Understanding the inner workings of these lights is crucial before attempting any modifications.
Unlike traditional incandescent lights, which operate in a straightforward circuit, LED string lights are more complex. They often feature a series-parallel circuit design, where groups of LEDs are connected in series and then arranged in parallel with other groups. This design allows the lights to function even if one LED burns out. However, cutting into the wrong section of the circuit can disrupt the flow of electricity, rendering the entire string useless or causing safety hazards like short circuits or overheating. Some LED strings are marketed as “cuttable” or “customizable,” while others are not. Knowing the difference is the first step toward a safe and successful trimming.
Types of LED String Lights: Cuttable vs. Non-Cuttable
Not all LED string lights are created equal when it comes to trimming. Here’s a breakdown of the two main categories:
- Cuttable LED Strings: These are explicitly designed to be modified. They feature cut points—marked sections where the wire can be safely severed without damaging the rest of the circuit. These are common in commercial-grade lights used for architectural lighting, retail displays, or permanent installations.
- Non-Cuttable LED Strings: Most consumer-grade LED strings (e.g., holiday lights, fairy lights) are not meant to be cut. They use a continuous circuit, and cutting them will break the electrical path, leaving the remaining lights unpowered. Attempting to cut these can also void warranties and create fire risks.
For example, a 50-foot commercial LED strip with silicone-sealed cut marks every 12 inches is designed for trimming. In contrast, a 20-foot battery-operated fairy light string from a home goods store is likely not. Always check the product packaging or manufacturer’s website for terms like “cuttable,” “segmentable,” or “customizable.” If these terms are absent, assume the lights are not safe to cut.
How LED Circuits Function: The Science Behind the Sparks
To understand why cutting is sometimes safe and sometimes dangerous, you need to grasp how LED circuits work. Most LED strings operate on low-voltage DC (direct current), often 12V or 24V, powered by a transformer or batteries. The circuit design determines whether cutting is feasible:
- Series Circuits: All LEDs are connected end-to-end. Cutting one part breaks the entire circuit. This is common in non-cuttable strings.
- Parallel Circuits: Each LED or group has its own path to the power source. Cutting one segment doesn’t affect others. This is typical in cuttable strings.
- Series-Parallel Hybrid: A mix of both, where groups of LEDs are in series, but groups are in parallel. Cutting must occur at designated points between groups.
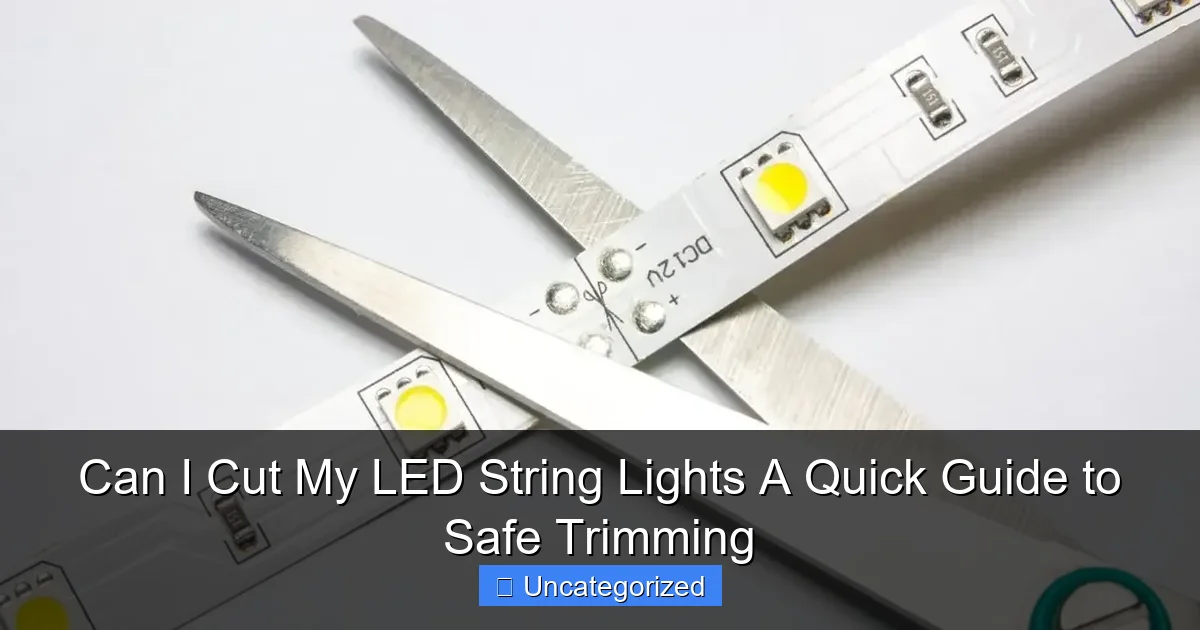
For instance, a 100-LED string with 10 groups of 10 LEDs in series (each group in parallel) can be cut between groups. But cutting within a group will disable that entire segment. This is why cut points—usually marked by a scissor icon or dashed line—are critical. They indicate where the circuit is designed to be interrupted safely.
Can You Cut LED String Lights? The Definitive Answer
The answer isn’t a simple “yes” or “no.” It hinges on whether your LED string lights are specifically designed for cutting. Here’s how to determine if your lights qualify:

Visual guide about can i cut my led string lights
Image source: lightingcraze.com
Check the Manufacturer’s Specifications
Before reaching for scissors, consult the product manual, packaging, or manufacturer’s website. Look for:
- Explicit statements like “cuttable,” “customizable,” or “segmentable.”
- Cut point markings (e.g., scissor icons, dashed lines) on the wire or PCB (printed circuit board).
- Voltage ratings (e.g., 12V or 24V DC) and power supply details.
For example, Philips Hue Lightstrip Plus and GE Color Effects are marketed as cuttable, with clear cut points every 10–12 inches. In contrast, Target’s Room Essentials fairy lights have no such markings and are not intended for modification.
Test for Cut Points
If documentation is unclear, inspect the lights physically:
- Look for small gaps or notches in the wire or PCB every 6–12 inches.
- Check for labels like “Cut Here” or symbols (e.g., scissors, dashed lines).
- Measure the distance between LEDs. Cuttable strings often have uniform spacing, while non-cuttable ones may have irregular gaps.
Pro Tip: Shine a flashlight through the wire’s insulation. Cuttable strings often have exposed copper traces at cut points, while non-cuttable ones have continuous insulation.
Risks of Cutting Non-Cuttable Lights
Cutting lights not designed for modification can lead to:
- Electrical Hazards: Exposed wires may cause short circuits, overheating, or fire.
- Voided Warranty: Most manufacturers void warranties if lights are altered.
- Irreparable Damage: Once cut, non-cuttable strings often can’t be reconnected safely without soldering.
For example, cutting a 50-foot non-cuttable string in half leaves you with two 25-foot strings, but only the half still connected to the power source will work. The other half is dead.
Step-by-Step Guide: How to Safely Cut Cuttable LED String Lights
If your lights are designed for cutting, follow this step-by-step guide to trim them safely and effectively.

Visual guide about can i cut my led string lights
Image source: i.ytimg.com
Tools You’ll Need
- Sharp scissors or wire cutters
- Electrical tape or heat-shrink tubing
- Wire strippers (if re-terminating)
- Multimeter (optional, for testing)
- Soldering iron and solder (if reconnecting)
Step 1: Confirm Cut Points
Locate the marked cut points on the wire or PCB. These are usually:
- Silicone-sealed notches on commercial strips.
- Small gaps between LEDs on flexible PCB strips.
- Labeled sections on outdoor-rated strings.
Example: A 24V LED strip has cut points every 10 inches, marked by a dashed line. Cutting here ensures the remaining LEDs receive full voltage.
Step 2: Cut at the Designated Point
Use sharp scissors or wire cutters to make a clean, perpendicular cut. Avoid:
- Angled cuts (can damage wires).
- Cutting too close to LEDs (may sever internal connections).
- Using dull tools (can fray wires).
Pro Tip: Cut slightly beyond the marked point (e.g., 0.5 inches) to ensure no frayed wires remain.
Step 3: Insulate the Cut End
Exposed wires are a hazard. Immediately cover the cut end with:
- Electrical tape: Wrap tightly 2–3 times.
- Heat-shrink tubing: Slide over the end, then shrink with a heat gun.
Warning: Never leave cut ends bare, even temporarily. Moisture or accidental contact can cause short circuits.
Step 4: Test the Remaining Lights
Plug in the lights to ensure they still work. If they don’t:
- Check for loose wires or incomplete cuts.
- Use a multimeter to test voltage at the cut end.
- Re-tape or re-solder if needed.
Step 5: Reconnecting (Optional)
If you want to use the cut-off segment, reconnect it using:
- Wire nuts: Twist wires together and cap.
- Solder and heat-shrink: More permanent, waterproof.
- LED connectors: Commercial clips designed for this purpose.
Example: A 30-foot cuttable string is trimmed to 20 feet. The 10-foot cut-off is reconnected to a new power supply using solder and heat-shrink tubing.
Common Mistakes to Avoid When Cutting LED Lights
Even with cuttable lights, mistakes happen. Here are the top errors and how to avoid them.
Cutting at the Wrong Point
Cutting outside designated areas disrupts the circuit. For example:
- A 12V LED strip cut mid-segment will have LEDs receiving 6V—too low to light up.
- Cutting a parallel circuit at a non-designated point may create a dead zone.
Solution: Always cut only at marked points. If unsure, measure the distance between LEDs. Cuttable strings have uniform spacing; non-cuttable ones don’t.
Using Dull or Inappropriate Tools
Frayed wires from dull scissors can cause shorts. Avoid:
- Kitchen scissors (too blunt).
- Pliers (can crush wires).
- Utility knives (risk of slicing too deep).
Solution: Use sharp wire cutters or precision scissors. For PCB strips, flush-cutters work best.
Neglecting Insulation
Exposed wires are a major hazard. In 2022, the U.S. Consumer Product Safety Commission reported 1,200+ electrical incidents involving DIY-modified holiday lights, many due to uninsulated cuts.
Solution: Insulate immediately after cutting. Use heat-shrink tubing for outdoor or wet environments.
Overloading the Power Supply
Cutting lights changes the total load. For example:
- A 50-foot string drawing 10W is cut to 25 feet, reducing load to 5W. This is safe.
- But reusing a 10W power supply for 20 feet (drawing 4W) is also safe—the supply won’t overheat.
Warning: Never use a power supply rated for less than the remaining lights. For example, don’t power a 25-foot segment (drawing 5W) with a 3W supply.
Ignoring Voltage Drop
Longer LED strips experience voltage drop, making LEDs dimmer at the end. Cutting reduces this issue, but:
- If you reconnect a cut-off segment, voltage drop may return.
- Use a higher-voltage supply (e.g., 24V) for long runs.
Pro Tip: For segments over 15 feet, inject power at multiple points to prevent dimming.
Data: Cuttable vs. Non-Cuttable LED String Lights
Below is a comparison of key features to help you identify cuttable lights.
| Feature | Cuttable LED Strings | Non-Cuttable LED Strings |
|---|---|---|
| Markings | Scissor icons, dashed lines, “Cut Here” labels | No markings or warnings against cutting |
| Circuit Design | Parallel or series-parallel with isolated segments | Continuous series circuit |
| Voltage | 12V or 24V DC (low voltage) | Often 120V AC (high voltage) or battery-powered |
| Insulation | Silicone-sealed cut points; waterproof options | PVC or rubber insulation; no cut points |
| Reconnection | Possible with solder, connectors, or wire nuts | Rarely possible; requires advanced soldering |
| Common Uses | Architectural lighting, retail displays, custom installations | Holiday decor, fairy lights, temporary displays |
| Price Range | $20–$100+ per 16-foot segment | $5–$30 per 16-foot segment |
Note: Always verify with the manufacturer. Some “non-cuttable” strings can be modified with advanced techniques (e.g., soldering), but this voids warranties and requires expertise.
Alternatives to Cutting: Creative Solutions for Custom Lengths
If your lights aren’t cuttable, don’t despair! Here are safe, creative alternatives.
Use Connectors and Extensions
Many LED brands offer:
- Extension cords: Add length without cutting.
- Splitter connectors: Branch off into multiple strands.
- End caps: Seal unused ends for safety.
Example: A 20-foot non-cuttable string is too long for a 12-foot mantle. Use a 12-foot extension cord to bridge the gap, then coil the excess behind the mantle.
Fold or Coil Excess
For fairy lights or holiday strings:
- Coil excess wire behind furniture or decor.
- Use zip ties or clips to secure coils.
- Hide under rugs or in planters (for outdoor lights).
Pro Tip: Avoid tight coils—they can overheat. Use a 3-inch diameter minimum.
Buy Multiple Short Strings
Instead of cutting one long string, buy shorter ones:
- Combine 5-foot strings with connectors.
- Use battery-powered mini lights for tight spaces.
Example: A 50-foot string is cut into 5x 10-foot segments. Each is powered by a separate battery pack for a starry-night effect.
Repurpose with Dimmers or Controllers
Adjust brightness or color instead of length:
- Use a dimmer to “soften” overly bright sections.
- Program a smart controller to turn off LEDs in excess areas.
Example: A 30-foot RGB string is too bright for a bedroom. Use a smart plug to dim it to 50%.
Conclusion: Cut with Confidence—Or Choose Alternatives
So, can you cut LED string lights? Yes—but only if they’re explicitly designed for it. Cuttable lights with marked cut points can be trimmed safely using the right tools and techniques. However, cutting non-cuttable lights risks electrical hazards, voided warranties, and permanent damage. Always prioritize safety: check manufacturer guidelines, cut only at designated points, and insulate exposed wires immediately.
For those with non-cuttable strings, alternatives like extensions, folding, or multiple short strings offer flexibility without risk. Remember, LED lights are a long-term investment. A little research and creativity can save you from costly mistakes and ensure your lighting project shines safely for years to come. Whether you’re trimming for a custom display or adapting for a new space, knowledge is your best tool. Happy decorating!
Frequently Asked Questions
Can I cut my LED string lights without damaging them?
Yes, you can cut LED string lights, but only if they’re labeled as “cuttable” or “customizable.” Look for marked cutting points (often indicated by scissors icons) to avoid damaging the circuit. Always disconnect the lights before trimming.
Where should I cut my LED string lights safely?
Only cut at the designated cutting points, usually marked by a line or icon near the wires between bulbs. Cutting elsewhere can break the circuit or create a short. Check the manufacturer’s instructions for guidance.
Will cutting my LED string lights void the warranty?
Yes, trimming LED string lights often voids the warranty since it alters the original product. If you’re unsure, contact the manufacturer first. Always keep the original packaging and receipt for warranty claims.
Can I cut my LED string lights and reconnect them later?
Most cuttable LED string lights aren’t designed for reconnection after cutting. Some specialty kits include connectors, but standard sets won’t work once trimmed. Plan your desired length before making cuts.
What tools do I need to cut LED string lights?
Use sharp scissors or wire cutters to cleanly snip the wires at the marked cutting points. Avoid dull tools to prevent frayed wires or damage. Always cut straight across to ensure safety.
Are there risks to cutting my LED string lights?
Cutting incorrectly can cause electrical shorts, flickering, or permanent damage. Only cut at designated points and avoid nicking internal wires. If unsure, opt for non-cuttable lights or consult an electrician.

