Featured image for can u cut led string lights
Image source: lepro.ca
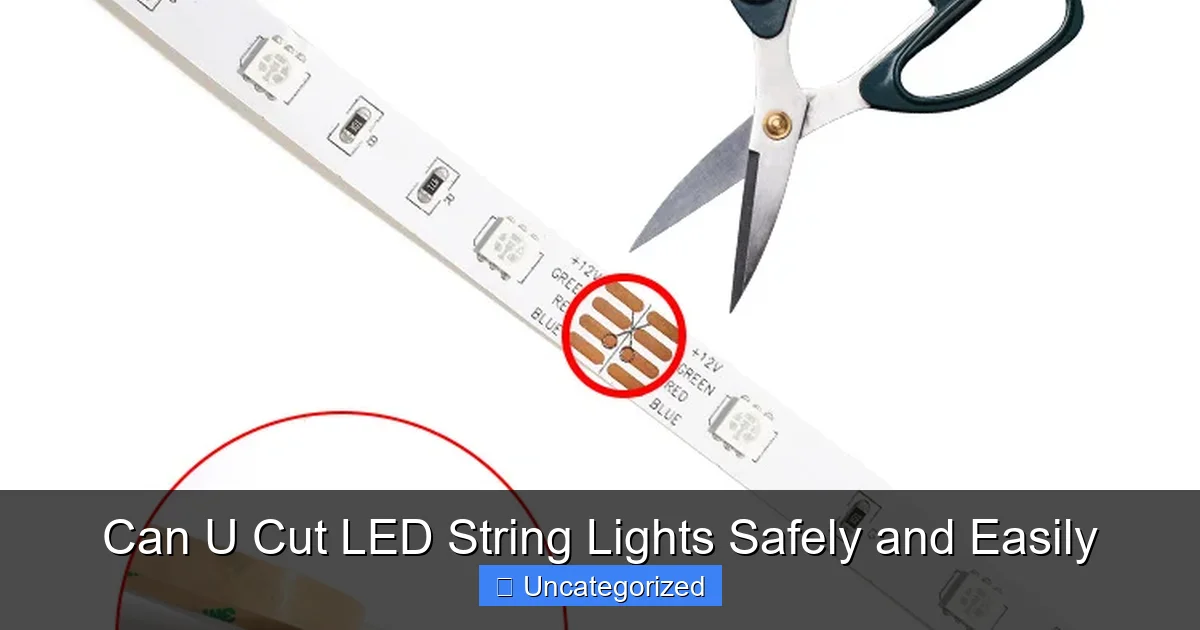
Yes, you can cut LED string lights safely and easily—if they’re designed for it. Look for models with marked cut points or “cut-to-fit” features to avoid damaging the circuit or creating a fire hazard. Always power off and test after trimming to ensure continued performance.
Key Takeaways
- Check manufacturer guidelines: Always verify if your LED lights are designed to be cut.
- Locate cutting points: Cut only at marked sections to avoid damage.
- Use sharp tools: Clean cuts prevent frayed wires and ensure safety.
- Seal cut ends: Use silicone to waterproof and insulate exposed wires.
- Test before trimming: Confirm functionality post-cut to avoid unnecessary waste.
- Avoid over-cutting: Measure twice to prevent irreversible mistakes.
📑 Table of Contents
- Can U Cut LED String Lights Safely and Easily?
- Understanding How LED String Lights Work
- Identifying Cut Points: Where Can You Safely Cut?
- Tools and Techniques for Cutting LED String Lights
- Safety Precautions and Common Mistakes
- Creative Uses for Cut LED String Lights
- Data Table: LED String Light Cutting Guide by Brand and Type
- Conclusion: Cutting LED String Lights with Confidence
Can U Cut LED String Lights Safely and Easily?
LED string lights have become a staple in modern home decor, offering versatility, energy efficiency, and a warm, inviting glow. Whether you’re draping them across a mantel, wrapping them around a tree, or using them to illuminate a cozy reading nook, their adaptability makes them a favorite for both seasonal and everyday use. However, one common question arises: Can you cut LED string lights? The short answer is yes—but with important caveats. Unlike traditional incandescent string lights, which can be cut anywhere without damaging the rest of the strand, LED string lights require a more thoughtful approach. Cutting them incorrectly can result in a non-functional strand, short circuits, or even safety hazards.
This comprehensive guide will walk you through everything you need to know about cutting LED string lights safely and effectively. From understanding how they’re constructed to identifying the right cutting points, we’ll cover the technical aspects, safety precautions, and practical tips to help you customize your lighting setup without compromising performance. Whether you’re trimming a long strand to fit a small shelf or creating custom lengths for a DIY project, this article will equip you with the knowledge to do it right—every time.
Understanding How LED String Lights Work
Before you grab a pair of scissors or wire cutters, it’s essential to understand the internal workings of LED string lights. Unlike traditional bulbs that rely on a filament, LEDs (Light Emitting Diodes) are semiconductor devices that emit light when an electric current passes through them. Their construction and circuitry differ significantly, which affects how they can be modified.
Visual guide about can u cut led string lights
Image source: wikihow.com
Series vs. Parallel Circuitry: What’s the Difference?
LED string lights are typically wired in either series or parallel circuits, and this distinction is critical when considering cutting them.
- Series Circuit: In a series configuration, all LEDs are connected end-to-end along a single conductive path. The same current flows through each bulb, and if one LED fails or is disconnected, the entire circuit breaks, and the rest of the lights go out. Most basic LED string lights use series wiring because it’s simpler and more cost-effective.
- Parallel Circuit: In a parallel setup, each LED has its own separate branch from the power source. This means that if one bulb fails or is cut out, the others continue to function. Parallel circuits are more complex and often found in higher-end or customizable LED strings.
Knowing your string’s wiring type is the first step. If you’re unsure, look for markings on the plug or packaging, or consult the manufacturer’s website. Some brands clearly state whether the lights are “cuttable” or “non-cuttable” and specify the wiring type.
The Role of Resistors and Drivers
LEDs require precise voltage and current to operate safely. To regulate this, manufacturers include resistors (often built into each bulb or socket) and drivers (in the plug or inline box). These components ensure that the LEDs receive the correct power levels and prevent overheating or burnout.
When you cut an LED string, you risk disrupting this balance. For example, cutting too many LEDs from a series circuit can cause the remaining bulbs to receive too much current, leading to premature failure. In parallel circuits, cutting a section may not affect the rest, but it can still impact overall brightness or cause voltage irregularities if not done correctly.
Tip: Always check if your LED string has a driver or transformer. If it does, never cut between the plug and the driver—only cut after the driver, and only at designated cut points.
Identifying Cut Points: Where Can You Safely Cut?
One of the most crucial aspects of cutting LED string lights is knowing where to cut. Not every section of the strand is designed for modification. Cutting at the wrong point can render the entire string useless or create safety risks.

Visual guide about can u cut led string lights
Image source: diysmarthomehub.com
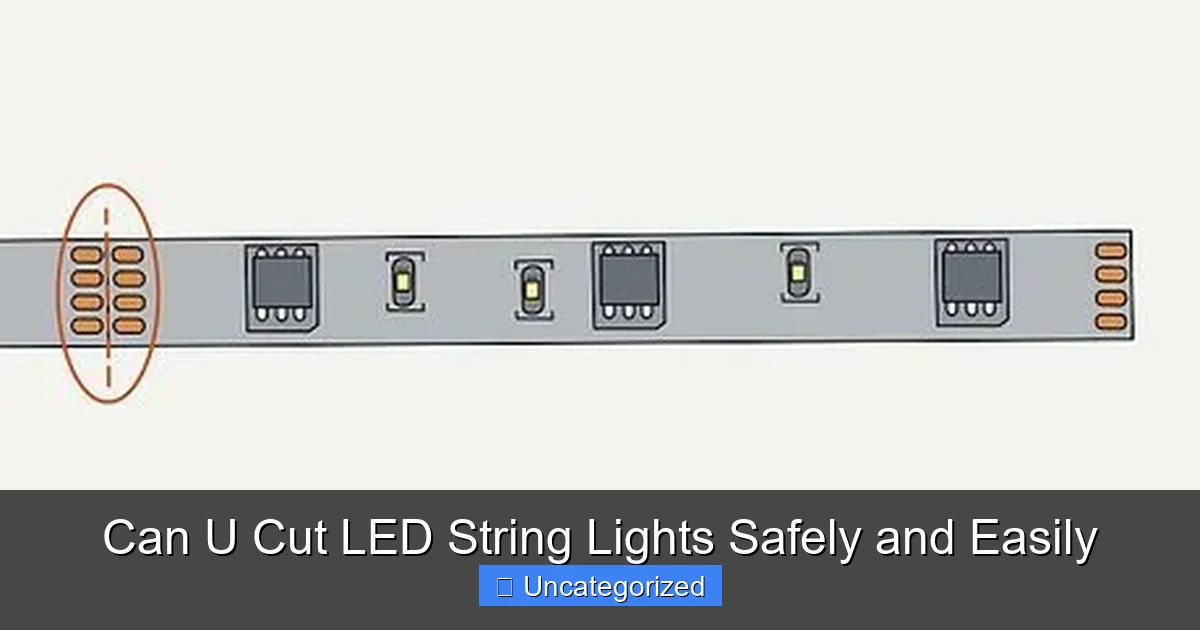
Look for the Cut Marks
Many manufacturers design their LED string lights with pre-marked cut points. These are often indicated by:
- A small scissor icon or “cut here” label on the wire
- A thicker section of insulation or a plastic sleeve
- Spacing between bulbs that’s slightly larger than usual
These cut points are strategically placed at the end of a complete circuit segment. For example, a 50-foot string might be divided into 10-foot segments, each ending at a cut point. Cutting here ensures that the remaining lights continue to function properly.
Example: A popular brand of LED Christmas lights has cut marks every 3 feet. If you cut at one of these points, the remaining 47 feet will still light up, while the 3-foot section can be discarded or used separately (with a new plug, if needed).
Understanding the “End of Circuit” Rule
When cutting, always aim to cut at the end of a complete circuit. In series-wired strings, this means cutting just after the last bulb in a segment. In parallel-wired strings, it may mean cutting a branch that doesn’t affect the main power line.
To find the end of a circuit, trace the wire from the plug. The cut point should be located where the circuit “closes” or where a new segment begins. If you’re unsure, use a multimeter to test continuity between bulbs. A break in continuity often indicates the end of a circuit.
What If There Are No Cut Marks?
Not all LED strings have visible cut marks. In such cases:
- Check the product manual or manufacturer’s website for guidance
- Look for consistent spacing between bulbs—some strings have uniform 6-inch gaps, suggesting modular design
- Test with a small cut: Snip a single bulb or a short section (with power off!) and see if the rest of the string still works
Caution: Never cut a random section without testing. If the lights go out after cutting, you’ve likely severed the main circuit.
Tools and Techniques for Cutting LED String Lights
Cutting LED string lights isn’t just about snipping the wire—it’s a process that requires the right tools and techniques to ensure safety, functionality, and a clean finish.
Essential Tools You’ll Need
- Wire Cutters or Scissors: Use sharp, precision tools. Dull scissors can fray the wire and damage insulation.
- Wire Strippers: Needed if you plan to reconnect or splice wires (e.g., for custom lengths).
- Heat-Shrink Tubing or Electrical Tape: For insulating cut ends and preventing short circuits.
- Multimeter (optional): Useful for testing continuity and voltage after cutting.
- Solder Iron and Solder (optional): For professional-grade reconnections.
Pro Tip: Invest in a pair of flush-cut wire cutters. These cut cleanly without leaving sharp wire ends, reducing the risk of injury or shorting.
Step-by-Step Cutting Process
- Power Off: Always disconnect the string from the power source before cutting. Even low-voltage LEDs can pose a shock risk if mishandled.
- Locate the Cut Point: Identify the pre-marked cut point or the end of a circuit segment.
- Cut the Wire: Snip the wire cleanly at the designated point. Avoid cutting too close to a bulb or resistor.
- Insulate the Cut Ends: Cover the exposed wires with heat-shrink tubing or electrical tape. This prevents moisture ingress and short circuits.
- Test the Remaining String: Reconnect the power and verify that the uncut section still works.
Example: To shorten a 20-foot string to 15 feet, locate the cut mark at 15 feet (if available). Cut the wire, insulate the end near the plug, and test the 15-foot section. Discard the 5-foot end or save it for future projects.
Advanced: Reconnecting or Splicing Wires
If you want to reuse the cut section or create a custom configuration, you may need to splice wires. Here’s how:
- Strip about 1/2 inch of insulation from each wire end
- Twist the corresponding wires (positive to positive, negative to negative)
- Solder the connection for durability
- Cover with heat-shrink tubing or electrical tape
For parallel-wired strings, you can even add a new plug to the cut end, turning it into a standalone strand.
Safety Precautions and Common Mistakes
Cutting LED string lights is generally safe, but ignoring key precautions can lead to hazards, equipment damage, or wasted money. Here’s what to watch out for.
Electrical Safety First
- Always unplug the lights before cutting. Even if the string is low-voltage, a short circuit can damage the driver or create a fire risk.
- Work in a dry area. Water and electricity don’t mix—avoid cutting lights outdoors or in damp conditions.
- Use insulated tools. Non-conductive handles reduce shock risk.
Warning: Never cut LED strings that are powered on. This can cause sparks, burns, or damage to the LEDs.
Common Mistakes to Avoid
- Cutting at non-designated points: This breaks the circuit and kills the lights. Always verify the cut location.
- Leaving exposed wires: Uninsulated ends can short out or corrode. Always cover cut ends.
- Overloading the circuit: Cutting too many LEDs from a series string can cause the remaining bulbs to overheat. Stick to one or two cuts per string.
- Ignoring polarity: When splicing wires, reversing positive and negative can damage LEDs. Use a multimeter to test polarity if unsure.
Real-Life Example: A homeowner cut a 30-foot LED string in the middle to fit a window, but the lights went out. They later realized the string was series-wired, and the cut severed the main circuit. The lesson? Always check the wiring type first.
Dealing with Moisture and Outdoor Use
If you’re cutting outdoor LED string lights, extra care is needed. Moisture can seep into cut ends, causing corrosion or short circuits. Use:
- Waterproof heat-shrink tubing
- Silicone sealant on splices
- Outdoor-rated plugs for reused sections
Never leave cut ends exposed to rain or snow.
Creative Uses for Cut LED String Lights
Cutting LED string lights doesn’t just shorten them—it opens up a world of creative possibilities. Here are some innovative ways to use your customized strands.
Custom-Length Lighting for Furniture
Instead of draping long strings over a bookshelf or headboard, cut them to exact lengths. For example:
- Cut a 6-foot section to line the inside of a glass cabinet
- Use 3-foot strands to outline each shelf in a display unit
- Create a “floating” effect by mounting cut lights behind picture frames
This approach reduces clutter and ensures a perfect fit.
DIY Projects and Art Installations
Cut LED strings are perfect for:
- Lighted signs: Bend and secure cut sections into letters or shapes
- Terrariums or aquariums: Use waterproof cut lights to illuminate small ecosystems
- Photo backdrops: Arrange cut strands into geometric patterns for events
Tip: Use adhesive LED clips or mounting tape to position cut lights without damaging surfaces.
Seasonal and Holiday Decor
Shorten long strings for specific holiday needs:
- Cut 2-foot sections to wrap around wreaths or garlands
- Use 1-foot strands to highlight individual ornaments
- Create “light clusters” by splicing multiple cut sections together
For Halloween, cut orange and purple strings into 18-inch lengths to outline pumpkins or windows.
Repurposing Cut Ends
Don’t throw away cut sections! They can be reused for:
- Small-scale lighting (e.g., in dollhouses or model displays)
- Emergency lighting (e.g., in a toolbox or drawer)
- Art projects (e.g., embedding in resin or clay)
Just add a new plug or battery pack to the cut end.
Data Table: LED String Light Cutting Guide by Brand and Type
| Brand/Type | Wiring Type | Cuttable? | Cut Point Markings | Max Cuts Per String | Special Notes |
|---|---|---|---|---|---|
| Philips LED Christmas Lights | Series | Yes | Scissor icon every 3 ft | 2 | Cut only at marked points; do not cut within 1 ft of plug |
| Twinkly Smart LEDs | Parallel | Yes (with app) | None (app-controlled) | Unlimited | Use app to reconfigure after cutting; supports custom lengths |
| GE Indoor String Lights | Series | No | None | 0 | Not designed for cutting; cutting voids warranty |
| LEDMO Outdoor String Lights | Parallel | Yes | Plastic sleeve every 5 ft | 3 | Waterproof; insulate cut ends with silicone |
| Enbrighten Color-Changing LEDs | Series | Yes | “Cut here” label every 6 ft | 1 | Only one cut allowed; cut near plug end |
Conclusion: Cutting LED String Lights with Confidence
So, can you cut LED string lights? The answer is a resounding yes—but only if you follow the right steps. By understanding the wiring type, identifying safe cut points, using the proper tools, and prioritizing safety, you can customize your LED strings to fit any space or project. Whether you’re shortening a strand for a cozy corner, creating a unique art piece, or repurposing cut ends for DIY decor, the possibilities are endless.
Remember: Not all LED strings are created equal. Always check the manufacturer’s guidelines, look for cut marks, and never cut a powered string. When in doubt, start with a small test cut to verify the wiring and functionality. With this knowledge, you can transform your lighting setup from generic to perfectly tailored—safely, easily, and with professional results.
Now that you know how to cut LED string lights the right way, it’s time to get creative. Measure your space, plan your cuts, and let your imagination light the way. Happy decorating!
Frequently Asked Questions
Can you cut LED string lights without damaging them?
Yes, you can cut LED string lights safely, but only at designated cut points, which are usually marked with a scissor icon or line. Cutting elsewhere may damage the circuit and cause the entire strand to stop working.
Where should I cut LED string lights to avoid ruining them?
Always cut at the marked cut points, typically located between LEDs or at specific intervals along the wire. These points ensure the circuit remains intact and the remaining lights stay functional.
Can u cut LED string lights and still use the leftover portion?
Yes, as long as you cut at the designated points and seal the end with electrical tape or a connector. This prevents short circuits and lets you reuse the remaining section for another project.
What tools do I need to cut LED string lights safely?
Use sharp scissors or wire cutters to make a clean cut at the marked points. Avoid jagged edges or squeezing the wires too hard, as this can damage the internal connections.
Can I reconnect LED string lights after cutting them?
Yes, but it requires soldering or using a compatible connector to restore the circuit. If you’re not comfortable with DIY repairs, it’s best to use the cut section as a standalone strand.
Will cutting LED string lights void the warranty?
Most manufacturers consider cutting a modification that voids the warranty, even if done correctly. Check the product manual or contact the brand to confirm before cutting your lights.

