Featured image for hanging string lights for patio
Image source: loveandrenovations.com
Transform your patio into a captivating outdoor oasis with the simple addition of hanging string lights, perfect for elevating evening ambiance and functionality. Choose weather-resistant, energy-efficient LED options to ensure durability, style, and cost savings while creating a warm, inviting glow for gatherings or quiet relaxation.
Key Takeaways
- Plan your layout first: Measure and mark hanging points to ensure even spacing and symmetry.
- Choose weatherproof lights: Opt for UL-listed or outdoor-rated lights for durability and safety.
- Use proper hardware: Install hooks, anchors, or zip ties to support weight and prevent sagging.
- Mix heights for depth: Vary light heights to add dimension and visual interest to your patio.
- Layer lighting sources: Combine string lights with lanterns or LEDs for balanced ambiance.
- Control with smart plugs: Use timers or smart plugs for effortless, energy-efficient operation.
- Maintain for longevity: Check bulbs, wires, and connections seasonally to extend lifespan.
📑 Table of Contents
- Why String Lights Are the Secret to a Magical Patio
- Choosing the Right String Lights for Your Patio
- Planning Your Layout: Design Tips for Maximum Impact
- Step-by-Step Guide to Hanging String Lights for Patio
- Creative Ideas to Elevate Your Patio Lighting
- Maintenance, Safety, and Seasonal Care
- Real-World Examples and Inspiration
- Final Thoughts: Light Up Your Life
Why String Lights Are the Secret to a Magical Patio
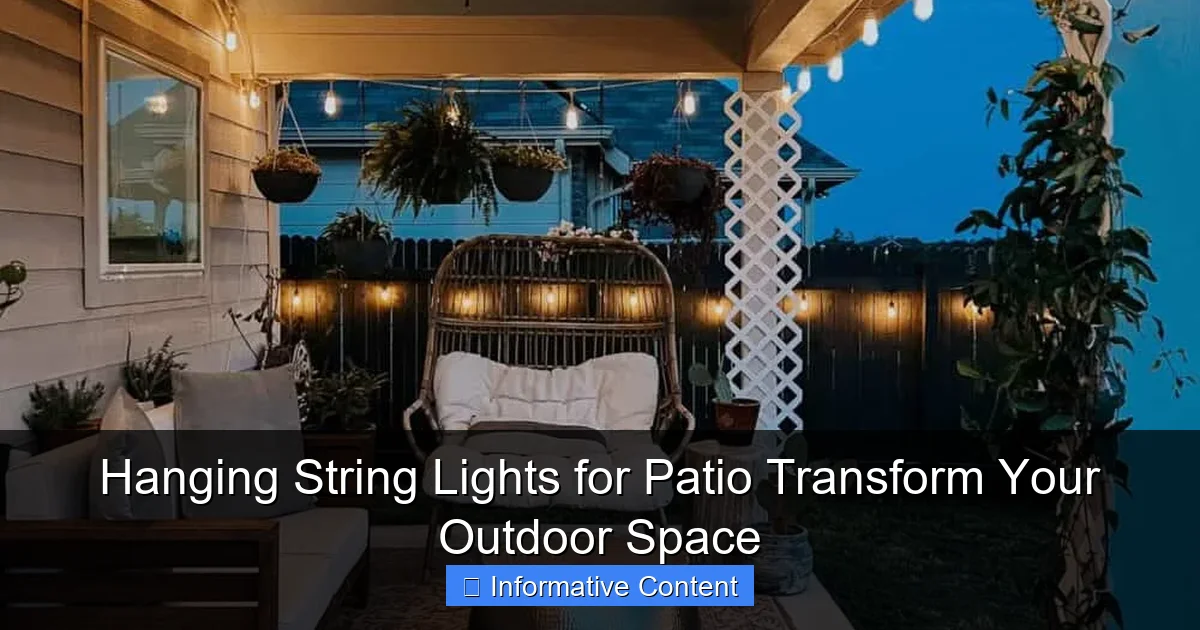
Picture this: It’s a warm summer evening. The sun has dipped below the horizon, painting the sky in soft hues of orange and purple. You’re sitting outside with a glass of wine, laughter filling the air, and above you, twinkling lights stretch across your patio like stars brought down to earth. That’s the magic of hanging string lights for patio—they don’t just illuminate; they transform.
For years, I thought outdoor lighting meant harsh floodlights or those clunky solar path lights that never seem to stay charged. Then one day, while visiting a friend’s backyard, I saw it: a canopy of warm white string lights draped between trees, creating an instant cozy, inviting vibe. The space felt intimate, stylish, and effortlessly charming. That night, I realized something profound: lighting isn’t just functional—it sets the mood. And when it comes to transforming your outdoor space, few things do it better than carefully hung string lights.
Whether you’re hosting a dinner party, enjoying a quiet night alone, or simply want to extend your time outdoors after sunset, the right lighting can make all the difference. But here’s the catch: hanging string lights for patio isn’t as simple as just draping them wherever they fit. There’s artistry, strategy, and a bit of practical know-how involved. Done right, they elevate your patio from ordinary to extraordinary. Done wrong? You might end up with tangled wires, sagging lines, or a dim glow that does little more than highlight the cobwebs.
In this guide, we’ll walk through everything you need to know about hanging string lights for patio—from choosing the right type of lights to installation techniques, layout ideas, and even how to maintain them season after season. No fluff, no sales pitches—just honest, practical advice based on real-world experience. So grab a notebook (or just bookmark this page), and let’s turn your patio into the kind of outdoor oasis you’ve always dreamed of.
Choosing the Right String Lights for Your Patio
The first step in creating a stunning lit-up patio is selecting the right kind of string lights. With so many options on the market—LED vs. incandescent, warm white vs. colored, plug-in vs. solar—it’s easy to feel overwhelmed. But don’t worry. By focusing on a few key factors, you can narrow down your choices quickly.
LED vs. Incandescent: Which Should You Pick?
Let’s start with the big debate: LED or incandescent?
- LED string lights are energy-efficient, long-lasting (often rated for 20,000+ hours), and generate very little heat. They’re ideal for year-round use and are especially great if you plan to leave them up through multiple seasons. Most modern LEDs also come with dimmable options and remote controls, giving you flexibility in brightness and ambiance.
- Incandescent string lights, on the other hand, have that classic, warm glow that many people associate with nostalgia—think vintage holiday decor. However, they consume more electricity, burn out faster, and get hot to the touch. While they offer charm, they’re less practical for frequent or extended use.
Tip: If you’re going for a cozy, intimate feel and don’t mind replacing bulbs occasionally, incandescents can work well. But for most patios, especially those used regularly, LEDs are the smarter, safer choice.
Warm White, Cool White, or Colored Lights?
Color temperature plays a huge role in setting the mood.
- Warm white (2700K–3000K) mimics candlelight and creates a soft, inviting glow. This is the most popular choice for patios because it enhances skin tones and makes food look more appetizing—perfect for dining al fresco.
- Cool white (4000K+) feels modern and crisp, almost like daylight. It works well for task lighting (e.g., over a grill or bar area) but can feel too clinical for relaxation zones.
- Colored lights (red, blue, green, etc.) are fun for parties and special occasions, but they can be distracting for everyday use. Consider using color-changing LEDs with multiple settings so you can switch between warm white for dinners and festive colors for events.
Pro tip: Test a sample strand before committing. Buy one set and hang it temporarily to see how it looks at night. Trust me—what looks good in the store might look harsh or too dim once installed.
Plug-In, Solar, or Battery-Powered?
This decision depends largely on your patio setup.
- Plug-in lights provide consistent, bright illumination and are best for permanent installations. Just make sure you have access to a GFCI-protected outdoor outlet. Use weatherproof extension cords and outdoor-rated timers for safety and convenience.
- Solar string lights are eco-friendly and easy to install since they don’t require wiring. However, they rely on sunlight to charge, so performance varies by climate and placement. They’re great for shaded areas or if you lack nearby outlets—but expect slightly dimmer output and inconsistent performance on cloudy days.
- Battery-powered lights offer maximum flexibility and portability. Ideal for renters or temporary setups, but batteries need frequent replacement and can be costly over time.
My recommendation? Go with plug-in LEDs for a permanent, reliable setup. Pair them with a dusk-to-dawn timer so they turn on automatically every evening without you lifting a finger.
Bulb Shape and Spacing Matter
Not all string lights are created equal. Pay attention to:
- Bulb type: Globe, Edison-style, fairy lights, or lantern-shaped? Globe bulbs give a modern, clean look; Edison-style adds rustic charm; fairy lights are delicate and whimsical.
- Spacing: Closer spacing (every 3–6 inches) creates a dense, starry effect. Wider spacing (8–12 inches) feels more open and minimalist. Choose based on your desired density and coverage area.
- Wire gauge: Thicker wires (like 20-gauge) are sturdier and less prone to sagging over long runs. Thin wires (24-gauge) are lighter but may droop without proper support.
Example: For a 15-foot span between two trees, I’d recommend 20-gauge wire with globe bulbs spaced every 6 inches—enough coverage without looking cluttered.
Planning Your Layout: Design Tips for Maximum Impact
Now that you’ve chosen your lights, it’s time to plan where and how to hang them. A well-thought-out layout ensures even coverage, avoids dark spots, and enhances the overall design of your patio. Here’s how to approach it like a pro.
Sketch Your Patio First
Grab graph paper or use a free app like SketchUp Free or Canva. Draw an overhead view of your patio, including key features:
- Furniture (table, chairs, lounge areas)
- Architectural elements (pergolas, railings, walls)
- Trees, fences, or posts
- Entry points and pathways
Then, sketch potential light paths. Think about where people will gather, where food is served, and which areas need ambient vs. task lighting.
Personal story: When I first tried this, I skipped the sketch and just started hanging lights. Result? I ended up with a giant “X” across my patio that blocked views and looked chaotic. A quick sketch would’ve saved me hours of frustration.
Create a Focal Point
Every great lighting design has a focal point. This could be:
- A dining table under a canopy of lights
- A seating area centered around a fire pit
- A pergola or gazebo acting as a ceiling
- A water feature or planter box highlighted with accent lighting
Use your string lights to draw attention to this area. For example, create a tighter cluster of lights directly above your dining table, then fan them out toward the edges of the patio.
Tip: Add a dimmer switch so you can adjust the intensity depending on the occasion. Bright for cooking, soft for romantic dinners.
Use Layers for Depth
Flat, single-layer lighting feels one-dimensional. To add depth and dimension, use multiple layers:
- Overhead canopy: The main layer, spanning between trees, posts, or a pergola.
- Perimeter lighting: Wrap lights around railings, columns, or fence posts to define the space.
- Accent lighting: Add fairy lights inside glass jars, wrap them around tree trunks, or drape them along planter boxes.
This layering technique mimics natural lighting in a forest—dappled sunlight filtering through leaves—and creates a much more immersive atmosphere.
Consider Height and Spacing
Too high, and the lights disappear into the darkness. Too low, and people bump their heads. Aim for:
- Minimum height: 7 feet (2.1 meters) to allow head clearance.
- Optimal height: 8–10 feet (2.4–3 meters) for most residential patios.
- Spacing between anchor points: No more than 10–12 feet without intermediate support. Beyond that, lights will sag and look sloppy.
Use existing structures whenever possible: trees, eaves, fences, or pergola beams. If you don’t have natural anchor points, install light poles, shepherd’s hooks, or tension rods to create artificial ones.
Think About Power Sources
Plan your layout around available outlets. Avoid long extension cords across walkways (safety hazard!). Instead:
- Run cords along walls or under decking.
- Use outdoor-rated cord covers to protect wires.
- Install a dedicated outdoor outlet if needed (consult an electrician).
Smart move: Use a smart plug so you can control your lights via voice command or smartphone app. “Alexa, turn on patio lights” is a game-changer on lazy evenings.
Step-by-Step Guide to Hanging String Lights for Patio
Alright, time to get your hands dirty. Whether you’re a DIY newbie or a seasoned home improver, these step-by-step instructions will help you install your hanging string lights for patio safely and effectively.
Step 1: Gather Your Tools
Here’s what you’ll need:
- String lights (measured to fit)
- Measuring tape
- Drill and appropriate drill bits
- Outdoor-rated hooks, eye screws, or cup hooks
- Stainless steel wire or nylon cord (for tension lines)
- Ladder (if working at height)
- Extension cords and outdoor-rated timer
- Gloves and safety glasses
Note: Always use stainless steel or galvanized hardware—regular metal will rust outdoors and fail over time.
Step 2: Mark Your Anchor Points
Using your layout sketch, mark where each hook or screw will go. Use painter’s tape or chalk to indicate positions. Double-check distances and alignment with a level.
Example: If hanging between two trees, measure from the trunk outward to ensure symmetry. For a pergola, mark spots every 8–10 feet along the beams.
Step 3: Install Support Hardware
Drill pilot holes to prevent wood splitting, then screw in your hooks. For masonry or brick, use anchors. For trees, use tree-friendly hooks (like those with wide bases or rubber padding) to avoid damaging bark.
Warning: Never nail into trees—it creates entry points for disease and weakens the trunk.
Alternative: Use a Tension System
If you don’t want to drill holes, consider a tension cable system. Run a stainless steel wire between anchor points (trees, posts, or brackets), then attach your string lights to the cable with S-hooks or zip ties. This method is removable, reusable, and perfect for renters.
Step 4: Hang the Lights
Start at the power source and work outward. Attach the first end of the light strand to a hook, then gently pull it toward the next anchor point. Don’t stretch it taut—allow a slight sag (about 6–8 inches in the middle of a 10-foot span) to prevent stress on the wires and bulbs.
Use zip ties, S-hooks, or built-in hanging clips to secure the lights at each anchor point. For a neater look, hide connectors under leaves or behind beams.
Step 5: Connect and Test
Once all strands are hung, connect them end-to-end (if using multiple sets). Plug into a GFCI outlet and test the lights. Fix any dead bulbs or loose connections before finalizing.
Pro tip: Use outdoor-rated zip ties to bundle excess cord and keep everything tidy. Avoid wrapping cords tightly around branches—this can cut into bark over time.
Step 6: Add Finishing Touches
- Hide power cords under mulch, behind furniture, or in cord channels.
- Install a timer so lights turn on at sunset automatically.
- Add decorative elements: lanterns, planters, or sheer curtains to soften the light.
Bonus: For extra flair, drape fairy lights vertically from the canopy to create “light curtains” around the edges.
Creative Ideas to Elevate Your Patio Lighting
Now that your lights are up, it’s time to get creative. These ideas go beyond basic canopies and turn your hanging string lights for patio into a true design feature.
Create a Light Canopy with a Twist
Instead of a simple grid, try these shapes:
- Parallel lines: Hang 3–5 straight rows of lights, 2–3 feet apart. Looks clean and modern.
- Crisscross pattern: Form an “X” or “+” shape for visual interest.
- Zigzag or wave: Alternate high and low anchor points to create movement.
- Hexagonal grid: For a pergola, use a geometric pattern for a contemporary look.
My favorite: A wave pattern with lights dipping low over the dining table and rising toward the corners—creates a sense of enclosure without blocking the view.
Use String Lights as Room Dividers
Define zones on your patio with vertical or angled lights:
- Hang lights diagonally from a high point (tree, roof) down to a lower post, creating a “light wall” between a dining area and lounge.
- Wrap lights around a freestanding screen or lattice panel.
- Suspend lights from a pergola beam down to a coffee table, forming a cozy nook.
Highlight Architectural Features
Draw attention to unique elements:
- Outline a stone fireplace or water feature.
- Frame a doorway or archway with lights.
- Wrap lights around columns or pillars.
This technique adds drama and makes your patio feel more intentional.
Incorporate Nature
Blend lights with your landscaping:
- Weave lights through tree branches for a “fairy tale” effect.
- Wrap fairy lights around tree trunks or shrubs.
- Place battery-operated lights inside hollow logs or planters.
Caution: Avoid covering too much foliage—plants still need airflow and light during the day.
Add Interactive Elements
Make your lights part of the experience:
- Install a motion-sensor light strand along a pathway.
- Use color-changing LEDs with a remote to match the mood (romantic, party, relaxation).
- Add smart bulbs that sync with music or change based on the time of day.
Maintenance, Safety, and Seasonal Care
Great lighting isn’t just about installation—it’s also about upkeep. With proper care, your hanging string lights for patio can last for years. Here’s how to keep them shining bright.
Regular Inspections
Check your lights monthly (or before each season) for:
- Frayed wires or cracked insulation
- Loose or rusted hooks
- Dead bulbs or flickering strands
- Overgrown vegetation interfering with lights
Replace damaged components immediately to prevent short circuits or fire hazards.
Cleaning Your Lights
Outdoor lights collect dust, pollen, and spider webs. To clean:
- Unplug the lights.
- Use a soft brush or microfiber cloth to wipe down bulbs and wires.
- For stubborn grime, use a damp cloth with mild soap—never submerge the lights.
- Allow to dry completely before re-plugging.
Tip: Clean during daylight hours to see dirt more clearly.
Winter and Storm Protection
If you live in a region with harsh winters:
- Remove and store non-weatherproof lights (especially incandescent or delicate fairy lights).
- Leave up heavy-duty, weatherproof LEDs—but inspect them for ice buildup.
- Use wind-resistant hooks and secure all connections tightly before storms.
Consider installing a light cover or canopy over your patio to protect lights from rain and snow.
Safety First: Avoid Common Hazards
- Always use GFCI outlets and outdoor-rated extension cords.
- Never overload circuits—follow the manufacturer’s guidelines for maximum strand connections.
- Keep cords away from walkways to prevent tripping.
- Use low-voltage lights if you have young children or pets.
Important: If you notice buzzing, sparking, or overheating, unplug immediately and inspect for damage.
Storage Tips for Off-Season
If removing lights for winter:
- Coil strands gently around a piece of cardboard or a reel.
- Store in a dry, temperature-controlled area (like a garage or basement).
- Label each strand with its length and bulb type for easy reinstallation.
Real-World Examples and Inspiration
Sometimes, seeing is believing. Here are a few real-life setups to inspire your own hanging string lights for patio project.
| Patio Type | Lighting Solution | Key Features | Best For |
|---|---|---|---|
| Small Urban Balcony | Battery-powered fairy lights + tension wire | No drilling; portable; dimmable | Renters, temporary setups |
| Large Backyard Patio | LED globe lights on pergola beams | Timer-controlled; warm white; 8-ft height | Frequent entertainers |
| Tree-Enclosed Courtyard | Crisscross pattern between trees | Tree-friendly hooks; solar-powered | Nature lovers, eco-conscious homes |
| Modern Rooftop Deck | Parallel LED strips with motion sensors | Cool white for task lighting; sleek design | City dwellers, late-night gatherings |
| Rustic Farmhouse Patio | Edison-style lights on wooden posts | Plug-in with remote; vintage look | Country homes, cozy ambiance |
Each of these setups proves that there’s no one “right” way to hang string lights. The best solution depends on your space, style, and lifestyle.
One couple I know transformed their tiny backyard into a romantic escape by wrapping fairy lights around a single maple tree and draping them down to a small bistro table. Simple, elegant, and utterly magical. Another family used a hexagonal grid on their pergola to create a modern, Instagram-worthy dining area.
The key takeaway? Start small, think big. You don’t need a huge budget or a professional installer. With a little planning and creativity, you can achieve stunning results.
Final Thoughts: Light Up Your Life
Transforming your patio with hanging string lights for patio isn’t just about adding light—it’s about adding life. It’s about creating a space where memories are made, stories are shared, and quiet moments feel just a little bit more special.
From choosing the right bulbs to planning your layout, installing with care, and maintaining over time, every step contributes to a result that’s both beautiful and functional. And the best part? You don’t need to be an electrician or designer to pull it off. All you need is a vision, a few tools, and the willingness to try.
So what are you waiting for? Grab those lights, sketch out your dream patio, and start hanging. Whether it’s a simple strand between two trees or an elaborate canopy over your dining area, the magic happens when you take that first step.
And when you finally sit back one evening, drink in hand, watching the lights twinkle above you—know that you didn’t just hang lights. You created a mood. You built an atmosphere. You made your outdoor space truly yours.
Now go make it shine.
Frequently Asked Questions
How do I hang string lights for patio without damaging my house?
Use removable adhesive hooks, gutter clips, or tension rods to avoid nails or screws. These methods securely hold hanging string lights for patio while protecting your siding or roof.
What’s the best way to power outdoor string lights?
Use outdoor-rated extension cords and GFCI outlets for safety. Solar-powered options are great for areas without easy access to electricity.
Can I leave hanging string lights up year-round?
Only if they’re rated for all-weather use (look for IP65 or higher). Otherwise, take them down during extreme weather to prolong their lifespan.
How many string lights do I need to cover my patio?
Measure your patio’s perimeter or layout, then add 10–15% extra for draping or spacing. Overlapping lights create a cozier ambiance.
Are LED string lights better for patios than incandescent?
Yes! LED hanging string lights for patio use less energy, last longer, and stay cooler, making them safer and more cost-effective.
How can I hide the wires from my patio string lights?
Run cords along walls or fences using cable clips, or tuck them under outdoor rugs or planters. For a cleaner look, choose lights with black or green wires.

