Featured image for how fix ge led string christmas lights
Image source: kassico-outdoor.com
Revive your GE LED string lights in minutes by identifying the faulty bulb or loose connection—most issues stem from a single bad bulb or poor contact in the socket. Use a simple voltage tester or swap suspected bulbs to quickly isolate and replace the culprit, restoring your festive glow without replacing the entire strand.
Key Takeaways
- Inspect bulbs first: Check for loose or damaged bulbs before troubleshooting further.
- Test the fuse: Replace blown fuses in the plug to restore power quickly.
- Use a voltage tester: Identify dead sections by testing individual bulb sockets.
- Swap faulty bulbs: Replace non-working bulbs with known good ones to test.
- Check for damaged wires: Look for cuts or frays causing intermittent connections.
- Reset the lights: Unplug for 10 minutes to reset internal circuits.
- Prevent future issues: Store lights properly to avoid tangles and damage.
📑 Table of Contents
Understanding the Anatomy of GE LED String Christmas Lights
Components That Make Up Your GE LED String Lights
Before diving into troubleshooting, it’s essential to understand the basic anatomy of your GE LED string Christmas lights. Unlike traditional incandescent lights, LED strings are more energy-efficient, durable, and longer-lasting, but they come with unique components that require specific attention. A standard GE LED string light consists of several key parts: the power plug (often with a built-in fuse), the control box (for flashing patterns or steady-on modes), the wiring harness, LED bulbs (usually soldered or socketed), and the insulating casing that protects the internal circuitry.
Each LED bulb in a GE string is typically connected in a series-parallel configuration. This hybrid design ensures that if one LED fails, others in its parallel branch continue to work—though some sections may go dark depending on the circuit layout. GE often uses shunted or non-shunted sockets, which affects how the string handles faults. Additionally, many modern GE LED strings include a rectifier and current-limiting resistors to regulate power flow and prevent overvoltage damage. Recognizing these components helps you diagnose issues more accurately, whether it’s a blown fuse, a faulty bulb, or a wiring break.
Why GE LED Lights Are Different from Older Models
GE LED string lights represent a significant upgrade from older incandescent models. For one, they consume up to 80% less energy and generate minimal heat, making them safer for indoor and outdoor use. They also have a much longer lifespan—typically 25,000 to 50,000 hours—compared to 1,000 to 2,000 hours for incandescent bulbs. However, this longevity comes with a trade-off: when a problem occurs, it’s often more complex than simply replacing a burned-out bulb.
For example, in older string lights, a single dead bulb usually meant the entire string wouldn’t light up due to the series circuit. In GE LED strings, the parallel branches allow partial functionality, but a shorted or open-circuit LED can disrupt the entire branch. Moreover, GE uses proprietary connectors and sometimes includes smart features like app control or voice activation (e.g., with Alexa or Google Assistant), which introduces new failure points. Understanding these nuances is the first step toward fast and effective repairs.
Common Problems with GE LED String Christmas Lights
Entire String Won’t Light Up
One of the most frustrating issues is when the entire GE LED string fails to illuminate. This can stem from several root causes:
Visual guide about how fix ge led string christmas lights
Image source: toddfun.com
- Blown fuse in the plug: Most GE plugs contain a tiny 3-amp or 5-amp fuse that protects the circuit. If the fuse blows due to a power surge or short, the lights won’t turn on.
- Loose or damaged plug: The connection between the wall outlet and the plug may be compromised due to wear, bending, or corrosion.
- Faulty control box: The control unit, which manages on/off and flashing modes, can fail internally due to moisture or electrical issues.
- Broken wiring: If the string has been bent, stepped on, or stored improperly, internal wires may be severed.
For example, a user in Colorado reported their GE LED lights stopped working after a thunderstorm. Upon inspection, the fuse was found to be blown—likely due to a voltage spike. Replacing the fuse restored full functionality.
Partial Lighting or Flickering Sections
When only part of the string lights up—or certain sections flicker—it often points to localized issues. Common culprits include:
- Defective LED bulbs: A single dead or shorted LED can disrupt its parallel branch, causing dimming or flickering.
- Corroded or loose sockets: Over time, moisture can corrode the metal contacts in the sockets, leading to poor conductivity.
- Worn insulation: Cracked or peeling insulation can expose wires, causing intermittent shorts.
- Overloading: Connecting too many GE strings in a daisy chain (beyond the manufacturer’s recommended limit, usually 2-3 sets) can cause voltage drop and flickering.
A practical tip: If flickering occurs in a specific section, try gently wiggling the bulbs in that area. If the flickering stops or changes, it’s likely a socket or bulb issue.
Control Box or Remote Malfunction
GE LED strings with remote controls or app integration may suffer from:
- Dead remote batteries: A simple fix, but often overlooked.
- Pairing issues: Smart lights may lose connection with the control app or hub.
- Water damage: Exposure to rain or snow can ruin the control box’s internal electronics.
For instance, a user in Seattle found their GE Smart LED lights unresponsive after leaving them outside during a rainy spell. After drying the control box and resetting the app, functionality was restored.
Tools and Materials You’ll Need for Repair
Essential Tools for DIY Fixes
To efficiently repair your GE LED string lights, gather the following tools:

Visual guide about how fix ge led string christmas lights
Image source: mobileimages.lowes.com
- Multimeter (digital or analog): Crucial for testing voltage, continuity, and resistance. A basic $20 multimeter from Home Depot or Amazon suffices.
- Wire strippers and cutters: For trimming damaged wires or preparing new connections.
- Soldering iron and solder: Needed for reattaching broken wires or replacing bulbs (if not socketed).
- Heat-shrink tubing or electrical tape: For insulating repaired connections.
- Needle-nose pliers: Useful for handling small components and bending wires.
- Small screwdriver set: For opening the plug housing or control box.
- Replacement fuses: Match the original amp rating (usually 3A or 5A).
- Replacement bulbs or sockets: GE sells compatible LED bulbs and sockets; ensure voltage and base type match (e.g., E12, E17).
Pro tip: Keep a repair kit with these tools and spare parts during the holiday season for quick fixes.
Optional but Helpful Add-ons
- Magnifying glass: For inspecting tiny solder joints or bulb connections.
- Non-conductive gloves: For safety when handling live wires (though always unplug before repairs).
- LED tester: A specialized tool that can identify dead or shorted LEDs without removing them.
- Label maker: To label sections of the string for easier troubleshooting.
Example: A DIYer in Texas used a $15 LED tester to pinpoint a dead bulb in a 100-light GE string in under 5 minutes, saving hours of manual testing.
Step-by-Step Repair Guide for GE LED String Lights
Step 1: Safety First – Unplug and Inspect
Always unplug the lights before starting any repair. Then, visually inspect the entire string:
- Check for frayed wires, cracked insulation, or bent sockets.
- Look for water damage (e.g., mold, corrosion) on the plug, control box, or bulbs.
- Ensure the plug is fully seated in the outlet and that no wires are pinched or kinked.
If you spot obvious damage, proceed to repair. If not, move to the next step.
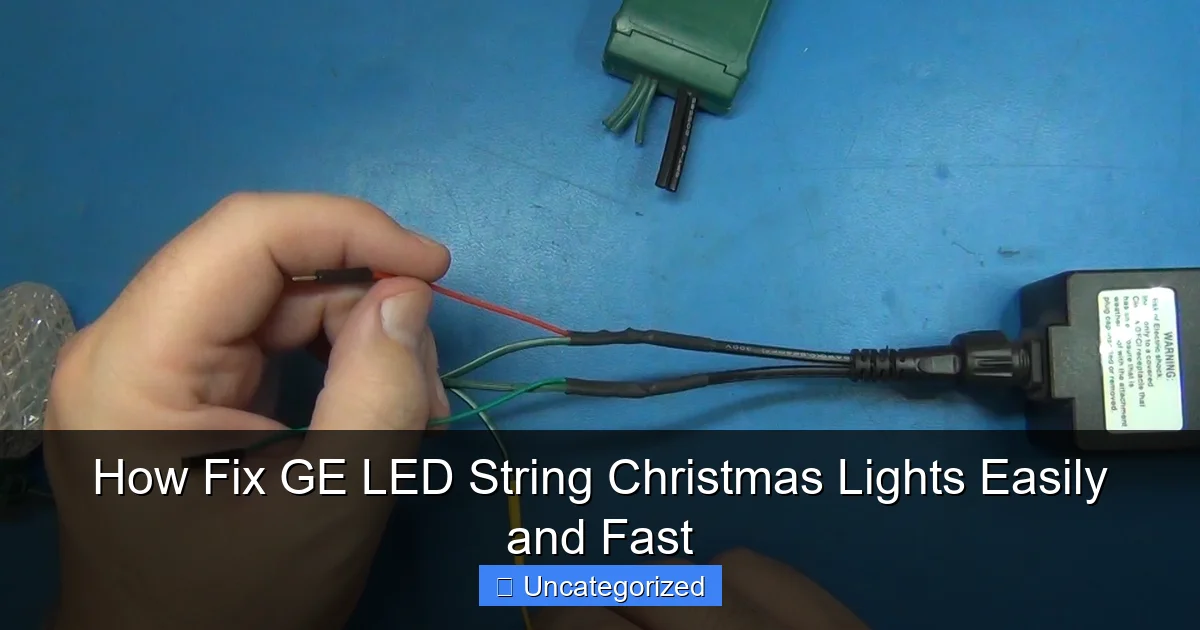
Step 2: Test the Fuse and Plug
- Open the plug housing (usually held by a screw or snap-fit).
- Remove the fuse and test it with a multimeter on the “continuity” or “ohms” setting. If there’s no continuity, the fuse is blown.
- Replace the fuse with an identical one (same amp rating). Never substitute with a higher-amp fuse—this can cause fire hazards.
- Reassemble the plug and test the lights.
Practical tip: Keep spare fuses in a labeled bag with your holiday decorations.
Step 3: Check for Dead or Faulty Bulbs
- Plug in the lights and observe which sections are dark.
- Use an LED tester or multimeter to test each bulb in the dark section:
- For socketed bulbs: Remove the bulb and test its contacts.
- For soldered bulbs: Test continuity across the bulb’s leads.
- Replace any bulb showing no continuity or erratic behavior.
Example: A user in Ohio found that a single dead LED in a 50-light string was causing the last 10 bulbs to flicker. Replacing the bulb fixed the entire string.
Step 4: Repair Broken Wires or Sockets
- Cut out damaged wire sections with wire cutters.
- Strip 1/2 inch of insulation from each end.
- Solder the wires together and cover with heat-shrink tubing (or electrical tape).
- For socket repairs: Desolder the old socket, solder a new one, and test continuity.
Pro tip: Use a third-hand tool to hold wires while soldering for cleaner joints.
Step 5: Troubleshoot the Control Box
- Unplug and open the control box.
- Check for loose wires, corrosion, or burnt components.
- For smart lights: Reset the app, re-pair the device, or replace the control box (GE offers replacements online).
Note: If the control box is sealed or water-damaged, it may need professional repair or replacement.
Preventive Maintenance and Storage Tips
How to Store GE LED Lights Properly
Proper storage extends the life of your GE LED string lights. Follow these steps:
- Remove bulbs: For socketed models, take out bulbs to prevent stress on sockets during storage.
- Use a storage reel: Wrap lights around a cardboard tube or plastic reel to avoid tangles.
- Store in a dry, cool place: Avoid attics or basements with temperature swings and humidity.
- Label each string: Note the length, bulb count, and any known issues (e.g., “Flickers at bulb #40”).
Example: A family in Florida stored their GE lights in airtight plastic bins with silica gel packets, preventing corrosion for 5+ years.
Seasonal Maintenance Checks
Before decorating each year, perform these checks:
- Visual inspection: Look for damage, discoloration, or loose bulbs.
- Test each string: Plug in and verify all sections light up.
- Clean bulbs and sockets: Wipe with a dry microfiber cloth to remove dust or residue.
- Update smart features: Ensure app and firmware are current for smart lights.
Pro tip: Keep a holiday maintenance log to track repairs and replacements over time.
When to Replace vs. Repair
Signs It’s Time to Retire Your GE LED String
While most GE LED strings can be repaired, some issues warrant replacement:
- Widespread wire damage: If more than 20% of the wiring is frayed or corroded.
- Control box failure: If the control box is cracked, water-damaged, or non-functional after repair attempts.
- Age and wear: Strings older than 7-10 years may have degraded LEDs or insulation.
- Cost of repair exceeds replacement: If buying a new string is cheaper than sourcing parts and labor.
For example, a user in Arizona found their 8-year-old GE string had 15 dead bulbs and a failing control box. Replacing the entire string was more cost-effective than repairing it.
Choosing a New GE LED String
If replacement is needed, consider:
- LED type: Choose between warm white, cool white, multicolor, or color-changing.
- Length and bulb count: Match to your decorating needs (e.g., 50, 100, or 200 lights).
- Smart features: Opt for app or voice control if desired.
- Weather resistance: Look for IP44 or higher rating for outdoor use.
GE’s 2023 “EverBright” line, for instance, offers 200 warm white LEDs with app control and a 10-year warranty—ideal for long-term use.
| Issue | Likely Cause | Repair Time | Estimated Cost | Difficulty Level |
|---|---|---|---|---|
| Entire string dark | Blown fuse or broken wire | 5-15 minutes | $1-$5 (fuse) | Easy |
| Partial lighting | Dead bulb or corroded socket | 10-30 minutes | $0.50-$2 (bulb) | Easy-Moderate |
| Flickering | Overloading or wiring issue | 15-45 minutes | $0-$10 (tools) | Moderate |
| Control box failure | Water damage or electronics fault | 30-60 minutes | $10-$25 (replacement) | Moderate-Difficult |
| Smart light pairing issues | App or hub malfunction | 5-10 minutes | $0 (reset) | Easy |
Repairing GE LED string Christmas lights doesn’t have to be a daunting task. With a clear understanding of their components, common issues, and the right tools, you can tackle most problems in under an hour. From replacing a simple fuse to soldering a broken wire, the steps outlined here empower you to save money, reduce waste, and keep your holiday decor shining bright. Remember, preventive maintenance is just as important as repair—proper storage and annual checks can prevent 80% of issues before they arise. Whether you’re fixing a single bulb or reviving an entire string, the satisfaction of a successful repair is its own reward. So this holiday season, don’t toss those lights—troubleshoot, repair, and celebrate the glow of a job well done.
Frequently Asked Questions
How do I troubleshoot GE LED string Christmas lights that won’t turn on?
First, check the power source and ensure the outlet is working. Inspect the fuse in the plug (if applicable) and replace it if blown—this is a common fix for GE LED string lights.
Why do only some bulbs work on my GE LED Christmas lights?
This usually indicates a loose bulb or a break in the circuit. Reseat all bulbs in their sockets and look for damaged wires or broken LEDs along the string.
How can I fix flickering GE LED string Christmas lights?
Flickering often stems from loose connections or a failing bulb. Tighten all bulb connections and replace any visibly damaged bulbs to restore steady lighting.
Can I repair a cut or damaged wire on my GE LED light string?
Yes, if the damage is minor, cut out the affected section, strip the wires, and reconnect them with a waterproof wire nut or electrical tape. For extensive damage, consider replacing the string.
How do I replace a burnt-out bulb in GE LED string Christmas lights?
Use a GE replacement LED bulb with the same voltage and size. Turn off the lights, remove the faulty bulb, and insert the new one firmly into the socket.
Are GE LED string Christmas lights waterproof? Can I fix outdoor damage?
Most GE LED strings are weather-resistant but not fully waterproof. For outdoor damage, ensure repairs are insulated and dry; use silicone sealant on exposed connections to prevent moisture issues.

