
Featured image for how hang string lights outdoors
Image source: st.hzcdn.com
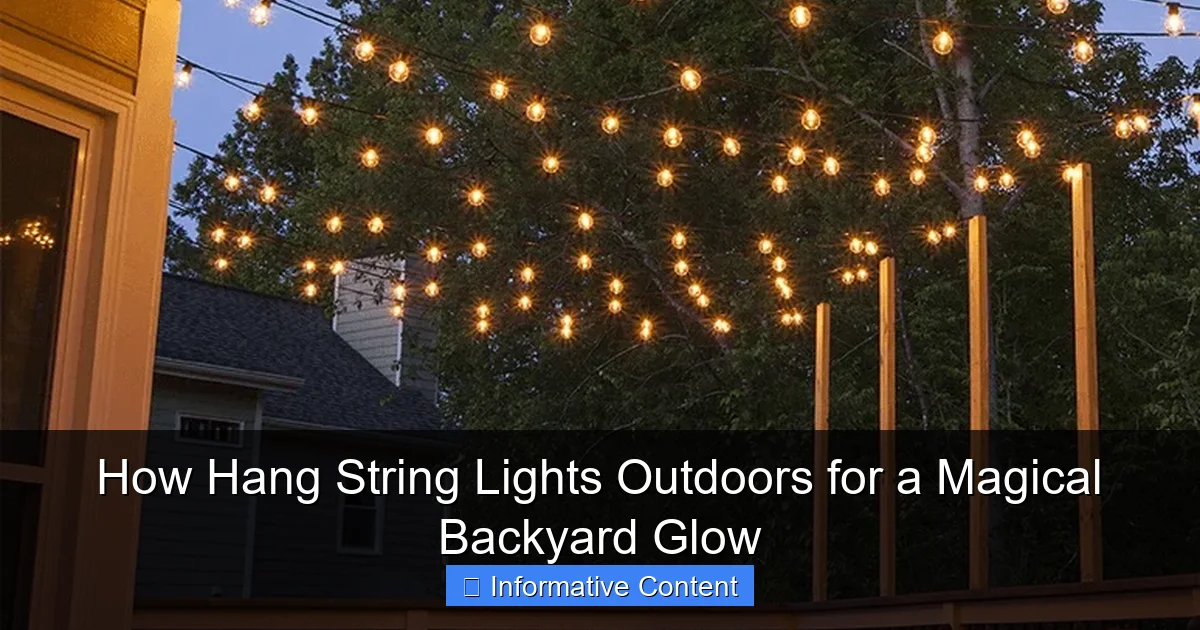
Transform your backyard into a magical retreat by securely anchoring string lights to sturdy structures like trees, fences, or pergolas using hooks, zip ties, or specialized mounting hardware. Ensure lights are spaced evenly and follow a natural path to highlight key areas—think dining zones, walkways, or seating nooks—for both ambiance and safety. Always use outdoor-rated lights and check for weather resistance to keep the glow going all season long.
Key Takeaways
- Plan your layout first: Sketch light placement to avoid overhangs or uneven spacing.
- Use weatherproof lights: Choose outdoor-rated string lights for safety and durability.
- Secure with proper hardware: Install hooks, clips, or poles rated for outdoor use.
- Hide cords strategically: Tuck wires along fences or trees for a clean look.
- Layer lighting: Combine string lights with lanterns or spotlights for depth.
- Test before finalizing: Check connections and brightness to ensure flawless results.
📑 Table of Contents
- How Hang String Lights Outdoors for a Magical Backyard Glow
- Choosing the Right String Lights for Your Outdoor Space
- Planning Your Layout: Design Tips for Maximum Impact
- Tools and Hardware: What You’ll Need to Hang String Lights Safely
- Step-by-Step Guide: How to Hang String Lights Outdoors
- Maintenance and Long-Term Care
- Data Table: Recommended String Light Options
- Final Thoughts: Create Your Own Magical Glow
How Hang String Lights Outdoors for a Magical Backyard Glow
There’s something undeniably enchanting about a backyard softly lit by string lights. Whether you’re hosting a summer barbecue, enjoying a quiet evening with a book, or celebrating a special occasion, the warm glow of outdoor string lights can transform your space into a cozy, magical retreat. I remember the first time I strung up lights in my own backyard. I was skeptical—would they be too dim? Would they look tacky? But the moment I flipped the switch, I was hooked. The way the light danced through the trees, casting delicate shadows on the patio, made me feel like I’d discovered a secret to instant ambiance.
But getting that perfect glow isn’t always as simple as it looks. I’ve learned (sometimes the hard way) that hanging string lights outdoors requires more than just draping them over a tree branch and hoping for the best. From choosing the right lights to planning your layout and ensuring safety, there’s a lot to consider. The good news? With a little planning and the right approach, you can create a stunning outdoor lighting display that feels both effortless and professional. In this guide, I’ll walk you through everything you need to know to hang string lights outdoors—step by step, with real-life tips and lessons learned from my own backyard experiments.
Choosing the Right String Lights for Your Outdoor Space
Before you start hammering hooks or tying knots, take a moment to pick the right type of string lights. Not all lights are created equal, and the wrong choice can leave you with dim, flickering, or even unsafe results. The goal is to find lights that are beautiful, durable, and suited to your space.
Visual guide about how hang string lights outdoors
Image source: kanglight.com
Types of Outdoor String Lights
- Solar-powered lights: Great for eco-conscious homeowners. They charge during the day and turn on automatically at dusk. Ideal for areas with direct sunlight. However, they may be dimmer than plug-in options and can be inconsistent on cloudy days.
- Plug-in (AC-powered) lights: Brighter and more reliable, especially in shaded areas. You’ll need access to an outdoor outlet, but they offer consistent performance and are often dimmable or color-changing.
- LED vs. incandescent: LED lights are energy-efficient, long-lasting (up to 25,000 hours), and cooler to the touch. Incandescent bulbs have a warm, nostalgic glow but use more energy and burn out faster. For outdoor use, LED string lights are almost always the better choice.
- Weatherproof ratings: Look for lights with an IP44 or higher rating. This means they’re protected against splashing water and dust—essential for surviving rain, dew, and wind.
Bulb Shape and Spacing
Think about the mood you want to create. Edison-style bulbs with exposed filaments give a vintage, romantic feel—perfect for patios or pergolas. Mini globe lights offer a more subtle, twinkling effect, great for trees or railings. Consider spacing too: bulbs spaced 4–6 inches apart give a dense, warm glow, while 8–12 inch spacing creates a more open, airy look. For a dramatic effect, mix both—use dense clusters over seating areas and spaced bulbs along pathways.
Length and Power Needs
Measure your space before buying. You don’t want to run out of lights halfway through your project. Most string lights come in 25, 50, or 100-foot lengths. If you’re covering a large area, you can connect multiple strands—but check the manufacturer’s maximum connection limit (usually 2–4 strands). For plug-in lights, use a weatherproof outdoor extension cord with a ground fault circuit interrupter (GFCI) to prevent electrical hazards. Pro tip: buy one extra strand. You’ll likely need it for corners, curves, or unexpected gaps.
Planning Your Layout: Design Tips for Maximum Impact
Great lighting isn’t just about hanging bulbs—it’s about creating a visual flow that enhances your outdoor space. I once made the mistake of randomly draping lights over my patio, only to realize they looked chaotic and didn’t highlight the areas where we actually spent time. A little planning goes a long way.
Map Out Your Zones
Start by dividing your yard into functional zones: dining area, lounging space, pathways, and focal points (like a fire pit or water feature). Each zone can have its own lighting style. For example:
- Dining area: Use a crisscross or “X” pattern over a table for focused, inviting light.
- Lounging space: Drape lights in gentle curves or waves above a seating area to create a canopy effect.
- Pathways: Line walkways with low-hanging lights or use ground-level fairy lights for a magical, floating look.
- Focal points: Wrap lights around a tree trunk or drape them over a pergola to draw attention to a feature.
Use the “Rule of Thirds” for Visual Balance
Instead of centering everything, place lights slightly off-center or in clusters. This creates visual interest and avoids a “stuck-on” look. For example, hang lights in a zigzag pattern from one corner of your patio to the opposite tree, rather than straight across. It feels more natural and draws the eye through the space.
Think in Layers
Combine different heights and depths for a professional look. Try:
- High: Lights strung between trees or from a house to a pergola.
- Medium: Lights draped along a fence or railing.
- Low: Lights wrapped around tree trunks or placed along garden borders.
This layering mimics natural lighting and adds dimension. I once layered lights over my pergola, along my fence, and around a birch tree. The result? My backyard felt like a secret garden at night.
Sketch It First
Grab a piece of paper or use a free app like SketchUp Free to sketch your layout. Note where lights will connect, where outlets are, and any obstacles (like branches or rooflines). This helps you buy the right amount of lights and avoid last-minute scrambling.
Tools and Hardware: What You’ll Need to Hang String Lights Safely
You don’t need to be a DIY expert to hang string lights, but having the right tools and hardware makes the job safer and more durable. I learned this after a storm knocked down my first attempt—lights were hanging on flimsy twine and bent nails.
Essential Tools
- Measuring tape: To plan spacing and lengths.
- Ladder: For reaching high points. Use a stable, non-slip model.
- Drill and drill bits: For installing hooks or anchors (if needed).
- Wire cutters: To trim zip ties or adjust cords.
- Extension pole: Handy for reaching trees or high eaves without a ladder.
Mounting Hardware Options
Choose the right hardware based on your surface:
- For wood (fences, pergolas, decks): Use cup hooks or eye screws. Drill a pilot hole first to avoid splitting the wood. These provide a secure anchor and are easy to remove.
- For vinyl or aluminum siding: Use adhesive hooks rated for outdoor use (like 3M Command Outdoor Strips). Avoid nails or screws—they can damage the surface and void warranties.
- For stucco or brick: Use masonry anchors or tapcon screws. Drill into mortar joints, not the bricks, to avoid cracking. For a no-drill option, try gutter hooks that clip onto roof edges.
- For trees: Use tree-friendly zip ties or fabric straps. Never use nails or wire—they can damage the bark and invite pests. Wrap ties loosely to allow for tree growth.
Supporting the Lights
String lights need support to prevent sagging or snapping. Here’s how to keep them taut:
- Use guide wire: For long spans (over 15 feet), run a thin, galvanized steel wire between anchor points. Attach the lights to the wire with small carabiners or zip ties. This distributes weight and prevents stress on the light cord.
- Add turnbuckles: For adjustable tension on guide wires. Tighten them after installation to remove slack.
- Reinforce corners: Use extra hooks or zip ties at bends to prevent the lights from slipping.
Safety First
Never hang lights from power lines, gutters, or anything not designed to hold weight. Use outdoor-rated extension cords and plug them into a GFCI outlet. If you’re unsure about electrical safety, consult a licensed electrician. And always unplug lights during storms or high winds.
Step-by-Step Guide: How to Hang String Lights Outdoors
Now for the fun part—putting it all together. I’ll walk you through my go-to method, which works for most backyard setups. This approach balances durability, safety, and aesthetics.
Step 1: Install Anchor Points
Start by installing your hooks, screws, or adhesive mounts. For a pergola-to-tree setup:
- Drill pilot holes into the pergola beams and insert cup hooks.
- On the tree side, wrap a fabric strap around the trunk and secure it with a zip tie. Attach a carabiner to the strap.
- For a house-to-gutter setup, clip gutter hooks onto the roof edge.
Pro tip: Use a level to ensure hooks are aligned. Misaligned hooks make lights look crooked.
Step 2: Run the Guide Wire (For Long Spans)
If your span is over 15 feet, install a guide wire first:
- Cut a length of galvanized steel wire slightly longer than your span.
- Loop one end around the first anchor and secure it with a wire clamp.
- Stretch the wire to the opposite anchor, add a turnbuckle, and tighten until taut (no sagging).
Step 3: Attach the Lights
Now, hang the string lights:
- Plug in the lights and drape them along the guide wire (if using) or between anchors.
- Secure each bulb socket or every 2–3 feet with small zip ties or carabiners. Don’t tie too tightly—allow a little slack for movement.
- For a “crisscross” pattern, weave the lights diagonally between anchors, securing at each intersection.
For trees, wrap lights gently around the trunk in a spiral, securing at the base and top. Avoid wrapping too tightly—tree bark needs to breathe.
Step 4: Adjust and Test
Turn on the lights and check for:
- Sagging: Add more support points or tighten the guide wire.
- Glare: Angle bulbs downward or use frosted bulbs to reduce brightness.
- Uneven spacing: Reposition zip ties or hooks.
Walk around and view the lights from different angles. Make adjustments until the glow feels balanced.
Step 5: Hide the Cords
Exposed cords can ruin the look. Tuck them behind plants, use cord clips, or run them along a fence. For plug-in lights, hide the outlet under a planter or use a weatherproof outlet box.
Maintenance and Long-Term Care
Great lighting isn’t a one-time project. To keep your backyard glow magical year after year, a little maintenance goes a long way.
Seasonal Care
- Spring: Inspect lights for damage from winter weather. Replace burnt-out bulbs or frayed cords.
- Summer: Clean bulbs with a damp cloth to remove dust and bugs. Check for loose connections.
- Fall: Before storms, tighten loose hooks and remove debris from around cords.
- Winter: If you live in a cold climate, consider removing lights during heavy snow or ice. Or, use all-weather string lights designed for year-round use.
Troubleshooting Common Issues
- Flickering lights: Often caused by loose bulbs or a faulty connection. Tighten sockets and check the plug.
- Dim lights: Could be low voltage. Use a shorter extension cord or add a power booster.
- Lights not turning on: Check the outlet, fuse, and bulb connections. Use a circuit tester to verify power.
Storage Tips
If you remove lights seasonally:
- Coil them loosely and store in a dry, dark place.
- Use a cord reel or wrap them around a piece of cardboard to prevent tangles.
- Label strands (e.g., “Pergola – 50ft”) for easy reinstallation.
When to Replace
Even the best lights don’t last forever. Replace them if:
- More than 20% of bulbs are out.
- Cords are cracked or frayed.
- Water has seeped into the sockets.
Most quality LED lights last 5–10 years. When it’s time to upgrade, consider smart lights with timers, dimmers, or color-changing options for added convenience.
Data Table: Recommended String Light Options
| Brand/Model | Type | Length | Bulb Spacing | Weatherproof Rating | Best For | Pros | Cons |
|---|---|---|---|---|---|---|---|
| Brightech Ambience Pro | Plug-in LED | 48 ft | 4 in | IP65 | Pergolas, patios | Bright, dimmable, shatterproof bulbs | Requires outlet access |
| Brightown Solar String Lights | Solar-powered | 25 ft | 6 in | IP65 | Trees, fences | No wiring, auto-on/off | Dimmer on cloudy days |
| Twinkle Star LED Globe | Plug-in | 50 ft | 3 in | IP44 | Large spaces, events | Affordable, dense glow | Not dimmable |
| LITOM Solar String Lights | Solar | 33 ft | 4 in | IP65 | Gardens, pathways | 8 lighting modes, motion sensor | Battery life varies |
Final Thoughts: Create Your Own Magical Glow
Hanging string lights outdoors isn’t just about lighting up a space—it’s about creating a feeling. The right setup can turn your backyard into a place where memories are made, conversations linger, and everyday moments feel special. I’ve hosted countless gatherings under my own string lights, and the feedback is always the same: “It feels magical.” And it does.
Remember, the best lighting is the kind that feels natural and inviting. Don’t stress over perfection—embrace the little imperfections. A slightly crooked line or a bulb that flickers can add character. The goal is to create a space where you and your loved ones want to spend time.
So grab your lights, plan your layout, and get started. Whether you’re lighting up a cozy patio or transforming a sprawling yard, the process of how to hang string lights outdoors is as rewarding as the result. With the tips in this guide, you’re not just installing lights—you’re crafting an atmosphere. And trust me, the glow is worth it.
Frequently Asked Questions
How do I hang string lights outdoors without damaging my walls or trees?
Use removable adhesive hooks, outdoor-rated clips, or zip ties for a damage-free setup. For trees, wrap lights around branches or use soft cord to avoid harming the bark.
What’s the best way to hang outdoor string lights for even spacing?
Measure your space first, then use a guide (like painter’s tape) to mark hook or anchor points. Maintain consistent tension while hanging to avoid drooping or uneven gaps.
Can I hang string lights outdoors in all weather conditions?
Yes, but always use outdoor-rated string lights with weatherproof seals. Avoid leaving them exposed to extreme storms; unplug during heavy rain or snow.
How high should I hang outdoor string lights for a safe, magical glow?
For walkways or seating areas, aim for 7–9 feet above the ground. Higher placements (10–12 feet) work best for large spaces like patios or pergolas.
Do I need a power source nearby to hang string lights outdoors?
Yes, ensure an outdoor GFCI outlet is within reach of your lights’ cord. Use heavy-duty extension cords rated for outdoor use if needed, and hide them safely.
How can I hang string lights outdoors on a budget?
Use existing structures (fences, railings, or trees) as anchors instead of buying poles. DIY solutions like repurposed hooks or zip ties keep costs low without sacrificing style.

