
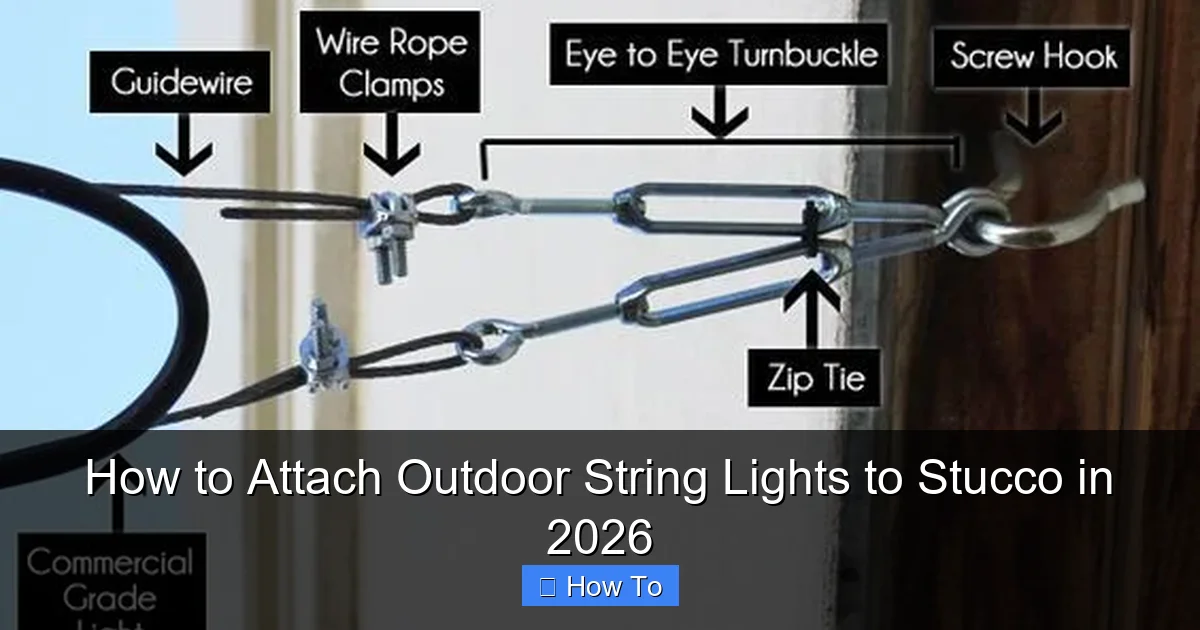
Featured image for how to attach outdoor string lights to stucco
Image source: cdn.thewirecutter.com
Attaching outdoor string lights to stucco in 2026 is easiest and safest using adhesive-backed, outdoor-rated mounting clips designed for textured surfaces—no drilling required. These modern solutions provide a secure hold while protecting your stucco from cracks and moisture damage. For long-term installations, always choose UV-resistant clips and seal any gaps with clear exterior caulk to ensure durability through all seasons.
How to Attach Outdoor String Lights to Stucco in 2026
Key Takeaways
- Use stucco-rated anchors: Choose anchors designed for stucco to prevent cracks and ensure secure hold.
- Drill pilot holes: Always pre-drill to avoid damaging the stucco’s fragile surface during installation.
- Opt for removable clips: Use adhesive hooks rated for outdoor use for damage-free removal later.
- Check weatherproofing: Ensure all hardware is weather-resistant to withstand rain, sun, and humidity.
- Space mounts evenly: Distribute weight by placing anchors 2-3 feet apart for sagging-free lighting.
- Test before finalizing: Hang lights temporarily to adjust spacing and avoid over-drilling unnecessary holes.
- Seal gaps: Apply silicone caulk around holes to block moisture and protect stucco integrity.
Why This Matters / Understanding the Problem
Let’s be real—nothing sets the mood for a summer evening like twinkling outdoor string lights draped across your patio, balcony, or backyard. But if you’ve got a stucco exterior, you’ve probably stared at the rough, textured surface and thought, “How the heck do I hang these without wrecking my house?”
I’ve been there. Last year, I tried using regular nails. Big mistake. Not only did the stucco crack, but the lights kept falling after a light breeze. I learned the hard way that stucco is tricky—it’s durable but brittle, and standard hardware doesn’t always play nice with it.
That’s why learning how to attach outdoor string lights to stucco in 2026 isn’t just about aesthetics. It’s about preserving your home’s integrity while creating a magical outdoor space. Whether you’re hosting a dinner party or just enjoying a quiet night under the stars, the right technique makes all the difference.
The good news? With the right tools and a little patience, you can get a clean, secure, and long-lasting installation—without drilling holes that look like Swiss cheese. And yes, it’s totally doable, even if you’re not a DIY pro.
What You Need
Before we dive in, let’s get your toolkit ready. You don’t need a full workshop—just a few smart, stucco-friendly items. Here’s what I’ve found works best after years of trial and error:
Visual guide about how to attach outdoor string lights to stucco
Image source: i.pinimg.com
- Stucco anchors (like E-Z Ancor or SnapToggles) – These expand behind the stucco layer for a rock-solid grip.
- Plastic or rubber-coated hooks – Gentle on stucco and won’t rust over time.
- Outdoor-rated string lights – Look for weatherproof, LED, and with a long cord (at least 10–15 feet).
- Measuring tape and level – Because crooked lights are a vibe killer.
- Pencil – For light marking (don’t press too hard).
- Power drill with a masonry bit – A 3/16” or 1/4” bit works well for pilot holes.
- Rubber mallet (optional) – For gently tapping in anchors without cracking.
- Silicone caulk (optional but smart) – For sealing holes after installation to prevent moisture.
- Gloves and safety glasses – Safety first, especially when drilling into brittle stucco.
Pro tip: If you’re renting or hesitant about permanent holes, consider adhesive-backed outdoor hooks (like Command Outdoor Strips). They’re not as strong in high winds, but they’re great for temporary setups or renters. Just make sure the stucco is clean and dry before applying.
Now that you’re prepped, let’s get into the how to attach outdoor string lights to stucco in 2026—step by step, no fluff, no confusion.
Step-by-Step Guide to How to Attach Outdoor String Lights to Stucco in 2026
Step 1: Plan Your Layout
Before you touch a drill, take a step back and visualize where your lights will go. Are you framing a patio? Creating a canopy over a dining table? Or just outlining a wall?
Grab your measuring tape and mark potential anchor points with a light pencil dot. Space them every 2–3 feet for a balanced look. Use a level to ensure your lines are straight—trust me, your OCD self will thank you later.
Why this matters: Stucco can be uneven. Measuring and leveling now saves you from a lopsided setup that looks amateurish. I once skipped this step and ended up with a “drunken” light line that made my backyard look like a carnival gone wrong.
Pro tip: Sketch a quick layout on paper or use a free app like SketchUp Free to visualize. This helps you estimate how many anchors and how much string you’ll need.
Step 2: Choose the Right Anchors
Not all anchors are created equal. For stucco, you need ones that grip the base (usually wire mesh or metal lath) behind the outer layer. Here’s what works:
- E-Z Ancor Twist-in Anchors: Great for lighter loads. Twist them in with a screwdriver—no drill needed for small holes.
- SnapToggles: Ideal for heavier lights or windy areas. The toggle expands behind the stucco for serious holding power.
- Plastic anchors with screws: Use these with caution—only if your stucco is thick and you’re sure you’re hitting the lath.
Warning: Avoid drywall anchors. They’re designed for soft drywall, not hard, brittle stucco. I tried once. The anchor spun in place, and I ended up with a hole twice the size. Not cute.
For most outdoor string lights, E-Z Ancors or SnapToggles are your best bet. They’re designed for masonry and won’t crack the stucco when installed correctly.
Step 3: Drill Pilot Holes (Gently!)
Now it’s time to drill—but go easy. Stucco is like a hard candy shell. Too much pressure, and it cracks.
- Use a masonry drill bit (3/16” or 1/4”). These are designed to cut through stucco without shattering it.
- Set your drill to a low speed. High RPMs can overheat and crack the surface.
- Drill straight, not at an angle. Hold the drill steady and let the bit do the work—don’t force it.
- Drill to the depth of your anchor (usually 1–1.5 inches). Don’t go too deep—you don’t want to hit the wood or metal lath behind.
Real talk: I once got impatient and drilled too fast. The stucco cracked like a sunburnt sidewalk. Now I use a rubber mallet to tap the bit in lightly at first, then drill slowly. It’s saved me from disaster more than once.
After drilling, blow out the dust with your mouth or a can of compressed air. You want a clean hole for the anchor to seat properly.
Step 4: Insert the Anchors
This is where the magic happens. Insert your anchor into the hole:
- For E-Z Ancor: Twist it in with a screwdriver until it’s flush. The wings expand behind the stucco.
- For SnapToggle: Insert the toggle, then push the plastic sleeve through. Snap it off—it locks in place.
Don’t overtighten. Once it’s snug, stop. You’re not building a bridge—just securing lights.
Pro tip: Test the anchor with a gentle tug. If it wiggles, the hole might be too big or the stucco too thin. In that case, move the anchor 2–3 inches over and try again. Sometimes stucco has weak spots.
Step 5: Attach the Hooks
Now screw in your hooks. Use rubber-coated or plastic hooks—they won’t rust and are gentle on the stucco.
- Twist the hook into the anchor until it’s secure.
- Make sure it’s pointing in the right direction (usually outward or upward, depending on your layout).
- Repeat for all anchor points.
Double-check that all hooks are at the same height and aligned. A level helps here. Crooked hooks = crooked lights = sad vibes.
Step 6: Hang the String Lights
Now for the fun part—hanging the lights!
- Start at one end (ideally near an outdoor outlet).
- Loop the light’s hanging cord (or built-in hooks) over each wall hook.
- Use zip ties or outdoor-rated clips to secure the cord between hooks—this prevents sagging.
- If your lights have a plug, make sure the plug hangs down (not up) to prevent water from pooling.
Real-life scenario: I once hung my lights and didn’t secure the middle cords. After a windy night, the lights sagged like a hammock. I had to go back and add zip ties every 18 inches. Lesson learned: support the middle, not just the ends.
For a cleaner look, tuck excess cord behind the lights or use a cord cover (available at hardware stores).
Step 7: Seal the Holes (Optional but Smart)
This step is often skipped, but it’s a game-changer for longevity.
Use a small bead of outdoor silicone caulk around each anchor and hook base. This:
- Prevents moisture from getting behind the stucco.
- Keeps insects out.
- Makes the installation look more professional.
Let the caulk dry for 24 hours before turning on the lights.
Why I do this: I live in a humid area. After two years, I noticed some anchors had rusted. Once I started sealing, no more rust. It’s a small step that pays off big.
Pro Tips & Common Mistakes to Avoid
After hanging lights on stucco for over a decade (and making every mistake), here are my hard-earned insights:
1. Don’t Rush the Drilling
Stucco cracks easily. Go slow, use a low drill speed, and let the bit cut. If you feel resistance, stop—don’t push harder. You might be hitting the metal lath behind.
2. Test Your Lights First
Before hanging, plug in your outdoor string lights and make sure every bulb works. It’s way easier to fix a dead bulb on the ground than on a ladder.
3. Consider Wind and Weather
Stucco anchors are strong, but wind can be brutal. If you live in a windy area:
- Use more anchors (every 1.5–2 feet).
- Choose lights with sturdy, braided cords.
- Avoid long, unsupported spans.
4. Avoid Overloading Hooks
Each anchor can hold about 25–50 lbs, depending on type. But your lights? Probably 2–5 lbs total. Still, don’t hang heavy decorations or multiple strings on one hook. Spread the load.
5. Clean Stucco Before Adhesive Hooks
If you’re using Command Outdoor Strips or adhesive hooks:
- Wipe the stucco with isopropyl alcohol.
- Let it dry completely.
- Apply the hook and press for 30 seconds.
Dirty stucco = weak adhesion. I once skipped cleaning, and the hook fell off after a week.
6. Think About Power Access
Plan your layout so the plug reaches an outlet. Use a weatherproof extension cord if needed. Never daisy-chain too many lights—check the manufacturer’s max wattage.
7. Use a Ladder Safely
Stucco is usually on second stories or high walls. Use a stable ladder, have someone spot you, or use a ladder stabilizer. No light is worth a fall.
My biggest fail: I once used regular screws instead of anchors. The stucco cracked, the lights fell, and I had to redo everything. Anchors aren’t optional—they’re essential for how to attach outdoor string lights to stucco in 2026.
FAQs About How to Attach Outdoor String Lights to Stucco in 2026
Q: Can I use nails or screws directly into stucco?
Technically, yes—but it’s not recommended. Nails can crack stucco, and screws without anchors may loosen over time. Anchors distribute the weight and grip the lath behind the stucco, making them far safer and longer-lasting.
Q: Are adhesive hooks safe for stucco?
Yes, but with caveats. Outdoor-rated adhesive hooks (like Command Outdoor) can work for lightweight lights. But they’re not ideal for windy areas or long-term use. I use them for temporary setups or renters. Always clean the surface first.
Q: How do I remove anchors without damaging stucco?
Unscrew the hook first, then gently pry out the anchor with a flathead screwdriver. If it’s stuck, wiggle it slightly. Fill the hole with a dab of stucco patch or caulk. It’ll be barely noticeable.
Q: Can I hang lights in winter?
Yes, but be extra careful. Cold stucco is more brittle. Drill slowly, and avoid hanging heavy or wet lights (like icicle styles). Make sure the lights are rated for freezing temps.
Q: What if my stucco is cracked or damaged?
Repair it first. Use a stucco patching compound, let it cure, then proceed. Hanging lights on damaged stucco can worsen the cracks. I learned this after ignoring a small crack—it grew into a 6-inch fissure.
Q: Do I need a permit?
For simple string lights, usually not. But if you’re running wiring through walls or adding outlets, check local codes. When in doubt, ask your HOA or city building department.
Q: How long will the installation last?
With proper anchors and sealing, your setup can last 5–10 years. I’ve had the same lights up for 7 years with zero issues. Just check the anchors annually and reseal if needed.
Final Thoughts
Hanging outdoor string lights on stucco doesn’t have to be a headache. With the right tools, a little patience, and the steps I’ve shared, you can create a stunning, long-lasting display that turns your outdoor space into a cozy retreat.
Remember: how to attach outdoor string lights to stucco in 2026 is all about working with the material, not against it. Use stucco anchors, drill gently, seal your holes, and plan your layout. Skip the shortcuts—they’ll come back to haunt you.
And hey, if you’re still nervous, start small. Hang one strand over your patio table. Once you see how easy and rewarding it is, you’ll be ready for the whole backyard.
So grab your drill, pick out those dreamy lights, and get started. The stars (and your string lights) are waiting.
Now go make your outdoor space shine—literally.

