Featured image for how to attach string lights to vinyl fence
Image source: blesserhouse.com
Attaching string lights to a vinyl fence is simple and damage-free when you use UV-resistant, removable mounting clips designed specifically for smooth surfaces. These clips snap securely onto the fence’s top rail, letting you space and adjust lights evenly without drilling, staples, or adhesives that can crack or stain vinyl. For a polished 2026-ready look, opt for smart LED string lights with timers and app control, enhancing both ambiance and security all year round.
How to Attach String Lights to Vinyl Fence in 2026 Easy Guide
Key Takeaways
- Use vinyl-safe clips: Avoid damage with non-penetrating, UV-resistant mounting clips.
- Plan spacing first: Measure and mark light placement for even, professional results.
- Choose LED lights: Opt for energy-efficient, cool-running bulbs to protect vinyl.
- Secure with tension: Keep wires taut but not overly tight to prevent sagging.
- Weatherproof connections: Use outdoor-rated extension cords and seal all electrical joints.
- Test before installing: Ensure lights work properly before mounting to avoid rework.
Why This Matters / Understanding the Problem
Let’s be honest: vinyl fences are sleek, low-maintenance, and look great year-round. But when it comes to how to attach string lights to vinyl fence in 2026 easy guide, most of us hit a wall. You can’t just hammer nails into vinyl—it cracks. And sticky hooks? They fail when humidity kicks in or winter hits. I learned this the hard way after my first string light setup collapsed during a summer thunderstorm. Lights dangling by one corner, tangled, and half the bulbs out. Not exactly the cozy vibe I was going for.
You’re not alone. Homeowners love string lights for patios, decks, and outdoor entertaining. But vinyl fencing? It’s smooth, non-porous, and unforgiving. The real challenge isn’t just hanging the lights—it’s doing it in a way that’s secure, weatherproof, and won’t damage your fence. Plus, you want it to look intentional, not like a last-minute craft project.
This guide is built from real-world trial, error, and a few “why didn’t I think of that?” moments. Whether you’re lighting up your backyard for a summer BBQ or creating a year-round ambiance, I’ll walk you through the best ways to attach string lights to a vinyl fence—without drilling, cracking, or frustration. The how to attach string lights to vinyl fence in 2026 easy guide is all about smart, safe, and stylish solutions.
What You Need
Before we dive in, let’s gather the right tools and materials. The goal is to avoid damaging your fence while keeping your lights secure through rain, wind, and temperature swings. Here’s what I’ve found works best:
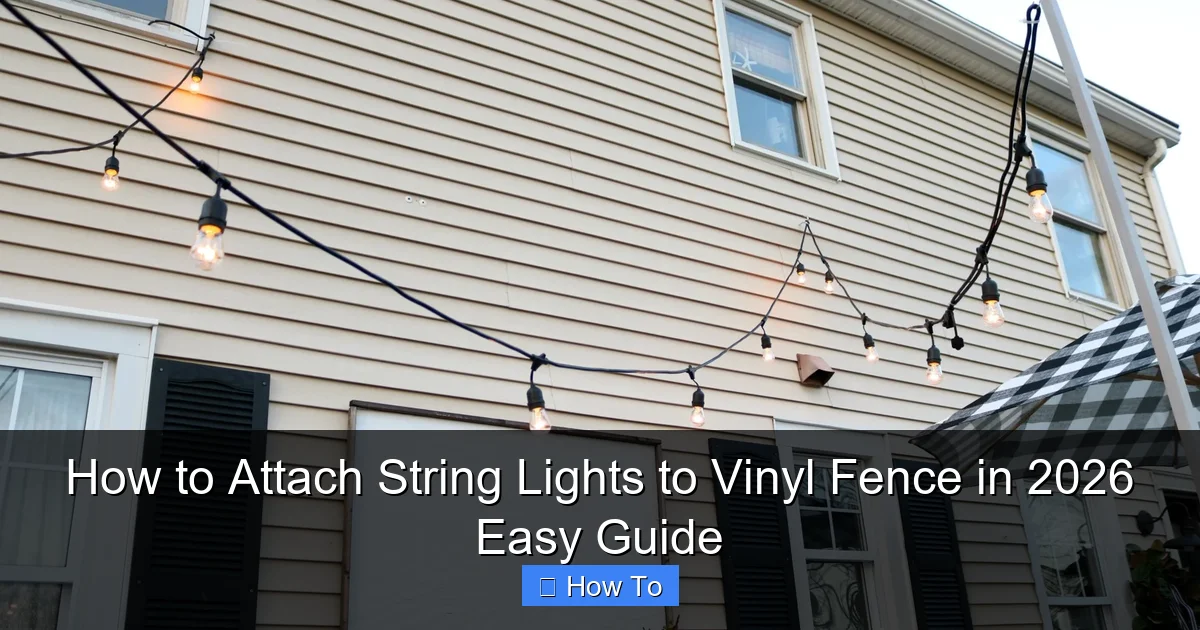
Visual guide about how to attach string lights to vinyl fence
Image source: nestingwithgrace.com
- Outdoor-rated string lights (LED, weatherproof, with a UL or ETL safety rating)
- Fence-mounted clips or hooks (specifically designed for vinyl or smooth surfaces—look for rubberized or soft-grip versions)
- Adhesive-backed outdoor mounting squares (like 3M Command Outdoor Strips—rated for 16 lbs and all weather)
- Zip ties (UV-resistant) – 8” or 12”, black or white to match your fence
- Plastic-coated wire or cord clips (optional, for extra security)
- Measuring tape (for spacing and layout)
- Level (optional but helpful) – ensures your lights aren’t slanted
- Extension cord (outdoor-rated) with GFCI protection
- Timer or smart plug (to automate lighting and save energy)
- Ladder (if needed) – for taller fences
- Rubbing alcohol and microfiber cloth – to prep the surface
Pro insight: Skip the cheap plastic clips from big-box stores. They snap in cold weather. Invest in rubber-coated or vinyl-specific clips—they last longer and grip better. I use FenceFast clips, which are designed for this exact job.
Step-by-Step Guide to How to Attach String Lights to Vinyl Fence in 2026 Easy Guide
Step 1: Choose the Right String Lights
Not all string lights are created equal. For vinyl fences, you need lights that are:
- Weatherproof (rated IP65 or higher)
- LED bulbs (they’re cooler, last longer, and use less power)
- With a plug-and-go design (no need to wire them in)
- Lightweight – heavy strands can pull on weak clips
I prefer Edison-style LED string lights with a black or brown cord—they blend with vinyl and look elegant. Avoid incandescent bulbs; they get hot and can melt plastic clips over time.
Also, check the length. Measure your fence section (or the area you want to light) and add 10–15% extra for slack and connections. Nothing worse than running out of lights halfway through.
Personal note: I once bought 50-foot lights for a 40-foot run. By the time I connected two strands and added a few feet for the plug, I was short. Now I always add a buffer.
Step 2: Plan Your Layout (Before You Hang)
Don’t just start clipping. Take 10 minutes to plan. This is where the how to attach string lights to vinyl fence in 2026 easy guide really pays off—because a good layout prevents headaches later.
- Decide if you want a straight line along the top, a zigzag, or draped loops (great for patios).
- Mark where each light bulb will sit using painter’s tape or chalk. This helps you visualize spacing.
- Use a measuring tape to space clips every 12–18 inches—closer if you’re doing loops or curves.
- Plan for the plug location. Can you reach an outdoor outlet? Do you need an extension cord? Avoid running cords across walkways.
For a zigzag pattern, I like to start at one corner and angle the lights at 45 degrees, clipping every 12 inches. It creates depth and makes the space feel larger.
Warning: Avoid running cords over the top of the fence. If it rains, water can pool and damage the plug. Always route the plug down and away.
Step 3: Clean and Prep the Fence Surface
Vinyl is smooth, but it collects dust, pollen, and even mildew. If your clips or adhesive don’t stick, it’s likely because the surface isn’t clean.
- Wipe the fence rails and posts with rubbing alcohol and a microfiber cloth.
- Let it dry for 1–2 minutes. This removes oils and grime that weaken adhesion.
- For adhesive strips, press and hold each one for 30 seconds. The 3M Command Outdoor Strips need time to bond.
I once skipped this step—big mistake. The clips held for two days, then half fell off during a light rain. A quick wipe makes all the difference.
Pro tip: Do this on a dry, warm day (above 50°F). Cold, wet surfaces reduce adhesive grip.
Step 4: Install the Mounting System (Clips, Strips, or Zip Ties)
Now it’s time to attach your mounting points. You have three solid options—pick the one that fits your fence and style.
Option A: Vinyl-Specific Clips (Best for Long-Term Use)
- Snap the clip over the top rail or side post.
- Most are designed to fit standard 5” or 6” vinyl rails.
- They grip without scratching and are reusable.
I use these for permanent installations. They’re sturdy, and I can take the lights down for winter if needed.
Option B: Adhesive Outdoor Strips (Great for Renters or Lightweight Lights)
- Apply 3M Command Outdoor Strips to the back of each clip or directly to the fence.
- Wait 1 hour before hanging lights (per manufacturer instructions).
- These are rated for 16 lbs—perfect for LED strands.
Ideal if you don’t want to leave permanent marks. Just pull the tab to remove later—no residue.
Option C: UV-Resistant Zip Ties (Budget-Friendly and Secure)
- Thread zip ties through pre-existing holes in the fence (many vinyl fences have them).
- Loop the tie around the cord, not the bulb.
- Trim excess with scissors.
Zip ties are cheap and strong, but they’re permanent. Only use them if you’re okay with tiny holes in your fence. I use them for seasonal setups—just cut them off in winter.
Insider move: For extra security, use a combo—clips for most points, zip ties at corners or high-wind areas.
Step 5: Hang the Lights (With Tension Control)
This is where most people go wrong: hanging lights too tight or too loose.
- Start at the plug end. Leave a few feet of cord slack near the outlet.
- Attach the first clip, then gently pull the strand to the next clip—don’t yank it.
- Leave a slight dip or curve between clips (about 1–2 inches). This prevents sagging and allows for expansion in heat.
- For loops or drapes, use extra clips to hold the “bunch” at the bottom.
I learned the hard way that pulling lights too tight causes bulbs to pop out. Now I hang them with a relaxed hand—like I’m laying a ribbon, not stretching a rubber band.
Common mistake: Hanging lights in a straight, taught line. Vinyl expands in heat. If your lights are too tight, they’ll pull clips off or snap in summer.
Step 6: Secure the Cord and Plug
Your lights are up—now keep them safe.
- Use zip ties or clips to secure the cord every 2–3 feet, especially near the plug.
- Keep the plug off the ground. Use a hook or clip to hang it 6–12 inches above the soil.
- Route the cord along the fence base or use a cord cover (like a flexible conduit) to protect it from tripping and weather.
I use a small plastic hook near the outlet to hold the plug. It keeps it dry and easy to unplug.
Step 7: Test and Adjust
Plug in your lights. Walk around and check:
- Are all bulbs lit?
- Is there any sagging or tension?
- Do clips feel secure?
- Is the plug safe and dry?
If a clip pops off, re-clean the area and reapply. For sagging, add an extra clip in the middle. For tension, loosen slightly and re-clip.
This step takes 5 minutes but saves you from redoing the whole thing later.
Step 8: Automate with a Timer or Smart Plug (Optional but Smart)
Want your lights to turn on at sunset and off at bedtime? Use a timer or smart plug.
- Plug the string lights into a weatherproof outdoor timer or smart plug (like Kasa or TP-Link).
- Set the schedule via app or manual dial.
- Bonus: Use a motion sensor or voice control (Alexa/Google) for on-demand lighting.
I use a smart plug so I can turn the lights on from my phone when guests arrive. No more fumbling with switches in the dark.
Pro Tips & Common Mistakes to Avoid
After years of trial and error, here’s what I wish I knew earlier:
Pro tip #1: Use clear zip ties for a discreet look. They’re less visible against white or tan vinyl.
Pro tip #2: For curved or angled fences, use flexible cord clips that bend with the shape. Rigid clips can pop off on corners.
Pro tip #3: Store lights properly. When taking them down, coil them loosely and store in a dry, cool place. Avoid plastic bags—they trap moisture.
Common mistake #1: Using indoor adhesive hooks. They fail in UV light and humidity. Always choose outdoor-rated products.
Common mistake #2: Ignoring wind load. If your fence faces open space, use extra clips at the top and corners. Wind can whip lights and pull them down.
Common mistake #3: Overloading one outlet. If you’re running multiple strands, use a power strip with surge protection—not a daisy-chained extension cord.
Personal story: I once ran six strands on one outlet. The breaker tripped during a storm. Now I use a 10-outlet outdoor power strip—game changer.
Also, check your lights annually. Replace any with frayed cords or flickering bulbs. Safety first.
And if you’re in a cold climate, consider removable clips so you can take lights down in winter. Ice buildup can weigh them down and damage clips.
FAQs About How to Attach String Lights to Vinyl Fence in 2026 Easy Guide
Can I use regular Command strips on a vinyl fence?
Not the indoor ones. Use 3M Command Outdoor Strips—they’re UV-resistant and rated for all weather. Indoor strips degrade in sunlight and humidity. I learned this when my lights fell off after two weeks of summer sun.
Will zip ties damage my vinyl fence?
Not if you’re careful. Most vinyl fences have pre-drilled holes or weep slots. Use those to thread zip ties. Avoid drilling new holes unless you’re okay with permanent marks. I use zip ties only for seasonal setups and cut them off later.
How do I hang lights on a tall fence?
Use a sturdy ladder and a helper. For fences over 6 feet, consider a telescoping pole with a hook to reach the top rail. Or, use a zipper-style light hanger that lets you attach clips from the ground. Safety first—don’t lean over the edge.
What if my fence has no top rail?
No problem. Use side-mounted clips that grip the vertical posts. Or, install a light rail—a thin, removable aluminum bar that clips onto the fence. It gives you a surface to hang from without drilling. I use one on my neighbor’s fence for holiday lights.
Can I leave my string lights up all year?
Yes—if they’re outdoor-rated and properly secured. But check them every season. In winter, snow and ice can weigh them down. I take mine down in December and reinstall in April. It keeps them in better shape.
How do I hide the cords?
Use cord covers (flexible PVC channels) along the fence base. Or, run the cord behind the fence if there’s a gap. For a clean look, match the cord color to your fence. I use brown cords on tan vinyl—they almost disappear.
Are there solar string lights for vinyl fences?
Yes! Solar lights with a detachable panel are great for shaded areas. Mount the panel in direct sun, then run the cord along the fence. Just make sure the panel gets 6+ hours of sunlight. I use solar for my north-facing fence—no outlet needed.
Final Thoughts
Attaching string lights to a vinyl fence doesn’t have to be a battle between aesthetics and durability. With the right tools and a little planning, you can create a warm, inviting space that lasts through every season. The how to attach string lights to vinyl fence in 2026 easy guide isn’t just about hanging lights—it’s about doing it smart, safe, and with style.
Remember: clean your surface, use outdoor-rated hardware, and leave room for expansion. Don’t rush. Take your time with the layout. And if a clip pops off? No shame. We’ve all been there. Just re-clean, reapply, and keep going.
Start small. Try one section first. Once you see how it looks and holds up, expand. Whether it’s for a cozy evening, a backyard party, or just to enjoy your garden at night, those lights will make all the difference.
And hey—when you’re done, send me a photo. I love seeing how people bring their spaces to life. Happy lighting!

