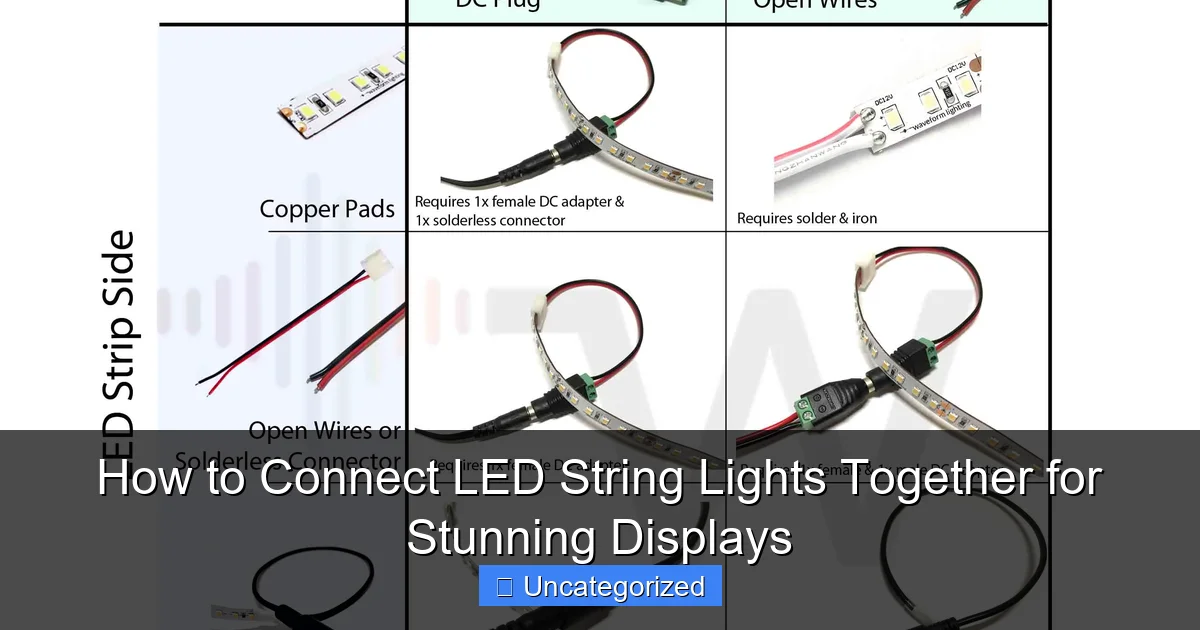
Featured image for how to connect led string lights together
Image source: waveformlighting.com
Connecting LED string lights together is simple and safe when you use compatible, end-to-end connectors designed for seamless linking. Always check the manufacturer’s maximum wattage or strand limit to prevent overloading and ensure a dazzling, uninterrupted display—perfect for holidays, weddings, or ambient home lighting.
How to Connect LED String Lights Together for Stunning Displays
Key Takeaways
- Check compatibility: Ensure lights are same voltage and plug type before connecting.
- Use connectors: Leverage manufacturer-provided connectors for secure, seamless joins.
- Limit connections: Avoid daisy-chaining more than 3-4 strands to prevent overload.
- Weatherproof outdoor links: Seal connections with silicone for outdoor or damp areas.
- Test before hanging: Verify all strands work before installing for easier troubleshooting.
- Plan layout first: Map light placement to minimize cord stress and tangled wires.
Why This Matters / Understanding the Problem
Whether you’re decorating for a holiday, a wedding, or just want to add cozy ambiance to your living room, how to connect LED string lights together for stunning displays is a skill every DIY decorator should master. These lights aren’t just festive—they’re versatile, energy-efficient, and perfect for creating magical atmospheres indoors and outdoors.
But here’s the catch: many people run into issues when linking multiple strings. Lights flicker, some sections don’t turn on, or the entire setup overloads the circuit. This often happens because of mismatched voltage, poor connectors, or exceeding the manufacturer’s recommended number of connected strands.
Imagine planning a dreamy backyard dinner party, only to find that half your fairy lights are dead because you connected too many in a chain. Frustrating, right? The good news? With the right knowledge, you can safely and beautifully connect LED string lights together for stunning displays that last all night—and all season.
Understanding how these lights work, what tools to use, and how to avoid common pitfalls will save you time, money, and headaches. Whether you’re wrapping trees, outlining a patio, or draping lights across a ceiling, this guide will walk you through every step to create a seamless, glowing masterpiece.
What You Need
Before you start, gather these tools and materials. Having everything ready makes the process faster, safer, and more fun.
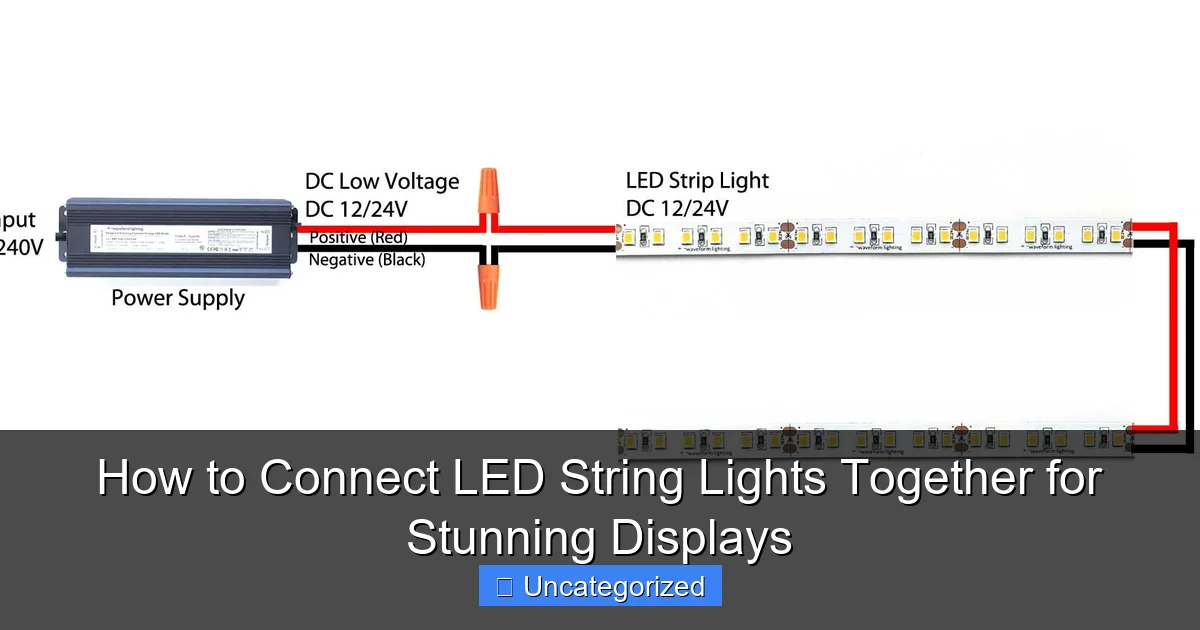
Visual guide about how to connect led string lights together
Image source: waveformlighting.com
- LED string lights (preferably the same brand and model for best compatibility)
- End-to-end connectors (built-in or add-on, depending on the lights)
- Extension cords or power strips (rated for outdoor use if needed)
- Weatherproof sealant or electrical tape (for outdoor connections)
- Zip ties or clips (to secure lights and manage wires)
- Voltage tester (optional) – helps confirm power flow after connections
- Scissors or wire cutters – for trimming zip ties or adjusting cords
- Ladder or step stool – for high installations
- Measuring tape – to plan layout and avoid overstretching
Pro Insight: Always check your light packaging for the maximum number of strings you can safely connect. Most 50–100 LED strings allow 2–4 in a chain. Going beyond this risks overheating or fire hazards.
Step-by-Step Guide to How to Connect LED String Lights Together for Stunning Displays
Step 1: Choose the Right Type of LED String Lights
Not all LED string lights are created equal. Before you start connecting, identify the type of lights you have—this affects how you link them.
- Plug-in strings with end-to-end connectors: These have a male plug on one end and a female socket on the other. You can daisy-chain them easily.
- Non-connectable strings: No built-in connectors. You’ll need to splice or use special adapters.
- USB-powered or battery-operated: Not ideal for long chains unless you have a multi-port USB hub or extra batteries.
- Smart LED strips: Often come with app control and built-in linking ports. Check the manual for max chain length.
For how to connect LED string lights together for stunning displays, plug-in strings with end-to-end connectors are your best bet. They’re designed for linking and reduce the risk of voltage drop or overloading.
Real-Life Example: Sarah from Colorado wanted to line her porch with 60 feet of warm white lights. She bought three 20-foot strings with end-to-end connectors. She connected them in a line, plugged into a single outlet, and got a continuous glow—no dark spots.
Step 2: Check the Manufacturer’s Maximum Chain Length
This is crucial and often overlooked. Every LED string light set has a limit to how many can be safely connected in a series. Exceeding it can cause:
- Dimming or flickering lights
- Overheating wires
- Tripped breakers or blown fuses
- Fire hazard (rare but possible)
Check the packaging or user manual. Look for phrases like:
- “Up to 5 sets can be connected”
- “Max 200 LEDs per circuit”
- “Do not exceed 3 connected strings”
For example, if your 100-LED string says “max 3 connected,” you can safely link three—300 LEDs total. If you need more, use a parallel connection (more on that later).
Warning: Never assume all LED lights have the same limit. A 50-LED set from Brand A might allow 4 chains, while Brand B’s 100-LED set only allows 2. Always verify.
Step 3: Test Each String Before Connecting
Before you start linking, plug in each string individually and turn it on. This simple step saves hours of troubleshooting later.
- Are all LEDs lit?
- Is the color consistent?
- Are there any flickers or buzzing sounds?
If one string fails, replace it or return it. Connecting a faulty string can drag down the whole chain. Think of it like a bad battery in a flashlight—it affects the entire system.
Also, test the connectors. Plug and unplug them a few times. Loose or stiff connectors can cause intermittent power loss.
Pro Tip: Label each string with tape (e.g., “#1 – works”) so you know which ones are good when you start building your display.
Step 4: Plan Your Layout and Power Source
Before connecting, sketch your display. Where will the lights go? How far from the outlet?
- Measure the total length needed.
- Identify where the power plug will be (ideally near the start or middle).
- Decide if you need extension cords or power strips.
For long runs (e.g., around a large yard), place the power source in the center and run strings outward. This reduces voltage drop—lights stay bright from start to end.
If you’re using multiple chains, plan for parallel connections (each chain gets its own plug). This avoids overloading a single circuit and keeps lights bright.
Example: Mark wanted to outline his entire patio—80 feet. He bought four 20-foot strings. Instead of connecting all four in a line (risky), he split them into two chains of two strings each, plugged into separate outlets. Result? Even brightness and zero flickering.
Step 5: Connect the Strings Safely
Now for the main event: connecting the lights. Follow these steps carefully.
- Unplug all strings from power.
- Align the male plug of String A with the female socket of String B.
- Firmly push them together until they click or lock (if they have a twist-lock mechanism).
- Repeat for additional strings, following the max chain limit.
- For outdoor use, wrap each connection with weatherproof sealant or electrical tape to prevent moisture damage.
For non-connectable strings (no built-in sockets), use splice connectors or butt connectors:
- Strip about 1/4 inch of insulation from the end wires of each string.
- Twist the corresponding wires (positive to positive, negative to negative).
- Secure with a waterproof wire nut or heat-shrink tube.
- Seal with silicone or tape.
Warning: Never twist bare wires together without insulation. Exposed copper can cause short circuits or shocks.
Step 6: Use Extension Cords and Power Strips Wisely
Most LED strings come with short cords. You’ll likely need an extension cord or power strip to reach the outlet.
- Use outdoor-rated extension cords for exterior displays.
- Choose cords with weather-resistant jackets and ground fault circuit interrupter (GFCI) protection.
- Plug the first string into the extension cord, not the last.
If using a power strip:
- Check its wattage rating. LED strings use 10–50 watts each, but add up quickly.
- Don’t overload the strip. A standard 15-amp strip handles ~1,800 watts. That’s about 36 strings of 50 watts—but stick to the light’s max chain rule.
- Use a timer to automate on/off times and save energy.
Pro Tip: For large installations, use a multi-port outdoor timer to control multiple chains independently. Great for holiday lights that need different patterns.
Step 7: Secure and Manage the Wires
A stunning display isn’t just about light—it’s also about clean, safe installation.
- Use zip ties, clips, or adhesive hooks to attach lights to surfaces (walls, trees, railings).
- Keep cords off the ground to avoid tripping or water damage.
- Bundle excess cord with zip ties to prevent tangling.
- For trees, wrap lights gently—don’t pull too tight.
For ceiling or wall draping, use light-hanging clips or adhesive strips designed for LEDs. These won’t damage paint or leave residue.
Real-Life Scenario: Lisa wanted to create a “floating canopy” in her bedroom. She used clear adhesive hooks spaced every 6 inches along the ceiling and draped the connected strings in gentle waves. The result? A dreamy, starry-night effect—no nails, no damage.
Step 8: Test the Full Chain and Troubleshoot
Now plug in the entire setup and turn it on. Watch closely for:
- Flickering or blinking
- Sections that don’t light up
- Dim or uneven brightness
- Warm or hot wires
If you see issues:
- Unplug immediately.
- Check each connection—reseat loose plugs.
- Test each string individually again.
- Ensure you haven’t exceeded the max chain length.
- Use a voltage tester to check for power flow at each connection.
Dimming? You might have a voltage drop. Try:
- Shortening the chain.
- Using a thicker-gauge extension cord.
- Switching to a parallel setup.
Pro Tip: If one string fails in a chain, the whole chain may go out (if it’s a series circuit). Some modern strings have bypass diodes—so one dead bulb won’t kill the whole string. Check your model’s specs.
Step 9: Protect Connections (Especially Outdoors)
Outdoor displays face rain, snow, wind, and temperature swings. Protect your connections to extend lifespan.
- Wrap each plug connection with self-sealing tape or silicone sealant.
- Use waterproof connection boxes (available at hardware stores).
- Elevate plugs off the ground using stakes or clips.
- For long-term outdoor use, consider outdoor-rated LED net lights or rope lights with sealed connectors.
Warning: Never leave outdoor connections exposed. Moisture can corrode wires and create fire hazards.
Step 10: Create a Parallel Setup for Longer Displays
If you need more than the max allowed chain length, use parallel connections—not series.
In a parallel setup:
- Each chain of strings is connected independently to the power source.
- Each chain follows the max limit (e.g., 3 strings per chain).
- Each chain plugs into the same power strip or outlet.
Example: You need 100 feet of lights. Each string is 20 feet and allows 3 in a chain (60 feet max per chain).
- Chain 1: Strings 1–3 (60 feet)
- Chain 2: Strings 4–5 (40 feet)
- Plug both chains into a power strip with a timer.
This keeps lights bright and avoids overloading.
Real-Life Example: A wedding planner used parallel chains to outline a 150-foot reception tent. She used three chains of 50 feet each, each with 2 strings connected. All lit up evenly—no dim spots.
Pro Tips & Common Mistakes to Avoid
- Match brands and models: Different brands may have different voltages or connector types. Stick to one brand for consistency.
- Use LED-specific extension cords: Regular cords can overheat under LED loads. Look for “LED compatible” labels.
- Don’t mix LED and incandescent strings: They have different power needs. Mixing can cause flickering or damage.
- Label your setup: Use tags to mark which chain is which. Makes troubleshooting easier.
- Store properly: Coil lights loosely and store in a dry, cool place. Tight coils can damage wires.
- Use timers and smart plugs: Automate your display to turn on at sunset and off at midnight. Saves energy and extends bulb life.
Common Mistake: People often plug the last string into an outlet, creating a long “tail” of cord. Instead, plug the first string in and run the rest from there. This reduces tripping hazards and keeps cords neat.
Pro Tip: For a “twinkling” effect, use strings with built-in controllers or a smart plug with a flashing mode. You can connect multiple strings to one controller for synchronized patterns.
FAQs About How to Connect LED String Lights Together for Stunning Displays
Can I connect different brands of LED string lights together?
Technically, yes—if they have compatible connectors and similar voltage (usually 120V for US). But it’s not recommended. Different brands may have different current draw, leading to dimming or flickering. For the best how to connect LED string lights together for stunning displays, stick to one brand and model.
What if my lights don’t have end-to-end connectors?
You can use splice kits or butt connectors to join wires. Strip the ends, twist corresponding wires (positive to positive), and seal with heat-shrink tubing or waterproof tape. Or, buy connector adapters designed for non-connectable strings.
How many LED strings can I safely connect?
It depends on the model. Most allow 2–4 strings (100–400 LEDs). Always check the packaging. A general rule: don’t exceed 80% of the max limit to allow for voltage drop. For example, if the max is 4 strings, connect only 3 for best performance.
Why are my connected lights dim or flickering?
Common causes:
- You’ve exceeded the max chain length.
- Voltage drop due to long wire runs.
- Loose or corroded connections.
- Using a low-quality extension cord.
Solution: Shorten the chain, use a heavier gauge cord, or switch to parallel connections.
Can I connect LED lights to a dimmer switch?
Only if the lights are dimmable and compatible with the dimmer. Check the packaging. Non-dimmable LEDs can buzz, flicker, or burn out when used with a dimmer. Use an LED-compatible dimmer for best results.
Are outdoor LED string lights safe to leave on overnight?
Yes, if they’re rated for outdoor use and installed correctly. Use a timer to turn them off automatically. Avoid covering connections with snow or leaves. Always use GFCI outlets outdoors.
How do I connect battery-powered LED lights to other strings?
You can’t directly connect battery-powered lights to plug-in strings. But you can:
- Use a multi-port USB hub to power multiple USB lights.
- Place battery lights in separate zones and control them with remotes.
- Use a battery-to-AC adapter (rare, but available).
For a unified display, stick to one power type.
Final Thoughts
Mastering how to connect LED string lights together for stunning displays opens up endless creative possibilities—from cozy bedroom canopies to grand holiday light shows. The key is safety, planning, and attention to detail.
Remember: always check max chain limits, test each string, protect outdoor connections, and use parallel setups for long runs. With these steps, you’ll create displays that are not only beautiful but also reliable and long-lasting.
Now it’s your turn. Grab your lights, plan your layout, and start connecting. Whether it’s a simple window garland or a full backyard transformation, you’ve got the tools to make it shine.
And when your guests gasp at the glowing ambiance, you’ll know it was worth every step. Light up your world—safely, beautifully, and brilliantly.

