Featured image for how to connect strings of led rope lights
Image source: realgreenled.com
Connecting strings of LED rope lights safely starts with using manufacturer-approved connectors and ensuring all power sources are off before installation. Always check for compatible voltage and wattage ratings to prevent overheating or electrical hazards, and use waterproof connectors for outdoor setups to maintain durability and safety.
How to Connect Strings of LED Rope Lights Easily and Safely
Key Takeaways
- Always power off before connecting LED rope lights to avoid electrical hazards.
- Use compatible connectors designed for your specific rope light model and voltage.
- Seal connections properly with waterproof tape or enclosures for outdoor installations.
- Check wattage limits to prevent overloading circuits or damaging the lights.
- Measure total length to ensure connections stay within manufacturer’s recommended limits.
- Test each connection immediately after installation to catch issues early.
Why This Matters / Understanding the Problem
LED rope lights are a favorite for adding ambiance to patios, decks, bedrooms, and holiday displays. They’re flexible, energy-efficient, and come in a rainbow of colors. But here’s the catch: most people hit a snag when they try to connect multiple strings.
You’ve got 20 feet of lights, but your space needs 50. You plug in the second string, and—nothing. Or worse, the first one flickers and dies. This isn’t magic. It’s usually about power limits, connectors, or installation errors.
Learning how to connect strings of LED rope lights easily and safely means you can light up your entire outdoor area, wrap your tree, or highlight your kitchen island—without blowing a fuse or buying a whole new set.
Many people assume all LED rope lights can be daisy-chained. That’s not always true. Some have built-in limits. Others use incompatible connectors. And overloading the circuit? That’s a fire hazard waiting to happen.
The good news? With the right approach, connecting LED rope lights is simple, safe, and totally doable—even if you’ve never touched a wire in your life. This guide walks you through every step, from picking the right tools to avoiding costly mistakes.
Whether you’re setting up for a party, a wedding, or just everyday coziness, mastering this skill saves time, money, and stress. Let’s get started.
What You Need
Before you plug anything in, gather the right tools and materials. Skipping this step is the #1 reason people struggle when learning how to connect strings of LED rope lights easily and safely.
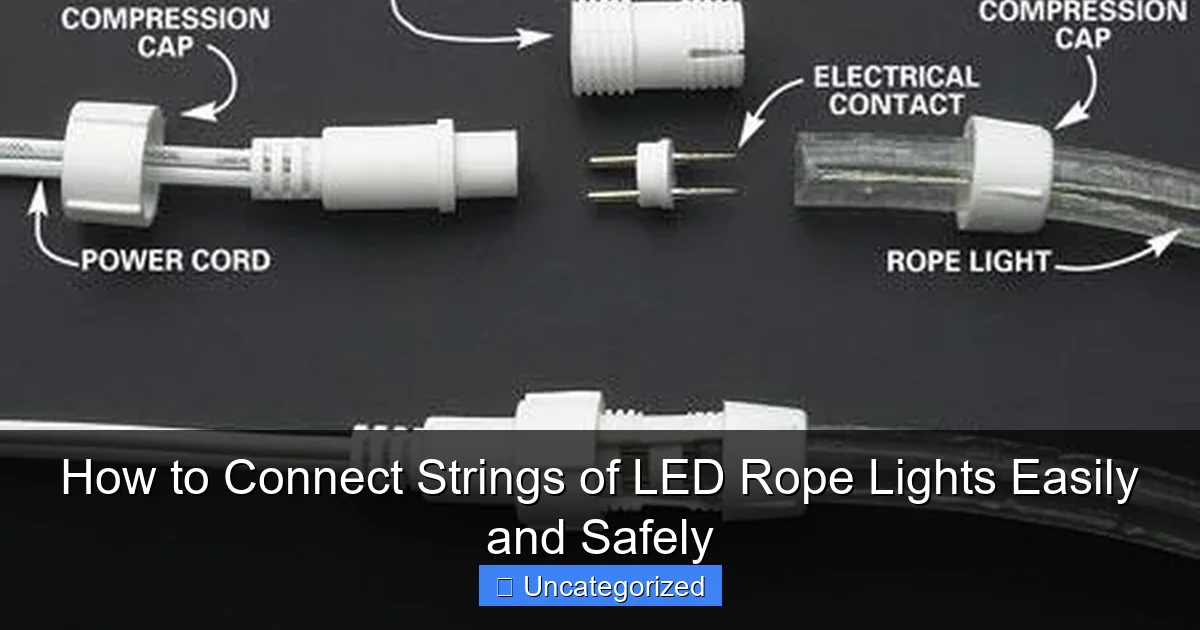
Visual guide about how to connect strings of led rope lights
Image source: towerelectrical.com.cy
Here’s your checklist:
- LED rope lights (with matching connectors—more on that below)
- Extension cords or power strips (rated for outdoor use if needed)
- Connectors (end-to-end, T-junction, or Y-splitter, depending on layout)
- Weatherproof sealant or silicone tape (for outdoor installations)
- Zip ties or mounting clips (to secure lights without damaging them)
- Measuring tape (to plan spacing and length)
- Scissors or wire cutters (only if modifying custom-cut lights)
- Voltage tester (optional but smart)—to check power flow
- Power adapter or controller (if your lights use one)
Pro Tip: Always check the packaging or product manual for the maximum number of connectable strings. Most standard 120V LED rope lights can handle 3–5 strings in a row before voltage drop or overload becomes an issue.
For example, a 20-foot string might support up to 3 more 20-foot strings (total 80 feet) if the manufacturer allows it. Exceeding that limit? You’ll see dimming, flickering, or total failure.
Also, make sure all your lights are from the same brand and model. Mixing brands often leads to incompatible connectors or mismatched voltage requirements. That’s a common mistake—and an easy fix with a little planning.
Step-by-Step Guide to How to Connect Strings of LED Rope Lights Easily and Safely
Step 1: Check the Manufacturer’s Specifications
Before you even touch the lights, read the label on the packaging or the product manual. Look for key details:
- Maximum number of connectable strings
- Voltage (usually 120V for indoor/outdoor, 24V for low-voltage systems)
- Wattage per foot or per string
- Connector type (e.g., male/female, proprietary, standard)
- Indoor/outdoor rating (IP44 or higher for outdoor use)
For example, if the label says “Do not connect more than 3 strings,” stick to that. Exceeding it risks overheating or circuit failure.
Why does this matter? Because how to connect strings of LED rope lights easily and safely starts with understanding your product’s limits. A 24V system needs a transformer. A 120V system can plug directly into the wall—but only up to the max load.
Warning: Never assume all LED rope lights are the same. A 120V string from Brand A might not work with a 24V string from Brand B. Mismatched voltage = dead lights or damaged components.
Step 2: Plan Your Layout and Measure the Space
Grab your measuring tape and walk through the area. Decide where the lights will go—along a railing, under a cabinet, around a window frame.
Sketch a quick diagram (even on paper) showing:
- Start and end points
- Where you’ll plug in
- How many strings you’ll need
- Any corners, T-junctions, or splits
For example, wrapping a rectangular deck? You might need two straight runs and two corners. Or installing under kitchen cabinets? You might use a T-connector to split left and right.
Measure each section. Add 10–15% extra length for curves, overlaps, or slack. This helps avoid last-minute panic when you’re 2 feet short.
Also, plan your power source. Can you reach an outlet with the first string? If not, use a heavy-duty extension cord. But don’t daisy-chain extension cords—this increases resistance and fire risk.
Smart layout planning is a huge part of how to connect strings of LED rope lights easily and safely. It prevents overloading and messy setups.
Step 3: Inspect and Test Each String
Before connecting, test every string individually. Plug one in and make sure it lights up fully—no flickering, dark spots, or color shifts.
Why? Because if you connect a faulty string, you won’t know which one is broken. Troubleshooting becomes a nightmare.
Check the connectors too. Look for:
- Cracks or frayed wires
- Loose pins or bent prongs
- Moisture inside the housing (a sign of past water damage)
If a string fails, return it or replace it. Don’t try to “fix” it with tape—that’s unsafe and temporary.
For outdoor setups, make sure each connector is rated for outdoor use (look for IP44, IP65, or higher). Indoor connectors will corrode when exposed to rain or humidity.
Pro Tip: Use a voltage tester on the first string after plugging it in. If it reads significantly lower than the rated voltage (e.g., 120V drops to 90V), you may already be near the max load.
Step 4: Connect the Strings (Daisy-Chain Method)
This is the most common way to link LED rope lights. It’s simple and works for straight runs.
How it works: Plug the male end of String 2 into the female end of String 1. Then plug the male end of String 3 into the female end of String 2, and so on.
Here’s how to do it right:
- Unplug the first string (safety first!).
- Align the male and female connectors—match the arrow or keyway.
- Push them together firmly until they click or lock.
- Twist the locking ring (if present) to secure the connection.
- Repeat for each additional string.
Don’t force it. If it doesn’t go in easily, check the alignment. Forcing connectors can damage the pins or housing.
After connecting 2–3 strings, plug in the first one and test the entire chain. If it works, great! If not, unplug and check each connection.
Remember: how to connect strings of LED rope lights easily and safely means going slow and checking as you go. Don’t connect all 5 strings at once—test incrementally.
If you hit the manufacturer’s max (say, 4 strings), stop. Don’t push it. Use a second power source instead.
Step 5: Use Connectors for Complex Layouts (T-Junctions, Corners, Splits)
Not every setup is a straight line. You might need to:
- Split lights to go in two directions (e.g., left and right from a center point)
- Turn a 90-degree corner without kinking the rope
- Create a loop or U-shape
For these, use specialized connectors:
- T-junction connector—splits power to two strings
- 90-degree elbow connector—bends the rope smoothly
- Y-splitter—diverts light to two separate paths
- Inline connector—joins two ends in a straight line (useful for repairs)
Example: Installing lights under a kitchen island? Use a T-junction at the center, then run one string to the left and one to the right. This avoids a long daisy-chain and keeps voltage stable.
To install:
- Cut the rope (only if the manufacturer allows it—some are pre-terminated).
- Strip 1/2 inch of insulation from the wires.
- Insert wires into the connector slots (match colors: red to red, black to black, etc.).
- Snap or screw the connector shut.
- Seal with silicone tape or waterproof sealant if outdoors.
Never cut non-cuttable ropes. Forcing a cut can break internal wiring and void warranties.
Warning: Don’t use electrical tape alone on outdoor connections. It dries out and peels. Always use a sealed connector or silicone wrap.
Step 6: Secure the Lights and Protect the Connections
Once connected, don’t just leave the lights dangling. Secure them with zip ties, mounting clips, or adhesive hooks.
Here’s how:
- Use UV-resistant zip ties outdoors—they won’t crack in the sun.
- Space ties every 12–18 inches to prevent sagging.
- Use clear adhesive clips on smooth surfaces (glass, wood, metal).
- For corners, use bendable clips or 90-degree brackets.
Now, protect the connections:
- For outdoor use, wrap each connector with silicone self-fusing tape. Stretch it as you wrap—it seals when it bonds.
- Or use heat-shrink tubing with adhesive lining. Slide it over the connector, then apply heat.
- Elevate connections off the ground. Don’t let them sit in puddles.
This step is critical for how to connect strings of LED rope lights easily and safely—especially in wet or windy areas. A loose connector can short out or pull apart.
Step 7: Test the Full Setup and Monitor for Issues
Plug in the first string and turn on the power. Watch the entire chain for:
- Flickering or pulsing
- Dimming at the far end (voltage drop)
- Color shifts (e.g., white lights turning blue)
- Hot spots on the rope or connectors
If you see flickering, it could mean:
- Too many strings connected (overload)
- Loose or corroded connection
- Faulty string in the chain
To fix:
- Unplug and disconnect all strings.
- Test each one individually.
- Reconnect one at a time, testing after each addition.
- Replace any faulty string.
For dimming at the end, consider:
- Using a second power source (see Step 8)
- Switching to a higher-gauge power cord
- Using a voltage booster (for 24V systems)
Let the lights run for 30 minutes. Feel the connectors—they should be warm, not hot. If they’re burning hot, unplug immediately. That’s a sign of overload or poor connection.
Step 8: Use Multiple Power Sources for Long Runs
When you exceed the max number of connectable strings, don’t force it. Instead, use multiple power sources.
For example:
- Run 3 strings from one outlet (within the limit).
- Run another 3 strings from a second outlet (or a different circuit).
- Use a timer or smart plug for both—so they turn on/off together.
This avoids overloading a single circuit and prevents voltage drop.
Smart setup: Use a power distribution block (available at hardware stores). It splits one outlet into multiple safe connections, each on its own fuse.
For outdoor events, consider a weatherproof power box with GFCI protection. It keeps everything safe and organized.
This strategy is a game-changer for large installations. It’s part of what makes how to connect strings of LED rope lights easily and safely scalable.
Step 9: Add a Timer or Smart Controller (Optional but Recommended)
Once your lights are connected, automate them. A timer or smart controller:
- Saves energy
- Prevents leaving lights on all night
- Enables color-changing or dimming effects
For basic use, get a mechanical timer (set and forget). For advanced control, use a smart plug with app control (e.g., TP-Link Kasa, Alexa-compatible).
Some LED rope lights come with built-in controllers. If yours does, use it to sync all strings—even if they’re on different power sources.
Just make sure the controller is rated for the total wattage of all connected strings. Check the manual.
Bonus: Smart controllers let you schedule lights to turn on at sunset or during parties—no fumbling with switches.
Pro Tips & Common Mistakes to Avoid
Even with the right tools, mistakes happen. Here’s how to avoid the most common ones.
Pro Tip #1: Label each string with a tag or sticker. Write the order (e.g., “String 1,” “String 2”). Makes troubleshooting 10x easier.
Pro Tip #2: Use a power strip with surge protection—especially for outdoor setups. Lightning storms can fry your lights.
Pro Tip #3: For curved surfaces (like a tree trunk), use bendable LED strips instead of stiff rope lights. They’re more flexible and safer for tight turns.
Common Mistake #1: Ignoring the Max Load
Just because you can plug in 5 strings doesn’t mean you should. Overloading causes heat buildup, which can melt insulation or start a fire. Always follow the manufacturer’s limit.
Common Mistake #2: Skipping Connection Sealing
Outdoor connections need protection. A single rainstorm can corrode metal contacts. Use silicone tape or waterproof connectors—don’t rely on tape alone.
Common Mistake #3: Daisy-Chaining Extension Cords
This increases resistance and fire risk. Use one heavy-duty outdoor extension cord (14-gauge or lower) instead of linking multiple thin ones.
Common Mistake #4: Forcing Connectors
If it doesn’t click in, don’t force it. Check alignment. Forcing can bend pins or crack the housing, leading to shorts.
Common Mistake #5: Not Testing Before Final Installation
Test the full chain before securing it with clips or adhesive. Once it’s mounted, fixing a faulty string is a pain.
These tips help you master how to connect strings of LED rope lights easily and safely—without the headaches.
FAQs About How to Connect Strings of LED Rope Lights Easily and Safely
Q: Can I connect different brands of LED rope lights?
A: Generally, no. Connectors and voltage requirements vary by brand. Mixing them can cause incompatibility, flickering, or damage. Stick to the same brand and model for best results.
Q: What if my lights flicker when connected?
A: Flickering usually means overload, loose connections, or a faulty string. Unplug, test each string individually, and reconnect one at a time. If flickering continues, reduce the number of connected strings.
Q: Are LED rope lights safe to leave on overnight?
A: Yes—if installed correctly and within load limits. LED lights produce little heat and are energy-efficient. But always use a timer or smart plug to avoid leaving them on unnecessarily.
Q: Can I cut LED rope lights to fit?
A: Only if the manufacturer says so. Look for marked “cut points” (usually every 1–2 feet). Cutting non-cuttable ropes breaks internal wiring and voids warranties.
Q: How do I connect lights around a corner?
A: Use a 90-degree elbow connector. Or, bend the rope gently—don’t kink it. For tight corners, consider LED strips (more flexible than rope lights).
Q: Why do my lights get dimmer at the end of the chain?
A: This is voltage drop. Too many strings or thin wiring reduces power. Solutions: reduce the number of strings, use a second power source, or switch to a higher-gauge cord.
Q: Can I connect LED rope lights to a dimmer switch?
A: Only if the lights are labeled “dimmable.” Regular LED rope lights may flicker or not work at all with standard dimmers. Use a compatible LED dimmer if available.
Final Thoughts
Connecting LED rope lights doesn’t have to be stressful. With the right prep, tools, and method, you can light up any space—indoors or out—without a single flicker.
Remember, how to connect strings of LED rope lights easily and safely comes down to three things: know your limits, test as you go, and protect your connections.
Start small. Test one string. Then add another. Watch for heat, flickering, or dimming. Use the right connectors. Seal outdoor joints. And never exceed the manufacturer’s max load.
Whether you’re setting up for a holiday, a party, or just everyday coziness, this skill saves you money and gives you full control over your lighting design.
Now go ahead—plug in, connect, and shine. Your space is about to look amazing.
Pro Tip: After your event, store the lights properly. Coil them loosely, keep connectors clean, and store in a dry place. They’ll last for years.

