Featured image for how to hang outdoor string lights on pole
Secure your outdoor string lights like a pro by using heavy-duty zip ties or stainless steel cable clamps to attach them directly to the pole, ensuring a tight, weather-resistant hold that won’t sag over time. For a clean, professional look, run the lights in straight lines or gentle swags, spacing anchors every 2–3 feet and using a level to maintain alignment.
Key Takeaways
- Measure pole height: Ensure lights hang safely above head level.
- Use weatherproof fixtures: Choose UV-resistant and waterproof lights.
- Anchor securely: Install eye bolts or hooks for strong support.
- Plan spacing: Space bulbs evenly for balanced illumination.
- Check tension: Keep wires taut to avoid sagging or damage.
- Weatherproof connections: Use sealed covers for all electrical joints.
- Test before finalizing: Ensure lights work before securing in place.
📑 Table of Contents
- Why Hanging Outdoor String Lights on a Pole Is Worth the Effort
- Planning Your Setup: The Foundation of a Stunning Display
- Choosing the Right String Lights and Hardware
- Step-by-Step Installation: How to Hang Outdoor String Lights on a Pole
- Pro Tips for a Flawless, Long-Lasting Display
- Common Mistakes (and How to Avoid Them)
- Data Table: Recommended Hardware by Pole Type
- Final Thoughts: Light Up Your Space with Confidence
Why Hanging Outdoor String Lights on a Pole Is Worth the Effort
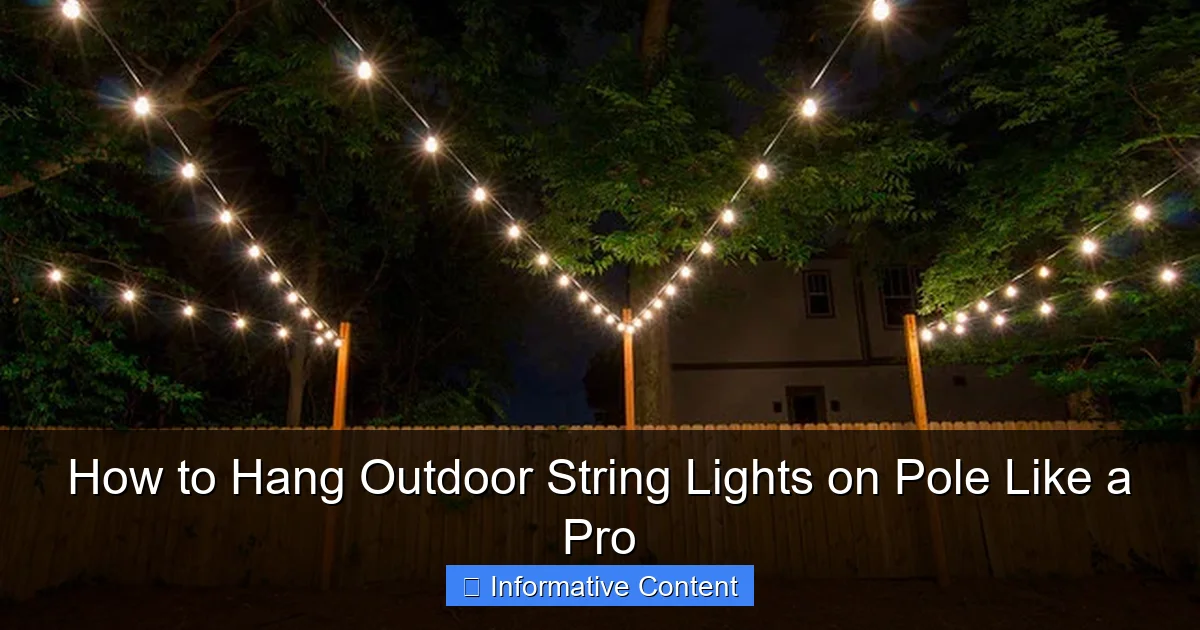
Imagine this: It’s a warm summer evening. The sun has dipped below the horizon, and your backyard is bathed in a soft, golden glow. The kids are laughing, the grill is sizzling, and the gentle flicker of outdoor string lights overhead makes everything feel magical. That’s the power of well-placed lighting.
But here’s the catch: Getting that perfect ambiance isn’t as simple as just draping lights between two trees. If you’re using poles—like fence posts, pergolas, or even standalone poles—you need a solid plan. I learned this the hard way after my first attempt ended with tangled wires, sagging lights, and one very frustrated partner. But after years of trial, error, and a few “aha!” moments, I’ve figured out how to hang outdoor string lights on a pole like a pro—and I’m here to share every tip and trick so you can skip the headaches.
Planning Your Setup: The Foundation of a Stunning Display
Before you even touch a light or a pole, take a breath. Planning is where most people skip ahead and pay for it later. A little time spent measuring, sketching, and thinking through your layout will save you hours of frustration.
Visual guide about how to hang outdoor string lights on pole
Image source: st.hzcdn.com
Assess Your Space and Lighting Goals
Start by walking around your outdoor area. Where do you want the lights? Over a dining table? Along a pathway? Wrapping around a pergola? Think about function first. Are these lights for ambiance, safety, or both?
- Ambiance: Go for soft, warm white or Edison-style bulbs spaced evenly.
- Safety: Use brighter lights or add motion-sensor bulbs near stairs or entry points.
- Entertaining: Consider dimmable or color-changing options for versatility.
Pro tip: Take photos of your space at night. This helps you visualize how the lights will look and identify dark spots.
Measure and Map Your Layout
Grab a measuring tape and a notepad. Measure the distance between each pole where you plan to hang lights. Write down the length in feet. Most outdoor string lights come in 24-foot, 48-foot, or 100-foot strands. You’ll want to know:
- Total linear feet needed
- Number of connection points (poles, hooks, etc.)
- Distance from the nearest outdoor electrical outlet
Example: If you have three poles spaced 15 feet apart, you’ll need at least 30 feet of lighting (15 ft x 2 spans). But add 20% extra for draping, sagging, or wrapping—so 36 feet total. That means two 24-foot strands or one 48-foot strand with room to spare.
Choose the Right Pole Type and Condition
Not all poles are created equal. Here’s what to consider:
- Material: Wood, metal, vinyl, or composite? Wooden poles can be drilled, but metal poles may need special clamps. Avoid rotting or cracked wood—safety first!
- Height: Most poles are 6–8 feet tall. If they’re shorter, you may need to add extensions or use ground stakes.
- Stability: Wobble test each pole. If it shakes, reinforce it with concrete or guy wires before hanging lights.
Relatable moment: I once tried to hang lights on a wobbly pergola post. By the third gust of wind, the whole strand came crashing down—lights and all. Lesson learned: stabilize first!
Choosing the Right String Lights and Hardware
Now that your plan is set, it’s time to pick the right gear. This is where quality matters—cheap lights or flimsy hardware can ruin your entire setup.
Pick the Best Outdoor String Lights
Not all string lights are built for the outdoors. Look for these features:
- Weatherproof (IP65 or higher): This means they’re dust-tight and can handle rain, snow, and humidity.
- LED bulbs: Energy-efficient, cool to the touch, and last 25,000+ hours.
- Connectable strands: Allows you to link multiple sets without overloading circuits.
- Bulb type: G40 (globe), S14 (candle-style), or Edison (vintage filament) are popular. G40 is my go-to—they’re bright, durable, and look great in any setting.
Bonus: Look for lights with a “dimmable” or “remote control” option. It’s a game-changer for setting the mood.
Hardware That Holds Up—Literally
The lights are only as good as the hardware holding them. Here’s what I recommend:
- Stainless steel hooks or eye screws: Rust-resistant and strong. Use #8 or #10 size for most poles.
- Zip ties (nylon, UV-resistant): Great for temporary setups or securing wires to poles.
- Clamps (for metal or vinyl poles): No drilling required. Look for “no-drill” clamps with rubber padding to protect the pole.
- Turnbuckles or tensioners: These let you adjust sag and keep lights taut. A must for long spans.
Pro tip: Avoid nails or staples. They can damage the lights’ insulation and create fire hazards. Trust me—I’ve seen it happen.
Don’t Forget the Power Source
Outdoor outlets are often limited. Here’s how to manage power safely:
- Use a GFCI outlet: Prevents shocks in wet conditions. Most outdoor outlets are GFCI, but test yours with a plug-in tester.
- Extension cords: Choose outdoor-rated, heavy-duty cords (14-gauge or thicker). Never daisy-chain more than three strands unless the manufacturer allows it.
- Timer or smart plug: Set lights to turn on at sunset and off at bedtime. Saves energy and keeps things consistent.
Example: I use a smart Wi-Fi plug with my lights. I can control them from my phone, even when I’m not home. It’s perfect for holidays or surprise get-togethers.
Step-by-Step Installation: How to Hang Outdoor String Lights on a Pole
Now for the fun part—installing! Follow these steps for a clean, professional look.
Step 1: Install Hooks or Clamps on the Poles
Start at the highest point (usually the top of the pole). Use a ladder and a level to ensure hooks are straight.
- Wooden poles: Drill a pilot hole, then screw in eye hooks or lag screws. Angle them slightly outward for better tension.
- Metal or vinyl poles: Use no-drill clamps. Tighten firmly but don’t over-torque—cracks happen!
- Spacing: Place hooks 6–12 inches from the top. For long spans, add a third hook in the middle to reduce sag.
Tip: Use a pencil to mark hook positions. Double-check measurements before drilling or clamping.
Step 2: Test the Lights and Layout
Unspool the lights and lay them along the ground between poles. Plug them in to make sure all bulbs work. This saves you from climbing up and down later.
- Check for dark bulbs or flickering.
- Ensure connectors are snug and waterproof (use electrical tape if needed).
Relatable moment: I once hung an entire strand before realizing a bulb was dead. It took 20 minutes to find it—don’t make my mistake!
Step 3: Hang the Lights
Now, attach the lights to the hooks. Here’s the best method:
- Start at the power source. Hang the first hook near the outlet.
- Use zip ties or S-hooks to secure the light’s end cap to the hook. Don’t hang by the cord—this strains the wires.
- Walk to the next pole and gently pull the lights taut. Use a turnbuckle here if you have one.
- Secure the second end. For a draped look, leave 6–12 inches of slack between poles.
- For multiple spans, connect strands end-to-end. Use a waterproof connector or wrap with electrical tape.
Pro tip: Use light clips (like those for holiday lights) to secure the cord along the pole. Keeps it neat and prevents tripping hazards.
Step 4: Adjust and Secure
Once hung, step back and inspect:
- Are lights level? Use a level or eyeball it from a distance.
- Is there too much sag? Tighten the turnbuckle or add a middle hook.
- Are wires exposed or dangling? Tuck them behind the pole or use conduit for a clean look.
Example: On my pergola, I used clear zip ties to secure wires to the beams. You can barely see them, but the lights stay put in wind and rain.
Pro Tips for a Flawless, Long-Lasting Display
Even the best setup can fail if you skip maintenance. Here’s how to keep your lights shining for years.
Prevent Sag and Wind Damage
Gravity and wind are the enemies of outdoor lights. Fight back with:
- Turnbuckles: Adjust tension seasonally. Lights sag more in summer heat.
- Middle supports: Add a pole or hook in the center of long spans.
- Wind-resistant clips: Use clips with rubber grips or twist ties for extra hold.
Tip: In high-wind areas, consider shorter spans (under 20 feet) or use heavier-duty lights with thicker cords.
Weatherproof Every Connection
Water is the #1 cause of light failure. Seal all connections:
- Wrap connectors with self-fusing tape or heat-shrink tubing.
- Use outdoor-rated junction boxes for multiple connections.
- Elevate plugs off the ground. Use a plug cover or hang them from a hook.
Relatable moment: I learned about plug covers after my lights shorted during a thunderstorm. Now I never skip this step.
Seasonal Maintenance
Check your lights twice a year (spring and fall):
- Inspect bulbs and cords for damage.
- Replace burned-out bulbs promptly to avoid overloading the circuit.
- Clean bulbs with a soft cloth to remove dirt and bugs.
- Store lights in a dry place during winter (or leave them up if rated for year-round use).
Pro tip: Label each strand with its location (e.g., “Pergola North”). Makes troubleshooting easier!
Common Mistakes (and How to Avoid Them)
Even pros make mistakes. Here’s what to watch for—and how to fix it fast.
Overloading Circuits
Too many lights on one outlet can trip breakers or cause fires. The rule of thumb: Never connect more than three 24-foot LED strands unless the manufacturer says otherwise.
- Check the wattage: Most LED strands use 5–10 watts. Multiply by the number of strands.
- Use a power strip with overload protection.
- Spread lights across multiple outlets if needed.
Using the Wrong Hardware
Cheap hooks or plastic clamps can break. Invest in stainless steel or UV-resistant materials. And never hang lights by the cord—always use the end cap or a clip.
Ignoring Local Codes
Some areas have rules about outdoor electrical use. Check with your local building department if:
- You’re running cords across a yard or driveway.
- You’re installing permanent poles (may require permits).
- You’re using high-voltage lights (over 120V).
Not Planning for Growth
Want to add more lights later? Leave extra slack and unused hooks. I once added a second strand to my setup—because I left a “future expansion” hook. Saved me a whole reinstallation!
Data Table: Recommended Hardware by Pole Type
| Pole Type | Recommended Hardware | Max Span (Feet) | Installation Time (Minutes per Hook) | Cost (Per Hook) |
|---|---|---|---|---|
| Wooden Post (4×4 or larger) | Stainless steel eye hook (#10) | 30 | 5–10 | $0.50–$1.00 |
| Metal Pole (Galvanized) | No-drill clamp with rubber pad | 25 | 8–15 | $2.00–$4.00 |
| Vinyl/PVC Fence Post | UV-resistant zip ties or adhesive clips | 20 | 3–5 | $0.20–$0.50 |
| Pergola Beam | Lag screw with washer | 35 | 10–20 | $1.00–$2.50 |
| Concrete Pole | Concrete anchor with hook | 25 | 15–30 | $3.00–$6.00 |
Note: Costs are approximate and vary by region and brand. Max span assumes LED string lights with proper tensioning.
Final Thoughts: Light Up Your Space with Confidence
Hanging outdoor string lights on a pole isn’t just about aesthetics—it’s about creating a space where memories are made. Whether you’re hosting a birthday party, enjoying a quiet night with a book, or just watching the stars, the right lighting transforms your backyard into an extension of your home.
Remember: Start with a plan, invest in quality gear, and don’t rush the installation. A little extra time upfront means years of hassle-free enjoyment. And when the lights come on and your guests say, “Wow, this looks amazing!”—you’ll know it was worth every step.
So grab your tools, channel your inner DIY pro, and let there be light. Your perfect outdoor oasis is just a few hooks away.
Frequently Asked Questions
How do I securely attach outdoor string lights to a pole without damaging it?
Use non-invasive methods like zip ties, adjustable straps, or specialized pole clips designed for string lights. These options distribute pressure evenly and won’t scratch or weaken the pole’s surface. Always ensure the attachment method can withstand wind and weather.
What’s the best way to hang outdoor string lights on a tall pole safely?
Use a telescopic pole or hire a lift to safely reach heights. For added stability, anchor the string lights with guide wires or hooks at multiple points along the pole to prevent sagging or swinging in the wind.
Can I hang string lights on a metal pole, or should I use wood?
Both materials work, but metal poles may require magnetic hooks or rubber-coated clamps to prevent slipping. For wooden poles, screw-in eye hooks are a durable option—just ensure they’re rated for outdoor use to resist rust.
How far apart should I space poles for outdoor string lights?
Space poles 8–12 feet apart for standard string lights, depending on bulb weight and wire tension. For longer runs, use intermediate poles or tension cables to avoid drooping. Always measure your light strand length first.
Do I need special hardware to hang outdoor string lights on a pole?
Yes, use weather-resistant hardware like stainless steel hooks, UV-resistant zip ties, or commercial-grade pole mounts. These prevent corrosion and ensure your lights stay secure in all seasons.
How can I hide the wires when hanging string lights on a pole?
Route wires through the pole’s interior (if hollow) or use cable raceways for a clean look. Alternatively, choose poles with built-in wire channels or paint the wires to match the pole’s color for subtlety.

