Featured image for how to hang string lights from patio ceiling
Image source: loveourreallife.com
Transform your patio into a cozy, inviting space in 2026 by securely mounting string lights to the ceiling using heavy-duty hooks or adhesive clips designed for outdoor use. Ensure even spacing and proper tension for a professional look, and always follow manufacturer guidelines for safe, weather-resistant installation. This simple upgrade adds ambiance and extends your outdoor enjoyment into the night.
“`html
How to Hang String Lights from Patio Ceiling in 2026 Easy Guide
Key Takeaways
- Plan your layout first: Measure and map light placement for even, balanced coverage.
- Use sturdy anchors: Secure hooks or eye screws into ceiling joists for safe support.
- Opt for LED string lights: Energy-efficient and durable for long-term outdoor use.
- Install a dimmer switch: Control brightness to match ambiance and save energy.
- Weatherproof connections: Use outdoor-rated extension cords and seal all electrical joints.
- Test before finalizing: Check lights work properly before securing all fixtures in place.
Why This Matters / Understanding the Problem
You’ve probably been there—sitting outside on a warm summer night, the sun has just dipped below the horizon, and you’re ready to enjoy your patio. But it’s too dark to see, and the overhead light feels harsh and uninviting.
That’s where string lights come in. They transform your outdoor space into a cozy, magical retreat with just a soft glow. But if you’re wondering how to hang string lights from patio ceiling without it looking like a tangled mess or falling after the first gust of wind, you’re not alone.
In this How to Hang String Lights from Patio Ceiling in 2026 Easy Guide, I’ll walk you through every step—from picking the right tools to creating a layout that looks professionally installed. No guesswork. No frustration. Just a beautiful, long-lasting setup you can enjoy for years.
Whether you have a covered pergola, a flat ceiling, or a vaulted roof, this guide adapts to your space. And don’t worry—this isn’t about fancy tools or contractor-level skills. It’s about smart, simple solutions that anyone can do.
What You Need
Before we dive in, let’s gather your gear. The good news? Most of this stuff is probably already in your garage or basement.
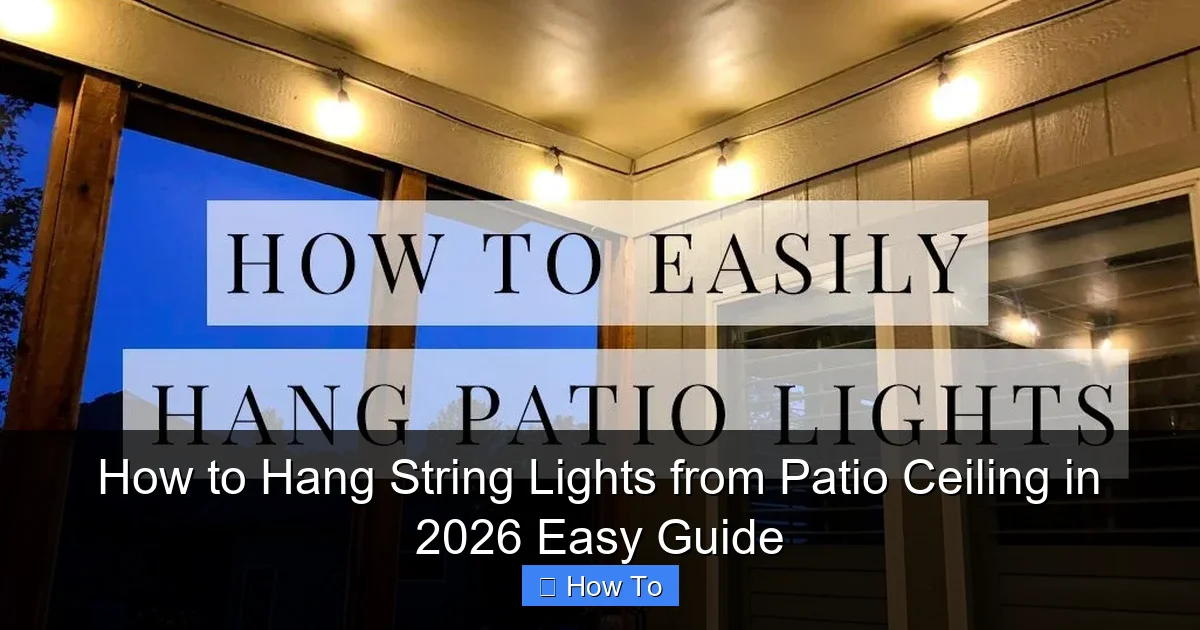
Visual guide about how to hang string lights from patio ceiling
Image source: sengerson.com
- String lights (outdoor-rated) – Look for LED, weatherproof, and with a plug that can reach an outlet. Solar options work too, but wired gives you more control.
- Ceiling anchors or hooks – Use toggle bolts for hollow ceilings (like drywall), eye screws for wood, or self-tapping metal screws for metal roofs.
- Measuring tape – For spacing and layout planning.
- Drill with bits – A cordless drill makes life easier, but a screwdriver works in a pinch.
- Level (optional) – Helps keep lines straight, especially for long runs.
- Extension cords (if needed) – Use outdoor-rated, GFCI-protected cords.
- Zip ties or light clips – For securing wires between anchor points.
- Ladder or step stool – Safety first!
- Pencil – For marking drill spots.
Pro tip: If you’re using How to Hang String Lights from Patio Ceiling in 2026 Easy Guide as your blueprint, skip the flimsy adhesive strips. They might seem easy, but they fail fast in heat or wind. Go for mechanical fasteners—they’re worth the extra 10 minutes.
Step-by-Step Guide to How to Hang String Lights from Patio Ceiling in 2026 Easy Guide
Step 1: Plan Your Layout (The Secret to a Professional Look)
Before you touch a drill, stand back and imagine how you want the lights to flow. Do you want a grid? A zigzag? A single line over your seating area?
Grab your measuring tape and sketch a quick layout on paper or use a free app like SketchUp Free or even Google Drawings. Mark where you want anchor points—typically every 3 to 5 feet for stability.
For a pergola with beams, you can use the existing structure. For flat ceilings, you’ll need to space anchors evenly along the perimeter or create a central “web” pattern.
Think about where the plug will go. You don’t want a cord dangling down the middle. Try to position the plug near an outlet or hide it behind furniture.
Personal insight: I once tried to wing it and ended up with a lopsided triangle. It looked like a spiderweb from a bad horror movie. Planning saved me the second time.
Step 2: Choose the Right Fasteners for Your Ceiling Type
Not all ceilings are created equal. Here’s what to use depending on what you’re working with:
- Drywall or plaster: Use toggle bolts or snap-toggle anchors. They grip behind the wall and hold up to 50 lbs.
- Wood (beams, pergola, soffit): Eye screws or cup hooks are perfect. They screw in easily and look clean.
- Metal (aluminum or steel roof): Use self-tapping metal screws with rubber washers to prevent leaks.
- Concrete or stucco: Masonry anchors or concrete screws with a hammer drill.
Don’t guess—check what your ceiling is made of. A quick tap can tell you if it’s hollow (drywall) or solid (wood/metal). If you’re unsure, use a stud finder.
For the How to Hang String Lights from Patio Ceiling in 2026 Easy Guide, I recommend starting with eye screws for wood and toggle bolts for drywall. They’re reliable and easy to remove if you change your mind.
Step 3: Mark and Drill Anchor Points
Now, grab your pencil and measuring tape. Mark each anchor point based on your layout. Use a level if you want perfectly straight lines—especially important for long runs.
For drywall: Pre-drill a small pilot hole, then insert the toggle bolt. For wood: Just screw in the eye screw by hand or with a screwdriver. For metal: Use a drill with a metal bit, then attach the screw.
Pro tip: Don’t overtighten. You want the hook to rotate freely so the light string can hang naturally without strain.
Spacing matters. Too close? Wasteful and cluttered. Too far? Sagging lights and weak structure. Stick to 3–5 feet for most string lights.
Warning: Avoid drilling into electrical wires or plumbing. If you’re unsure, use a stud finder with a live wire detector. Better safe than sorry.
Step 4: Test Your Lights (Yes, Before Hanging!)
Before you start hanging, plug in your string lights and check every bulb. Nothing worse than finishing the job and realizing one strand is dead.
Also, test the length. Lay the lights out on the ground or floor in your planned pattern. Make sure the plug reaches an outlet without stretching or needing a long extension cord.
If you’re using multiple strands, confirm they connect properly and don’t overload the circuit. Most outdoor outlets handle 15 amps—check your breaker box if you’re running several sets.
This step saves time and frustration. I learned this the hard way when I hung a full grid only to find the last strand had a broken socket.
Step 5: Hang the Lights with Proper Tension
Now the fun part—hanging! Start at the plug end and work your way out. This keeps the cord from getting tangled.
Hook one end of the string light onto the first anchor. Then, gently pull the light toward the next anchor. Don’t yank—just enough tension to keep it straight but not so much it strains the wires.
Use zip ties or light clips to secure the wire between anchors if needed. For a clean look, tuck the cord behind beams or use wire raceways (available at hardware stores).
If you’re creating a grid, use a crisscross pattern. Hook lights diagonally across the space, then add horizontal or vertical lines for depth.
For vaulted ceilings, hang lights in a “V” shape from the peak to the edges. It draws the eye upward and maximizes light spread.
Personal insight: I like to use S-hooks instead of tying knots. They’re easier to adjust and won’t damage the light wires. Plus, you can remove them later without leaving marks.
Step 6: Secure Cords and Hide the Plug
Once all lights are up, check for loose cords. Use zip ties or cord clips to bundle wires along beams or edges. This prevents tripping and keeps things tidy.
Hide the plug behind furniture, under a planter, or in a decorative outlet box. If you’re using an extension cord, run it along the wall or ceiling with clips—never drape it across the floor.
For a polished look, consider a smart plug or timer. You can schedule lights to turn on at sunset and off at bedtime. No more fumbling for a switch in the dark.
In the How to Hang String Lights from Patio Ceiling in 2026 Easy Guide, smart tech isn’t required—but it’s a game-changer for convenience.
Step 7: Test and Adjust
Turn on the lights and step back. Look for:
- Sagging strands
- Uneven spacing
- Cords dangling in the way
- Glare in seating areas
Make small tweaks. Adjust tension, move a hook, or add a clip. It’s okay to spend 10 minutes fine-tuning—this is your space, and it should feel just right.
Invite a friend over for a “test night.” Fresh eyes often catch things you miss.
Pro Tips & Common Mistakes to Avoid
After hanging lights on three patios, I’ve made (and fixed) every mistake in the book. Here’s what I’ve learned:
- Don’t use indoor lights outdoors. Even if they’re in a covered area, humidity and temperature swings can ruin them. Always choose outdoor-rated or damp-location-rated lights.
- Avoid overloading circuits. If you’re running 5+ strands, use a dedicated outdoor outlet or a GFCI-protected power strip.
- Think about maintenance. Lights near trees? You’ll need to clean them seasonally. Hang them high enough to avoid leaves and debris.
- Use dimmable lights if possible. Not all moments need full brightness. A dimmer creates ambiance for dinner or movie nights.
- Skip the nails. They can split wood and don’t hold well. Screws or hooks are stronger and safer.
Personal insight: I once used nails to hang lights on a cedar pergola. After a month, they started pulling out. Switched to eye screws—no issues since.
Another big one: don’t hang lights in a straight line across a wide space. They’ll sag. Use a zigzag, crisscross, or “catenary” (dip and rise) pattern to add support and visual interest.
And finally—don’t rush the planning phase. Spend 20 minutes sketching and measuring. It’ll save you hours of rework.
For the How to Hang String Lights from Patio Ceiling in 2026 Easy Guide, the difference between “meh” and “wow” is in these little details.
FAQs About How to Hang String Lights from Patio Ceiling in 2026 Easy Guide
Can I hang string lights on a flat, solid ceiling without beams?
Absolutely. Use toggle bolts or snap-toggles for drywall, or self-tapping screws for metal. Space anchors every 4 feet and run lights in a grid or perimeter loop. Just make sure your drill bit matches the anchor size.
Do I need a permit or professional help?
For most DIY setups—no. This isn’t electrical work, just hanging lights. But if you’re running new wiring through walls or adding outlets, check local codes. When in doubt, consult an electrician.
How do I keep lights from sagging over time?
Use enough anchor points (3–5 feet apart). For long runs, add a center support—like a hook under a beam or a temporary pole. Also, choose lights with thicker gauge wire—they hold shape better.
Can I use solar-powered string lights?
Yes! They’re great if you don’t have an outlet nearby. But keep in mind: solar lights are often dimmer and may not last all night. Place the panel where it gets 6+ hours of direct sun. And avoid shaded areas—they won’t charge well.
How do I remove the lights later without damaging the ceiling?
For screws: Unscrew them and fill holes with wood filler (wood) or spackle (drywall). For toggle bolts: Remove the bolt, then push the toggle through the hole and patch. Sand and touch up paint for a clean finish.
What if my patio has no ceiling?
No problem. Use freestanding poles, umbrella lights, or stake lights in planters. Or install a temporary pergola with a tarp or fabric roof to hang from.
Are LED string lights worth it?
100%. They use less power, last 10+ years, and don’t get hot. Plus, they’re available in warm white, cool white, and color options. Just make sure they’re outdoor-rated for UV and moisture resistance.
Final Thoughts
Hanging string lights isn’t just about adding light—it’s about creating a feeling. That soft glow transforms your patio into a place where stories are told, meals are shared, and memories are made.
This How to Hang String Lights from Patio Ceiling in 2026 Easy Guide is designed to make that process simple, safe, and satisfying. You don’t need to be a handyman or spend a fortune. Just follow the steps, use the right tools, and take your time.
Start small. Hang one strand over your favorite chair. See how it feels. Then expand. Add a grid. Try a zigzag. Experiment with dimmers or smart controls.
And remember—this isn’t a one-time project. As your space evolves, so can your lights. Swap colors for holidays. Add more strands for parties. Or take them down in winter if you prefer.
The goal isn’t perfection. It’s enjoyment. So grab your drill, invite a friend, and get started. Your dream patio is just a few hooks away.
Now go enjoy the glow.
“`

