Featured image for how to hang string lights on aluminum covered patio
Image source: i.ytimg.com
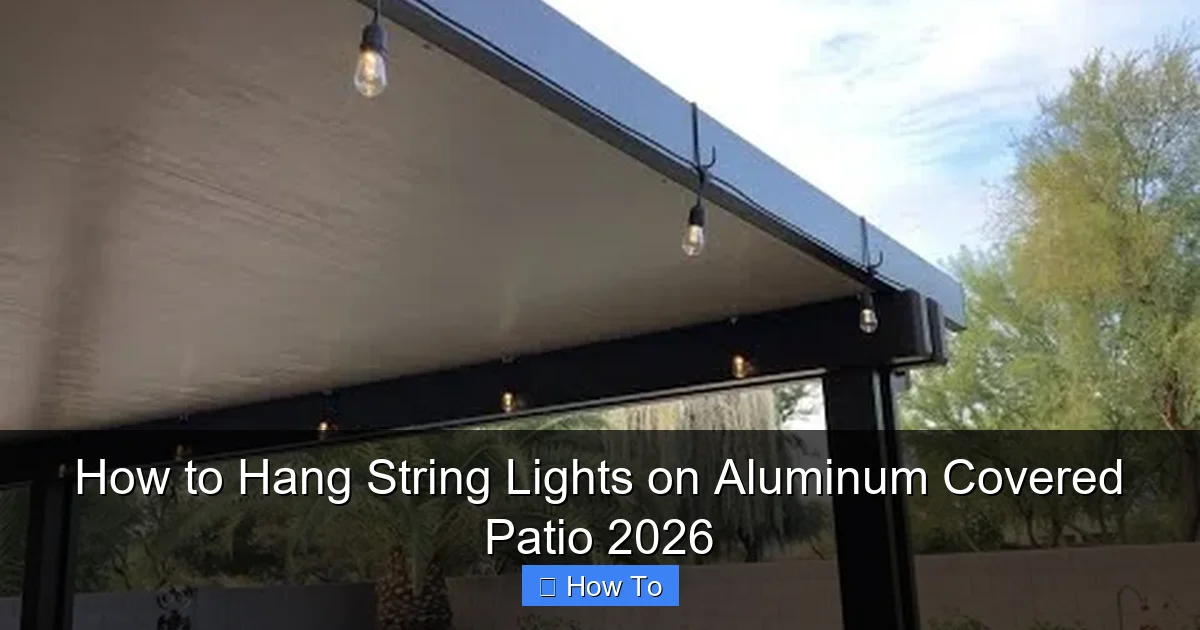
Transform your aluminum-covered patio into a glowing retreat by using magnetic hooks or adhesive clips designed for metal surfaces—no drilling required. These easy-to-install solutions securely hold string lights while protecting your patio’s finish, making setup fast and damage-free. For a polished 2026-ready look, choose weather-resistant lights and space them evenly for balanced, inviting ambiance all year long.
“`html
How to Hang String Lights on Aluminum Covered Patio 2026
Key Takeaways
- Use magnetic hooks: Securely attach lights without drilling into aluminum surfaces.
- Measure spacing: Plan light placement for even, balanced coverage.
- Choose LED bulbs: Opt for energy-efficient, weather-resistant options.
- Anchor with zip ties: Reinforce connections for added stability in wind.
- Check weight limits: Ensure your mounting method supports the lights’ weight.
- Test before finalizing: Verify lighting layout and function before securing.
Why This Matters / Understanding the Problem
Let’s be real: you’ve got this gorgeous aluminum-covered patio—sleek, low-maintenance, and perfect for summer hangouts. But when the sun goes down, it feels a little… empty. You want to add some warmth and ambiance, but you’re stuck. How do you hang string lights on a surface that’s smooth, non-porous, and *not* wood or stucco?
That’s where the challenge lies. Aluminum soffits or patio covers don’t play nice with nails, screws, or tape that fails in heat. And if you’re like me, you’ve probably tried a few DIY hacks that ended with dangling lights and a ladder-shaped bruise on your ego.
But here’s the good news: How to Hang String Lights on Aluminum Covered Patio 2026 isn’t just possible—it’s easier than you think, once you know the right tricks. Whether you’re prepping for a cozy dinner party or just want to enjoy your backyard after dark, this guide will help you do it safely, cleanly, and without damaging your patio.
You’ll learn how to choose the right lights, pick the best mounting method, and avoid the common pitfalls that leave lights sagging or falling. Let’s turn that cold, shiny surface into a warm, inviting oasis.
What You Need
Before we jump into the steps, let’s gather your gear. You don’t need a full toolbox—just a few smart picks that work with aluminum’s unique surface.

Visual guide about how to hang string lights on aluminum covered patio
Image source: drivenbydecor.com
- String lights: Choose weatherproof, LED, and preferably with a flat, lightweight cord (not round or thick). Solar-powered ones are great if you don’t have an outlet nearby.
- Aluminum-safe mounting clips or hooks: Look for magnetic, adhesive, or tension-based options. Avoid anything that requires drilling unless you’re okay with permanent holes.
- Measuring tape: To space your lights evenly and avoid overhang.
- Ladder or step stool: Safety first! Use one with rubber feet to avoid scratching the aluminum.
- Extension cord (if needed): Make sure it’s rated for outdoor use and long enough to reach your outlet.
- Zip ties (optional): For securing excess cord or bundling lights at corners.
- Level (optional but helpful): To keep your lines straight and avoid the “drunken zigzag” look.
Pro tip: If your patio cover has gutters or a lip, you’re in luck—those edges are perfect for hanging lights without any hardware. But if it’s a smooth, flat surface, we’ll focus on non-destructive methods.
Step-by-Step Guide to How to Hang String Lights on Aluminum Covered Patio 2026
Step 1: Plan Your Layout (Before You Climb the Ladder)
Before you start hanging anything, take a few minutes to sketch your ideal layout. Do you want a grid? A perimeter? A zigzag pattern? This step saves so much frustration later.
- Measure the length and width of your patio cover. Note any vents, fans, or seams.
- Decide where the lights will start and end. Ideally, near an outdoor outlet or extension cord access.
- Use painter’s tape to mark anchor points on the ground. This helps visualize spacing.
For a classic look, I like to go around the perimeter first, then add a few diagonal or crisscross lines for depth. If you’re using multiple strands, plan where the connections will be—don’t overload a single outlet!
Real talk: I once hung lights in a rush and ended up with a “light tunnel” that made my patio look like a haunted house. Planning your layout avoids that. Trust me.
When thinking about How to Hang String Lights on Aluminum Covered Patio 2026, layout is 50% of the battle. Get this right, and the rest is smooth sailing.
Step 2: Choose the Right Mounting Method
Here’s where most people get stuck. You can’t just hammer nails into aluminum—it’s slippery, and you’ll damage the finish. So what works?
- Magnetic hooks: Best for steel-backed aluminum or if your cover has steel support beams. These are strong, reusable, and easy to reposition. Look for neodymium magnets rated for outdoor use.
- Adhesive clips or hooks: Use 3M VHB (Very High Bond) tape or outdoor-rated Command strips. These stick to smooth, clean surfaces and hold up to 3–5 lbs per clip—perfect for lightweight string lights.
- Clip-on gutter hooks: If your patio has gutters, these slide right on and require zero installation. They’re cheap and effective.
- Tension rods or spring clips: Great for flat, horizontal surfaces. They grip the edge without adhesives or magnets.
- Zip ties (temporary): Use them with caution. They can cut into the cord over time, especially in sun. Only use for short-term setups.
For most aluminum patio covers, I recommend a mix of adhesive clips and magnetic hooks. Use magnets where you can, and adhesive clips for areas without metal backing.
Warning: Avoid regular tape, duct tape, or cheap adhesive hooks. They’ll fail in heat, leave residue, or fall off after a week. Invest in quality—your patio deserves it.
This step is crucial for a successful How to Hang String Lights on Aluminum Covered Patio 2026 project. Pick the right method, and you’ll avoid mid-season repairs.
Step 3: Clean and Prep the Surface
Aluminum gets dusty, greasy, and oxidized. If you skip cleaning, your clips will fall off faster than a toddler’s ice cream.
- Use a mild soap and water solution (dish soap works great).
- Wipe down the areas where clips or hooks will go. Focus on edges, seams, and corners.
- Rinse with water and dry thoroughly with a lint-free cloth.
- For stubborn grime, use a non-abrasive aluminum cleaner (avoid steel wool or harsh scrubs).
Let the surface dry for at least 30 minutes before mounting anything. A clean, dry surface ensures maximum adhesion.
My mistake: I once hung lights on a “clean enough” patio after a rain. Two days later, half the clips were on the ground. Lesson learned: clean it like you mean it.
Cleaning is a small step, but it makes a huge difference in how long your How to Hang String Lights on Aluminum Covered Patio 2026 setup lasts.
Step 4: Install the Mounting Hardware
Now it’s time to attach your clips, hooks, or magnets. Work in small sections—don’t try to do the whole thing at once.
- For adhesive clips: Remove the backing, press firmly for 30 seconds, and let it cure for 1–2 hours before hanging lights (if the package says so).
- For magnetic hooks: Simply place them on any steel-backed area. Test the hold by gently tugging. If it slides, it’s not strong enough—try a bigger magnet.
- For gutter hooks: Slide them onto the gutter lip. Space them every 12–18 inches.
- For tension clips: Snap them onto the edge of the cover. Make sure they’re secure before hanging.
Use your measuring tape to space clips evenly. I like 12–16 inches apart for a balanced look. Too close, and it looks cluttered. Too far, and the lights sag.
Pro tip: Install clips in pairs—one on each side of a corner or seam. This helps maintain tension and prevents sagging.
This step is where your How to Hang String Lights on Aluminum Covered Patio 2026 project starts to take shape. Take your time—precision now means fewer adjustments later.
Step 5: Hang the String Lights
Now for the fun part! Start at the end nearest your power source. This way, you won’t have to run cords over already-hung lights.
- Uncoil the lights carefully. Don’t pull or stretch the cord—this can damage internal wiring.
- Hang one end on a clip or hook. Then, work your way across, securing each section as you go.
- Keep the cord taut but not tight. A slight curve (like a gentle “U”) prevents sagging without stressing the clips.
- At corners, use a corner-specific clip or wrap the cord around a hook to maintain direction.
If you’re using multiple strands, connect them at the end of each run. Use outdoor-rated connectors, and never leave exposed wires.
Real-life example: I once hung lights from the center outward and ended up with a tangled mess. Starting from the power source keeps everything clean and logical.
When hanging, think about how the lights will look from the ground. Step back every few feet to check spacing and alignment. This is key to a professional-looking How to Hang String Lights on Aluminum Covered Patio 2026 setup.
Step 6: Secure Excess Cord and Test
You’re almost there! Now, tidy up the loose ends and make sure everything works.
- Bundle excess cord with zip ties or cord clips. Keep them hidden under the patio cover or behind furniture.
- Use adhesive cord clips to secure long runs to the aluminum surface.
- Plug in the lights and test them. If one bulb is out, check the strand—most LED lights have one bad bulb that kills the whole row.
- Look for sagging sections. If a clip is slipping, reinforce it with an extra clip or a zip tie.
Let the lights run for at least 15 minutes to check for overheating or flickering—especially if you’re using incandescent (though I recommend LEDs).
Warning: Never leave lights on unattended for long periods. Even LED lights can overheat if poorly ventilated or overloaded.
This final check ensures your How to Hang String Lights on Aluminum Covered Patio 2026 installation is safe, secure, and beautiful.
Step 7: Maintain and Store (Seasonal Tip)
If you live in a climate with harsh winters, consider removing the lights seasonally. But if you leave them up year-round, a little maintenance goes a long way.
- Every 4–6 weeks, inspect clips and cords for wear, sun damage, or loosening.
- Clean the lights gently with a damp cloth to remove dust and cobwebs.
- For adhesive clips, reapply or replace if they start to peel (especially after winter).
- If storing, coil lights in a figure-eight pattern to avoid kinks. Store in a dry, cool place.
For permanent setups, consider using UV-protected cords and clips. They last longer and resist fading.
My habit: I leave my lights up year-round in California, but I do a “spring refresh” every March—clean, test, and re-secure as needed.
Proper care means your How to Hang String Lights on Aluminum Covered Patio 2026 project can last for years, not just one summer.
Pro Tips & Common Mistakes to Avoid
After hanging lights on three patios (and learning the hard way), here are the insider tips that make all the difference.
- Use a light strand with built-in clips: Some brands (like Brightech or Govee) have pre-attached clips. They save time and look cleaner.
- Go solar if you can: No cords, no outlets, no hassle. Just make sure the solar panel gets 6+ hours of sun.
- Mix patterns for depth: Try a perimeter loop + one diagonal line. It creates visual interest without clutter.
- Don’t overload circuits: Most outdoor outlets handle 1,800 watts. Check your light specs—LEDs use ~10 watts per strand, incandescent ~100.
- Use a timer or smart plug: Automate your lights to turn on at sunset. No more forgetting to flip the switch!
Now, the mistakes I’ve made (so you don’t have to):
- Using indoor lights outside: They’ll short out in the first rain. Always use outdoor-rated lights.
- Ignoring the wind factor: Strong gusts can rip clips off. Use extra clips in windy areas or add windbreaks (like plants or screens).
- Over-tightening the cord: It stresses the clips and can break the cord. Keep it snug, not stretched.
- Not checking for aluminum thickness: Thin aluminum (like soffits) can’t support heavy magnets. Use adhesive or tension clips instead.
- Skipping the test run: Always plug in before finalizing. You don’t want to redo the whole thing because one strand is dead.
These insights come from real experience—not a manual. Use them to make your How to Hang String Lights on Aluminum Covered Patio 2026 project foolproof.
FAQs About How to Hang String Lights on Aluminum Covered Patio 2026
Q: Can I use regular adhesive hooks on aluminum?
A: Only if they’re rated for outdoor use and smooth surfaces. Regular Command strips might fail in heat. Go for 3M VHB or heavy-duty outdoor hooks. I’ve had good luck with the 3M Outdoor Fasteners—they last 2+ years.
Q: What if my aluminum patio has no gutters or edges?
A: No problem! Use adhesive clips or magnetic hooks (if there’s steel underneath). You can also install small L-brackets with self-tapping screws (if you’re okay with drilling). But for a no-damage option, adhesive is your best bet.
Q: How many lights can I safely hang?
A: It depends on your outlet and light type. Most outdoor outlets handle 15 amps (1,800 watts). LED string lights use about 10 watts per strand, so you can safely run 15–20 strands. Always leave 20% headroom for safety.
Q: Will the lights damage my aluminum patio?
A: Not if you use the right method. Magnetic and adhesive clips won’t scratch if applied correctly. Avoid zip ties or metal clamps that can rub and leave marks. And never use nails or screws unless you’re prepared for permanent holes.
Q: Can I leave the lights up all year?
A: Yes, but check them monthly. Adhesive clips can loosen in extreme heat or cold. In snowy areas, remove them to avoid ice buildup. For year-round use, invest in UV-resistant cords and clips.
Q: What’s the best way to hide the cords?
A: Use cord clips to secure them along the edge of the patio cover. Or, run them behind furniture or planters. For a clean look, choose lights with flat, low-profile cords—they’re easier to hide.
Q: Do I need a professional?
A: Not at all! With the right tools and this guide, anyone can do it. But if you’re unsure about electrical safety or have a complex layout, a handyman can help. Just make sure they understand aluminum-safe methods.
Final Thoughts
Hanging string lights on an aluminum-covered patio isn’t about brute force—it’s about smart, gentle solutions. You don’t need to drill, nail, or damage your beautiful cover. With the right clips, a clean surface, and a little planning, you can transform your outdoor space into a cozy, magical retreat.
Remember, How to Hang String Lights on Aluminum Covered Patio 2026 is all about working *with* the material, not against it. Choose non-destructive methods, test your setup, and maintain it seasonally. That’s how you get lights that last—and look amazing.
So grab your ladder, your favorite playlist, and get started. In a few hours, you’ll have a patio that’s ready for stargazing, late-night chats, and summer memories. And when your friends ask, “How did you do that?”—you’ll have the answer.
Now go light up the night. Your patio’s waiting.
“`

