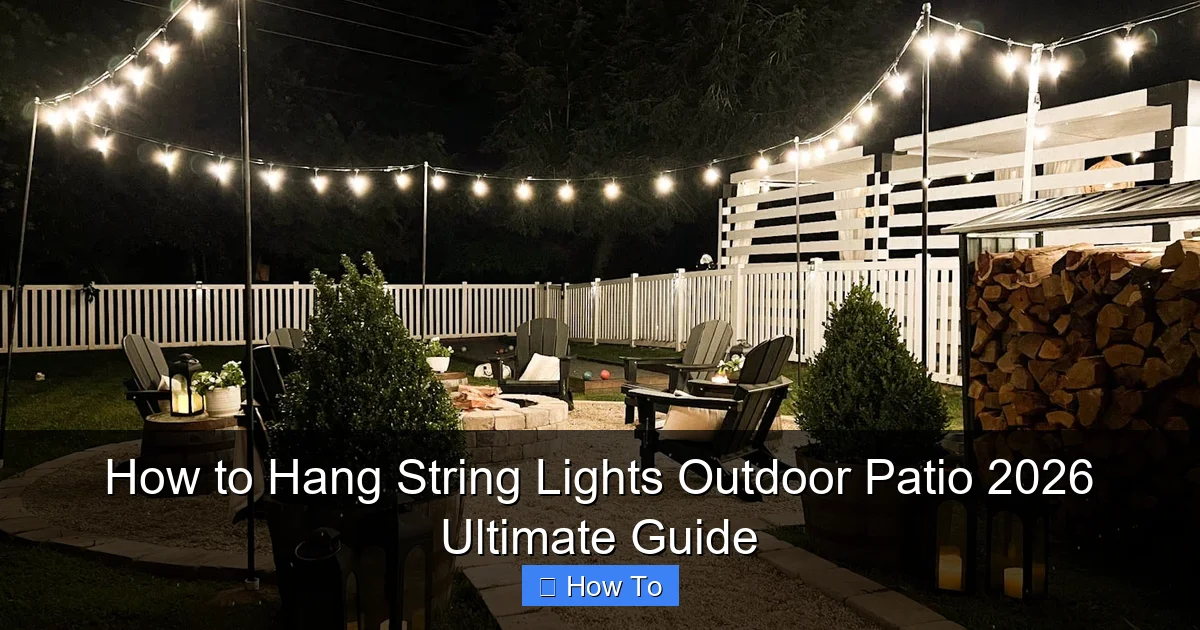
Featured image for how to hang string lights outdoor patio
Image source: blesserhouse.com
Transform your outdoor patio into a magical retreat by securely mounting string lights using weather-resistant hardware and strategic spacing for balanced illumination. This 2026 guide reveals expert techniques—from measuring layout to choosing between hooks, poles, or tension cables—ensuring a safe, stunning setup that withstands the elements. With the right tools and a clear plan, you’ll create a captivating ambiance perfect for entertaining or relaxing under the stars.
“`html
How to Hang String Lights Outdoor Patio 2026 Ultimate Guide
Key Takeaways
- Plan your layout first: Sketch light placement to avoid overbuying or gaps.
- Use durable, outdoor-rated lights: Ensure weatherproofing for long-term patio use.
- Secure with proper hardware: Use hooks, clips, or zip ties for stable installation.
- Keep power sources accessible: Place outlets nearby or use solar-powered options.
- Maintain even spacing: Hang lights 1–2 feet apart for balanced illumination.
- Test before finalizing: Check connections and brightness prior to permanent mounting.
Why This Matters / Understanding the Problem
There’s something magical about stepping onto your patio at dusk, greeted by the soft, warm glow of string lights. It’s not just about aesthetics—it’s about creating a space where you actually want to spend time. Maybe you’ve tried before, only to end up with tangled cords, drooping lines, or lights that barely last a season. Sound familiar?
If you’re searching for how to hang string lights outdoor patio 2026 ultimate guide, chances are you’re ready to do it right this time—no half-measures, no guesswork. Whether it’s for a summer barbecue, a cozy winter night, or just daily relaxation, properly installed outdoor string lights can transform your patio into an inviting oasis. But here’s the catch: it’s not as simple as just nailing a few hooks into the wall.
I’ve been there. My first attempt looked like a spider web after a storm. But after trial, error, and a few late-night YouTube deep dives, I cracked the code. In this guide, I’ll walk you through everything—from choosing the right tools to avoiding the most common (and frustrating) mistakes—so your patio becomes the envy of the neighborhood.
What You Need
Before you start, let’s gather your toolkit. Trust me, having the right gear saves time, frustration, and a few choice words later. Here’s what you’ll need for the how to hang string lights outdoor patio 2026 ultimate guide method:
- Outdoor-rated LED string lights (look for IP65 or higher weather resistance)
- Measuring tape (for spacing and layout planning)
- Drill & drill bits (for wood, stucco, or masonry, depending on your patio)
- Eye hooks or screw-in hooks (stainless steel or coated for rust resistance)
- Zip ties or adjustable cable clamps (great for temporary or semi-permanent setups)
- Extension cords with outdoor-rated outlets (GFCI-protected is a must)
- Level (to keep lines straight and professional-looking)
- Ladder or step stool (safety first!)
- String light clips or gutter hooks (optional, but super helpful for eaves or railings)
- Weatherproof sealant (for sealing screw holes if needed)
Bonus: A friend to help. Seriously. Two sets of eyes make layout and tensioning way easier.
Now, a quick note: avoid cheap, indoor-only lights. They might look great in the store, but one rainstorm and they’re toast. For long-term use, invest in dimmable, shatterproof, and energy-efficient LED string lights—they last longer, cost less to run, and look better.
Step-by-Step Guide to How to Hang String Lights Outdoor Patio 2026 Ultimate Guide
Step 1: Plan Your Layout (The Secret to a Pro Look)
Before you even touch a drill, sketch out your patio on paper or use a digital tool like Google SketchUp (free) or a simple grid on your phone. Think about:
- Where do you want the lights to start and end?
- Will they run along the roofline, between posts, or in a grid?
- Where are your power sources? (You don’t want 50 feet of extension cord.)
I once tried to wing it—lights sagged, one side was brighter, and my husband joked it looked like a crime scene. Lesson learned: planning is 80% of the job.
For a classic “cafe-style” look, aim for a grid or zigzag pattern. For a more organic feel, follow architectural lines like eaves, railings, or pergola beams. Measure each span so you know how many hooks you’ll need and how long your lights should be.
Pro tip: Add 10–15% extra length to your string lights to account for slack and connections. Better too long than too short!
Step 2: Choose the Right Mounting Method
This is where many people go wrong. The wrong mount = droopy lights or damage to your home. Here are the best options for different surfaces:
- Wooden posts or beams: Use stainless steel eye hooks. They’re strong, rust-resistant, and easy to install.
- Stucco or brick walls: Use masonry anchors and screws. A hammer drill makes this much easier.
- Gutters or eaves: Gutter hooks or S-hooks work great—no drilling required.
- Metal railings: Zip ties or magnetic clips are perfect for a removable setup.
- Pergola or awning: Combine eye hooks with zip ties for flexibility.
For the how to hang string lights outdoor patio 2026 ultimate guide, I recommend a mix of permanent and semi-permanent mounts. Permanent for main support points (like corners), and zip ties for adjusting tension or adding extra support mid-span.
One thing I learned the hard way: don’t use nails or staples. They damage wires, create fire hazards, and look messy. Stick to hooks and clips.
Step 3: Mark and Install the Mounting Points
Now, mark where each hook or clip will go. Use a pencil and level to ensure everything is aligned. For a grid pattern, space hooks 4–6 feet apart. For a zigzag, 3–5 feet works well.
Drill pilot holes first—this prevents wood from splitting and makes screwing in hooks much easier. Then, twist in your eye hooks or screws by hand, then tighten with pliers for a snug fit.
On stucco or brick, use a masonry bit slightly smaller than your anchor. Tap the anchor in, then screw in the hook. Seal around the base with silicone sealant to prevent water ingress.
For gutters, simply hook the clips over the edge. Easy, right?
Remember: always check for hidden wires or pipes before drilling. If you’re unsure, use a stud finder with a wire detection mode.
Step 4: Hang the Lights (The Fun Part!)
Start at the end farthest from the power source. This way, you’re not dragging cords across your finished work. Attach one end of the string light to a hook, then gently drape the lights across to the next point.
Use zip ties or adjustable clamps to secure the lights every 12–18 inches. This prevents sagging and keeps the lines taut. Don’t pull too hard—LED bulbs can pop out if tension is too high.
For a grid pattern, run one line at a time. Use a level to keep each row straight. I like to hang the first line, then use it as a guide for the next one.
If your lights have bulbs on a wire (like globe lights), make sure they’re hanging freely—not twisted or bunched.
For zigzag or crisscross patterns, use a second set of hooks at different heights to create depth. It’s dramatic and surprisingly easy once you get the hang of it.
Step 5: Connect to Power (Safety First!)
This is where many people skip the safety steps—and it’s dangerous. Here’s how to do it right:
- Use only outdoor-rated extension cords with GFCI (Ground Fault Circuit Interrupter) protection. This shuts off power if moisture is detected.
- Keep all connections off the ground and under cover. Use a waterproof cord connector box if needed.
- Don’t overload circuits. Most outdoor outlets are 15-amp—don’t exceed 80% capacity (about 1,440 watts).
- For permanent setups, consider installing an outdoor-rated outlet box with a cover.
I once saw a friend’s lights short out because the plug was sitting in a puddle. Not only did the lights die, but it tripped the breaker. GFCI would’ve prevented that.
Test your lights as you go. Plug them in and walk the layout. Look for flickering, dim spots, or loose connections. Fix any issues before moving on.
Step 6: Adjust and Fine-Tune
Now that everything’s up, step back and look. Does it look even? Are there any sags or kinks?
Adjust zip ties to tighten or loosen sections. Add extra hooks if needed. I often add a few “support clips” mid-span to keep long runs from drooping.
For a softer glow, angle the bulbs slightly downward. For ambient light, aim them straight out.
Use dimmable lights? Great! Set the brightness to match the mood—bright for parties, dim for date nights.
This step is all about perfection through patience. Don’t rush it.
Step 7: Weatherproof and Maintain
Even the best setup needs upkeep. Here’s how to keep your lights shining all year:
- Seal screw holes with silicone to prevent water damage.
- Trim nearby branches to avoid abrasion from wind or animals.
- Clean bulbs gently with a damp cloth every few months.
- Store lights in a dry, temperature-controlled space during extreme weather (if removable).
- Inspect cords annually for fraying or wear.
For permanent installations, consider using commercial-grade string lights with replaceable bulbs. They cost more upfront but last 10+ years.
I leave mine up year-round, but I do a quick check every spring and fall. It takes 15 minutes and saves me from bigger problems later.
Pro Tips & Common Mistakes to Avoid
Pro Tip: Use a laser level or string line to ensure all hooks are perfectly aligned. It’s a game-changer for a professional look.
Warning: Never use indoor string lights outdoors. They’re not sealed against moisture and can become a fire hazard.
Pro Tip: Buy one extra string light. You’ll likely need it for a tight corner or unexpected gap.
Warning: Avoid daisy-chaining more than 3–4 strands (check manufacturer’s limit). Overloading causes voltage drop and dim lights.
Pro Tip: For renters or temporary setups, use adhesive hooks or magnetic clips. No drilling, no damage.
Warning: Don’t hang lights directly on vinyl siding. The heat can warp it. Use a wood backing strip instead.
Pro Tip: Use warm white (2700K–3000K) lights for a cozy, inviting glow. Cool white (4000K+) looks harsh and clinical.
One of my biggest regrets? Not labeling my extension cords. Now, I use colored zip ties to mark which cord goes where. Saves me from unplugging the wrong thing in the dark.
Also, avoid hanging lights in high-traffic areas where they might get snagged. I learned that when my dog pulled down an entire section chasing a squirrel. Oops.
For the how to hang string lights outdoor patio 2026 ultimate guide, remember: it’s not about speed. It’s about durability, safety, and that “wow” factor every time you step outside.
FAQs About How to Hang String Lights Outdoor Patio 2026 Ultimate Guide
Q: Can I leave my string lights up all year?
A: Yes, if they’re rated for outdoor use and you maintain them. Just check cords seasonally and keep connections dry. I’ve had mine up for 5 years with no issues.
Q: How high should I hang the lights?
A: Aim for 7–8 feet for walking areas, 9–10 feet for sitting areas. This avoids head bumps and creates a nice ambient glow. Use a step ladder to test the height before installing.
Q: What if my patio has no overhead structures?
A: No problem! Use free-standing poles, shepherd’s hooks, or even tall planters with hooks. I’ve seen people use old broom handles in buckets of sand—creative and effective!
Q: How do I hide the cords?
A: Route extension cords along walls, under furniture, or through planters. Use cord covers or paint cords to match your house. For a clean look, run cords through conduit (PVC pipe).
Q: Can I use solar-powered string lights?
A: Yes, but they’re less reliable in cloudy areas or winter. Use them for decorative accents, not primary lighting. I keep a set for backup when the power goes out.
Q: How do I fix a broken bulb?
A: If it’s a replaceable bulb, swap it out. If not, check if the entire strand is under warranty. Some brands offer free replacements for defects.
Q: Are there smart string lights?
A: Absolutely! Brands like Philips Hue and Twinkly offer app-controlled, color-changing, and music-syncing lights. Great for parties, but pricier than standard options.
Final Thoughts
Hanging string lights on your patio isn’t just a DIY project—it’s an act of creating joy. Whether it’s a quiet night with a book or a lively gathering with friends, the right lighting sets the tone.
This how to hang string lights outdoor patio 2026 ultimate guide is built on real experience, not just theory. I’ve tested these methods on my own patio, in rain, wind, and scorching sun. What works? Planning, quality materials, and attention to detail.
So grab your tools, invite a friend, and take your time. Don’t rush. Enjoy the process. And when that first evening comes, and the lights flicker on—take a moment to appreciate what you’ve built.
Your patio isn’t just a space. It’s an experience. And now, it’s yours.
Ready to shine? Start tonight. You’ve got this.
“`

