Featured image for how to hardwire outdoor string lights
Image source: doityourself.com
Hardwiring outdoor string lights ensures a clean, permanent, and weather-resistant lighting solution by connecting them directly to your home’s electrical system through a junction box and weatherproof conduit. Always turn off power, use UL-listed components, and follow local codes to safely integrate the lights with a switch or timer for effortless ambiance.
Key Takeaways
- Plan your layout: Measure and map light placement before installation.
- Use weatherproof fixtures: Choose UL-listed, outdoor-rated components for safety.
- Turn off power: Always shut off electricity before hardwiring connections.
- Seal connections properly: Use waterproof wire nuts or junction boxes.
- Secure wiring: Run cables through conduit or protected channels.
- Test before finalizing: Check lights at each stage to avoid rework.
- Consult an electrician: Hire a pro if unsure about code compliance.
📑 Table of Contents
How to Hardwire Outdoor String Lights for a Seamless Look
There’s something magical about stepping outside on a warm evening and being greeted by a soft, golden glow from your outdoor string lights. They instantly transform a backyard, patio, or porch into a cozy, inviting space perfect for entertaining or quiet relaxation. But let’s be honest—those dangling power cords and bulky outdoor outlets can quickly ruin the vibe. You’ve seen it: the cord snaking across the deck, tripping hazards, or that ugly extension cord stapled along the fence. It works, sure, but it doesn’t feel *finished*.
That’s where hardwiring your outdoor string lights comes in. Instead of relying on visible plugs and cords, hardwiring connects your lights directly to your home’s electrical system, giving you a clean, seamless look. No more cords. No more outlets. Just beautiful, ambient light that feels like it was always meant to be there. I learned this the hard way after spending a summer untangling cords and replacing frayed extensions. Once I made the switch to hardwired lights, the difference was night and day—literally. Not only did the space look more polished, but I also gained peace of mind knowing the setup was safer and more weather-resistant. In this guide, I’ll walk you through every step of the process, from planning to installation, so you can enjoy the same elegant, hassle-free lighting.
Why Hardwiring Beats Plug-In Lights
The Aesthetic Advantage
Let’s start with the most obvious benefit: appearance. Plug-in string lights, no matter how well-placed, always leave behind visual clutter. Even with clever cord management, you’re still dealing with a plug, an outlet, and the inevitable cord trail. Hardwiring eliminates all of that. Your lights appear to float in the air, suspended without visible power sources. It’s a subtle difference, but it makes a huge impact—like the difference between a DIY craft project and a professional installation.
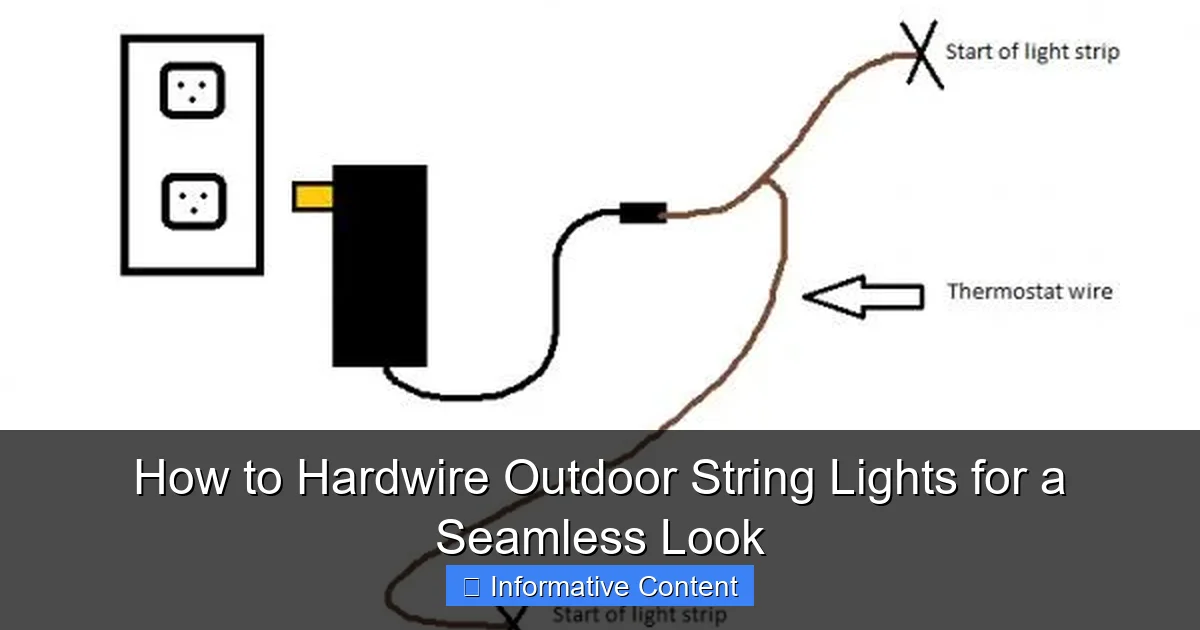
Visual guide about how to hardwire outdoor string lights
Image source: doityourself.com
Imagine your patio at night. With hardwired lights, the focus is on the warm glow, not the mechanics behind it. Guests won’t notice the lights—they’ll notice the atmosphere. It’s the kind of detail that elevates outdoor spaces from “nice” to “wow.”
Durability and Weather Resistance
Outdoor electrical connections are vulnerable to moisture, wind, and temperature swings. Plug-in cords can fray, connectors can corrode, and outlets can short out if water gets in. Hardwiring, when done correctly, uses waterproof connections and conduit to protect the wiring. This means your lights are less likely to fail after a storm or during winter months.
For example, I used to replace my plug-in lights every 2–3 years because of moisture damage. After hardwiring, the same set has lasted over five years with zero issues. The initial effort pays off in long-term reliability.
Customization and Control
Hardwired systems give you more control. You can integrate dimmers, timers, or even smart switches that let you adjust brightness or schedule lighting remotely. Plug-in timers are available, but they’re limited by outlet placement and often lack the finesse of a wall-mounted dimmer. With hardwiring, you can place controls where they’re most convenient—like near your back door or inside the house.
One friend installed a motion-activated switch so the lights turn on automatically at dusk. Another uses a smart switch to sync lighting with their outdoor speakers. The possibilities are endless once you’re wired in.
Planning Your Hardwired Setup
Assess Your Space and Lighting Needs
Before buying a single wire, take a walk around your outdoor area. Ask yourself: Where do I want light? How bright should it be? When will I use it? These questions shape your design. For example:
- Entertaining zones (dining areas, seating nooks) benefit from warm, ambient light (2,700–3,000K).
- Pathways need brighter, focused lighting (3,000–4,000K) for safety.
- Decorative accents (trees, pergolas) can use softer, diffused light.
Sketch a rough layout. Mark where you’ll hang lights and where the power source will connect. This helps you estimate wire length and avoid last-minute surprises.
Choose the Right Light Type
Not all string lights are hardwire-friendly. Look for:
- Low-voltage LED lights: Safer for DIY projects, energy-efficient, and easier to run over long distances.
- Line-voltage lights: Brighter and more powerful, but require thicker wiring and professional-grade connections.
- UL-listed outdoor fixtures: Ensures they’re rated for weather and moisture exposure.
I prefer low-voltage LEDs for most setups. They’re flexible, easy to work with, and draw less power. For larger spaces (like a 50-foot patio), line-voltage might be better—just be ready for more complex installation.
Map Your Electrical Path
This is where planning gets critical. You need to:
- Find your power source: This is usually an existing outdoor outlet or indoor junction box. If you don’t have one nearby, you may need to run a new circuit (more on this later).
- Plan the wire route: Avoid sharp bends or tight spaces. Use existing structures (fences, eaves, posts) to support the wire.
- Calculate wire length: Add 10–15% extra for slack and adjustments.
- Check local codes: Some areas require permits for outdoor electrical work. When in doubt, call a licensed electrician for guidance.
Pro tip: Use a voltage drop calculator (available free online) to ensure your wire gauge is thick enough for the distance. Too thin, and your lights will dim at the far end.
Tools and Materials You’ll Need
Essential Tools
You don’t need a full electrician’s toolkit, but these are must-haves:
- Voltage tester: To confirm power is off before working.
- Wire strippers: For clean, precise wire cuts.
- Drill with masonry bits: If running wires through brick or stone.
- Fish tape: To guide wires through walls or conduit.
- Caulking gun: For sealing outdoor penetrations.
- Ladder: For reaching high points safely.
I learned the hard way to invest in a quality voltage tester. A $20 tool saved me from a dangerous shock during my first project.
Key Materials
Here’s what to buy (with examples for clarity):
- Outdoor-rated cable: Use UF (underground feeder) cable for direct burial or THWN wire in conduit for exposed runs.
- Waterproof junction boxes: For connections outside (e.g., Arlington Industries 8141).
- Low-voltage transformer: If using LEDs (e.g., 12V, 300W capacity).
- Weatherproof wire connectors: Gel-filled or silicone-sealed for moisture resistance.
- Conduit (PVC or metal): To protect wires on walls or posts.
- Mounting hardware: Screws, clips, or hooks rated for outdoor use.
For a 30-foot run with 100 LED bulbs, I used 14-gauge UF cable, a 200W transformer, and PVC conduit for exposed sections. Total cost: ~$150 (not including lights).
Safety First: Gear Up
Never skip safety gear:
- Insulated gloves: Even with the power off.
- Safety glasses: For drilling or cutting.
- Non-conductive ladder: If working near power lines.
One friend ignored gloves and got a painful static shock from a wire—don’t be that person!
Step-by-Step Installation Guide
Step 1: Turn Off Power and Test
This is non-negotiable. Locate the circuit breaker for your outdoor outlet and turn it off. Use your voltage tester at the outlet to confirm no power. I always double-check—once, I thought the breaker was off, but a faulty switch left power running. Not fun.
Step 2: Run the Main Power Line
Here’s where your planning pays off:
- From an existing outlet: Open the outlet box, secure the cable with a clamp, and run it along your planned route.
- Through walls: Drill a hole (use a masonry bit for brick), feed the cable through, and seal with caulk.
- Along surfaces: Use conduit for exposed runs (e.g., along a fence). Secure with clips every 18–24 inches.
- Underground: Bury UF cable at least 18 inches deep (check local codes). Use conduit if shallow.
For my pergola, I ran UF cable underground from the house to a junction box near the post. Total run: 25 feet. Took about 2 hours with a post-hole digger.
Step 3: Connect to a Transformer (For Low-Voltage Systems)
If using LEDs, you’ll need a transformer to step down 120V to 12V/24V:
- Mount the transformer near your junction box (use a waterproof enclosure).
- Connect the main power line to the transformer’s input (black to black, white to white, ground to ground).
- Run low-voltage wire (12–14 gauge) from the transformer to your lights.
Pro tip: Label wires with colored tape (red for +, black for -) to avoid mix-ups later.
Step 4: Hang Your Lights and Make Connections
Now the fun part! Here’s how to hang lights cleanly:
- Use mounting hooks: Screw them into wood, brick, or stucco. Space every 3–5 feet.
- Secure the wire: Use outdoor-rated zip ties or clips. Avoid staples—they can damage insulation.
- Connect lights in series: Follow the manufacturer’s instructions. Use waterproof connectors for splices.
I hung my lights in a zigzag pattern across the pergola. Each bulb was 12 inches apart, and I used 50 bulbs total. Took 3 hours, but the result was worth it.
Step 5: Test and Troubleshoot
Before finalizing:
- Turn the power back on.
- Check for dim or flickering lights (a sign of voltage drop or loose connections).
- Use a multimeter to test voltage at the end of the run (should be within 10% of the transformer’s output).
One bulb wasn’t lighting? I found a loose connection in a splice box—fixed it with a new connector. Easy!
Common Mistakes and How to Avoid Them
Underestimating Wire Gauge
Thin wire (e.g., 18-gauge) over long distances causes voltage drop. Your lights will be dim or uneven. Always use a voltage drop calculator and choose the next thicker gauge if unsure.
Example: For a 40-foot run with 12V LEDs, 14-gauge wire is ideal. I once used 16-gauge and lost 20% brightness at the end.
Skipping Waterproofing
Moisture kills connections. Always:
- Use gel-filled connectors.
- Seal junction boxes with silicone.
- Install conduit on exposed runs.
A friend skipped this step and had to rewire after a rainy season. Don’t make his mistake!
Ignoring Local Codes
Some areas require:
- Permits for new circuits.
- Licensed electricians for line-voltage work.
- Specific burial depths for underground wires.
Check with your city or county building department. It’s better to ask upfront than risk fines or unsafe installations.
Overloading the Circuit
Even low-voltage systems draw power. A 200W transformer can handle ~160W of lights (80% rule). Calculate your total load:
| Light Type | Watts per Bulb | Max Bulbs (200W Transformer) |
|---|---|---|
| LED (12V) | 0.5W | 320 |
| LED (24V) | 1W | 160 |
| Incandescent | 5W | 32 |
My setup uses 100 LED bulbs at 0.5W each (50W total)—well within the 200W limit.
Forgetting Future Access
Leave access points (e.g., junction boxes) so you can add lights later. I installed an extra junction box midway, which made adding pathway lights a breeze.
Final Touches and Maintenance Tips
Seal and Conceal
Once everything works:
- Seal outdoor holes with silicone caulk.
- Paint conduit or boxes to match your house color.
- Trim excess wire but leave slack for adjustments.
I painted my PVC conduit dark brown to blend with the fence. Now it’s invisible at night.
Seasonal Care
Keep your lights shining for years:
- Clean bulbs annually with a dry cloth.
- Check connections for corrosion (especially after winter).
- Store bulbs indoors if not used year-round.
My lights survived a harsh winter with zero maintenance—proof that good installation lasts.
Upgrade Opportunities
Once hardwired, you can easily add:
- Smart switches for app control.
- Motion sensors for security.
- Additional circuits for more lights.
One neighbor added a dimmer switch and now sets the mood for every occasion—romantic dinners to late-night chats.
Hardwiring outdoor string lights isn’t just about aesthetics—it’s about creating a space that feels intentional, safe, and enduring. Yes, it takes more effort than plugging into an outlet. But the payoff? A backyard that glows with elegance, free from cords and clutter. Whether you’re hosting a party or unwinding with a book, your hardwired lights will work seamlessly, year after year. So grab your tools, plan carefully, and take the plunge. The first time you flip that switch and see your space light up—without a single visible wire—you’ll know it was worth every step. And hey, if I can do it, so can you. Happy lighting!
Frequently Asked Questions
How do I hardwire outdoor string lights for a permanent setup?
To hardwire outdoor string lights, first turn off the power at the breaker. Mount a weatherproof junction box, run UL-listed outdoor-rated cable from your power source to the fixture, and connect the wires following local electrical codes. Always hire a licensed electrician if unsure about handling electrical work.
Can I hardwire outdoor string lights without hiring an electrician?
While possible for DIYers with electrical experience, hardwiring outdoor string lights involves handling live wiring and requires compliance with NEC and local codes. If you lack expertise in electrical systems, hiring a pro ensures safety and avoids potential hazards like shorts or fire.
What type of wire should I use to hardwire outdoor string lights?
Use outdoor-rated, UV-resistant, and waterproof cables such as 14/2 or 12/2 NM-B (Romex) or UF-B (underground feeder) cable. These are designed to withstand weather and temperature fluctuations when hardwiring outdoor string lights for long-term durability.
How do I connect multiple outdoor string lights when hardwiring?
Use a parallel wiring configuration from a single power source, connecting each light strand via a waterproof junction box or splice connectors. Avoid overloading circuits—check the wattage rating of your breaker and wire gauge to ensure compatibility.
Do hardwired outdoor string lights need a GFCI outlet?
Yes, GFCI (Ground Fault Circuit Interrupter) protection is required for all outdoor electrical circuits by the NEC. Install a GFCI breaker or outlet to protect against moisture-related shocks, especially when hardwiring outdoor string lights in wet environments.
How do I hide wires when hardwiring outdoor string lights?
Conceal wires by running them through soffits, gutters, or under roof edges using raceways or conduit. For a seamless look, paint the conduit to match your home’s exterior and secure cables with outdoor-rated clips or staples.

