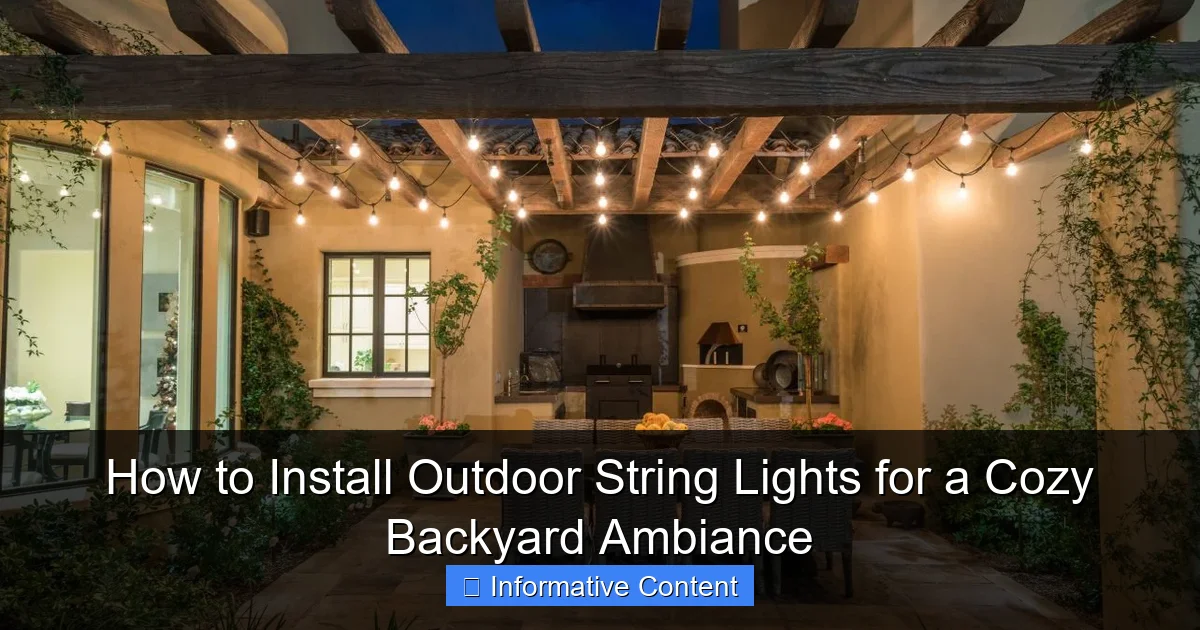
Featured image for how to install outdoor string lights
Image source: cdn.homedit.com
Transform your backyard into a cozy retreat by securely mounting outdoor string lights along fences, trees, or pergolas using weather-resistant hardware. Ensure proper spacing, use outdoor-rated extension cords, and connect lights to a GFCI outlet for safety and longevity. With simple tools and smart placement, you can create a warm, inviting ambiance in under an hour.
Key Takeaways
- Plan your layout: Measure space and mark anchor points before installing.
- Use sturdy anchors: Choose hooks, poles, or trees that support light weight.
- Opt for weatherproof lights: Select UL-rated or IP65+ for outdoor durability.
- Secure connections safely: Use outdoor-rated extension cords and GFCI outlets.
- Maintain tension: Tighten cables slightly to prevent sagging in warm weather.
- Hide cords neatly: Use clips or conduit to keep wires tidy and safe.
- Test before finalizing: Check bulbs and connections prior to full installation.
📑 Table of Contents
- How to Install Outdoor String Lights for a Cozy Backyard Ambiance
- 1. Planning Your Layout: Start with a Vision
- 2. Choosing the Right Outdoor String Lights
- 3. Gathering Tools and Materials
- 4. Installing the Lights: Step-by-Step
- 5. Safety and Maintenance: Keep Your Lights Shining
- 6. Creative Ideas to Elevate Your Ambiance
How to Install Outdoor String Lights for a Cozy Backyard Ambiance
There’s something magical about a backyard lit with soft, twinkling string lights. It’s like stepping into a scene from a movie where laughter echoes, fireflies dance, and time slows down. I remember my first attempt at installing outdoor string lights—I was so excited, I bought the first set I saw and tried to drape them across my backyard like a Hollywood set designer. Spoiler: it didn’t go well. The lights sagged in the middle, one side kept flickering, and the whole setup looked more like a tangled mess than a cozy retreat.
But after a few trial runs, a few mistakes, and a lot of YouTube tutorials, I cracked the code. Now, my backyard is my favorite place to unwind, host friends, or just sip coffee at sunset. Installing outdoor string lights isn’t just about hanging bulbs—it’s about crafting a mood. Whether you’re planning a romantic dinner under the stars or a casual BBQ with friends, the right lighting can transform your outdoor space into a sanctuary. In this guide, I’ll walk you through everything you need to know—from planning and choosing the right lights to the actual installation—so you can skip the rookie mistakes and get straight to the cozy ambiance.
1. Planning Your Layout: Start with a Vision
Before you buy a single string of lights, take a step back and visualize your space. Think about where you want people to gather, where you’ll dine, and which areas need a soft glow. This isn’t just about aesthetics—it’s about function, safety, and avoiding that “tacky” look that comes from over-lighting or poor placement.
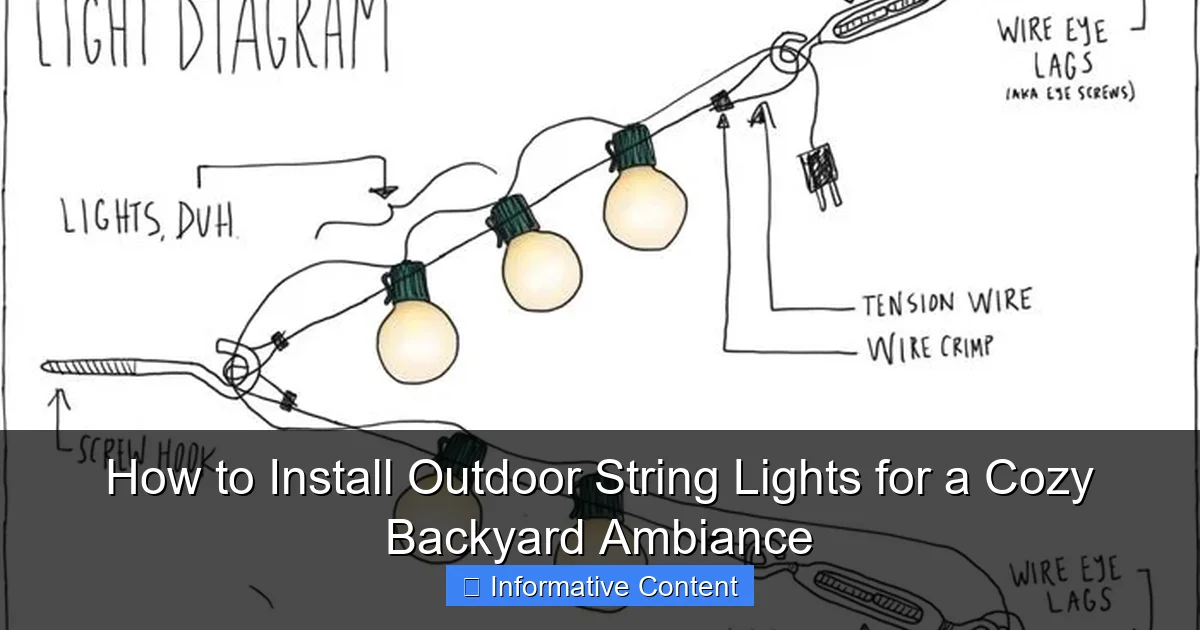
Visual guide about how to install outdoor string lights
Image source: i.pinimg.com
Sketch Your Backyard Layout
Grab a piece of paper or use a simple app like Google SketchUp (it’s free and user-friendly) to sketch your backyard. Mark key areas:
- Dining area (e.g., patio table or grill zone)
- Seating nook (e.g., lounge chairs or a hammock)
- Pathways or steps
- Existing structures (trees, pergolas, eaves)
For example, I wanted my string lights to frame my 12×12 ft patio, with one strand running along the pergola and two crossing overhead to create a “canopy” effect. Sketching it out helped me realize I needed three strands instead of two—and that one tree branch would be perfect for anchoring a light strand.
Measure Your Space
Use a measuring tape to determine the exact distances between anchor points. For overhead runs, add an extra 6–12 inches to each side for slack. Why? Because lights naturally sag, and you don’t want them drooping into your headspace. If your patio is 15 feet wide, plan for 16.5–17 feet of lighting. Pro tip: measure twice, buy once. I once bought 10-foot strands for a 12-foot span—don’t make that mistake!
Consider Power Source Access
Most outdoor string lights are plug-in, so you’ll need an outdoor-rated electrical outlet nearby. If your backyard is far from a power source, you have two options:
- Use a weatherproof extension cord (rated for outdoor use, with a GFCI protector).
- Install solar-powered string lights (no cords, but less reliable in cloudy climates).
I have a GFCI outlet near my back door, so I used a 25-foot outdoor extension cord. For solar, I’d recommend them only for accent lighting—like along a fence—since they’re dimmer and may not last all night.
2. Choosing the Right Outdoor String Lights
Not all string lights are created equal. The wrong choice can lead to frustration, safety hazards, or lights that burn out after one season. Here’s what to look for:
Light Type: LED vs. Incandescent
LED lights are the gold standard for outdoor use:
- Energy-efficient (uses up to 80% less power)
- Long lifespan (25,000+ hours vs. 1,000 for incandescent)
- Weather-resistant (most are rated IP44 or higher)
- Cool to the touch (safer around kids/pets)
Incandescent lights are cheaper but burn out faster, get hot, and use more electricity. I tried them once—they lasted one summer before the bulbs started popping. Stick with LED.
Bulb Style: Globe, Edison, or Mini?
Match the bulb style to your vibe:
- Globe bulbs: Soft, diffused glow (great for dining areas)
- Edison bulbs: Vintage, exposed filament (perfect for rustic or industrial styles)
- Mini bulbs: Subtle, starry effect (ideal for overhead canopies)
I use globe lights over my dining table (warm 2700K color temp) and Edison bulbs along the pergola for a bistro feel.
Weather Resistance: Check the IP Rating
The IP (Ingress Protection) rating tells you how well the lights handle water and dust. For outdoor use, look for:
- IP44: Splash-proof (okay for covered patios)
- IP65: Water-resistant (safe for open areas, rain)
- IP67: Waterproof (can handle heavy rain or snow)
My backyard has a mix of covered and open areas, so I bought IP65-rated lights for the pergola and IP67 for the tree-mounted strands.
Connectability and Length
Some string lights can be connected end-to-end (check the max number—usually 3–5 strands). If your space is large, this saves you from multiple extension cords. I connected three 24-foot strands to cover 72 feet total. But be careful: overloading can trip the circuit or damage the lights.
3. Gathering Tools and Materials
You don’t need a toolbox full of gadgets, but having the right gear makes installation smoother and safer.
Essential Tools
- Measuring tape: For precise spacing
- Ladder or step stool: For reaching high anchor points
- Drill and drill bits: If using screws or anchors
- Wire cutters/strippers: For trimming zip ties or adjusting cords
- Gloves: To protect your hands from rough surfaces
I used a 6-foot ladder for my pergola and a step stool for the tree branch. A drill with a 1/8” bit was key for installing eye hooks.
Anchoring Hardware
Choose hardware based on your anchor points:
- Eye hooks: For wood (trees, pergolas, fences)
- Concrete anchors: For brick or stucco walls
- Zip ties: For temporary setups (e.g., around a railing)
- Turnbuckles: To tighten sagging strands (a game-changer!)
I used stainless steel eye hooks (they won’t rust) for my pergola and zip ties for a temporary strand around my grill. Turnbuckles saved me when one strand started sagging after a windstorm.
Extension Cords and Timers
- Outdoor extension cord: 16-gauge or thicker (thicker = less voltage drop)
- Timer or smart plug: So you don’t have to manually plug/unplug every day
I use a dusk-to-dawn timer that turns the lights on at sunset and off at midnight. Total game-changer for ambiance and energy savings.
4. Installing the Lights: Step-by-Step
Now for the fun part! Follow these steps for a secure, professional-looking installation.
Step 1: Install Anchor Points
Mark where you’ll place your eye hooks, anchors, or zip ties. For wood:
- Drill pilot holes (slightly smaller than the hook’s shaft)
- Screw in eye hooks by hand, then tighten with pliers
For concrete or stucco, use a masonry bit and anchors. I spaced my eye hooks 8 feet apart on the pergola—close enough to prevent sagging, far enough to look intentional.
Step 2: Test the Lights
Before hanging, plug in the lights to make sure they work. Check for:
- Dead bulbs
- Flickering
- Damaged cords
One of my strands had a loose connection—fixed it with a dab of electrical tape. Better to catch it now than after installation!
Step 3: Hang the Lights
Start at the power source and work outward. For overhead runs:
- Loop the light’s hook (or a zip tie) around the anchor point
- Let the strand hang, then secure the other end
- Use turnbuckles for long spans (tighten until the strand is taut but not overstretched)
I used turnbuckles on my 20-foot overhead run. Without them, the lights sagged 18 inches—with them, just 3 inches. Huge difference!
Step 4: Manage Cords and Cables
Hide or secure extension cords:
- Use cord clips to attach cords to the ground or a wall
- Run cords behind furniture or planters
- For long runs, use a cord cover (like a rubber raceway)
I ran my extension cord behind my patio table and used black zip ties to blend it into the pergola beams. No tripping hazards, no eyesores.
Step 5: Adjust for Aesthetics
Once hung, step back and assess:
- Do the lights frame the space evenly?
- Is there enough light for dining/entertaining?
- Are cords visible from key viewing angles?
I adjusted one strand to dip lower over the dining table—it created a “cocoon” effect that made dinners feel intimate.
5. Safety and Maintenance: Keep Your Lights Shining
Outdoor lights face wind, rain, UV rays, and critters. A little maintenance goes a long way.
Weatherproofing
Even IP65-rated lights need help:
- Seal plug connections with electrical tape or a weatherproof cover
- Elevate plugs off the ground (use a plastic box or hang them)
- Trim branches that rub against the lights (they’ll wear down the insulation)
I use a $5 plastic outlet cover for my plug-in connection. It’s survived two winters and zero shorts.
Seasonal Care
- Spring/Fall: Inspect for damage, clean dust/debris
- Winter: Remove lights if you get heavy snow (it can overload the strands)
- Summer: Check for overheating (rare with LED, but still)
I take my lights down every winter. It’s a hassle, but they’ve lasted 5+ years because of it.
Troubleshooting Common Issues
- Flickering: Check connections, replace damaged bulbs
- Sagging: Add turnbuckles or shorten the run
- Dead strand: Use a light tester (a $10 tool that pinpoints breaks)
One summer, a squirrel chewed through part of my cord. I used a waterproof splice kit to fix it—no need to replace the whole strand.
6. Creative Ideas to Elevate Your Ambiance
Once the basics are set, get creative! Here are my favorite ways to level up:
Layer Your Lighting
Combine string lights with:
- Path lights (solar stakes along walkways)
- Fairy lights (in mason jars or wrapped around trees)
- Fire pits (adds warmth and flicker)
I have fairy lights in glass orbs on my dining table—it’s like having fireflies in a jar.
Use Color Temperature Wisely
Warm white (2700K–3000K) is cozy and inviting. Cool white (4000K+) feels clinical. I use warm white everywhere, but I’ve seen cool white work well for modern, minimalist spaces.
Try Themed Designs
- Romantic: Drape lights over a canopy or around a gazebo
- Party-ready: Use colored LED strands (red, blue, or multi-color)
- Minimalist: Single strand along a fence or wall
For my friend’s birthday party, I added red and blue strands to the mix—it felt like a backyard festival!
Data Table: Recommended String Lights
| Brand/Model | Length | Bulb Type | IP Rating | Connectable? | Price Range |
|---|---|---|---|---|---|
| Brightown Outdoor String Lights | 48 ft | Edison (LED) | IP65 | Yes (up to 5) | $30–$40 |
| Brightech Ambience Pro | 27 ft | Globe (LED) | IP65 | Yes (up to 3) | $40–$50 |
| Twinkle Star Solar String Lights | 72 ft | Mini (LED) | IP65 | No | $25–$35 |
| LITOM 2-Pack | 2×24 ft | Globe (LED) | IP67 | Yes (up to 4) | $35–$45 |
Installing outdoor string lights isn’t just a DIY project—it’s an investment in joy. When I see my backyard lit up, I’m reminded of why I started: to create a space that feels like a hug. Whether you’re hosting a dinner party, stargazing with a loved one, or just enjoying a quiet evening, the right lighting sets the stage for memories. So grab your tools, plan your vision, and let those lights shine. With a little effort, you’ll transform your backyard into a cozy retreat that’s as functional as it is beautiful. And hey, if you make a mistake? That’s part of the journey. Just like I did, you’ll learn, adapt, and—most importantly—enjoy the glow.
Frequently Asked Questions
How do I install outdoor string lights without damaging my house?
Use removable hooks, adhesive clips, or tension cables to hang lights without nails or screws. These options provide sturdy support while protecting siding, gutters, and eaves during installation.
What’s the best way to plan the layout for installing outdoor string lights?
Sketch your backyard, noting anchor points (trees, posts, eaves) and measuring distances to ensure adequate light coverage. Leave extra length for swags or loops to create a cozy, balanced ambiance.
Can I install outdoor string lights on a patio without poles?
Yes—attach lights to existing structures like railings, pergolas, or fences using zip ties or hooks. For open spaces, rent or install temporary poles to secure the lights.
How do I power outdoor string lights if outlets are far away?
Use outdoor-rated extension cords or a power kit with a transformer to extend reach safely. Always check the manufacturer’s guidelines to avoid overloading circuits when installing outdoor string lights.
Are solar-powered string lights good for year-round use?
Solar lights work well in sunny areas but may dim in winter or cloudy climates. For reliable brightness, opt for plug-in or battery-powered options, especially if you frequently host evening events.
How do I prevent outdoor string lights from sagging?
Tighten lights with turnbuckles or tensioners, or install them in a zigzag pattern between anchor points. For long runs, add a support wire or center pole to maintain even tension.

