Featured image for how to put string lights outdoor
Image source: thecreativityexchange.com
Transform your outdoor space into a magical retreat by securely mounting string lights along fences, railings, or trees using weather-resistant hooks or zip ties. Choose a layout that highlights key areas—like seating zones or pathways—and always use outdoor-rated lights with a proper power source to ensure safety and longevity. With minimal effort, you’ll create a warm, enchanting glow perfect for entertaining or quiet evenings.
Key Takeaways
- Plan your layout first: Sketch the area to ensure even coverage and avoid last-minute adjustments.
- Use durable, weatherproof lights: Choose IP65-rated or higher for long-lasting outdoor performance.
- Secure lights properly: Use clips, hooks, or zip ties to prevent sagging or damage.
- Hide cords strategically: Tuck wires along edges or under decor for a clean, seamless look.
- Layer with other lighting: Combine string lights with lanterns or spotlights for added depth.
- Test before finalizing: Check brightness and connections to ensure a flawless, magical glow.
📑 Table of Contents
- Why String Lights Are the Secret to Outdoor Magic
- Choosing the Right String Lights for Your Outdoor Space
- Planning Your Layout: Mapping the Perfect Glow
- Safe and Secure: Tools, Hardware, and Installation Techniques
- Power Solutions: Wiring, Outlets, and Smart Control
- Maintaining Your Outdoor String Lights Year-Round
- Data Table: Comparing Outdoor String Light Options
- Final Thoughts: Creating Your Outdoor Oasis
Why String Lights Are the Secret to Outdoor Magic
Remember that one summer evening when you sat in a backyard lit by soft, twinkling lights, laughing with friends under a sky full of stars? Chances are, those memories are made even more magical by the gentle glow of string lights. Whether it’s a cozy patio, a sprawling garden, or a simple balcony, outdoor string lights can transform any space into a serene retreat. I’ve been there—standing in my own backyard, wondering how to turn it from “meh” to “wow.” And guess what? The answer was as simple as hanging a few strands of lights.
String lights aren’t just for holidays anymore. They’ve become a year-round staple in outdoor decor, offering ambiance, warmth, and a touch of whimsy. But here’s the thing: knowing how to put string lights outdoor properly can make the difference between a dazzling display and a frustrating mess. From choosing the right lights to securing them safely, there’s more to it than just draping them over a tree branch (though that’s a good start!). In this guide, I’ll walk you through everything you need to know—based on real experiences, trial and error, and a whole lot of string lights. Whether you’re planning a romantic dinner under the stars or just want to enjoy your yard after sunset, let’s create that magical glow together.
Choosing the Right String Lights for Your Outdoor Space
Before you start hammering hooks into your fence or wrapping lights around trees, take a moment to pick the right type of string lights. Not all lights are created equal, and using indoor-rated lights outside can lead to safety hazards or premature failure. Here’s what to consider:
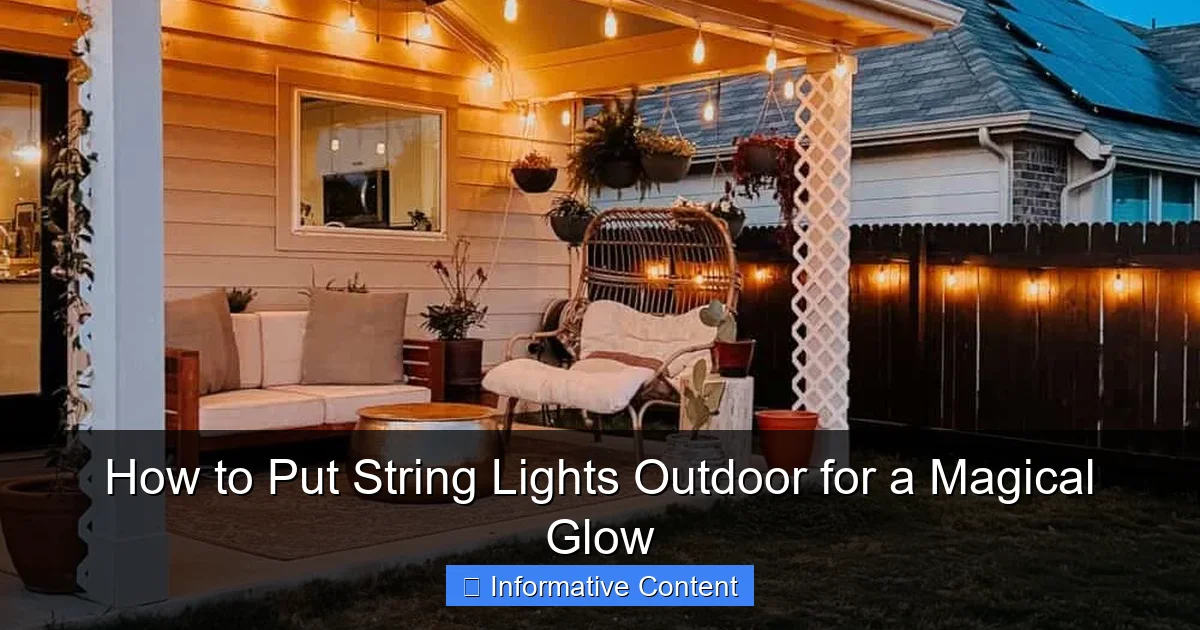
Visual guide about how to put string lights outdoor
Image source: loveandrenovations.com
1. Weather Resistance: Look for Outdoor-Rated Lights
The first rule of thumb: always use outdoor-rated string lights. These are designed to withstand rain, wind, UV exposure, and temperature fluctuations. Check the packaging for an IP (Ingress Protection) rating. For outdoor use, aim for at least IP44—this means the lights are protected against splashing water and small solid objects. Higher ratings like IP65 or IP67 offer even better protection, especially if you live in an area with heavy rain or snow.
For example, I once used indoor fairy lights on my patio during a summer storm. Within 24 hours, the transformer fried, and the entire strand went dark. Lesson learned: invest in weatherproof lights from the start.
2. Bulb Type: LEDs vs. Incandescent
- LED string lights: These are energy-efficient, long-lasting (up to 25,000–50,000 hours), cooler to the touch, and more durable. They’re perfect for year-round use and come in a wide range of colors and styles (warm white, cool white, multicolor, color-changing).
- Incandescent string lights: These give off a warmer, more traditional glow but consume more electricity, generate heat, and have a shorter lifespan (around 1,000–2,000 hours). They’re best for short-term events or seasonal displays.
I recommend LEDs for most outdoor setups—they’re safer, cheaper to run, and easier to maintain. Plus, many LED sets are dimmable and compatible with smart home systems, so you can control them with an app or voice assistant.
3. Length, Spacing, and Power Source
Measure your space before buying. A 25-foot string might seem long, but once you account for gaps between mounting points, you may need multiple strands. Consider:
- Spacing between bulbs: 4–6 inches is ideal for a balanced look. Closer spacing creates a denser glow; wider spacing gives a more subtle effect.
- Total wattage and plug-in vs. solar: Plug-in lights offer consistent brightness but require access to an outdoor GFCI outlet. Solar-powered lights are great for areas far from power sources, but they may dim on cloudy days or after prolonged use.
- Connectable strands: Some lights let you connect multiple strands end-to-end. This reduces the number of extension cords and outlets needed—just check the maximum number allowed per circuit.
Pro tip: Buy one extra strand than you think you’ll need. It’s always better to have a backup than to run short mid-installation.
Planning Your Layout: Mapping the Perfect Glow
You wouldn’t build a house without a blueprint, and you shouldn’t hang string lights without a plan. A well-thought-out layout ensures even coverage, avoids overloading circuits, and creates the desired ambiance.
1. Sketch Your Space
Grab a piece of paper or use a free app like SketchUp Free or Google Drawings. Sketch your yard, patio, or deck, marking key features:
- Trees, poles, or structures you can hang lights from
- Furniture layout (tables, seating areas, grills)
- Power source locations (outlets, extension cords, solar panel placement)
- High-traffic zones (paths, stairs, dining areas)
I once skipped this step and ended up with lights clustered near the grill and dark spots around the seating area. Not ideal for entertaining!
2. Decide on a Hanging Pattern
Your layout will depend on the shape of your space and the mood you want to create. Here are popular patterns:
- Linear (straight lines): Great for patios, pergolas, or along fences. Creates clean, modern lines. Use zip ties or clips to attach to beams.
- Canopy (crisscross or grid): Ideal for open yards or under pergolas. Creates a starry-night effect. Requires two or more anchor points.
- Umbrella or drape style: Hang from a central point (tree, post, or ceiling) and let lights cascade down. Perfect for cozy nooks or bistro-style setups.
- Pathway lighting: Line walkways, stairs, or garden edges with low-hanging lights for safety and charm.
For example, my friend Sarah used a crisscross pattern across her pergola, spacing each strand about 12 inches apart. The result? A soft, even glow that made her backyard feel like a secret garden.
3. Test Before You Commit
Before drilling holes or tying knots, lay out the lights temporarily using painter’s tape or temporary hooks. Walk around at night (or use a flashlight) to see how the light spreads. Adjust spacing, height, and direction as needed.
Bonus tip: Use a laser level or measuring tape to keep strands parallel and evenly spaced. It’s worth the extra few minutes!
Safe and Secure: Tools, Hardware, and Installation Techniques
Now comes the fun part: actually hanging the lights. But safety and stability are key—nobody wants their lights blowing down in the wind or sparking a fire hazard.
1. Gather the Right Tools
Here’s what you’ll need:
- Outdoor-rated string lights (duh!)
- GFCI-protected outdoor outlet or extension cord (prevents electrical shocks)
- Weatherproof extension cord (if needed; rated for outdoor use)
- Mounting hardware:
- Outdoor-rated hooks, eye screws, or cup hooks for wood, stucco, or vinyl
- Zip ties or plastic cable clamps for metal, PVC, or railings
- Adhesive hooks (for temporary setups on smooth surfaces)
- Umbrella or ceiling hooks for central hanging points
- Drill, screwdriver, ladder, gloves
- Measuring tape, level, pencil
2. Choose the Right Mounting Method
The best method depends on your surface:
- Wood (fences, decks, pergolas): Use cup hooks or eye screws. Drill pilot holes first to avoid splitting the wood. Space hooks 12–24 inches apart for even support.
- Concrete or brick: Use masonry anchors and screws. A hammer drill makes this easier, but a regular drill can work with the right bit.
- Vinyl or aluminum siding: Use adhesive hooks or clips designed for siding. Avoid nails or screws that could crack the material.
- Metal railings or poles: Zip ties or plastic cable clamps are quick and secure. Use UV-resistant ties to prevent brittleness over time.
- Trees: Use tree-safe straps or soft rope (never wire or nails, which can harm the tree). Wrap the lights loosely around branches, allowing for growth.
I once used metal wire to hang lights on a young oak tree. A year later, the bark was girdled and the branch died. Learn from my mistake: always use tree-friendly materials.
3. Install with Care
Follow these steps for a safe, secure setup:
- Turn off power at the outlet and use a voltage tester to confirm it’s off.
- Install mounting hardware at planned locations. Use a level to keep everything straight.
- Start at the power source. Plug in the first strand and test it before continuing.
- Hang the lights, leaving a little slack (not too tight!) to prevent strain on the wires.
- For long runs, connect multiple strands using manufacturer-approved connectors. Don’t exceed the max number of connectable lights.
- Secure the cord with clips or ties every 12–18 inches to prevent sagging or tripping hazards.
- Use outdoor-rated zip ties to bundle excess cord or hide it along edges.
Pro tip: Leave a small loop of wire near the plug to allow for movement in wind. This prevents the plug from being pulled out accidentally.
Power Solutions: Wiring, Outlets, and Smart Control
Even the most beautiful lights won’t work without power. But running extension cords across your yard isn’t always safe or attractive. Here’s how to power your setup smartly.
1. Extension Cords: The Right Way
- Use heavy-duty, outdoor-rated extension cords (look for “SJTW” or “SJEOW” ratings).
- Choose the correct gauge (thickness): 14-gauge for short runs (up to 25 feet), 12-gauge for longer runs (25–50 feet) or high-wattage setups.
- Keep cords off the ground when possible. Use cord covers, conduit, or run them along walls to prevent tripping and water exposure.
- Never daisy-chain extension cords—this overloads circuits and increases fire risk.
2. GFCI Outlets: Non-Negotiable
Outdoor electrical work must be connected to a GFCI (Ground Fault Circuit Interrupter) outlet. These shut off power instantly if they detect a ground fault (like water contact), preventing shocks and fires. Test your GFCI monthly using the “test” and “reset” buttons.
3. Smart Lighting: Control at Your Fingertips
Want to turn your lights on with your voice or set a schedule? Smart string lights are a game-changer. Options include:
- Wi-Fi or Bluetooth-controlled lights: Use an app to adjust brightness, color, or patterns.
- Smart plugs: Plug your string lights into a smart plug (like Kasa, Wemo, or TP-Link) to control them via Alexa, Google Assistant, or Siri.
- Timer switches: Set lights to turn on at dusk and off at bedtime—no manual effort needed.
I installed a smart plug for my patio lights and now say, “Alexa, turn on the party lights” when guests arrive. It’s simple, convenient, and impresses everyone.
4. Solar and Battery Options
For remote areas (like a garden shed or treehouse), solar or battery-powered lights are ideal. Just remember:
- Solar panels need direct sunlight for 6–8 hours a day to charge fully.
- Battery-powered lights are great for short-term use or backup power.
Maintaining Your Outdoor String Lights Year-Round
Good news: once installed, string lights require minimal maintenance. But a little care goes a long way in keeping them safe and beautiful for years.
1. Seasonal Care
- Spring/Summer: Check for damage after winter. Replace burned-out bulbs or frayed wires. Clean dust and pollen with a dry cloth.
- Fall/Winter: In snowy climates, gently brush off snow to prevent wire strain. If using incandescent lights, consider taking them down in winter to extend lifespan.
2. Storage Tips
If you remove lights seasonally:
- Unplug and let cool completely.
- Use a storage reel or cardboard tube to prevent tangles.
- Store in a dry, temperature-controlled space (like a garage or basement).
- Label strands by location (e.g., “Pergola,” “Front Porch”) for easy reinstallation.
3. Safety Checks
Inspect your lights annually for:
- Frayed or cracked wires
- Loose connections
- Water damage (especially in plug areas)
- Overheating (if using incandescent)
Replace any damaged lights immediately. It’s better to spend $20 on a new strand than risk an electrical fire.
4. Cleaning and Bulb Replacement
For LED lights, wipe bulbs with a dry microfiber cloth. For incandescent, turn off and let cool first. Replace bulbs with the same type and wattage to avoid overloading the circuit.
Data Table: Comparing Outdoor String Light Options
| Feature | LED String Lights | Incandescent String Lights | Solar String Lights |
|---|---|---|---|
| Energy Efficiency | High (uses 75% less energy) | Low (generates heat) | Medium (depends on sunlight) |
| Lifespan | 25,000–50,000 hours | 1,000–2,000 hours | 2,000–5,000 hours |
| Weather Resistance | IP44 or higher (outdoor-rated) | IP44 (must be outdoor-rated) | IP65 (solar panel may be less durable) |
| Installation Ease | Easy (lighter, no heat) | Moderate (hot bulbs, heavier) | Easy (no wiring, but needs sun) |
| Cost (per 25-ft strand) | $20–$40 | $15–$30 | $25–$50 |
| Best For | Year-round use, permanent setups | Seasonal events, temporary displays | Remote areas, eco-conscious users |
Final Thoughts: Creating Your Outdoor Oasis
Learning how to put string lights outdoor isn’t just about hanging lights—it’s about creating a feeling. A feeling of warmth, connection, and wonder. Whether you’re hosting a summer barbecue, enjoying a quiet evening with a book, or celebrating a milestone, the right lighting can elevate the moment.
From choosing weatherproof LEDs to planning a crisscross canopy, every step matters. But remember: perfection isn’t the goal. It’s about making your space feel like you. Maybe your lights aren’t perfectly spaced, or one strand flickers in the wind. That’s okay. The charm is in the imperfection, the handmade touch, the effort you put in.
So go ahead—grab your lights, sketch your plan, and start hanging. Test it at night. Step back and admire your work. Then pour yourself a drink, turn on the lights, and enjoy the magic. Because sometimes, the simplest things—like a string of lights—can turn an ordinary backyard into an extraordinary escape.
Frequently Asked Questions
How do I hang outdoor string lights without drilling holes?
Use adhesive hooks, zip ties, or tension rods to secure lights to fences, railings, or trees. These methods are damage-free and work well for renters or temporary setups.
What’s the best way to put string lights outdoor for a professional look?
Plan your layout first, spacing bulbs evenly and using guide wires or clips for support. Avoid sagging by anchoring lights every 2–3 feet and keeping them taut.
Can I leave outdoor string lights up year-round?
Only if they’re rated for “wet” or “damp” locations and use weatherproof seals. Check manufacturer guidelines and inspect wires regularly for damage from snow, wind, or UV exposure.
How do I power outdoor string lights if there’s no nearby outlet?
Use an outdoor-rated extension cord or a solar-powered string light set. For longer distances, consider a low-voltage transformer or a portable power station.
How do I put string lights on a patio or pergola safely?
Secure lights to beams or rafters with S-hooks or outdoor-rated clips, ensuring cords stay clear of high-traffic areas. Use LED lights to reduce heat and energy use.
What type of string lights are best for outdoor use?
Choose lights labeled “outdoor-rated” with weatherproof, shatterproof bulbs and UV-resistant cords. LED string lights are ideal for energy efficiency and durability in harsh conditions.

