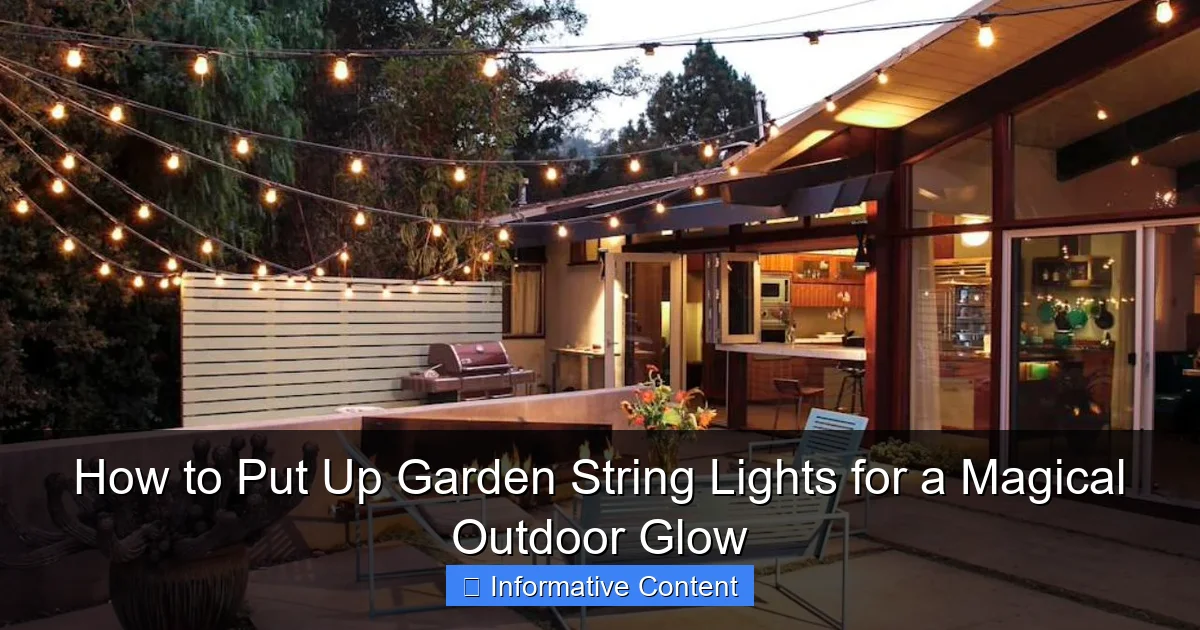
Featured image for how to put up garden string lights
Image source: cdn.homedit.com
Transform your outdoor space into a magical retreat by securely mounting garden string lights along fences, trees, or pergolas using weather-resistant hooks or zip ties. Ensure even spacing and a safe, taut installation by measuring the area and using a level, especially for long runs. Always connect lights to a GFCI outlet and test before finalizing for a stunning, twinkling glow that lasts all season.
Key Takeaways
- Plan your layout first: Sketch light placement to avoid over- or under-lighting key areas.
- Use weatherproof lights: Choose IP65-rated or higher for durability in outdoor conditions.
- Anchor securely: Install hooks, clips, or poles to prevent sagging or damage in wind.
- Hide cords neatly: Conceal wires along fences, trees, or edges to maintain a clean look.
- Layer lighting: Combine string lights with spotlights or lanterns for depth and ambiance.
- Test before finalizing: Check brightness and connections before permanently securing lights.
📑 Table of Contents
- Why Garden String Lights Are the Secret to a Magical Backyard
- Choosing the Right String Lights for Your Garden
- Planning Your Layout: Design Before Installation
- Tools, Materials, and Safety: What You’ll Need
- Step-by-Step Installation: From Plan to Glow
- Maintaining and Storing Your Garden String Lights
- Data Table: Recommended String Lights for Different Uses
Why Garden String Lights Are the Secret to a Magical Backyard
There’s something undeniably enchanting about stepping into a garden at night, where the soft glow of string lights dances above like fireflies caught in a net. I remember the first time I strung up lights in my own backyard—it was a warm summer evening, and as the last golden rays of sunset faded, I flicked the switch. Instantly, the space transformed. What had been a simple patio with a few chairs and a barbecue became a cozy, inviting oasis. My guests gasped. My dog barked in excitement. Even the cat, who usually avoids anything new, sat on the fence and watched the lights flicker with quiet fascination.
That moment sparked something in me. I realized that garden string lights aren’t just about decoration—they’re about mood. They turn ordinary outdoor spaces into places where memories are made: where friends linger over wine, kids giggle under a canopy of stars, and quiet moments feel just a little more special. Whether you’re hosting a dinner party, enjoying a solo evening with a book, or celebrating a holiday, the right lighting can elevate your garden from functional to magical. And the best part? You don’t need to be an electrician or a DIY expert to pull it off. With a little planning, the right tools, and a few practical tips, you can create your own glowing retreat. So let’s dive into how to put up garden string lights the smart, safe, and beautiful way.
Choosing the Right String Lights for Your Garden
Before you start hammering in hooks or running extension cords, take a beat to choose the right lights. Not all string lights are created equal, and the type you pick will affect everything from installation to longevity. Think of this step as setting the foundation—get it right, and the rest will follow smoothly.
Visual guide about how to put up garden string lights
Image source: clipart-library.com
Types of Garden String Lights: What Works Where
- Solar-powered string lights: These are great for eco-friendly setups and areas without easy access to outlets. They charge during the day and turn on automatically at dusk. However, they’re usually dimmer and may not last as long in cloudy regions. I once used solar lights along a pathway—they were lovely in summer but barely lasted past 9 PM in winter. A good option for ambiance, but not for bright, long-term illumination.
- Plug-in (AC-powered) string lights: These offer consistent brightness and longer runtimes. Ideal for patios, pergolas, and areas near power sources. Just remember: you’ll need outdoor-rated extension cords and GFCI-protected outlets.
- LED vs. incandescent: Always go LED. They use up to 80% less energy, last 10–20 times longer, and generate less heat. Incandescent bulbs may look nostalgic, but they burn out fast and get hot—risky if kids or pets are around.
- Weather-resistant (IP44 or higher): Look for this rating. It means the lights can handle rain, humidity, and dust. I learned this the hard way when a storm ruined a set of indoor-rated lights I’d used outside. Oops.
Bulb Style and Spacing: Aesthetic Matters
The shape and spacing of bulbs affect the overall look. Here’s a quick guide:
- Edison bulbs: Vintage charm with visible filaments. Best for cozy, rustic vibes. Spacing: 6–12 inches apart.
- Mini lights (pearl or clear): Delicate and twinkly. Great for wrapping around trees or draping across fences. Spacing: 3–6 inches.
- Large globe bulbs: Bold and modern. Ideal for patios or pergolas. Spacing: 12–18 inches.
Pro tip: Mix bulb styles sparingly. For example, use large globes over a dining area and mini lights on surrounding trees. Too many styles can look chaotic.
Length, Connectivity, and Power Needs
Measure your space before buying. You don’t want to be 5 feet short or have 20 feet of excess wire. Most string lights come in 25–50-foot lengths. Some are end-to-end connectable—check the packaging. If you’re planning a long run (say, 100+ feet), make sure your outlet can handle the load. A 14-gauge outdoor extension cord is safest for long setups.
Planning Your Layout: Design Before Installation
Now that you’ve got your lights, it’s time to map out where they’ll go. This step is crucial. Rushing into installation without a plan often leads to frustration—lights that don’t reach, awkward gaps, or tangled messes. Trust me, I’ve been there.
Sketch Your Space
Grab a notepad or use a free app like SketchUp or Canva. Draw a rough sketch of your garden, including:
- Trees, posts, and structures (fences, pergolas, gazebos)
- Power source location (outlet, solar panel spot)
- High-traffic zones (dining area, pathways, seating nooks)
- Obstacles (bushes, uneven terrain, water features)
Then, sketch in your light paths. Ask yourself: Do I want a canopy effect? A border? A starry sky vibe? For example, in my backyard, I created a “light tunnel” over the dining table by running two parallel strings from pergola to fence, then added a crisscross pattern for depth.
Decide on the Hanging Method
Your layout will determine how you hang the lights. Here are the most common methods:
- Overhead canopy (pergola, trees, between posts): Best for creating a “room” under the lights. Use sturdy anchors and consider sag—allow 6–12 inches of droop between supports for a natural look.
- Vertical drops (from roofline, fence, or trellis): Great for adding height and drama. I used this on a blank wall to mimic a waterfall of light.
- Wrapping (trees, columns, railings): Wrap lights around trunks or posts in a spiral. Use zip ties or clips to secure—never nails or staples, which can damage wood and create fire hazards.
- Border lighting (along pathways, flower beds): Use low-profile stakes or tuck lights under mulch. Solar path lights work well here.
Test Your Design First
Before you commit, do a dry run. Lay the lights out on the ground (or use glow sticks, ribbons, or even string) to visualize the effect. Walk around at night. Does it feel balanced? Are there dark spots? Adjust as needed. I once planned a zigzag pattern across my lawn—looked amazing on paper, but in person, it felt too busy. I simplified to a gentle curve, and it was perfect.
Tools, Materials, and Safety: What You’ll Need
Now comes the fun part—gathering your gear. The right tools make the job faster, safer, and more professional-looking. Don’t skip this step. Using the wrong hardware or cutting corners on safety can lead to headaches (and maybe even a fire).
Essential Tools and Hardware
Here’s your shopping list:
- String lights (weather-rated, LED)
- Outdoor extension cord (14-gauge, 3-prong, GFCI-protected)
- Outdoor-rated zip ties or cable clips – Look for UV-resistant and weatherproof types. I prefer the ones with a built-in screw hole—they’re more secure.
- Eye hooks or screw-in hooks – Use stainless steel or galvanized to prevent rust. Size depends on your surface (wood, masonry, etc.).
- Turnbuckles or tensioners – For overhead runs, these help tighten the wire and reduce sag. A game-changer for long spans.
- Measuring tape and level – Ensures even spacing and straight lines.
- Ladder (with stabilizer) – Safety first. Never lean over the edge or stand on the top rung.
- Drill and appropriate bits – For installing hooks in wood or masonry.
- Outdoor-rated wire clips or adhesive mounts – For securing cords along fences or walls.
- Timer or smart plug – Automate on/off times. Saves energy and adds convenience.
Safety First: Avoiding Common Hazards
Safety isn’t just about avoiding shocks—it’s about long-term durability too.
- Check your outlet: It must be GFCI-protected (look for a “Test” button). If it’s not, install a GFCI outlet or use a GFCI extension cord.
- Never overload circuits: Check the wattage of your lights. Most outdoor outlets can handle 1,500–1,800 watts. Use a power strip with surge protection if needed.
- Use outdoor-rated everything: Cords, plugs, and connectors must be rated for outdoor use. Indoor gear degrades fast in the elements.
- Avoid nails and staples: They can pierce insulation and cause shorts. Use clips or hooks instead.
- Keep cords off the ground: Use clips to secure cords to walls, fences, or railings. Tripping hazards are real!
- Inspect lights before hanging: Check for frayed wires, loose bulbs, or cracked sockets. Replace damaged sets.
Smart Add-Ons for Convenience
These aren’t essential, but they make life easier:
- Smart plug with app control: Turn lights on/off from your phone. Great for vacations.
- Weatherproof cord cover: Hides and protects extension cords running along the ground.
- Light sensor (photocell): Automatically turns lights on at dusk. No timer needed.
Step-by-Step Installation: From Plan to Glow
Alright, let’s get our hands dirty. With your plan, tools, and lights ready, it’s time to install. I’ll walk you through a few common setups, but the principles apply to most designs.
Method 1: Overhead Canopy (Pergola to Tree)
- Install hooks: Screw eye hooks into the pergola beam and tree trunk (at least 8 feet high). Use a level to keep them aligned.
- Run guide wire (optional): For long runs, string a thin wire between hooks first. Attach lights to the wire with clips. This prevents sagging.
- Hang the lights: Start at the outlet end. Drape the string over the hooks, leaving slack for sag. Use zip ties to secure every 3–4 feet.
- Tighten with turnbuckles: If using a guide wire, adjust turnbuckles to remove slack.
- Plug in and test: Turn on the lights. Check for even brightness and adjust sag as needed.
Tip: For a starry sky effect, add a second string in a crisscross pattern above the first.
Method 2: Wrapping Trees or Posts
- Start at the base: Attach the first bulb to the tree with a zip tie or clip.
- Wrap in a spiral: Move upward, spacing bulbs 6–12 inches apart. Keep tension light—don’t strangle the tree!
- Secure every 2–3 wraps: Use zip ties to prevent slipping.
- Finish at the top: Secure the end and plug in.
Caution: Don’t wrap too tightly. Tree trunks expand and contract with temperature and moisture. Loose wraps prevent damage.
Method 3: Fence or Wall Border
- Install clips or hooks: Space every 2–3 feet along the fence top or wall.
- Attach lights: Clip the string to each hook, leaving slight slack.
- Hide the cord: Use adhesive clips to secure the power cord along the base of the fence.
- Test and adjust: Ensure no bulbs are touching the fence (to prevent heat buildup).
Method 4: Pathway Lighting
- Use low-profile stakes: Insert into the ground along the path, 1–2 feet apart.
- Run the string along the stakes: Clip or tie the lights to each stake.
- Keep cords buried (optional): Tuck extension cords under mulch or use a cord cover.
Pro tip: For a whimsical look, drape lights over low bushes or flower beds. Just ensure bulbs aren’t in direct contact with plants (heat can wilt them).
Maintaining and Storing Your Garden String Lights
You’ve done it! The lights are up, the mood is set. But to keep that magic alive year after year, a little maintenance goes a long way.
Seasonal Care
- Spring: Inspect lights after winter. Look for damaged cords, loose bulbs, or corroded sockets. Replace any faulty sets.
- Summer: Wipe bulbs with a dry cloth to remove dust. Check for overheating (rare with LEDs, but possible if covered).
- Fall: Before storing, clean the entire set. Remove leaves, spider webs, and debris. Let it dry completely.
- Winter: If you live in a cold climate, consider taking lights down. Freeze-thaw cycles can crack sockets. If leaving up, ensure all connections are weatherproofed.
Storage Tips
- Coil properly: Use the “over-under” method to prevent tangles. Wrap the string around your elbow and hand, alternating direction every 5–6 wraps.
- Store in a cool, dry place: Use a plastic bin with a lid. Add silica gel packets to absorb moisture.
- Label sets: Note the length, bulb type, and where it was used. Saves time next season.
Troubleshooting Common Issues
- Half the lights are out: Usually a loose bulb or blown fuse. Check each bulb and replace if needed. Some sets have replaceable fuses in the plug.
- Flickering: Could be a loose connection or voltage drop. Unplug, check all connections, and try a shorter extension cord.
- Not turning on: Test the outlet with another device. If it works, check the string’s plug and fuse.
Data Table: Recommended String Lights for Different Uses
| Use Case | Recommended Type | Bulb Spacing | Power Source | Key Features |
|---|---|---|---|---|
| Patio Canopy | LED Edison or Globe | 6–12 inches | Plug-in (AC) | Weatherproof, 50,000-hour lifespan, connectable |
| Tree Wrapping | LED Mini or Pearl | 3–6 inches | Solar or Plug-in | Flexible wire, low heat, UV-resistant |
| Pathway Lighting | LED Path Lights | 12–18 inches (stake spacing) | Solar | Stake-mounted, auto-on at dusk, weatherproof |
| Fence Border | LED Globe or Edison | 6–12 inches | Plug-in | IP65 rating, dimmable option, timer |
| Large Garden (100+ ft) | Commercial-Grade LED | 6–12 inches | Plug-in (with GFCI) | 14-gauge wire, 200+ ft length, connectable |
Putting up garden string lights isn’t just about following steps—it’s about creating an experience. When I flick that switch now, I don’t just see lights. I see the laughter of friends, the quiet of a starry night, the joy of a space transformed. And you can create that too. With the right lights, a thoughtful plan, and a few practical tools, your garden can become a place of wonder. So grab your string lights, sketch your dream, and get glowing. The magic is in the details—and it starts with how to put up garden string lights the right way. Happy hanging!
Frequently Asked Questions
How do I install garden string lights without damaging my trees or walls?
Use soft, non-abrasive materials like zip ties, plant clips, or rope to secure the lights without harming surfaces. Avoid nails or staples, especially on trees, to prevent injury to bark and ensure long-term safety.
What’s the best way to plan the layout for garden string lights?
Start by measuring the area and sketching a rough design, focusing on key features like patios, fences, or trees. Leave extra cord length for adjustments, and use temporary clips to test the layout before permanent installation.
Can I connect multiple sets of garden string lights together?
Yes, but check the manufacturer’s guidelines—most sets allow end-to-end connections, but overloading can cause electrical issues. Use outdoor-rated extension cords and ensure the total wattage stays within safe limits.
How do I hang string lights in a large, open garden area?
Use freestanding poles, shepherd’s hooks, or install temporary posts to create anchor points. For even coverage, crisscross the lights in a zigzag or web pattern between supports, keeping tension consistent.
What type of hardware is best for securing outdoor string lights?
Opt for weather-resistant materials like stainless steel hooks, eye screws, or adhesive-backed outdoor mounting clips. Ensure hardware is rated for outdoor use to withstand sun, rain, and wind.
How do I safely power garden string lights in a yard without outdoor outlets?
Use a heavy-duty, outdoor-rated extension cord connected to an indoor GFCI outlet, or install a weatherproof outdoor outlet with a professional electrician. Always route cords away from high-traffic areas to prevent tripping hazards.

