Featured image for how to remove led light from string
Image source: 5.imimg.com
Always disconnect the power source first to safely remove an LED light from a string—this prevents electric shock and protects the remaining bulbs. Use a small flathead screwdriver or your fingers to gently twist and pull the faulty bulb straight out, avoiding damage to the socket or wiring. Quick, careful removal ensures the rest of the string stays functional.
How to Remove LED Light from String Safely and Easily
Key Takeaways
- Unplug first: Always disconnect power to avoid electric shocks.
- Inspect the bulb: Check for damage before attempting removal.
- Use gentle pressure: Twist counterclockwise to detach the bulb safely.
- Avoid force: Prevent socket damage by not prying or yanking.
- Store carefully: Keep removed bulbs in a padded container for reuse.
- Test the string: Reconnect and verify remaining lights work post-removal.
Why This Matters / Understanding the Problem
LED string lights are everywhere—draped over mantels, wrapped around trees, or glowing in bedroom corners. They’re energy-efficient, long-lasting, and add instant charm. But when one bulb burns out, or you need to replace a section, things get tricky.
Many people assume you can just yank out a dead LED and pop in a new one. That’s not always the case. Unlike traditional incandescent bulbs, LEDs are often sealed into the socket or soldered directly to the wiring. This makes how to remove LED light from string safely and easily a real concern—especially if you want to reuse the strand or avoid damaging the circuit.
Trying to force a bulb out can break the socket, cut internal wires, or even short the whole string. And if you’re not careful, you might end up with a tangled, unusable mess instead of a fixable strand. Whether you’re troubleshooting a holiday light display or upgrading your bedroom decor, knowing the right method saves time, money, and frustration.
The good news? With the right tools and a little patience, you can learn how to remove LED light from string safely and easily—without frying the circuit or breaking the bulb housing. This guide walks you through every step, from identifying your light type to safely extracting the bulb and even reusing or replacing it.
What You Need
Before diving in, gather these tools and materials. Having them on hand makes the process smoother and reduces the risk of mistakes.
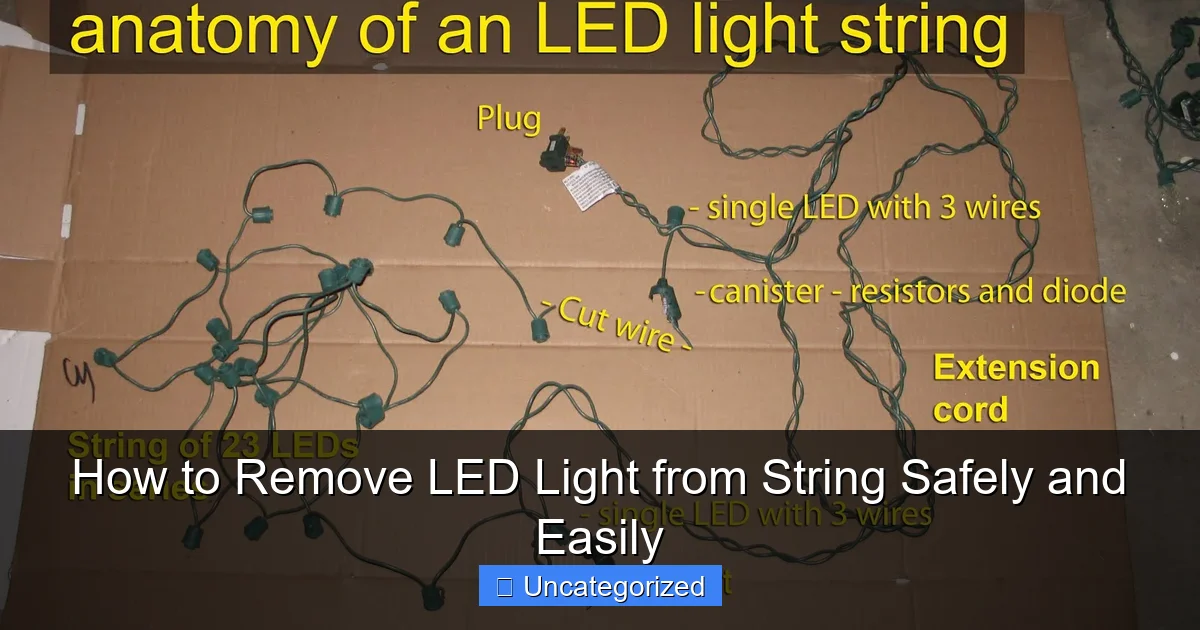
Visual guide about how to remove led light from string
Image source: 2.bp.blogspot.com
- Small flathead screwdriver – Ideal for prying open sockets or gently loosening sealed bulbs.
- Needle-nose pliers – For gripping small parts, bending wires, or removing stubborn bulbs.
- Wire cutters/strippers – Useful if you need to cut and reattach wires (especially for soldered LEDs).
- Multimeter (optional) – Helps test continuity and check if the circuit is still working after removal.
- Heat gun or hair dryer – For softening adhesive or sealant around sealed sockets.
- Isopropyl alcohol (70% or higher) and cotton swabs – To clean sticky residue or glue from the socket.
- Replacement LED bulbs (if needed) – Make sure they match the voltage, size, and color of your original lights.
- Heat-shrink tubing or electrical tape – For insulating any exposed wires if you’re doing repairs.
- Magnifying glass (optional) – Helpful for spotting tiny solder points or identifying bulb types.
Pro Tip: Always work on a clean, well-lit surface. Lay the string out straight so you can see each socket and connection clearly. Avoid working on carpet or fabric—it increases static risk, which can damage sensitive electronics.
Step-by-Step Guide to How to Remove LED Light from String Safely and Easily
Step 1: Identify the Type of LED Light and Socket
Not all LED strings are built the same. The method you use depends on how the bulb is attached.
There are three main types:
- Push-in (plug-in) LEDs – These slide into a socket and can usually be removed by pulling or twisting.
- Sealed or glued-in LEDs – The bulb is encased in plastic with adhesive. Common in outdoor or waterproof strings.
- Soldered LEDs – The LED is permanently attached to the wiring with solder. Found in custom or high-end strings.
To tell the difference, inspect the socket closely. Look for:
- Visible seams or clips (indicates push-in).
- Clear or colored epoxy around the bulb base (sealed).
- Small metal leads connected directly to wires (soldered).
Once you know your type, you can choose the right removal method. This step is crucial for how to remove LED light from string safely and easily—using the wrong technique can destroy the socket.
Warning: Never pull on the wires themselves. The connection points are fragile and can snap off, ruining the entire strand.
Step 2: Turn Off Power and Disconnect the String
Safety first! Even though LEDs use low voltage (usually 12V or 24V), you should always disconnect the power source before handling any part of the string.
Unplug the adapter from the wall or remove batteries if it’s a battery-powered string. If the string is plugged into a timer or remote control, disconnect it there too.
Why? Because even low voltage can cause a short circuit if wires touch, and static electricity from your hands can damage the internal components.
After disconnecting, let the string sit for a minute to discharge any residual current. This is especially important if you plan to cut or solder wires later.
Now you’re ready to work—safely and with peace of mind.
Step 3: For Push-In LED Bulbs – Gently Pull or Twist
If your LED string uses push-in bulbs (common in indoor holiday lights), removal is usually simple—but don’t rush it.
Start by gripping the base of the bulb, not the plastic housing. The base is the metal part that connects to the socket. Use your fingers or needle-nose pliers if needed.
Try a gentle twisting motion (left or right) while pulling straight out. This helps break any slight friction or corrosion in the socket.
If it won’t budge, insert a small flathead screwdriver into the gap between the bulb base and the socket. Gently lever up—don’t pry hard. The goal is to release the bulb, not crack the socket.
Once it’s loose, pull it straight out. Check the socket for damage. If the metal contacts are bent, use the screwdriver to straighten them gently before inserting a new bulb.
This method works great for strings that use replaceable bulbs. It’s the easiest way to learn how to remove LED light from string safely and easily without tools or heat.
Pro Tip: If the bulb breaks off, leaving the base stuck in the socket, use pliers to grip the metal base and pull it out. Don’t use excessive force—twist while pulling.
Step 4: For Sealed/Glued-In LED Bulbs – Apply Heat and Careful Pressure
Waterproof or outdoor LED strings often have bulbs sealed with clear silicone or epoxy. You can’t just pull these out—you need to soften the sealant first.
Use a hair dryer or heat gun on low or medium heat. Hold it about 6 inches from the bulb and heat the base for 1–2 minutes. The goal is to warm the adhesive, not melt the plastic.
You’ll know it’s ready when the bulb feels slightly loose or the sealant appears softer (it may look cloudy).
Now, use the flathead screwdriver to gently wedge into the seam between the bulb and socket. Wiggle it slightly to break the seal.
Once you have a small gap, use pliers to grip the bulb base and pull straight out. Apply steady pressure—don’t jerk or twist.
If the bulb breaks, don’t panic. Use a needle-nose pliers to grab the base or any remaining metal part. If nothing is accessible, you may need to cut the socket open (see Step 6).
After removal, clean the socket with isopropyl alcohol and a cotton swab to remove any leftover glue. This ensures a clean connection for a new bulb.
This method is essential for how to remove LED light from string safely and easily in outdoor or moisture-resistant lights.
Warning: Avoid using a lighter or open flame. It can melt the socket or ignite surrounding materials. Always use controlled heat sources.
Step 5: For Soldered LED Bulbs – Cut, Desolder, and Remove
Some high-end or custom LED strings have bulbs soldered directly to the wires. These can’t be pulled out—you need to desolder them.
Start by cutting the wires about 1 inch away from the bulb using wire cutters. This gives you room to work and avoids cutting too close to the solder joint.
Now, use a soldering iron (if you have one) to heat the solder points on the bulb’s metal leads. Once the solder melts, gently pull the leads free with pliers.
If you don’t have a soldering iron, you can use a heat gun to soften the solder. Heat the leads for 30–60 seconds, then use pliers to pull the bulb free. This is slower and riskier, but works in a pinch.
After removal, strip about 1/4 inch of insulation from the cut wires. You’ll need this later if you plan to attach a new bulb.
Soldered LEDs are the trickiest to remove, but with patience, you can do it. This is often the only way to fix a string where the LED is permanently attached—making it a key part of how to remove LED light from string safely and easily for custom setups.
Pro Tip: If you’re replacing the bulb, consider using a socket instead of soldering. Solder a socket to the wires, then plug in the new LED. This makes future replacements much easier.
Step 6: Dealing with Stubborn or Broken Bulbs
Sometimes, no matter what you do, the bulb won’t come out cleanly. The glass or plastic breaks, leaving the base stuck in the socket.
First, try using needle-nose pliers to grip the metal base inside the socket. Twist and pull gently. If it’s too tight, use the flathead screwdriver to create more space by carefully widening the socket opening.
If the base is flush with the socket, use a small drill bit (1/16 inch) to drill into the metal base. Then insert a screw and use pliers to pull it out—like a makeshift extractor.
For sealed sockets where the entire bulb is embedded, you may need to cut open the socket with a utility knife. Slice carefully along the seam to expose the bulb base. Once exposed, remove it as described in Step 4 or 5.
After removal, inspect the socket. If it’s cracked or damaged, it may need to be replaced. You can splice in a new socket from a spare string or use a universal LED socket.
Remember: the goal isn’t perfection—it’s functionality. As long as the wires and contacts are intact, the string can be repaired.
Step 7: Test and Reconnect (If Replacing the Bulb)
Once the bulb is out, it’s time to test or replace it.
If you have a multimeter, set it to continuity mode and test the socket. Touch one probe to each metal contact inside. If you hear a beep, the socket is still functional.
Now, insert the new LED bulb (make sure it’s the right voltage and polarity—check the + and – markings on the socket and bulb).
Reconnect the power and test the string. If the new bulb lights up, great! If not, double-check:
- The bulb is seated properly.
- The socket contacts aren’t bent or dirty.
- The polarity is correct (some LEDs won’t work if reversed).
If you removed a soldered bulb and spliced in a new one, use heat-shrink tubing or electrical tape to insulate the connections. This prevents shorts and keeps the string safe.
Finally, run your hand along the string to check for loose wires or sharp edges. A smooth, secure repair means your string is ready to shine again.
Pro Tips & Common Mistakes to Avoid
Pro Tip 1: Label each bulb or socket as you remove it. Use masking tape and a marker. This helps if you’re replacing multiple bulbs and need to track which ones were working.
Pro Tip 2: Keep a spare string of the same type on hand. You can harvest bulbs, sockets, or wiring from it if you damage your current string.
Pro Tip 3: For outdoor strings, always reseal the socket after replacing a bulb. Use clear silicone caulk or heat-shrink tubing to prevent moisture damage.
Common Mistake #1: Pulling on the wires instead of the bulb. This is the #1 cause of broken connections. Always grip the bulb base or housing—never the wires.
Common Mistake #2: Using too much heat. Overheating can melt the socket or damage adjacent bulbs. Use heat sparingly and monitor the plastic closely.
Common Mistake #3: Assuming all LEDs are replaceable. Some are designed to be permanent. Check the manufacturer’s label or website before starting.
Common Mistake #4: Skipping the power disconnect. Even low-voltage strings can cause shorts or damage components if powered during repair.
Another key insight: not every broken LED needs to be removed. If the string uses parallel wiring (common in modern LEDs), one dead bulb won’t kill the whole strand. But if it’s in a series circuit, the entire string may go dark. Use a multimeter to test continuity between sockets if unsure.
Also, consider the age of the string. If it’s more than 5 years old and multiple bulbs are failing, it might be cheaper to replace the whole strand than to fix it piecemeal.
Finally, practice on a spare or broken string first. This builds confidence and helps you master how to remove LED light from string safely and easily without risking your favorite display.
FAQs About How to Remove LED Light from String Safely and Easily
Can I just cut out a bad LED and reconnect the wires?
Yes, but it’s not always the best solution. If the string uses parallel wiring, you can cut out a dead LED and splice the wires together. The rest of the string will still work. But if it’s series-wired, cutting one bulb breaks the circuit. In that case, you must replace the bulb or use a jumper wire to bypass it. Always test the string type first.
Are LED bulbs in string lights replaceable?
It depends. Many indoor LED strings have replaceable bulbs (push-in type). Outdoor or waterproof strings often have sealed bulbs that aren’t designed for replacement. Check the packaging or manufacturer’s website. If it says “non-replaceable,” they’re likely sealed or soldered.
What if the LED is glued in and won’t come out with heat?
Try letting it cool and reheating it a second time. Sometimes the adhesive needs multiple heat cycles to soften. You can also use a small amount of isopropyl alcohol around the base to help break down the sealant. If all else fails, carefully cut the socket open with a utility knife to access the base.
Can I use a soldering iron on a live string?
No! Never use a soldering iron on a powered circuit. It can cause a short, damage the driver, or create a fire hazard. Always disconnect the power and let the string cool before soldering.
How do I know if a replacement LED is compatible?
Check these three things: voltage (usually 12V or 24V), size (5mm, 3mm, etc.), and color/temperature (warm white, cool white, RGB). Match these to your original bulb. Also, look for polarity markings—some LEDs won’t work if inserted backwards.
Is it safe to repair LED strings myself?
Yes, as long as you follow safety guidelines: disconnect power, avoid open flames, and insulate all connections. If you’re not comfortable with soldering or cutting wires, consider taking it to an electronics repair shop. But for most people, how to remove LED light from string safely and easily is totally doable at home.
What if the whole string stops working after I remove one bulb?
It could be a series circuit—where each bulb completes the circuit. If you remove one, the whole string goes dark. In that case, you must replace the bulb or use a jumper wire to reconnect the circuit. Use a multimeter to test continuity between sockets to confirm the wiring type.
Final Thoughts
Learning how to remove LED light from string safely and easily isn’t just about fixing a broken bulb—it’s about extending the life of your favorite lights and saving money on replacements.
Whether you’re dealing with push-in bulbs, sealed sockets, or soldered LEDs, the key is patience, the right tools, and a methodical approach. Always start by identifying the bulb type, disconnect power, and work gently.
Remember: not every repair needs to be perfect. As long as the string lights up and the connections are safe, you’ve succeeded. And if you’re ever unsure, test on a spare string first.
Next time one of your holiday lights goes dark, don’t toss the whole strand. Grab your screwdriver, heat gun, and pliers, and give it a try. You might be surprised how satisfying it is to bring a string back to life.
Now go fix that light—and enjoy the glow.

