Featured image for how to replace fuse in led string lights
Image source: wikihow.com
Replacing a fuse in LED string lights is a fast, DIY-friendly fix that restores illumination in minutes. Simply locate the plug’s fuse compartment, remove the old fuse with pliers, and insert a new one of the same rating—ensuring a secure connection. Always unplug the lights first for safety, and double-check the voltage match to prevent future failures.
How to Replace Fuse in LED String Lights: A Quick Fix Guide
Key Takeaways
- Unplug lights first: Always disconnect power before handling fuses to prevent shocks.
- Locate fuse box: Check near the plug or battery compartment for easy access.
- Use correct fuse: Match voltage and amperage ratings for safe replacements.
- Inspect wiring: Look for damage before inserting new fuses to avoid repeat failures.
- Test after replacement: Plug in and verify lights work before full use.
- Keep spares handy: Store extra fuses to quickly fix future outages.
Why This Matters / Understanding the Problem
You’re ready to light up your patio for a summer BBQ, but your LED string lights won’t turn on. You’ve checked the outlet, tried a new plug, and even tested the switch—still nothing. The issue might not be the bulbs or wiring at all. Often, the culprit is a blown fuse inside the plug housing. This is one of the most common—and fixable—problems with LED string lights.
Many people toss out entire light sets after one season, assuming they’re broken beyond repair. But learning how to replace fuse in LED string lights: a quick fix guide can save you time, money, and frustration. Most LED string lights have a small, replaceable fuse in the plug that protects the circuit from power surges or overloads. When it blows, the lights go dark—but the rest of the system is often fine.
Replacing the fuse is a simple DIY task that takes less than 10 minutes. You don’t need to be an electrician. All you need is a little patience, the right tools, and this step-by-step guide. Whether your lights are for holiday decor, outdoor ambiance, or backyard parties, knowing how to replace fuse in LED string lights: a quick fix guide means you can keep them glowing for years.
Unlike incandescent lights, LED strings use low voltage and generate less heat, making them safer and more energy-efficient. But their delicate electronics still need protection—enter the fuse. Understanding how it works and how to fix it empowers you to troubleshoot like a pro. No more replacing entire sets every year. Just a quick fix, and you’re back in business.
What You Need
Before you dive in, gather your tools and materials. The good news? Most of these are likely already in your toolbox or junk drawer. Here’s what you’ll need for how to replace fuse in LED string lights: a quick fix guide:
Visual guide about how to replace fuse in led string lights
Image source: bettyschristmashouse.com
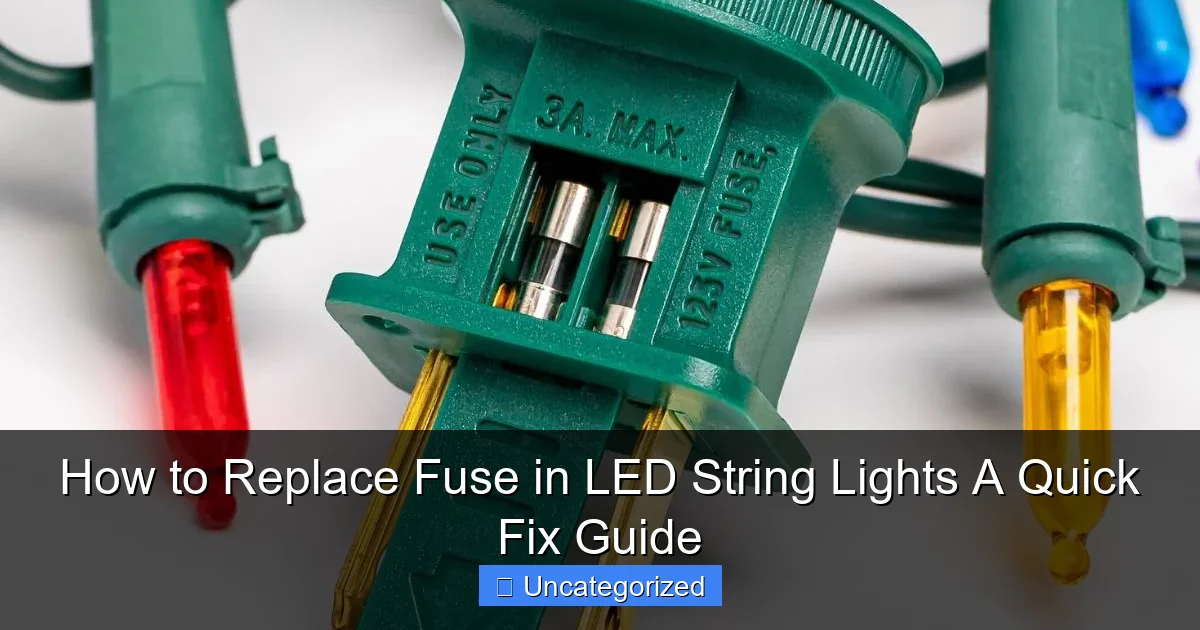
- Replacement fuses (usually 3A or 5A, 250V; check your light’s manual or plug label)
- Small flathead screwdriver (or a butter knife in a pinch)
- Needle-nose pliers (optional, but helpful for removing tiny fuses)
- Multimeter or voltage tester (optional, for testing continuity)
- Flashlight (to see inside the plug housing)
- Work surface (a clean, flat table works best)
- Original packaging or manual (to confirm fuse type and rating)
Pro Tip: Buy spare fuses when you purchase new LED string lights. They cost less than $5 for a pack of 10 and last for years. Keep them in a labeled bag with your holiday or outdoor decor supplies.
Don’t have replacement fuses? You can find them at hardware stores (like Home Depot or Lowe’s), online (Amazon, eBay), or at electronics retailers. Look for “glass tube fuses” with the same amperage (A) and voltage (V) as your original. Never use a higher-rated fuse—this defeats the safety purpose.
Also, avoid “universal” fuse kits unless they list the exact specs. Mismatched fuses can damage your lights or create a fire hazard. When in doubt, snap a photo of the blown fuse and show it to a store associate.
Step-by-Step Guide to How to Replace Fuse in LED String Lights: A Quick Fix Guide
Now that you’re prepared, let’s walk through the process. This how to replace fuse in LED string lights: a quick fix guide is designed for beginners—no electrical experience required. Follow each step carefully, and you’ll have your lights back in action in no time.
Step 1: Unplug the Lights and Inspect the Plug
First, unplug the lights from the wall outlet. Safety first! Even though LED strings use low voltage, you should never work on any electrical device while it’s connected to power.
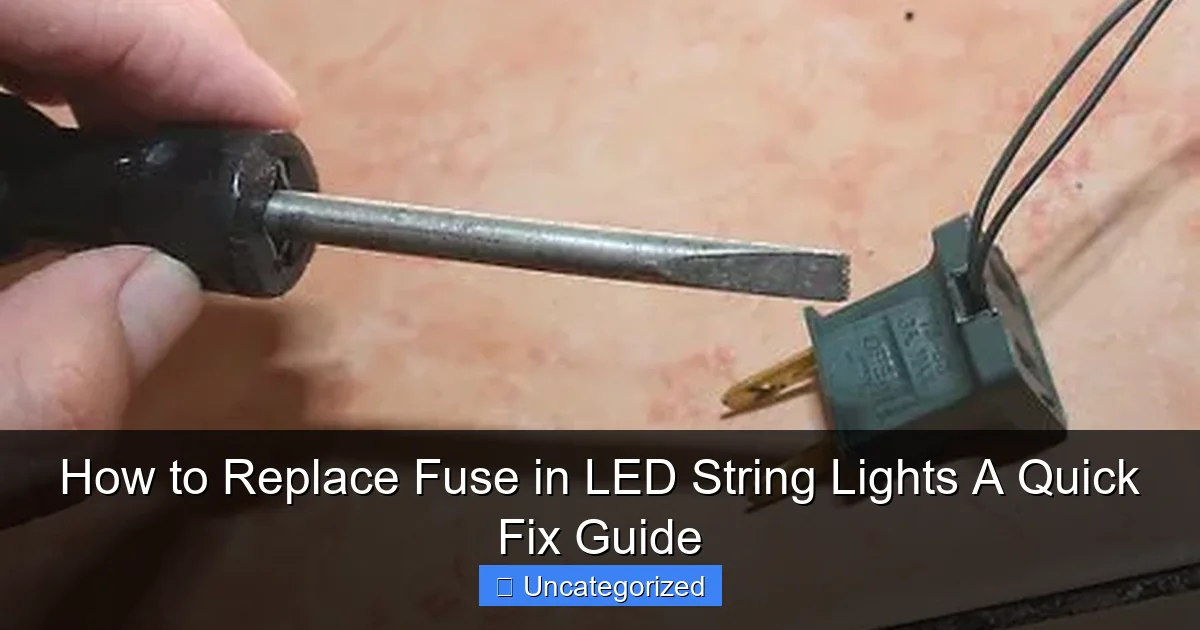
Next, examine the plug. Most LED string lights have a small, rectangular plug with a fuse compartment on the side or end. It’s usually labeled “Fuse” and has a tiny slot or cover. Some plugs have a sliding cover; others have a removable cap or require a screwdriver to open.
Warning: Never force the plug open. If it doesn’t budge, check the manufacturer’s instructions. Forcing it can crack the housing and damage internal wiring.
Use a flashlight to peek inside. Look for a small glass or ceramic tube with metal caps on each end—this is the fuse. If it’s dark, cracked, or has a broken wire inside, it’s blown and needs replacement.
Step 2: Open the Fuse Compartment
Now, open the fuse compartment. The method varies by plug type:
- Slide-open cover: Gently push the cover to the side with your fingernail or a plastic tool. Avoid metal to prevent scratching.
- Removable cap: Pull it straight off. If it’s stuck, wiggle it slightly.
- Screw-secured cover: Use a small flathead screwdriver to turn the screw counterclockwise. Keep the screw in a small bowl so you don’t lose it.
Once open, you’ll see the fuse held in place by two metal clips or a spring-loaded holder. Don’t yank it out yet—take a moment to note its orientation. The fuse has a specific direction (though it’s usually symmetrical, it’s good to confirm).
Pro Tip: Take a quick photo of the fuse in place. This helps you remember how to insert the new one and ensures you get the right replacement later.
Step 3: Remove the Blown Fuse
Carefully remove the old fuse. Use your fingers if it’s loose, or gently wiggle it out with needle-nose pliers if it’s snug. Don’t use too much force—glass fuses can shatter.
If the fuse is stuck, try:
- Using a plastic spudger (or a butter knife wrapped in tape) to pry it out.
- Turning the plug upside down and tapping it lightly on a soft surface to loosen the fuse.
Once removed, inspect it closely. A blown fuse often has:
- A blackened or cloudy glass tube
- A broken or melted wire inside
- Metal ends that appear discolored or corroded
Even if it looks fine, if the lights don’t work, the fuse may still be faulty. Use a multimeter on the “continuity” setting to test it. If there’s no beep or reading, it’s blown.
Step 4: Insert the New Fuse
Now, take your replacement fuse. Match it exactly to the old one in:
- Size (length and diameter)
- Type (glass or ceramic)
- Rating (3A, 5A, 250V—must match!)
Insert the new fuse into the clips or holder, ensuring it sits securely. It should fit snugly without wobbling. If it’s loose, the clips may be worn—gently bend them inward with pliers (carefully!) to improve grip.
Warning: Never use a fuse with a higher amperage (e.g., replacing a 3A with a 10A). This removes protection and can cause overheating, fire, or damage to your lights.
Double-check the orientation. Most fuses work either way, but some have polarity marks (rare in LED lights). When in doubt, follow the photo you took earlier.
Step 5: Close the Fuse Compartment
Once the new fuse is in, reseal the compartment:
- Slide cover: Push it back until it clicks or aligns flush.
- Removable cap: Press it firmly into place.
- Screw cover: Reinsert the screw and tighten gently—don’t over-tighten, or you could crack the plastic.
Give the plug a gentle shake. If you hear rattling, the fuse isn’t seated properly. Reopen and adjust.
Step 6: Test the Lights
Now comes the moment of truth. Plug the lights into a working outlet. Turn them on. Do they light up? Great!
If they still don’t work, try these troubleshooting steps:
- Check if other strings in a multi-set are working. A single blown fuse usually only affects one set.
- Inspect the new fuse with a multimeter to confirm it’s not faulty.
- Test the outlet with another device (like a lamp) to rule out power issues.
- Look for visible damage on the cord, especially near the plug or connectors.
If the lights flicker or dim, the new fuse may be too high-rated or the wiring could be compromised. Unplug immediately and inspect further.
Step 7: Label and Store Spare Fuses
Success! Your lights are back on. Now, don’t let this happen again. Label your spare fuses with the rating (e.g., “3A 250V”) and store them with your lights or in a dedicated toolbox.
Create a simple maintenance checklist:
- Inspect fuses annually (before holiday or summer use)
- Store lights in a dry, temperature-stable place
- Coil cords loosely to prevent internal wire damage
This simple habit can extend the life of your LED string lights for years—saving you money and reducing waste.
Pro Tips & Common Mistakes to Avoid
Even with a clear how to replace fuse in LED string lights: a quick fix guide, small mistakes can lead to frustration. Here are expert insights to help you avoid the most common pitfalls.
Pro Tip #1: Always unplug before working. Even “safe” LED lights can have residual charge or faulty wiring. Treat every plug like it’s live.
Pro Tip #2: Use the right fuse. If your plug says “3A,” use a 3A fuse—not 2A or 5A. Under-rated fuses blow too easily; over-rated ones don’t protect the circuit.
Common Mistake: Using the wrong fuse type. Some people grab any small fuse from their car or electronics kit. But household LED lights use fast-blow fuses, not slow-blow or time-delay types. Mismatches can cause erratic behavior or damage.
Common Mistake: Forcing the plug open. If the cover won’t budge, don’t use a hammer or pliers. This cracks the housing and exposes wires. Instead, check the manual or contact the manufacturer. Some brands use proprietary clips.
Common Mistake: Ignoring the root cause. Fuses blow for a reason. If you replace it and it blows again within minutes, there’s likely a deeper issue:
- A short circuit in the wiring
- Damaged insulation exposing wires
- Overloading (e.g., plugging too many sets together)
- Water damage (common in outdoor lights)
Warning: If the fuse blows repeatedly, stop using the lights. Unplug them and inspect the entire cord. Look for frayed wires, melted insulation, or corrosion. When in doubt, replace the entire set for safety.
Pro Tip #3: Test fuses before storing. If you have a multimeter, test spare fuses when you buy them. Sometimes, fuses are faulty out of the package. A quick continuity check ensures you’re not troubleshooting with a bad part.
Pro Tip #4: Keep a repair log. Jot down the date, fuse type, and any issues (e.g., “fuse blew after rain”). This helps you spot patterns and prevent future problems.
Pro Tip #5: Use silicone sealant for outdoor lights. After replacing the fuse, apply a small bead of clear silicone around the plug’s seam (if it’s not fully sealed). This keeps moisture out—especially helpful for patio or garden lights.
Common Mistake: Replacing fuses in cold weather. If your lights are frozen, bring them inside and let them warm up for 1–2 hours before working. Cold plastic is brittle and more likely to crack.
FAQs About How to Replace Fuse in LED String Lights: A Quick Fix Guide
Got questions? You’re not alone. Here are the most common queries about how to replace fuse in LED string lights: a quick fix guide, answered clearly and practically.
Q1: Can I replace a fuse without a screwdriver?
Yes! Many plugs have slide-off or pop-off covers that open with your fingers. If it’s tight, use a plastic tool (like a guitar pick or credit card) to gently pry it open. Avoid metal to prevent scratches or short circuits.
Q2: What if I can’t find the fuse compartment?
Some LED strings have fuses in the plug, others in the end connector or inline. Check the manual or look for a small rectangle on the plug labeled “Fuse.” If there’s no visible compartment, the fuse may be inside the plug and not user-replaceable. In that case, contact the manufacturer or replace the plug (a more advanced repair).
Q3: Can I use a 5A fuse if the original was 3A?
No. Never use a higher-rated fuse. It defeats the safety mechanism. A 5A fuse allows more current to flow, which can overheat the wires, melt insulation, or even cause a fire. Always match the original rating exactly.
Q4: Why did my fuse blow in the first place?
Common causes include:
- Power surge (e.g., lightning, faulty outlet)
- Overloading (too many light sets plugged together)
- Damaged cord (exposed wires touching)
- Moisture (rain, snow, or condensation)
- Manufacturing defect (rare, but possible)
Identifying the cause helps prevent future blowouts.
Q5: How do I know if the fuse is the problem?
If the lights are completely dark (no flicker, no sound), and other devices work on the same outlet, the fuse is a likely culprit. You can confirm by:
- Opening the plug and visually inspecting the fuse
- Testing it with a multimeter (no continuity = blown)
- Swapping it with a known-good fuse
Other issues (like a broken bulb or switch) usually cause partial lighting or flickering.
Q6: Can I repair LED string lights with no fuse?
Some budget sets don’t have replaceable fuses. If the plug is sealed, you can’t access the fuse. In this case, the lights may have a built-in circuit breaker or no protection at all. These are harder to fix—often requiring soldering or full replacement. For safety, avoid using lights that repeatedly fail without a fuse.
Q7: How long do LED string lights last after fuse replacement?
With proper care, your lights can last 5–10 years. Fuse replacement doesn’t shorten their lifespan. In fact, it extends it! Just remember to:
- Store them dry and coiled loosely
- Avoid overloading circuits
- Replace fuses promptly when they blow
LEDs degrade slowly, but good maintenance keeps them shining bright.
Final Thoughts
Learning how to replace fuse in LED string lights: a quick fix guide is one of the smartest moves you can make for home decor and outdoor lighting. It turns a frustrating “dead” string into a functional, cost-saving solution. No more throwing out entire sets after one season—just a 10-minute fix with a $0.50 fuse.
Remember: always match the fuse rating, unplug before working, and inspect for underlying issues if fuses blow repeatedly. Keep spare fuses on hand, label them, and store them with your lights. A little prevention goes a long way.
Whether you’re prepping for a holiday display, a backyard party, or just want cozy patio lighting, this skill ensures your lights are ready when you need them. And if you ever help a friend or neighbor fix their lights, you’ll be the neighborhood hero.
So next time your LED string lights go dark, don’t panic. Grab your screwdriver, open the plug, and follow this quick fix guide. In minutes, you’ll be back to glowing ambiance—and you’ll save money, reduce waste, and feel proud of your DIY win.
Light up your life—one fuse at a time.

