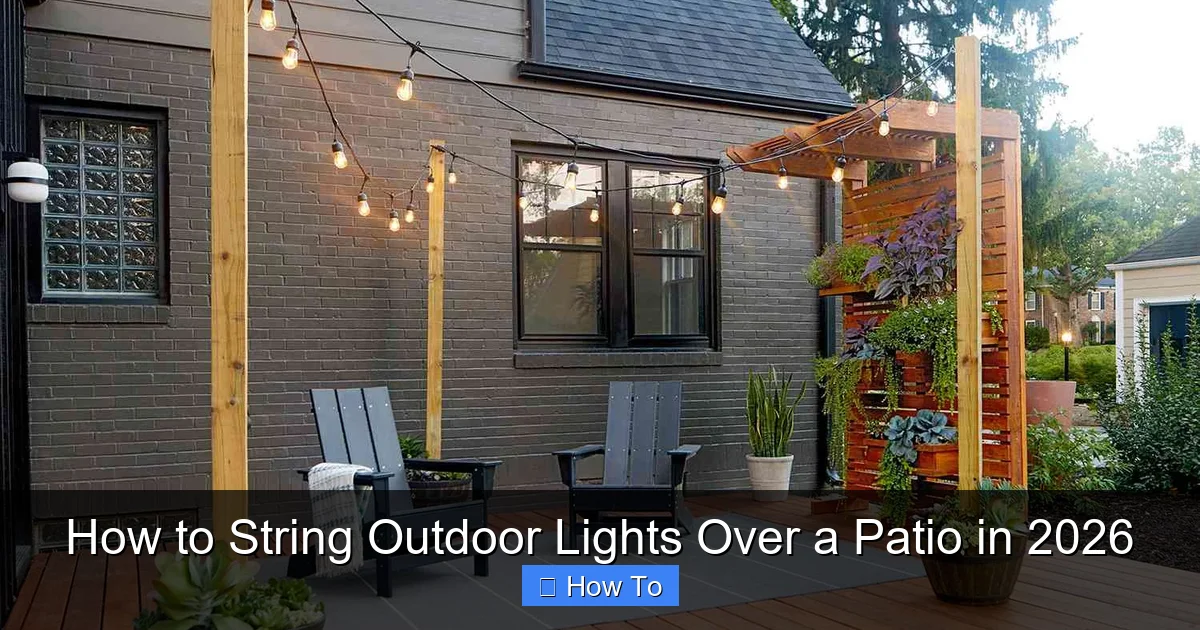
Featured image for how to string outdoor lights over a patio
Image source: bhg.com
Transform your patio into a stunning nighttime retreat by securely anchoring weather-resistant lights to durable mounting points like eaves, poles, or tension cables. Choose LED string lights with a UL wet rating for safety and longevity, and plan a zigzag or grid pattern to evenly distribute light without sagging. With the right hardware and layout, you’ll achieve a professional, inviting glow perfect for entertaining or relaxing in 2026.
“`html
How to String Outdoor Lights Over a Patio in 2026
Key Takeaways
- Plan your layout first: Sketch light placement for even coverage and visual balance.
- Choose weatherproof lights: Opt for LED or solar-powered options built for outdoor durability.
- Secure strong anchor points: Use eye hooks, beams, or poles rated for heavy loads.
- Maintain proper sag: Allow slight droop between fixtures to prevent wire tension damage.
- Hide cords strategically: Tuck wires along edges or under trim for a clean look.
- Test before final install: Check connections and brightness before securing all fixtures.
Why This Matters / Understanding the Problem
Let’s be honest—there’s something magical about a patio glowing softly under the stars. Whether you’re hosting a summer barbecue or just unwinding with a glass of wine, how to string outdoor lights over a patio in 2026 is more than a DIY task. It’s about creating a vibe. But if you’ve ever tried it, you know it’s not as simple as hanging Christmas lights on a tree.
I learned this the hard way. A few years ago, I bought a cheap string of lights, tied them to a tree branch, and called it a day. By the next morning, half the bulbs were dangling, and the other half were tangled in a bird’s nest. Not my finest moment.
The truth? Outdoor lighting needs planning, the right gear, and a bit of patience. In 2026, with weather extremes, smart tech, and safety concerns, it’s more important than ever to do it right. Done well, your patio becomes a sanctuary. Done poorly, it’s a tripping hazard.
This guide walks you through how to string outdoor lights over a patio in 2026—from picking the right lights to securing them safely, so your space shines for years.
What You Need
Before we dive in, let’s talk tools and materials. You don’t need to break the bank, but cutting corners here can lead to frustration (and possibly a call to an electrician).
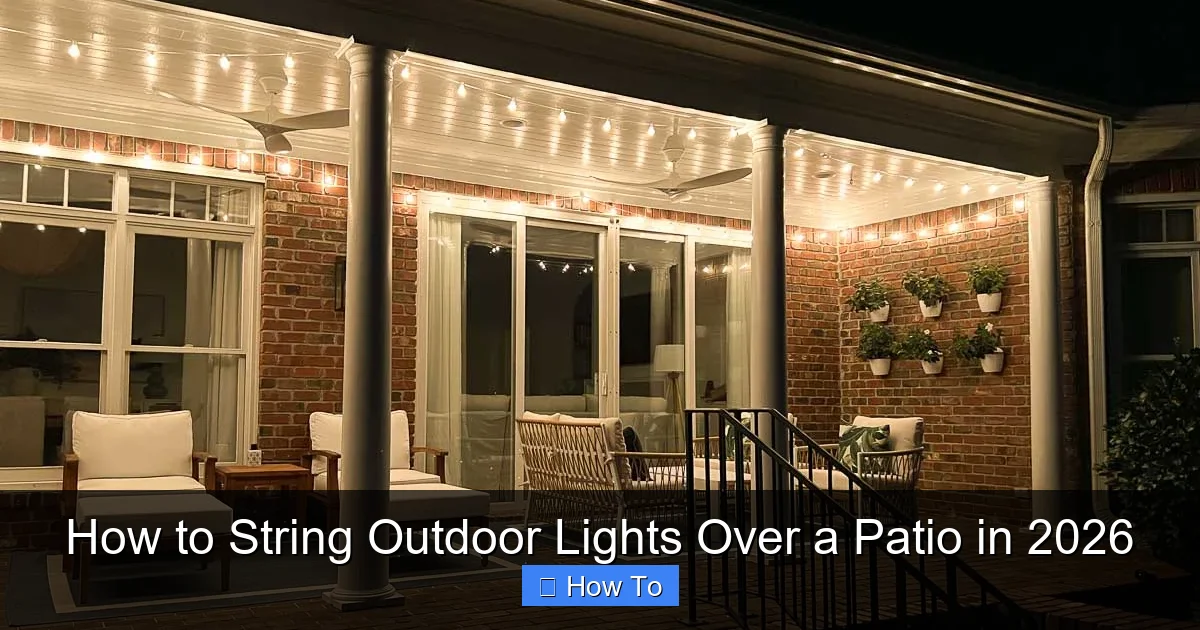
Visual guide about how to string outdoor lights over a patio
Image source: drivenbydecor.com
Here’s what I keep in my patio lighting kit—stuff I’ve tested over the years:
- Outdoor-rated string lights: Look for IP65 or higher waterproof ratings. LED is a must—energy-efficient and long-lasting.
- Weather-resistant extension cords: Get one with a built-in timer or smart plug (more on that later).
- Mounting hardware:
- Stainless steel screw hooks or eye hooks (for wood)
- Plastic anchors and screws (for stucco or brick)
- Zip ties (for temporary fixes or tree branches)
- Light clips (like the Gutter Clips or S-Hooks—game-changers!)
- Measuring tape: For spacing and planning.
- Ladder or step stool: Safety first!
- Drill and drill bits: For installing hooks.
- Smart plug or timer: Optional, but I swear by mine. No more forgetting to turn lights off.
- Voltage tester: If you’re using low-voltage lights (like solar or 12V systems).
Pro tip: Skip the “indoor/outdoor” lights. They’re not truly weatherproof. Invest in dedicated outdoor string lights—your future self will thank you.
Now, let’s get to the fun part: the setup.
Step-by-Step Guide to How to String Outdoor Lights Over a Patio in 2026
Step 1: Plan Your Layout (And Avoid Regret)
Before you buy a single bulb, sketch your patio. I use graph paper, but you can even use a napkin. Mark where your anchor points are: trees, posts, walls, or eaves.
Think about the path of the lights. Do you want a grid? A zigzag? A simple perimeter? I love a grid for large patios—it gives even coverage without dark spots.
- Measure the distance between anchor points.
- Add 10–15% extra length to your string lights for slack and curves.
- Plan for a central power source. Lights should daisy-chain, not run in parallel (which overloads circuits).
Warning: Don’t daisy-chain more than 3–4 standard 25-light strings. Overloading can blow fuses or damage sockets. Check your product’s max load.
For how to string outdoor lights over a patio in 2026, this step is crucial. A bad layout = tangled mess or uneven glow.
Step 2: Choose the Right Lights (LED, Solar, or Smart?)
Not all lights are created equal. Here’s how I pick:
- LED string lights: My go-to. They’re cheap per bulb, last 20,000+ hours, and use 80% less energy. Look for warm white (2700K) for a cozy feel.
- Solar-powered lights: Great for no-wiring setups. But in 2026, with longer winters and cloudy days, I use them only as accents. They dim after 4–5 hours.
- Smart lights: Want to control your patio from your phone? Try Philips Hue Outdoor or Govee. You can schedule them, change colors, or sync with music. Pricey, but worth it for parties.
- Low-voltage systems: For large patios or permanent setups. They use a transformer (like landscape lights) and are safer for kids/pets.
I mix and match. For my 12×16 ft patio, I use 2 strands of LED Edison bulbs (warm white) on the perimeter and 1 strand of solar fairy lights in the center. Total cost: under $70.
Pro tip: Buy lights with replaceable bulbs. If one dies, you’re not replacing the whole strand.
Step 3: Install Anchor Points (The Foundation of Your Glow)
This is where most people rush—and regret it later. Take your time. Anchor points hold the weight, so they must be secure.
- For wood (fences, posts, eaves): Use stainless steel screw hooks. Pre-drill pilot holes to avoid splitting. Space hooks every 12–18 inches.
- For stucco/brick: Use plastic anchors with screws. Tap the anchor in with a hammer, then screw in the hook. No anchors? Try adhesive hooks (like 3M Outdoor Mounting Tape), but only for lightweight lights.
- For trees: Use zip ties or tree-friendly straps (never nails!). Wrap them loosely to allow for tree growth.
- For metal railings: Use S-hooks or magnetic clips (if railing is magnetic).
I once used duct tape to hang lights on a brick wall. Spoiler: it fell down in a rainstorm. Lesson learned.
Warning: Never hang lights on power lines, gas meters, or anything that conducts electricity. And keep them 12+ inches from combustible materials (like dry leaves).
Step 4: Hang the Lights (With a Little Slack)
Now the fun part! But don’t just tie them tight. You need slack—about 1 inch of extra length between hooks. This:
- Prevents sagging in heat
- Reduces stress on sockets
- Looks more natural (like a gentle curve)
Here’s how I do it:
- Start at the power source. Plug in the first strand.
- Hang the first bulb socket on the hook. Don’t pull tight—let it droop slightly.
- Move to the next hook, repeating the slack. Use light clips to guide the wire between hooks.
- For corners, use a 45-degree angle (not a 90-degree bend). This reduces wire strain.
- For trees, spiral the lights up the trunk, securing every 12 inches.
Pro tip: Test the lights as you go. If a bulb flickers, it’s easier to fix now than after the whole strand is up.
Step 5: Secure the Wires (No Tripping Hazards!)
Loose wires = tripping hazards and tripped breakers. Here’s how to tame them:
- For walls: Use adhesive clips or wire raceways (like J-channel). Paint them to match your wall.
- For trees: Wrap wires with protective conduit (like split-loom tubing) to prevent bark damage.
- For ground-level runs: Use in-ground cable covers or bury wires in a shallow trench (6 inches deep, with conduit).
- For extension cords: Elevate them with cord covers or run them under outdoor rugs.
I use zip ties every 3 feet to bundle wires. But don’t over-tighten—it can damage insulation.
Step 6: Power Up (Safely and Smartly)
Now, plug it in! But first, check:
- All connections are tight and dry.
- No wires are frayed or touching metal.
- You’re not overloading the circuit (max 80% of breaker capacity).
For how to string outdoor lights over a patio in 2026, I recommend:
- Smart plug: Set it to turn on at sunset. I use the Kasa Outdoor Plug—works with Alexa and Google.
- Timer: A simple mechanical timer saves energy.
- GFCI outlet: Required by code. If you don’t have one, use a GFCI extension cord.
Warning: Never plug lights into an outlet that sparks or feels warm. That’s a fire hazard.
Step 7: Test, Adjust, and Enjoy!
Turn on the lights. Walk around. Look for:
- Dark spots? Add more lights or adjust spacing.
- Sagging? Add more hooks or shorten the strand.
- Flickering? Check connections or replace bulbs.
I always test at night. The glow is different in daylight. Make adjustments, then sit back and enjoy your work.
Pro Tips & Common Mistakes to Avoid
After 10+ years of patio lighting (and a few disasters), here’s what I’ve learned:
- Mistake: Using indoor lights. They’ll fail in rain or humidity. Always use outdoor-rated lights.
- Mistake: Overloading circuits. A single 15-amp circuit can handle about 1,440 watts. A 50-light LED strand uses ~20 watts. Still, check your breaker box.
- Mistake: Ignoring the weather. In 2026, storms are fiercer. Use weatherproof sockets and seal connections with electrical tape.
- Pro tip: Use a “light pole.” No anchor points? Buy a 6-ft metal pole (like a shepherd’s hook). Drive it into the ground and hang lights from the top.
- Pro tip: Add a dimmer. A plug-in dimmer lets you set the mood—bright for parties, soft for quiet nights.
- Pro tip: Go solar for accents. Solar fairy lights on planters or railings add sparkle without wiring.
Personal insight: I once hung lights too low. My dog knocked them down with his tail. Now I keep them 7+ ft high—safe for pets and people.
For how to string outdoor lights over a patio in 2026, remember: it’s not just about looks. It’s about safety, durability, and ease of use.
FAQs About How to String Outdoor Lights Over a Patio in 2026
Can I leave outdoor lights up all year?
Yes, but only if they’re rated for year-round outdoor use. Check the packaging for “all-weather” or “permanent outdoor.” In snowy areas, I take mine down in winter to prevent ice damage. Or, use heavy-duty commercial lights (like commercial-grade LED strings).
How do I hide the wires?
Good question! Try:
- Running wires along existing structures (gutters, eaves, railings).
- Using paintable wire covers.
- Burying wires in shallow trenches (with conduit).
- Wrapping tree trunks with lights (hides wires naturally).
I use a mix of all three. It’s not invisible, but it’s tidy.
What’s the best way to connect multiple strands?
Daisy-chain them—plug strand 1 into the outlet, then plug strand 2 into strand 1. Never use a power strip for multiple strands. It overloads the circuit. And always follow the manufacturer’s max strand limit (usually 3–4).
How do I keep birds from nesting in the lights?
Birds love warm, sheltered spots. To deter them:
- Use lights with tight sockets (no gaps).
- Hang lights away from bird feeders or trees.
- Install ultrasonic bird repellent nearby.
- Turn lights off when not in use.
I also check my lights monthly. A quick inspection saves you from a nest surprise.
Are solar lights worth it for patios?
For how to string outdoor lights over a patio in 2026, solar lights are great for accents—fairy lights on railings, lanterns on tables. But for main lighting, they’re not reliable. They need 6+ hours of direct sun and fade in winter. I use them as backups, not primary lights.
How do I clean and maintain outdoor lights?
Simple:
- Wipe bulbs with a damp cloth (unplug first!).
- Check for loose wires or corrosion every 3 months.
- Store lights in a dry, cool place in winter (if not year-round).
- Replace dead bulbs promptly—they can affect the whole strand.
I do this every spring. It adds 2–3 years to the lifespan.
Can I use extension cords with outdoor lights?
Yes, but use outdoor-rated extension cords (look for “SJTW” on the label). Never use indoor cords. And keep cords off the ground—use cord covers or elevate them. I once had a squirrel chew through my cord. Lesson learned: protect those wires!
Final Thoughts
Creating a glowing patio isn’t just about hanging lights—it’s about crafting a space where memories happen. Whether you’re following how to string outdoor lights over a patio in 2026 for the first time or upgrading your setup, remember: it’s a mix of art and science.
Start with a plan. Use the right tools. Respect the weather. And don’t rush. The best patios feel effortless, but they’re built with care.
So grab your ladder, pick your lights, and start stringing. Your perfect outdoor oasis is just a few hooks away. And when you’re done? Pour a drink, turn on the glow, and toast to your handiwork. You’ve earned it.
Now, go light up your life—safely, beautifully, and for years to come.
“`

