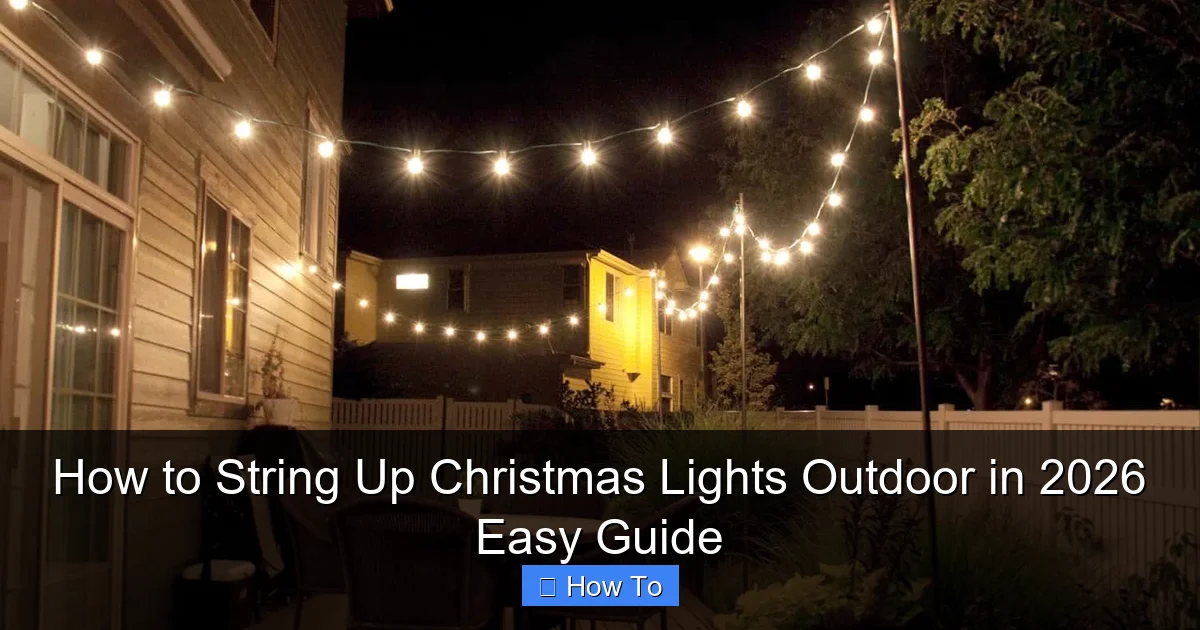
Featured image for how to string up christmas lights outdoor
Image source: wehangchristmaslights.com
Transform your home into a dazzling winter wonderland in 2026 with our foolproof guide to stringing up outdoor Christmas lights safely and efficiently. From choosing weather-resistant LED lights to using gutter hooks and timers for a polished, professional look, we break down every step—no experience needed. Get maximum sparkle with minimal effort using our expert tips and smart planning tools.
How to String Up Christmas Lights Outdoor in 2026: Easy Guide
Key Takeaways
- Plan your layout first: Sketch rooflines and trees to avoid mid-installation changes.
- Use outdoor-rated lights: Ensure all lights are UL-listed for exterior safety.
- Secure with proper clips: Attach lights with plastic or adhesive clips, not nails.
- Check power load: Never exceed 80% of circuit capacity to prevent outages.
- Test before hanging: Verify all strands work to save time and effort.
- Install timers: Automate on/off times for energy savings and convenience.
- Inspect annually: Replace damaged wires or bulbs before each holiday season.
Why This Matters / Understanding the Problem
Every year, I stand in my driveway, staring at a tangled mess of Christmas lights, wondering how I got myself into this again. Sound familiar? You’re not alone. The truth is, how to string up Christmas lights outdoor in 2026 easy guide isn’t just about making your house look festive—it’s about doing it safely, efficiently, and without losing your sanity (or a ladder).
Outdoor lighting has evolved. In 2026, we’ve got smart LEDs, app-controlled color schemes, solar-powered options, and weather-resistant tech that can handle everything from snowstorms to scorching sun. But with great power comes great… complexity. And that’s where this guide comes in.
Whether you’re a first-time decorator or a seasoned pro who’s tired of last-minute repairs, this how to string up Christmas lights outdoor in 2026 easy guide will walk you through every step—without the jargon, the headaches, or the need for a degree in electrical engineering.
From choosing the right lights to avoiding the most common (and painful) mistakes, I’ll share what’s worked for me over the past 15 holiday seasons. And yes, I’ve learned some hard lessons—like the year I used indoor lights outside and ended up with a tripped breaker and a very grumpy neighbor.
So if you’re ready to light up your yard like a pro (and maybe even impress the in-laws), let’s get started.
What You Need
Before you even think about climbing a ladder, let’s talk tools and materials. You don’t need a full toolkit, but a few essentials will save you time, frustration, and trips to the hardware store.
Visual guide about how to string up christmas lights outdoor
Image source: static.vecteezy.com
- Christmas lights (LED, weather-rated, preferably smart or app-controlled) – Look for “outdoor-rated” on the packaging. In 2026, most quality lights are IP65 or higher, meaning they’re dustproof and can handle rain, snow, and sleet.
- Extension cords (outdoor-rated, GFCI-protected) – Never use indoor cords outside. GFCI (Ground Fault Circuit Interrupter) cords shut off automatically if there’s a short—critical for safety.
- Light clips or adhesive hooks – Avoid nails or staples. Modern clips (like gutter clips, shingle hooks, or magnetic mounts) won’t damage your roof or siding.
- Measuring tape – Helps you estimate how many feet of lights you need. Trust me, eyeballing it leads to either too many or not enough.
- Ladder (with stabilizer or stand-off) – A 6–8 ft step ladder is usually enough for eaves and gutters. For two-story homes, consider a multi-position ladder with a stabilizer to avoid gutter damage.
- Power timer or smart plug – In 2026, most people use Wi-Fi or Bluetooth timers to turn lights on at sunset and off at bedtime. Saves energy and keeps the HOA happy.
- Work gloves and safety glasses – Protect your hands from cold, sharp edges, and debris. Safety glasses prevent dust or insulation from getting in your eyes.
- Zip ties (optional, for securing cords) – Great for bundling extra cord or securing lights to railings or trees.
- Smartphone or tablet (for app-controlled lights) – If you’re using color-changing or animated lights, you’ll need the app ready to go.
Pro Tip: Before you buy, check your circuit capacity. Most outdoor outlets are on a 15-amp circuit. A string of 250 LED mini-lights uses about 0.3 amps. You can usually run 5–6 strings on one circuit, but plug in a timer first to avoid overloads.
Now, let’s get into the how to string up Christmas lights outdoor in 2026 easy guide—step by step.
Step-by-Step Guide to How to String Up Christmas Lights Outdoor in 2026 Easy Guide
Step 1: Plan Your Layout (The Secret to Success)
Before you touch a single light, grab a piece of paper (or your phone) and sketch your house. Mark where you want lights: roofline, windows, doorways, trees, railings, or even the mailbox.
I learned this the hard way. One year, I started hanging lights randomly and ended up with a patchy, chaotic look. Not exactly “holiday magic.”
- Start from the power source (usually an outdoor outlet) and work outward.
- Use different colors or styles for different areas—white for rooflines, multicolor for trees, warm white for entryways.
- Measure each section. A 30-foot roofline needs at least 30 feet of lights, plus 10% extra for curves and connections.
- Note where you’ll need extension cords and where clips will go.
Warning: Don’t run extension cords under doors, through windows, or across walkways. It’s a tripping hazard and can damage seals or cords. Use cord covers if you must cross a path.
This planning step is crucial for the how to string up Christmas lights outdoor in 2026 easy guide—because a good plan means fewer mistakes, less rework, and more time sipping cocoa.
Step 2: Test and Untangle Your Lights
Pull out your lights and lay them on a clean, dry surface. Plug them in. Do they work? Are there any dark spots?
LEDs are more reliable than incandescents, but even the best can have a dead bulb or loose connection. In 2026, many lights have built-in diagnostics—some even show a blinking pattern to tell you which bulb is out.
- Use a light tester (available for $10–$20) to find dead bulbs quickly.
- If a bulb is out, check if it’s loose. Sometimes just pushing it in fixes it.
- Replace any damaged bulbs with spares (most kits include extras).
- For pre-lit wreaths or garlands, check each strand.
Now, untangle. I use the “figure-eight” method: hold one end, loop the cord in a figure-eight around your arm, then gently pull it apart. It works better than yanking.
Pro Tip: Store your lights on a reel or in a plastic tub with a lid. In 2026, some people use vacuum-sealed bags to keep them tangle-free and moisture-resistant.
Step 3: Choose the Right Hanging Method
This is where most people go wrong. Nails, staples, and duct tape might seem easy, but they damage your home and void warranties.
In 2026, the best methods are:
- Gutter clips: Hook over the front lip of the gutter. Perfect for rooflines. No tools needed.
- Shingle clips: Slide under shingles. Great for gables and peaks. Don’t use on slate or tile roofs.
- Adhesive hooks: Stick to smooth surfaces (vinyl, wood, metal). Use only on clean, dry surfaces. Remove in spring to avoid residue.
- Magnetic clips: For metal surfaces (like gutters or railings). Super easy to install and remove.
- Zip ties: For trees, railings, or fences. Use UV-resistant ties to prevent brittleness.
Warning: Never use nails, screws, or staples. They can damage shingles, create leaks, or cause electrical shorts. Plus, your HOA will send a strongly worded letter.
For the how to string up Christmas lights outdoor in 2026 easy guide, I recommend starting with gutter clips for rooflines and adhesive hooks for windows and doors. They’re fast, safe, and removable.
Step 4: Hang the Lights (Start at the Power Source)
Now the fun begins. Start at the outlet and work outward. This ensures you’re not stretching cords too far or creating a tangled mess.
- Plug in your first string of lights. Test it again.
- Attach the first clip near the plug. This secures the “tail” and prevents strain on the connection.
- Work your way along the roofline, spacing clips 6–12 inches apart. Closer spacing looks fuller; wider spacing is faster.
- For peaks or corners, use a clip at the bend to keep the lights tight.
- When you reach the end, leave a small loop (3–6 inches) before cutting the cord (if it’s a cuttable string) or connecting the next strand.
For multiple strands:
- Use end-to-end connectors. Most modern lights have these built in.
- Don’t exceed the manufacturer’s max number of connected strings (usually 25–30 for LEDs).
- If you need more, use a multi-outlet adapter (GFCI-protected) or a power distribution box.
Pro Tip: Use a ladder stabilizer or stand-off. It keeps the ladder from pressing into the gutter, which can bend or break it. I use a $30 stabilizer from Home Depot—best investment ever.
Step 5: Decorate Trees, Bushes, and Railings
Now that the house is lit, let’s add some sparkle to the yard.
For trees:
- Wrap lights from the trunk outward, moving up the branches. Use zip ties or twist ties to secure.
- For large trees, use a “spiral” pattern—start at the base and spiral up to the top.
- Use outdoor-rated extension cords to reach the tree. Bury the cord slightly or use a cord cover to prevent tripping.
For bushes and hedges:
- Weave lights through the branches, not just around the outside. This creates depth.
- Use low-voltage LED strips or net lights for even coverage.
For railings and fences:
- Use magnetic clips or zip ties. Avoid staples.
- For metal railings, wrap lights in a spiral or zigzag pattern.
- For wooden railings, use adhesive hooks or small zip ties.
Warning: Don’t overload trees or bushes. Too many lights can damage branches or create a fire hazard. Stick to one string per 6–8 inches of trunk diameter.
Step 6: Connect to Power and Set a Timer
Now, plug everything in. But don’t just leave it on 24/7.
- Use a smart plug or outdoor timer. In 2026, many people use Wi-Fi plugs (like TP-Link Kasa or Amazon Smart Plug) to control lights from their phone.
- Set the timer to turn on at sunset and off at 10 PM or midnight. This saves energy and keeps neighbors happy.
- For app-controlled lights, download the app and pair your lights. Test color modes, brightness, and animations.
- If you have multiple zones (e.g., roof, trees, entryway), use separate timers or a smart hub to control them individually.
Pro Tip: Use a surge protector. Winter storms can cause power surges. A $20 protector can save your $200 light setup.
Step 7: Inspect and Adjust
Step back and admire your work. Then, walk around and check:
- Are all clips secure? No sagging or dragging?
- Are extension cords out of walkways?
- Are lights evenly spaced? Any dark spots?
- Is the timer working? Do the lights turn on and off as scheduled?
Make small adjustments. A little tweaking goes a long way. I once fixed a “sad” roofline by adding a few extra clips—looked amazing after.
Pro Tips & Common Mistakes to Avoid
Pro Tip #1: Use color-changing LEDs. In 2026, many lights can shift from warm white to multicolor with a tap on your phone. Great for switching from Christmas to New Year’s.
Pro Tip #2: Label your light sets. Use masking tape or tags to mark which string goes where. Makes take-down and storage a breeze.
Pro Tip #3: Check the weather. Don’t install lights during rain, snow, or high winds. Wait for a dry, calm day. Safety first.
Common Mistakes (and How to Avoid Them):
- Using indoor lights outside: They’re not weatherproof. Use only outdoor-rated lights.
- Overloading circuits: Check amperage. Use a circuit tester if unsure.
- Ignoring the timer: Lights left on all night waste energy and annoy neighbors.
- Skipping the test: Always test before hanging. Saves time and frustration.
- Using nails or staples: Damages home and creates hazards. Use clips instead.
- Forgetting the ladder safety: Always have a spotter. Never stand on the top two rungs.
For the how to string up Christmas lights outdoor in 2026 easy guide, these tips are game-changers. They’ll save you time, money, and stress.
FAQs About How to String Up Christmas Lights Outdoor in 2026 Easy Guide
Q: Can I use the same lights for multiple years?
Absolutely. LED lights last 20,000–50,000 hours. If stored properly (in a dry, cool place, on a reel), they’ll work for 5+ years. Just test them each season.
Q: How many lights can I plug into one outlet?
Depends on the circuit. Most outdoor outlets are 15 amps. A string of 250 LED mini-lights uses ~0.3 amps. You can usually run 5–6 strings, but check the manufacturer’s “max connected” rating. Never exceed it.
Q: What if my lights flicker or don’t turn on?
First, check the fuse (usually in the plug). Replace if blown. Then, test each bulb. Use a light tester to find dead ones. For smart lights, reset the app or re-pair the device.
Q: Are solar-powered lights worth it?
For trees, bushes, or railings—yes. They’re eco-friendly and don’t need cords. But they’re less bright and may not work well in shady areas. For rooflines, stick with plug-in.
Q: How do I take down lights without breaking them?
Start at the farthest point from the outlet. Unplug, remove clips, and gently unwind. Store on a reel or in a labeled bin. Never yank or twist.
Q: Can I use smart lights with Alexa or Google Home?
Yes! Most 2026 smart lights (like Philips Hue, Govee, or Twinkly) work with voice assistants. Set routines like “Alexa, turn on Christmas lights at sunset.”
Q: What’s the best time to put up lights?
Anytime after Thanksgiving, but before December 10th. This gives you time to fix issues before the holidays. Avoid icy or stormy days.
Final Thoughts
Stringing up Christmas lights doesn’t have to be a chore. With the right tools, a solid plan, and a little patience, you can create a magical display that delights your family and neighbors.
This how to string up Christmas lights outdoor in 2026 easy guide isn’t just about following steps—it’s about doing it safely, efficiently, and with a smile on your face.
Remember: start with a plan, use the right clips, test your lights, and set a timer. And don’t forget to enjoy the process. I still get chills when I see my house lit up for the first time each year.
So grab your ladder, put on some holiday music, and get started. Your perfect Christmas display is just a few clips away.
And when you’re done? Pour yourself a hot cocoa, step back, and say, “Yep, I did that.”

