Featured image for how to troubleshoot led string lights
Image source: i2.wp.com
Master the art of diagnosing LED string light issues by first checking for loose connections, damaged wires, or burnt-out bulbs—most problems stem from these common culprits. Use a multimeter or voltage tester to identify breaks in the circuit, and always inspect fuses and power sources before assuming the entire strand is faulty.
How to Troubleshoot LED String Lights Like a Pro
Key Takeaways
- Inspect bulbs first: Check for loose or damaged bulbs before assuming wiring issues.
- Test with a multimeter: Verify voltage and continuity to pinpoint electrical faults quickly.
- Replace fuses proactively: Swap out blown fuses in the plug to restore power instantly.
- Look for water damage: Moisture can cause shorts—dry and seal connections if needed.
- Use a spare section: Swap in a working segment to isolate the problem area.
- Check the wiring path: Gently shake cords to detect hidden breaks or kinks.
Why This Matters / Understanding the Problem
You’ve hung your LED string lights for the holidays, a backyard party, or just to cozy up your patio—only to find they’re dim, flickering, or not lighting up at all. It’s frustrating, especially when you just want a little sparkle.
But here’s the good news: most LED string light issues are fixable. Unlike older incandescent strings, LEDs are more durable and energy-efficient, but they can still have connection problems, faulty bulbs, or power supply issues.
Learning how to troubleshoot LED string lights like a pro saves you time, money, and the hassle of replacing entire sets unnecessarily. Whether it’s a single dark section or a complete blackout, this guide walks you through diagnosing and fixing the most common problems—no electrical degree required.
With the right approach, you can revive your lights in under an hour. And once you master this skill, you’ll be the go-to person for holiday light emergencies among friends and family.
So let’s dive into the most common causes and how to fix them—starting with what you’ll need.
What You Need
Before you begin, gather these tools and materials. Most are already in your home or garage. The goal is to keep things simple and safe.
Visual guide about how to troubleshoot led string lights
Image source: hr-led.com
- LED string lights (the ones you’re troubleshooting)
- Replacement LED bulbs (check wattage and size—usually 3mm or 5mm)
- Needle-nose pliers (for gently removing bulbs)
- Small flathead screwdriver (for opening sockets or fuse caps)
- Multimeter (optional but helpful) for checking voltage and continuity
- Insulated gloves (for safety when handling wires)
- Electrical tape (for temporary fixes or sealing exposed wires)
- Flashlight or headlamp (to see inside dark sockets)
- Extension cord (optional) to test lights away from the original outlet
- Paperclip (straightened) for fuse testing
You don’t need to be an electrician to fix your lights. But having the right tools makes how to troubleshoot LED string lights like a pro much faster and safer.
Note: Always unplug the lights before working on them. Safety first—even low-voltage LEDs can pose risks if mishandled.
Step-by-Step Guide to How to Troubleshoot LED String Lights Like a Pro
Step 1: Check the Power Source & Outlet
Start with the simplest cause: the outlet. A dead outlet, tripped breaker, or faulty power strip could be the culprit—not the lights themselves.
Plug the string into a known working outlet (like one powering a lamp). If the lights turn on, the original outlet is the problem. Try resetting the GFCI outlet (look for a “Reset” button) or check your home’s circuit breaker.
If the lights still don’t work, unplug them and move to the next step. Never assume the lights are broken until you rule out the power source.
Pro Tip: Use a lamp or phone charger to test the outlet. If those don’t work, the issue is likely with your home’s electrical system—not the lights.
Step 2: Inspect the Fuse (Yes, LEDs Have Fuses!)
Most plug-in LED string lights have a small fuse inside the plug—usually a 2-amp or 3-amp glass or ceramic fuse. If it’s blown, the whole string won’t light.
Here’s how to check:
- Unplug the lights.
- Locate the fuse cap on the plug (it’s usually a small sliding or screw-off cover).
- Use a flathead screwdriver to open it.
- Remove the fuse and look through it—if the wire inside is broken or blackened, it’s blown.
You can test the fuse with a multimeter set to continuity mode. Or, use a straightened paperclip to bypass it temporarily (only for testing—don’t leave it like this).
If the lights turn on with the fuse bypassed, replace it with an identical one (check the amperage on the old fuse or the plug’s label). Never use a higher-amp fuse—it’s a fire hazard.
Warning: Fuses blow due to power surges or short circuits. Replacing a blown fuse without fixing the underlying issue may cause it to blow again.
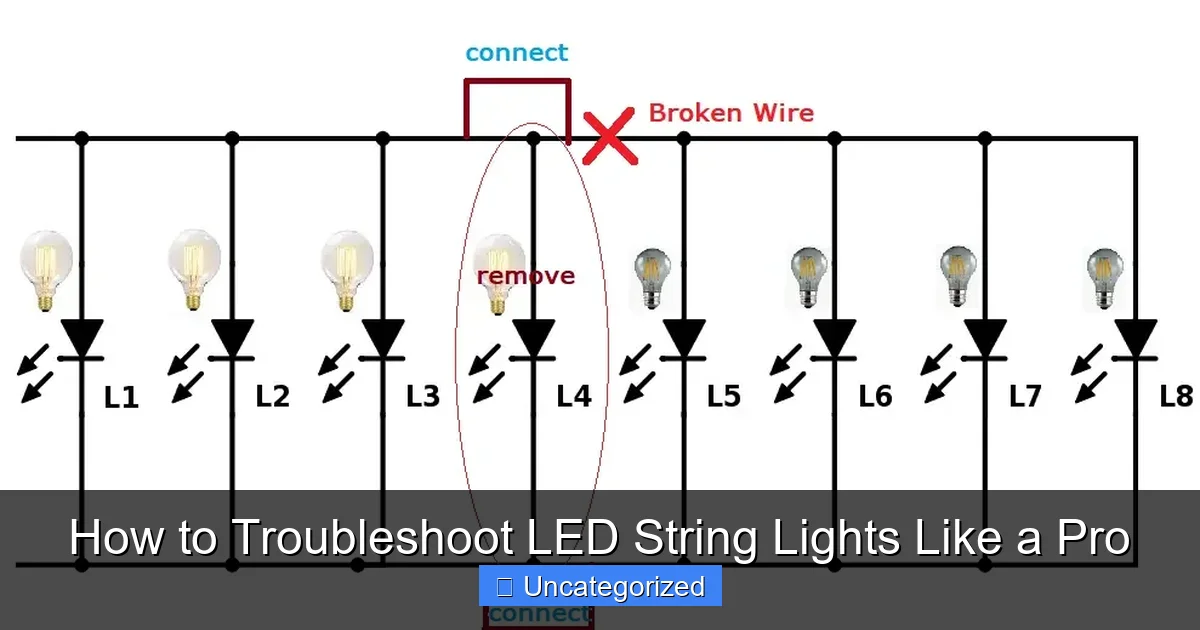
Step 3: Look for a “Shunt” or “Shunt Wire” Issue
LEDs work differently than incandescent bulbs. When one bulb fails in a string, it can break the circuit—but many modern LED strings use a shunt, a tiny wire that bypasses a dead bulb so the rest stay lit.
If one section is dark, the shunt might be damaged. This often happens when a bulb is loose or improperly installed.
To check:
- Unplug the lights.
- Inspect each bulb socket in the dark section.
- Look for a small metal wire (shunt) across the socket’s contacts. If it’s broken or missing, that’s the issue.
You can often fix this by:
- Reinserting the bulb firmly (push straight down).
- Replacing the bulb with a working one.
- Using needle-nose pliers to gently bend the shunt wire back into place (if visible).
This is a key part of how to troubleshoot LED string lights like a pro—many people overlook the shunt and assume the whole string is dead.
Real-Life Example: A customer thought her entire 50-light string was broken. After checking, we found one bulb was loose. Once reseated, the shunt reconnected, and all 50 bulbs lit up perfectly.
Step 4: Test and Replace Faulty Bulbs
Even with shunts, individual LED bulbs can fail. A single dead bulb can cause flickering, dimming, or a dark segment.
Here’s how to test each bulb:
- Unplug the lights.
- Use needle-nose pliers to gently twist and remove a bulb from its socket.
- Plug the string back in and see if the section lights up. If it does, that bulb was the problem.
- If not, reinsert the bulb and test the next one.
Alternatively, use a bulb tester (available at hardware stores) or a multimeter to check if the bulb conducts electricity.
When replacing bulbs, make sure you get the right type:
- Same size (3mm, 5mm, etc.)
- Same color (warm white, cool white, multicolor)
- Same voltage (usually 3V or 120V for household strings)
Pro tip: Keep a few spare bulbs in your holiday storage box. It’s much easier to replace one than to buy a whole new string.
Common Mistake: Forcing a bulb into the socket. LEDs have polarity—the longer lead is positive. If you install it backward, it won’t light. If it doesn’t light, flip it 180 degrees and try again.
Step 5: Check for Damaged Wires or Sockets
Over time, wires can fray, kink, or break—especially if the lights were stored tightly wound or exposed to weather.
Inspect the entire length of the string for:
- Exposed copper wire
- Bulges or kinks in the cord
- Loose or cracked sockets
- Burn marks or melting (a sign of overheating)
If you find exposed wire, unplug the lights immediately. Wrap the area with electrical tape as a temporary fix, but consider retiring the string for safety.
For loose sockets:
- Unplug the lights.
- Use a small screwdriver to open the socket (if possible).
- Check if the internal contacts are bent or corroded.
- Gently bend them back with pliers or replace the socket entirely.
If the damage is near the plug or transformer, it’s often safer to cut the string and splice in a new section or replace it.
Warning: Never use duct tape or regular tape on damaged wires. It’s not insulated and can cause shorts or fires. Only use electrical tape for temporary repairs.
Step 6: Test the Transformer or Driver (For Plug-In Strings)
Many LED strings have a small black box (the transformer or driver) between the plug and the lights. It converts 120V AC to low-voltage DC.
If the transformer is dead, the lights won’t turn on—even if everything else is fine.
To test:
- Plug the lights into a working outlet.
- Feel the transformer. If it’s hot, it may be failing.
- Use a multimeter to check output voltage (set to DC volts). Compare it to the label on the transformer (e.g., “12V DC, 1A”).
- If there’s no voltage or it’s way off, the transformer is faulty.
If you don’t have a multimeter, try plugging the lights into a different outlet. If they work, the transformer may be sensitive to power fluctuations.
Replacement transformers are available online. Match the voltage (V), current (A or mA), and connector type (barrel plug, USB, etc.).
This is a less common issue, but critical for how to troubleshoot LED string lights like a pro—especially with older or outdoor-rated sets.
Step 7: Look for Water Damage (Especially Outdoor Lights)
Outdoor LED strings are weather-resistant, but not waterproof. Water can seep into sockets, causing shorts or corrosion.
Signs of water damage:
- Flickering or intermittent lighting
- Green or white crusty residue on contacts (corrosion)
- Smell of burnt plastic
To fix:
- Unplug and dry the lights completely (use a hair dryer on low heat).
- Remove bulbs and clean sockets with a cotton swab and rubbing alcohol.
- Let them air dry for 24 hours before testing.
- If corrosion is severe, replace the affected socket or section.
For future use, use outdoor-rated extension cords and weatherproof covers for outlets. Store lights loosely coiled in a dry place.
Pro Tip: Use silicone sealant on socket openings if you’re hanging lights in a wet area. Just don’t cover the bulb contacts—only the outer rim.
Step 8: Test in Series or Parallel (For Multi-String Sets)
If you have multiple strings connected end-to-end, one faulty string can take down the whole display.
To isolate the problem:
- Unplug all strings.
- Test each string individually.
- Plug one in at a time and see which one causes the failure.
Some sets use a “plug-to-plug” connection. If the male/female connectors are loose or corroded, clean them with a dry cloth or electrical contact cleaner.
Also, check the manufacturer’s max string count. Exceeding it can overload the power supply and cause dimming or failure.
For example, a transformer rated for 3 strings may dim or shut off if you connect 5. Always follow the instructions.
This step is essential for how to troubleshoot LED string lights like a pro, especially during holiday displays.
Pro Tips & Common Mistakes to Avoid
Now that you’ve mastered the steps, here are insider tips and pitfalls to avoid.
Pro Tip #1: Use a “light tester” tool. These $10 gadgets plug into the string and light up when power is present—great for finding breaks in long runs.
Pro Tip #2: Label your strings. Use masking tape to mark which set is for the roof, porch, or tree. Makes troubleshooting much easier next year.
Pro Tip #3: Store lights properly. Wrap them loosely around a cardboard rectangle or use a storage reel. Avoid tangles and wire stress.
Common Mistake #1: Replacing the entire string too soon. Most issues are isolated. Fixing one bulb or fuse is cheaper and greener.
Common Mistake #2: Using non-LED replacement bulbs. Mixing LED and incandescent bulbs can damage the circuit or cause flickering.
Common Mistake #3: Ignoring polarity. LEDs have a positive and negative lead. If a bulb doesn’t light, flip it—don’t force it.
Common Mistake #4: Overloading outlets. Too many strings on one circuit can trip breakers or cause voltage drops. Use power strips with surge protection.
Remember: patience is key. Rushing can lead to missed details or accidental damage. Take your time, and you’ll save money and stress.
FAQs About How to Troubleshoot LED String Lights Like a Pro
Q1: Why do some LED lights stay lit when a bulb is removed?
Because they use a shunt—a bypass wire that keeps the circuit closed even if one bulb fails. This is a feature, not a bug. It’s one reason LEDs are more reliable than old-style lights.
Q2: Can I cut and splice LED string lights?
Yes, but only if the manufacturer says it’s safe. Some strings are designed for splicing; others are sealed. Use waterproof connectors and solder for outdoor use. Always cut between bulbs, not through a socket.
Q3: Why are my LED lights dim or flickering?
Causes include:
- Low power (overloaded circuit)
- Loose bulb or socket
- Failing transformer
- Water damage or corrosion
- Exceeding max string count
Start with the easiest fixes: check bulbs, fuses, and connections.
Q4: Are LED string lights safe to leave on overnight?
Generally, yes. LEDs generate little heat and have low fire risk. But always:
- Use outdoor-rated lights outside
- Avoid covering them with flammable materials
- Unplug when not in use if you’re concerned
Smart plugs with timers are a great safety upgrade.
Q5: What’s the lifespan of LED string lights?
Most last 25,000 to 50,000 hours—that’s 10 to 20 years with normal holiday use (3 months/year). But poor storage, weather, or power surges can shorten it.
Q6: Can I use a dimmer with LED string lights?
Only if the lights are labeled “dimmable” and the dimmer is compatible with LEDs. Regular incandescent dimmers can cause flickering or damage. Look for “LED-compatible” dimmers.
Q7: Why do my lights work in one outlet but not another?
The outlet may be on a different circuit, have a loose wire, or be controlled by a switch. It could also be a GFCI outlet that tripped (common in kitchens and bathrooms). Reset it and try again.
Final Thoughts
Learning how to troubleshoot LED string lights like a pro isn’t about being an electrician—it’s about being observant, patient, and methodical.
Most problems—flickering, dark sections, complete failure—are fixable with a few simple tools and the steps in this guide. You don’t need to toss out a $30 string just because one bulb is out or the fuse blew.
Remember:
- Always start with the power source and fuse.
- Check for loose bulbs and shunts.
- Inspect wires and sockets for damage.
- Test the transformer if applicable.
- Clean and dry outdoor lights regularly.
With practice, you’ll diagnose and fix issues in minutes. And when your neighbor’s lights go dark during the holidays, you’ll be the one they call.
So next time your LED string lights act up, don’t panic. Grab your tools, follow this guide, and light up the night—like a pro.
Action Step: Bookmark this guide and keep a repair kit (bulbs, fuse, tape, pliers) with your holiday storage. You’ll be ready for anything.

