Featured image for patio string light diy hanging guide wire
Image source: i2.wp.com
Transform your outdoor space with a professional-looking patio string light display using a DIY hanging guide wire system—effortless, durable, and customizable. By anchoring sturdy guide wires between posts or walls and spacing them strategically, you’ll achieve sag-free, evenly lit ambiance that withstands wind and weather. This simple yet effective method elevates both safety and style, making it the ultimate trick for flawless backyard lighting.
Key Takeaways
- Plan spacing first: Measure and mark guide wire positions for even light distribution.
- Use strong anchors: Install eye hooks or turnbuckles into studs or sturdy supports.
- Stretch wires tight: Pre-tension guide wires to prevent sagging over time.
- Choose weatherproof materials: Opt for stainless steel or coated cables for durability.
- Secure lights safely: Attach string lights with clips, not nails, to avoid damage.
- Add tensioners: Use turnbuckles for easy adjustments and long-term stability.
📑 Table of Contents
- Why a DIY Patio String Light Guide Wire Is a Game-Changer
- Understanding the Basics: What Is a Guide Wire and Why You Need One
- Choosing the Right Materials for Your Guide Wire System
- Step-by-Step: How to Install Your DIY Guide Wire System
- Creative Ideas and Layouts for Your Guide Wire Setup
- Maintenance, Safety, and Troubleshooting Tips
- Final Thoughts: Elevate Your Patio with Confidence
Why a DIY Patio String Light Guide Wire Is a Game-Changer
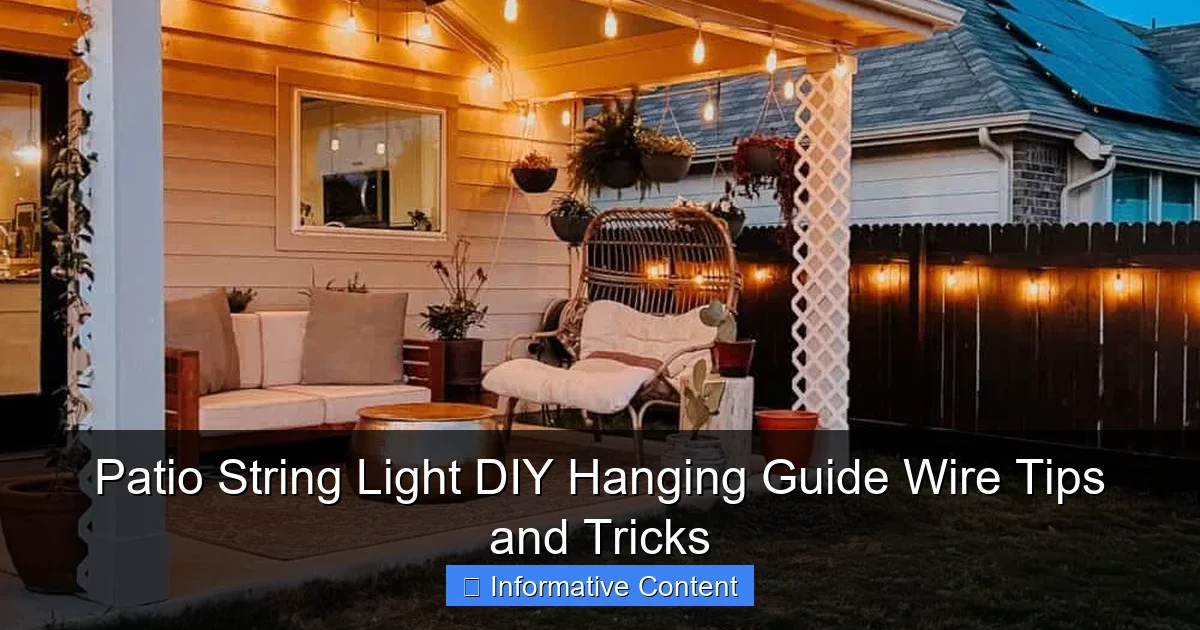
There’s something magical about a backyard at night. The soft glow of string lights, the hum of conversation, the gentle sway of leaves in the breeze—it’s the kind of ambiance that turns ordinary evenings into memories. But if you’ve ever tried hanging patio string lights without a guide wire, you know the struggle: sagging lines, uneven tension, and the dreaded moment when a bulb dangles too close to the ground or worse, a guest’s head.
That’s where a patio string light DIY hanging guide wire comes in. It’s not just a practical solution—it’s a design upgrade. By using a guide wire, you create a taut, professional-looking foundation that supports your lights evenly, prevents drooping, and even allows for creative layouts. Whether you’re lighting up a cozy nook or a spacious deck, this simple addition can transform your outdoor space from “meh” to “wow” with minimal effort and cost. And the best part? You don’t need to be a handyman to pull it off. With the right tips and tricks, anyone can master this technique and enjoy a stunning, functional lighting setup.
Understanding the Basics: What Is a Guide Wire and Why You Need One
Before we dive into the how-tos, let’s clarify what a guide wire is and why it’s essential for a clean, long-lasting patio string light installation.
Visual guide about patio string light diy hanging guide wire
Image source: cdn.northernfeeling.com
What Is a Patio String Light Guide Wire?
A guide wire is a thin, strong cable—usually made of stainless steel or galvanized steel—that acts as a support structure for your string lights. Instead of attaching lights directly to posts, trees, or walls, you run the guide wire between two or more anchor points. Your string lights then clip or tie onto this wire, creating a straight, tensioned line that won’t sag over time.
Think of it like a clothesline for your lights. Without it, your strings are like wet laundry—heavy, droopy, and prone to tangling. With it, they’re crisp, even, and ready for prime time.
Why Use a Guide Wire Instead of Hanging Lights Directly?
- Prevents sagging: Even the best string lights will sag if hung over long distances. A guide wire keeps them taut, especially in windy or rainy conditions.
- Reduces wear and tear: Lights aren’t designed to bear their own weight over long spans. A guide wire shares the load, extending bulb life and reducing breakage.
- Enables creative layouts: Want to create a crisscross pattern, a canopy, or a zigzag? A guide wire makes it possible without worrying about structural integrity.
- Easy to adjust: If you need to remove or replace lights, you can do so without re-tensioning the entire setup. Just unclip and reattach.
- Professional finish: Let’s face it—saggy lights look messy. A guide wire gives your patio a polished, high-end look, even on a budget.
For example, last summer, I helped a friend hang lights across her 20-foot patio. She initially planned to tie them directly to her pergola beams. After seeing how much they sagged in the center, we switched to a guide wire. The difference was night and day—literally. The lights stayed straight, looked cleaner, and she even added a second row for extra sparkle.
Choosing the Right Materials for Your Guide Wire System
Not all guide wires are created equal. The right choice depends on your space, budget, and how permanent you want the setup to be. Let’s break down the key components.
1. Guide Wire Cable: Stainless Steel vs. Galvanized Steel
Both are strong and weather-resistant, but here’s how they differ:
- Stainless steel: More expensive (about $20–$30 for a 100-foot roll), but highly corrosion-resistant. Ideal for coastal areas or humid climates. Looks sleek and blends in well.
- Galvanized steel: Budget-friendly ($10–$15 for 100 feet) and durable, but may rust over time in wet environments. Slightly more visible, but still functional.
Tip: For most backyards, galvanized steel works fine if you inspect it annually and replace it every 3–5 years. If you live near the ocean or have heavy rain, go with stainless steel.
2. Tensioning Hardware: Turnbuckles and Eye Bolts
To keep your wire taut, you’ll need tensioning tools:
- Turnbuckles: Adjustable metal loops that “pull” the wire tight. Use them at one end of the wire to fine-tune tension. Look for zinc-plated or stainless steel versions.
- Eye bolts or lag screws: Screwed into walls, posts, or trees to anchor the wire. Choose ones rated for outdoor use (stainless steel is best). For wood, use lag screws with washers to prevent splitting.
Practical example: For a 15-foot span between two trees, I used 1/8-inch galvanized wire, a stainless steel turnbuckle, and two 3/8-inch eye bolts. The turnbuckle let me adjust tension easily, even after the wire stretched slightly in the heat.
3. Fasteners for Lights: Hooks, Clips, and Zip Ties
How you attach your lights matters. Options include:
- Light clips: Small plastic or metal hooks designed for string lights. They grip the wire and hold the socket securely. Reusable and low-profile.
- Zip ties: Cheap and quick, but not reusable. Best for temporary setups or tight spaces.
- Carabiners: For heavy-duty lights or frequent changes. Easy to unclip, but more visible.
Tip: Avoid duct tape or nails—they damage wires and bulbs. Stick with purpose-built fasteners.
4. Tools You’ll Need
- Measuring tape
- Drill with wood/masonry bits (for eye bolts)
- Wrench or pliers (to tighten turnbuckles)
- Wire cutters
- Ladder (if working at height)
Pro tip: Buy a guide wire kit online. Many include wire, turnbuckles, eye bolts, and clips—saving you time and guesswork. Look for kits rated for at least 25 feet.
Step-by-Step: How to Install Your DIY Guide Wire System
Now for the fun part: building your system. Follow these steps for a sturdy, sag-free setup.
Step 1: Plan Your Layout
Sketch your patio on paper or use an app to map out:
- Anchor points (trees, posts, walls, etc.)
- Desired light patterns (straight lines, crisscross, canopy)
- Distance between points (measure with a tape)
- Height (aim for 8–10 feet to avoid head bumps)
Tip: For a crisscross design, use 4 anchor points. For a canopy, use 3 or more lines radiating from a center post.
Step 2: Install Anchor Points
Drill pilot holes into wood or masonry, then screw in eye bolts or lag screws. For trees, use tree-friendly straps (not nails!) to avoid harming the bark. Wrap the strap around the trunk and attach the eye bolt to the strap.
Caution: Don’t overtighten—this can damage wood or pull the screw loose over time. Use a washer to distribute pressure.
Step 3: Run the Guide Wire
- Cut the wire 6–12 inches longer than the distance between anchors.
- Thread one end through an eye bolt and loop it back. Secure with a wire rope clip (two clamps, tightened with a wrench).
- Run the wire to the opposite anchor. Don’t tighten yet!
- Attach the other end to a turnbuckle. Connect the turnbuckle to the second eye bolt.
Tip: Use a level to ensure the wire is horizontal. Slight slopes are okay, but avoid steep angles.
Step 4: Tension the Wire
Turn the turnbuckle clockwise to tighten. Stop when the wire is taut but not overly strained (it should make a low “twang” when plucked). Over-tightening can pull anchor points loose.
Pro tip: Test tension by pressing down on the wire’s midpoint. It should deflect no more than 1–2 inches.
Step 5: Attach Your Lights
Clip or tie your string lights to the guide wire. Space clips every 12–18 inches for even support. For crisscross patterns, use a second guide wire perpendicular to the first.
Example: For a 20-foot span, I used 12 light clips. The bulbs stayed perfectly aligned, even in wind.
Step 6: Test and Adjust
Turn on the lights. Check for:
- Sagging (adjust turnbuckle)
- Twisted bulbs (reclip)
- Uneven spacing (add/remove clips)
Make adjustments before the wire fully settles (usually within 1–2 weeks).
Creative Ideas and Layouts for Your Guide Wire Setup
Guide wires aren’t just for straight lines. With a little creativity, you can design stunning lightscapes.
1. The Classic Straight-Line Setup
Perfect for patios, decks, or between trees. Run one or more parallel guide wires. Ideal for dining areas—keeps lights out of the way but brightens the space.
Tip: Use 2–3 rows for a “light curtain” effect. Space them 12–18 inches apart.
2. Crisscross Canopy
Create a starburst or grid pattern by installing two guide wires at right angles. Great for covering large spaces or defining a seating area.
Example: My neighbor used this for her 15×20 ft backyard. She hung 4 guide wires (2 parallel, 2 perpendicular) and clipped lights to all of them. It looked like a magical web at night.
3. Zigzag or Chevron Design
Alternate guide wires at angles to create a dynamic, modern look. Use 3–4 anchor points in a zigzag pattern.
Tip: Add a dimmer switch to control brightness. Zigzags can feel busy at full power.
4. Floating “Clouds”
For a whimsical touch, hang multiple short guide wires from a single overhead wire. Attach lights to each “cloud” for a floating effect.
How-to: Use thin nylon cord or fishing line to suspend 3–5 guide wires from a main support wire. Clip lights to the lower wires.
5. Tree Wrap or Spiral
Wrap a guide wire around a tree trunk (using tree-friendly straps), then clip lights along the spiral. Works best with small to medium trees.
Caution: Don’t wrap too tightly—trees grow! Use adjustable straps.
6. Outdoor Room Divider
Use guide wires to create a light “wall” between areas (e.g., dining and lounging zones). Hang lights vertically or horizontally.
Pro tip: Combine with sheer fabric panels for extra privacy and ambiance.
Maintenance, Safety, and Troubleshooting Tips
A guide wire system is low-maintenance, but a few checks keep it safe and beautiful.
Regular Maintenance Checklist
Inspect your setup every 3–6 months:
- Check tension: If wires sag, tighten turnbuckles.
- Inspect hardware: Look for rust, loose screws, or frayed wire. Replace damaged parts.
- Clean lights: Dust and debris can dim bulbs. Wipe with a damp cloth.
- Trim vegetation: Keep branches away to prevent snags and fire hazards.
Safety First: Key Precautions
- Use outdoor-rated lights and hardware: Indoor lights can overheat or short out.
- Check local codes: Some areas restrict overhead wires. Avoid public sidewalks.
- Keep wires away from pools and water features: Water and electricity don’t mix!
- Use GFCI outlets: Protects against shocks. Install a GFCI outlet or use a GFCI extension cord.
- Don’t overload circuits: Check your string lights’ wattage. Don’t daisy-chain more than 3–4 strands unless rated for it.
Common Problems and Fixes
| Problem | Likely Cause | Solution |
|---|---|---|
| Wire sags after a week | Initial stretch or loose turnbuckle | Tighten turnbuckle. Retest after 48 hours. |
| Bulbs flicker or go out | Loose connection or damaged wire | Check clips and splices. Replace damaged sections. |
| Guide wire rusts | Galvanized steel in wet climate | Replace with stainless steel. Apply rust-resistant spray. |
| Anchor points pull loose | Overtightened wire or weak mounting | Use larger eye bolts or reinforce with brackets. Reduce tension. |
Real-world fix: My first guide wire sagged after a month. Turns out I’d used a weak turnbuckle. Upgrading to stainless steel solved it.
Final Thoughts: Elevate Your Patio with Confidence
A patio string light DIY hanging guide wire isn’t just a practical tool—it’s a design secret that unlocks endless possibilities. From preventing sagging to enabling creative layouts, it’s the difference between a “good enough” setup and a showstopper. And with the right materials and steps, it’s something you can build yourself in a weekend.
Remember: start small. Try a single guide wire across your deck before tackling a full canopy. Test your hardware in one spot. Make adjustments. Lighting should enhance your space, not stress you out. Whether you’re hosting a dinner party, enjoying a quiet night with a book, or just wanting to feel proud of your backyard, a well-hung guide wire system delivers.
So grab your tools, sketch a plan, and get started. The glow of your patio—and the smiles of your guests—are worth the effort. And when someone asks, “How’d you hang those lights so perfectly?” you can smile and say, “It’s all in the guide wire.”
Frequently Asked Questions
What is the best way to install a patio string light DIY hanging guide wire?
Use sturdy anchor points like eye hooks or turnbuckles secured to walls, trees, or posts, and run a galvanized steel guide wire between them. Tighten the wire with a turnbuckle to prevent sagging, ensuring it’s taut enough to support your string lights.
How do I choose the right wire for my patio string light hanging guide?
Opt for a vinyl-coated stainless steel or galvanized wire (16-18 gauge) for durability and weather resistance. The wire should be strong enough to hold the weight of your lights without stretching or rusting over time.
Can I use a DIY guide wire for permanent patio string light installations?
Yes, a well-installed guide wire with rust-resistant materials (e.g., stainless steel or coated wire) can last for years outdoors. Just inspect and tighten the wire annually to maintain tension and safety.
How far apart should anchor points be for a patio string light guide wire?
For most string lights, place anchor points 10–20 feet apart, depending on wire gauge and light weight. Use intermediate supports (like poles or hooks) for longer spans to avoid sagging.
What tools do I need for a patio string light DIY hanging guide wire setup?
You’ll need a tape measure, drill, eye hooks/turnbuckles, wire cutters, pliers, and a level. A tension gauge can help ensure consistent wire tightness for a professional look.
How do I hide the guide wire for a cleaner patio string light look?
Use black or dark-colored vinyl-coated wire to blend into the background, or run it along existing structures like fences or pergolas. Decorative clips or zip ties can also help conceal the wire while securing lights.

