Featured image for patio string lights diy
Image source: i0.wp.com
Transform your outdoor space effortlessly with DIY patio string lights that add instant charm and ambiance without breaking the bank. Simple installations—like wrapping lights around railings, draping them overhead, or weaving through planters—require no electrical skills and deliver stunning results in minutes. Perfect for enhancing evening gatherings or creating a cozy retreat, these customizable lighting ideas make any patio shine.
Key Takeaways
- Choose weather-resistant bulbs: Ensure durability with LED or solar-powered lights for long-term outdoor use.
- Plan your layout first: Sketch light placement to avoid overbuying and ensure even coverage.
- Use existing structures: Hang lights on fences, trees, or railings to simplify installation.
- Mix heights for depth: Vary hanging levels to create a dynamic, layered lighting effect.
- Add dimmers or timers: Control ambiance and save energy with adjustable brightness or automated schedules.
- Secure with proper hardware: Use hooks, zip ties, or clips designed for outdoor use to prevent damage.
📑 Table of Contents
- Why Patio String Lights DIY Are a Game-Changer
- Choosing the Right String Lights for Your Patio
- Planning Your Layout: Where and How to Hang
- Installation Methods: Tools, Techniques, and Safety
- Creative DIY Ideas to Personalize Your Space
- Maintenance and Longevity: Keeping Your Lights Shining
- Conclusion: Light Up Your Life, One Strand at a Time
Why Patio String Lights DIY Are a Game-Changer
Imagine this: it’s a warm summer evening, the sun has just dipped below the horizon, and your backyard transforms into a magical retreat. Twinkling lights drape from the trees, casting a soft glow over your patio. You’re sipping a cold drink, laughing with friends, and the mood is perfect. This isn’t a scene from a movie—it’s something you can create yourself with patio string lights DIY. There’s something special about crafting your own lighting setup. It’s not just about saving money (though that’s a nice bonus). It’s about personalization, creativity, and turning your outdoor space into a place that truly feels like yours.
Whether you’re hosting a backyard BBQ, enjoying a quiet night with a book, or just want to make your patio more inviting, DIY string lights can elevate the ambiance in minutes. And the best part? You don’t need to be an electrician or a DIY expert to pull it off. With a few tools, some basic materials, and a little inspiration, you can design a lighting scheme that’s both functional and beautiful. In this guide, we’ll walk you through everything you need to know—from choosing the right lights to creative installation ideas and practical tips to keep your setup safe and long-lasting.
Choosing the Right String Lights for Your Patio
Before you start draping lights across your backyard, it’s important to pick the right type. Not all string lights are created equal, and the wrong choice can lead to frustration—or worse, a fire hazard. Let’s break down the options so you can make an informed decision.
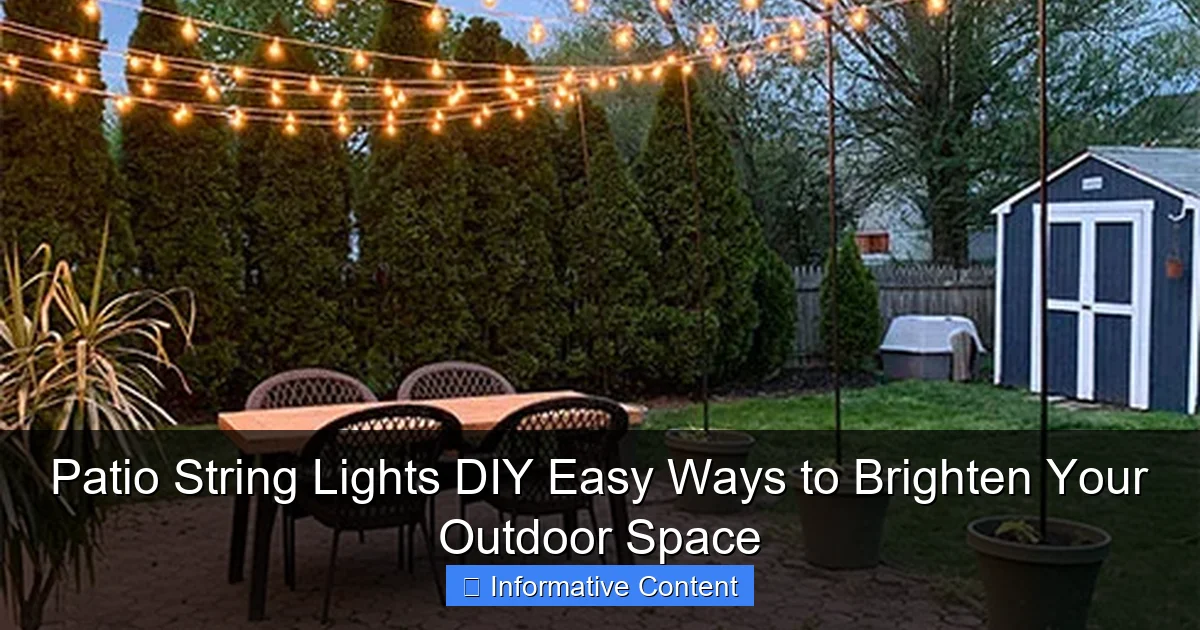
Visual guide about patio string lights diy
Image source: thehoneycombhome.com
Types of Patio String Lights
- Incandescent Bulbs: These are the classic warm-white lights you might remember from childhood. They give off a cozy, nostalgic glow, but they’re not very energy-efficient and tend to burn out faster. Best for occasional use or vintage-style setups.
- LED Lights: The most popular choice today. LEDs are energy-efficient, last up to 25,000 hours (that’s over 20 years with average use!), and come in a wide range of colors and styles. They’re also safer because they don’t get hot to the touch.
- Solar-Powered Lights: Perfect for eco-conscious homeowners. These charge during the day and turn on automatically at dusk. Great for areas without easy access to an outlet, but they may not shine as brightly on cloudy days.
- Smart String Lights: Want to change colors with your phone or sync them to music? Smart lights (like Philips Hue or LIFX) offer app control, timers, and even voice assistant compatibility. A bit pricier, but worth it if you love tech.
Key Features to Consider
When shopping for patio string lights DIY, keep these factors in mind:
- Length and Spacing: Measure your space first. A 24-foot strand might seem long, but if bulbs are spaced 12 inches apart, you’ll need more than one strand for full coverage. Look for “end-to-end” connections if you plan to link multiple strands.
- Bulb Shape and Size: Edison-style bulbs add a rustic charm, while globe lights feel more modern. Consider the mood you want: soft and romantic, or bright and festive?
- Weather Resistance: Outdoor lights need an IP44 or higher rating (resistant to splashing water and dust). Check for “outdoor-rated” labels and UV-protected wires.
- Power Source: Plug-in lights offer consistent brightness, but you’ll need an outlet nearby. Battery-powered lights are portable but require frequent replacements. Solar is great for remote areas.
Real-World Example
Take Sarah, a homeowner in Colorado. She wanted a cozy, bistro-style setup for her small patio. She chose 40-foot LED string lights with warm white Edison bulbs, spaced 6 inches apart. The lights were end-to-end connectable, so she linked two strands to cover her pergola. She opted for a plug-in model because her patio has a GFCI outlet. The result? A warm, inviting space perfect for evening dinners.
Planning Your Layout: Where and How to Hang
Now that you’ve picked your lights, it’s time to plan your layout. A well-thought-out design ensures even coverage, avoids tangles, and makes the most of your space. Here’s how to do it right.
Step 1: Sketch Your Space
Grab a piece of paper and sketch your patio or backyard. Mark key features: trees, railings, pergolas, fences, and seating areas. Think about where you want the lights to frame the space. For example:
- Overhead Canopy: Drape lights across a pergola or between trees to create a “ceiling” of light.
- Railings and Fences: Wrap lights around railings or run them along fence lines for a border effect.
- Vertical Accents: Hang lights from a second-story balcony down to the patio for a waterfall effect.
- Seating Zones: Focus lights above dining tables, lounge areas, or fire pits to highlight gathering spots.
Step 2: Measure and Calculate
Use a measuring tape to get the exact lengths of your hanging points. For example, if you’re draping lights between two trees 20 feet apart, you’ll need a 20-foot strand (or two 10-foot strands connected). Add 10-15% extra length for draping or slack. Pro tip: Buy one extra strand—you’ll likely need it!
Step 3: Test the Layout
Before drilling holes or tying knots, lay out your lights temporarily. Use painter’s tape to mark hanging points, or drape the lights with zip ties. Turn them on at night to see how the light spreads. Does it feel too bright? Too dim? Adjust the spacing or add more strands. This trial run saves time and prevents costly mistakes.
Creative Layout Ideas
- Zigzag Pattern: Hang lights in a zigzag across a wide space (e.g., between trees or posts) to maximize coverage.
- Grid Design: For a modern look, create a grid pattern with horizontal and vertical lines. Great for patios with pergolas.
- Hanging Lanterns: Use clip-on lights or small lanterns on a single strand for a boho vibe.
- Starry Sky Effect: Randomly space small LED fairy lights across a large area (like a lawn) for a magical, scattered glow.
Real-World Example
Mark, a DIY enthusiast in Oregon, wanted to light his 20×20-foot backyard patio. He had a pergola, two large trees, and a fence. He sketched his space and decided on a grid pattern: four horizontal lines (10 feet each) and three vertical lines (15 feet each). He used 20-foot LED strands, connecting them end-to-end. To test, he laid the lights on the ground first, then hung them with zip ties. The result? A bright, even glow that made his patio feel twice as big.
Installation Methods: Tools, Techniques, and Safety
Now for the fun part: installing your lights. With the right tools and techniques, this is a one-day project. But safety first—outdoor electrical work requires caution.
Essential Tools and Materials
- Measuring tape (for precise lengths)
- Drill and drill bits (for permanent installations)
- Zip ties (reusable, no damage)
- Command hooks or outdoor clips (removable, no drilling)
- Eye hooks or screw-in hooks (for permanent mounting)
- Ladder or step stool (for high areas)
- GFCI outlet tester (to verify safety)
- Extension cords (outdoor-rated, if needed)
Step-by-Step Installation Tips
- Turn Off Power: If using plug-in lights, ensure the outlet is GFCI-protected. Test with a GFCI tester to confirm it’s working.
- Start with Anchors: For permanent setups, install eye hooks or screw-in hooks at your hanging points. Space them 6-12 inches apart for even weight distribution.
- Use Zip Ties for Flexibility: Zip ties are great for trees, railings, or fences. They’re adjustable and won’t damage surfaces. For a cleaner look, trim the excess ends.
- Hang Lights in Sections: Don’t try to hang the entire strand at once. Work in 10-15 foot sections, starting from one anchor point and moving to the next.
- Secure the Cord: Use clips or hooks to guide the power cord along a safe path. Avoid sharp edges or high-traffic areas.
- Test as You Go: Plug in the lights after each section to check for dead bulbs or connection issues.
Safety First: Avoiding Common Hazards
- Don’t Overload Outlets: Most outdoor outlets can handle 15-20 amps. A single strand of LED lights uses about 0.5 amps, so you can safely connect 20-30 strands. But always check the manufacturer’s specs.
- Use Outdoor-Rated Cords: Never use indoor extension cords outside. Look for labels like “SJTW” or “W-A” for weather resistance.
- Keep Cords Dry: Elevate cords off the ground with clips or hooks. If they must cross a walkway, use a cord cover.
- Inspect Regularly: Check for frayed wires, loose bulbs, or water damage. Replace damaged strands immediately.
Real-World Example
Lisa, a busy mom in Texas, wanted a simple setup for her small patio. She avoided drilling by using 3M Command hooks on her pergola. She hung her lights in a zigzag pattern with zip ties, then ran the power cord along the railing with outdoor clips. Total time? Two hours. And no damage to her home!
Creative DIY Ideas to Personalize Your Space
Why stop at plain string lights? With a little creativity, you can turn your patio string lights DIY project into a unique work of art. Here are some fun ideas to inspire you.
1. Themed Light Displays
Match your lights to your patio’s style:
- Romantic Boho: Mix fairy lights with paper lanterns and tassels. Hang them from a macramé hammock stand.
- Rustic Farmhouse: Use vintage-style Edison bulbs in a grid pattern. Add mason jars with candles for extra glow.
- Tropical Oasis: Pair colored LEDs with tiki torches and palm-leaf string lights.
- Modern Minimalist: Stick to white LED strands in a clean, geometric pattern. Add sleek, black metal hooks.
2. Upcycled Light Covers
Give your lights a custom look with DIY covers:
- Wine Cork Bulbs: Glue wine corks around bulbs for a rustic, textured look. (Use LED bulbs only—no heat!)
- Paper Shades: Cut geometric shapes from cardstock and attach them to bulbs with glue or tape.
- Jars and Bottles: Place small LED bulbs inside glass jars or wine bottles for a lantern effect.
3. Interactive Lighting
Make your lights part of the experience:
- Light “Chandeliers”: Hang a cluster of lights inside a large basket or wire frame. Suspend it over a dining table.
- Shadow Play: Cut leaf or star shapes from cardboard and attach them to lights. Project shadows onto a wall or fence.
- Color-Changing Zones: Use smart lights to create zones—blue for the lounge area, red for the fire pit.
4. Seasonal Swaps
Keep your patio fresh year-round:
- Spring: Add pastel-colored bulbs or floral-shaped lights.
- Summer: Go for bright whites or blues. Add solar-powered firefly lights for a playful touch.
- Fall: Use warm oranges and yellows. Pair with pumpkins and hay bales.
- Winter: Switch to cool whites or twinkling lights. Add snowflake covers or icicle-style strands.
Real-World Example
Carlos, an artist in Arizona, turned his patio into a gallery. He hung LED string lights in a grid, then clipped handmade paper lanterns (cut from old maps and book pages) onto the strands. The result? A personalized, artistic display that changes with the seasons.
Maintenance and Longevity: Keeping Your Lights Shining
Your patio string lights DIY setup can last for years with proper care. Here’s how to keep them shining bright.
Seasonal Maintenance Checklist
- Spring: Inspect for winter damage. Replace burnt-out bulbs. Clean dust and pollen from bulbs and cords.
- Summer: Check for water damage after storms. Ensure cords are elevated and dry.
- Fall: Trim branches that might fall on lights. Store lights if you’re in a snowy climate.
- Winter: In cold climates, consider taking down lights to prevent ice damage. Store in a cool, dry place.
Prolonging Lifespan
- Use Timers: Turn lights on only when needed. A simple plug-in timer can save energy and extend bulb life.
- Store Properly: When not in use, coil lights loosely and store in a breathable bag (not a plastic bin, which traps moisture).
- Upgrade Bulbs: If you have incandescent lights, consider switching to LED retrofit bulbs for better efficiency.
- Check Connections: Loose or corroded connections can cause flickering. Tighten hooks and replace damaged plugs.
Troubleshooting Common Issues
- Flickering Lights: Usually caused by a loose bulb or bad connection. Tighten the bulb or check the plug.
- Dead Strand: Test with a bulb tester. If one bulb is out, the whole strand may go dark (especially in older models). Replace the bulb or the entire strand.
- Water Damage: If water gets into the socket, dry it thoroughly before use. Consider using waterproof caps for outdoor connections.
| Issue | Likely Cause | Solution |
|---|---|---|
| Flickering lights | Loose bulb or connection | Tighten bulb; check plug |
| Entire strand dead | Burnt-out bulb or fuse | Replace bulb or fuse |
| Water in socket | Damaged seal | Replace socket or strand |
| Dim lights | Overloaded circuit | Use fewer strands or a higher-amp outlet |
Real-World Example
After a rainy season, Maria noticed her lights were dim. She found water had seeped into one socket. She dried it with a hairdryer, replaced the bulb, and added waterproof caps to all connections. Problem solved—and no more flickering!
Conclusion: Light Up Your Life, One Strand at a Time
There’s a special kind of magic in a well-lit patio. It’s not just about visibility—it’s about creating a mood, a vibe, a place where memories are made. With patio string lights DIY, you’re not just buying a product; you’re crafting an experience. Whether you go for a simple zigzag between trees or an elaborate grid with custom lanterns, the result is a space that feels warm, welcoming, and uniquely yours.
Remember, the best projects start with a plan, a few tools, and a little patience. Choose lights that match your style, install them safely, and don’t be afraid to get creative. And when you’re done? Step back, pour yourself a drink, and admire your handiwork. Because there’s nothing quite like the glow of lights you put up yourself.
So go ahead—string up those lights, invite your friends over, and let your patio shine. After all, summer nights are meant to be enjoyed, and with a little DIY spirit, your outdoor space can be the star of the season.
Frequently Asked Questions
How do I install patio string lights DIY without drilling holes?
Use adhesive hooks, tension rods, or wrap lights around existing structures like pergolas or trees. This patio string lights DIY method keeps your walls damage-free while creating a cozy ambiance.
What type of string lights work best for outdoor DIY projects?
Opt for weatherproof LED string lights with a high IP rating (IP65 or higher) to withstand rain and sun. These are energy-efficient and last longer for your patio string lights DIY setup.
Can I connect multiple patio string lights together?
Yes, most outdoor string lights are connectable—just check the manufacturer’s maximum wattage or strand limit. Always plug them into a GFCI outlet for safety during your DIY installation.
How do I hide the wires when doing patio string lights DIY?
Use cable clips, raceways, or tuck wires behind gutters or railings for a clean look. For a natural touch, weave lights through plants or wrap them around posts.
What’s the easiest way to power patio string lights in a large yard?
Use an outdoor-rated extension cord with a timer or solar-powered lights to avoid long cable runs. Solar options are ideal for DIYers wanting hassle-free, off-grid patio string lights.
How do I create a DIY patio string lights canopy?
Stretch a guide wire between two anchor points (trees, poles, or walls) and clip your lights onto it using carabiners or zip ties. This DIY trick creates a stunning overhead glow with minimal effort.

