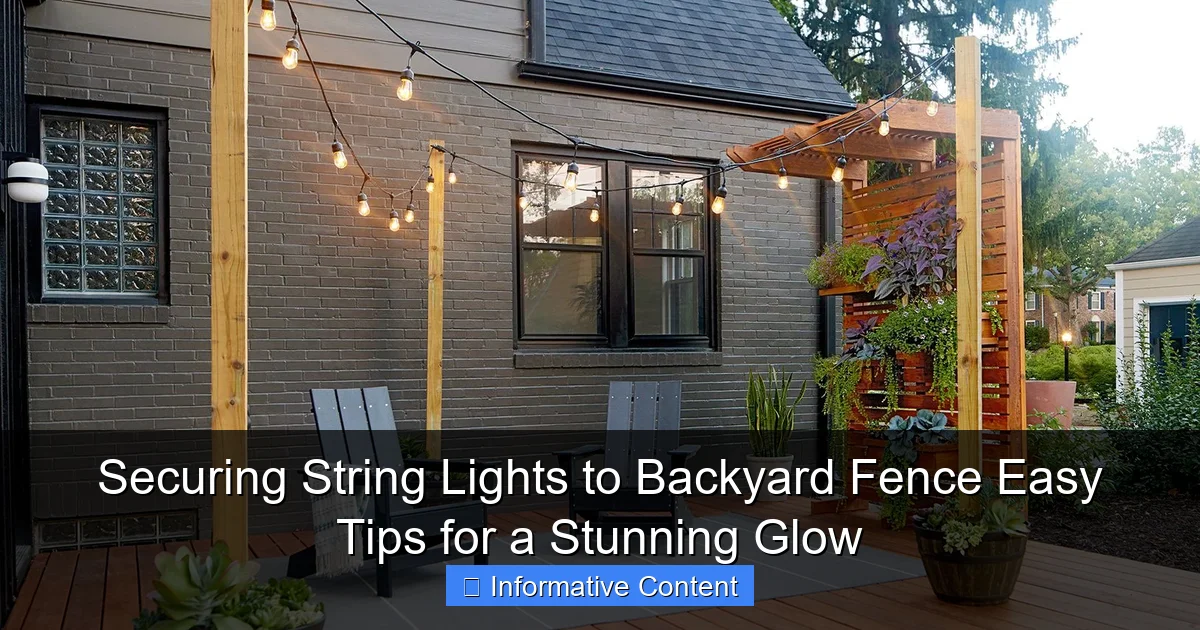
Featured image for securing string lights to backyard fence
Image source: bhg.com
Securing string lights to your backyard fence is effortless with the right tools and techniques—use weather-resistant hooks, zip ties, or adhesive clips designed for outdoor use to ensure a safe, long-lasting glow. Plan your layout first, spacing lights evenly and avoiding sagging for a polished, professional look that transforms your outdoor space into a stunning nighttime retreat.
Key Takeaways
- Plan spacing first: Measure and mark light placement for even, balanced illumination.
- Use durable clips: Opt for weatherproof, fence-specific clips to prevent sagging.
- Secure tightly: Fasten lights snugly but avoid over-tightening to protect wires.
- Anchor at corners: Reinforce turns and ends to maintain tension and alignment.
- Check bulb height: Ensure lights hang safely above reach to avoid damage.
- Test before finalizing: Power on lights early to troubleshoot placement or faults.
📑 Table of Contents
- Why String Lights Belong on Your Backyard Fence
- Choosing the Right String Lights for Your Fence
- Preparing Your Fence for Installation
- Top Methods for Securing String Lights to Fence
- Pro Tips for a Professional-Looking Installation
- Maintaining Your Fence Lighting for Year-Round Glow
- Comparison Table: String Light Mounting Methods
- Final Thoughts: Enjoy the Glow
Why String Lights Belong on Your Backyard Fence
There’s something magical about stepping into a backyard lit with the soft, warm glow of string lights. Whether you’re hosting a summer barbecue, enjoying a quiet evening with a book, or celebrating a special occasion, string lights instantly transform a simple outdoor space into a cozy, inviting retreat. I remember the first time I strung lights across my own backyard fence—it felt like I’d unlocked a secret level of outdoor ambiance. The transformation was so striking, even my neighbors stopped to admire it.
But here’s the thing: hanging string lights on a fence isn’t always as simple as it looks. Without the right approach, you risk lights sagging, falling, or even damaging your fence. And let’s be honest—no one wants to spend their evening reattaching lights every few days. That’s why knowing how to secure string lights to backyard fence properly is key. It’s not just about aesthetics; it’s about creating a durable, safe, and long-lasting setup that lets you enjoy that stunning glow night after night. In this guide, I’ll walk you through everything you need to know—from choosing the right lights to installation tricks that actually work.
Choosing the Right String Lights for Your Fence
Before you start hammering hooks or wrapping wires, take a moment to pick the right kind of string lights. Not all lights are created equal, and choosing the wrong type can lead to frustration down the line. Think of it like picking the right tool for a job—you wouldn’t use a butter knife to cut wood, right?
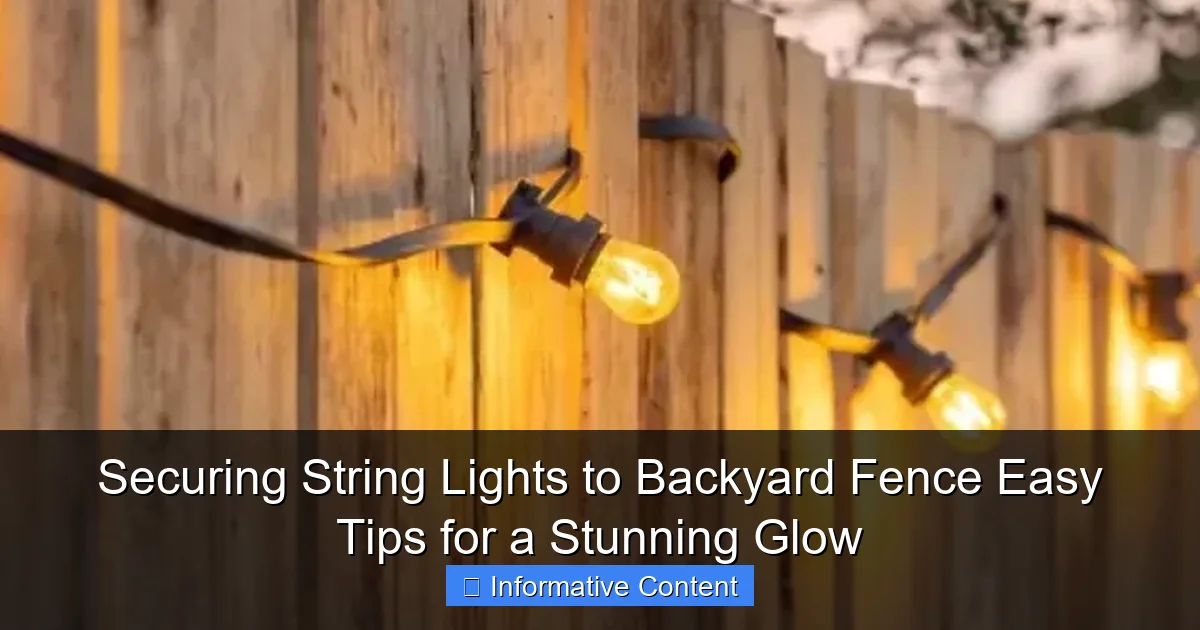
Visual guide about securing string lights to backyard fence
Image source: cdn-fastly.upgradedhome.com
LED vs. Incandescent: What’s the Difference?
LED string lights are the clear winner for most backyard setups. They use up to 80% less energy, last 25 times longer than traditional bulbs, and stay cool to the touch—making them safer around kids, pets, and dry vegetation. I switched to LEDs after my old incandescent set burned out after just one season. Now, my lights have been shining for over four years with zero bulb replacements.
Incandescent lights, while warmer in tone, generate heat, consume more power, and have a shorter lifespan. They’re fine for temporary setups, but if you’re going for long-term use, LEDs are the smarter, more eco-friendly choice.
Indoor vs. Outdoor Rated Lights
Always check the label: outdoor-rated string lights are designed to withstand rain, UV exposure, and temperature swings. Indoor lights might look the same, but they lack the protective coating and waterproof seals needed for backyard use. I learned this the hard way when my indoor-rated lights shorted out after a summer storm—lesson learned!
Look for an IP44 or higher rating (the “IP” stands for Ingress Protection), which means the lights are protected against splashing water and dust. For coastal areas or regions with heavy rain, aim for IP65 or IP67 for added durability.
Length, Spacing, and Power Source
Measure your fence before buying. You’ll want enough length to cover your space with a little extra for draping or wrapping posts. Most string lights come in 10- to 50-foot strands. If your fence is 40 feet long, a 48-foot strand gives you 4 feet of slack—perfect for wrapping corners or adding a slight drape.
Also, consider the bulb spacing. Standard spacing is 6 to 12 inches. Closer spacing gives a denser glow, while wider spacing creates a more minimalist, twinkling effect. And don’t forget the power source: solar-powered lights are great for off-grid areas, while plug-in models offer consistent brightness (just make sure you have a GFCI-protected outdoor outlet nearby).
Preparing Your Fence for Installation
You wouldn’t paint a wall without cleaning it first—so don’t skip prep when securing string lights to backyard fence. A little preparation now saves time, effort, and headaches later.
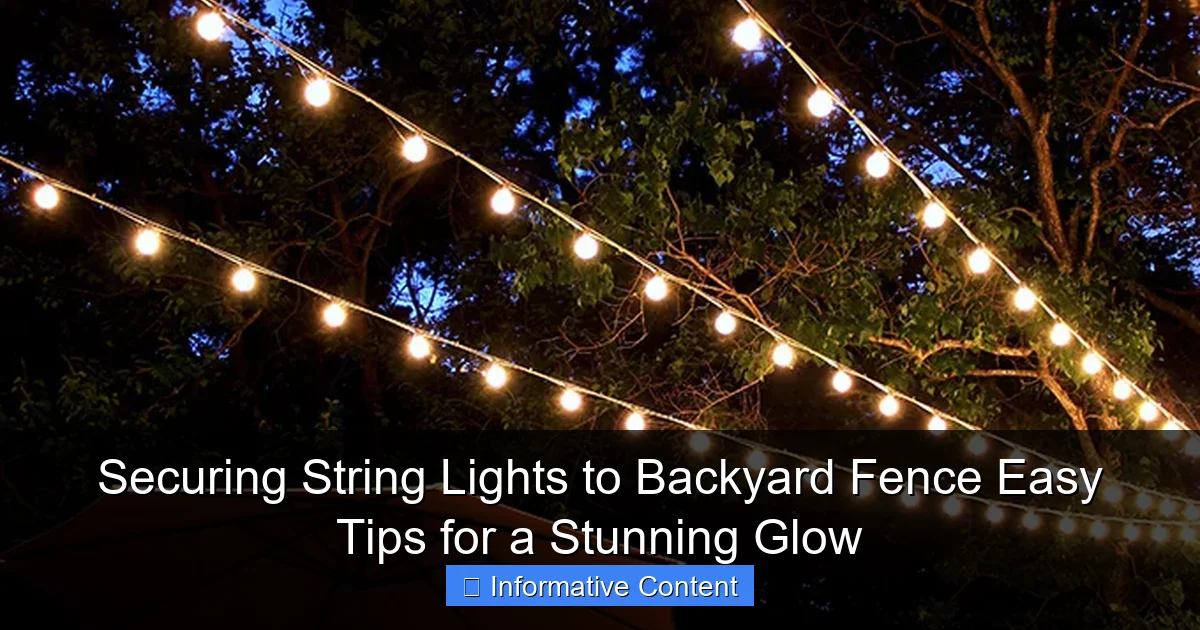
Visual guide about securing string lights to backyard fence
Image source: grayhousestudio.com
Inspect and Clean the Fence
Walk along your fence and check for loose boards, splinters, or rotting wood. Tighten any loose screws, sand down rough edges, and remove debris like leaves or cobwebs. A clean, stable fence ensures your lights stay put and reduces the risk of damage.
For vinyl or metal fences, wipe down surfaces with a damp cloth. Wooden fences benefit from a mild soap-and-water mix. Avoid harsh cleaners that could degrade paint or sealant.
Check Fence Height and Layout
Most fences are 4 to 6 feet tall—ideal for string lights. But if your fence has varying heights (like a stepped design), plan your lighting path accordingly. You might need longer strands or extension cords to bridge gaps.
Sketch a quick layout on paper or use painter’s tape to mark where lights will go. This helps you visualize spacing and avoid overcrowding or awkward gaps. Pro tip: leave a few inches of slack at corners so the lights can bend smoothly without straining the wire.
Weatherproofing and Safety Checks
Even outdoor-rated lights need extra protection in harsh conditions. If your area gets heavy rain, snow, or high winds, consider using weatherproof light clips or conduit sleeves for exposed wires. Also, ensure all connections (especially plug ends) are elevated off the ground to prevent water pooling.
And here’s a safety must: never daisy-chain more than three standard 20-watt string light strands. Overloading circuits can cause overheating or tripped breakers. Use a power distribution block or multiple outlets if you’re covering a large area.
Top Methods for Securing String Lights to Fence
Now for the fun part—actually hanging the lights! There are several reliable ways to secure string lights to backyard fence, each with its own pros and cons. Choose the method that best fits your fence type, climate, and aesthetic goals.
1. Use Outdoor-Rated Light Clips
These are my go-to. Made of UV-resistant plastic, light clips attach to fence posts, rails, or pickets without nails or screws. They have a loop that holds the wire snugly, and many are designed to accommodate multiple strands.
To install: simply snap the clip onto the fence, then thread the light wire through the loop. Spacing them every 12 to 18 inches keeps the lights taut and prevents sagging. I use these on my wooden fence and love how easy they are to adjust or remove.
Best for: wooden, vinyl, and metal fences. Avoid on rough or splintered wood—clips need a smooth surface to grip.
2. Try Command Outdoor Hooks
If you’re renting or don’t want to leave permanent marks, Command Outdoor Hooks are a game-changer. These adhesive hooks are designed for outdoor use and hold up to 2 pounds—perfect for most string light strands.
Clean the fence surface with rubbing alcohol, press the hook firmly for 30 seconds, and wait an hour before hanging lights. I’ve used them through summer heat and winter frost with no peeling or slipping.
Best for: renters, temporary setups, or fences you want to keep pristine.
3. Install Eye Screws or Cup Hooks
For a permanent, ultra-secure option, drill in stainless steel eye screws or cup hooks. These metal fasteners can handle heavy-duty lights or multiple strands. I used them on my backyard pergola and haven’t had a single issue in three years.
Space hooks every 2 to 3 feet, screwing them into fence posts or sturdy rails. Use a level to keep them aligned, and thread the lights through the eye or cup. For extra security, tie a knot in the wire behind the hook.
Best for: long-term installations, windy areas, or heavy-duty lighting.
4. Wrap Around Fence Posts (With Caution)
Wrapping lights around posts creates a whimsical, boho look. But be careful—over-tightening can stress the wire or damage the fence. Use zip ties or twist ties to secure the lights at the top and bottom of each post, leaving the middle free to drape.
I like to wrap 2-3 times around each post, then let the lights hang down in a gentle arc. This method works best with lightweight LED strands.
Best for: decorative, non-load-bearing setups. Avoid on weak or rotting posts.
5. Use Zip Ties (For Temporary or Quick Fixes)
Need a quick solution? UV-resistant zip ties are cheap, easy, and surprisingly strong. Wrap them around fence rails or posts, thread the light wire through the tie, and snip off the excess.
Just don’t overtighten—zip ties can cut into the wire insulation over time. And remember: they’re not as adjustable or removable as clips or hooks.
Best for: temporary events, rentals, or last-minute lighting.
Pro Tips for a Professional-Looking Installation
Great lighting isn’t just about hanging lights—it’s about creating a cohesive, polished look. These pro tips will help your setup go from “DIY” to “designer-approved.”
Create a Balanced Layout
Avoid the “Christmas light” effect by spacing your lights evenly and avoiding clusters. A good rule of thumb: if you can see the wire, it’s too tight. Let the lights have a slight drape (about 1-2 inches of sag between supports) for a natural, flowing look.
I like to step back and view the fence from different angles—especially from the house or patio. This helps spot gaps or unevenness before the lights go up for good.
Use Extension Cords Wisely
Need to reach an outlet? Use outdoor-rated extension cords with built-in GFCI protection. Keep cords off the ground by routing them along fence rails or using cord clips. For a cleaner look, tuck cords behind bushes or under planters.
And please—never run cords across walkways. Use a cord cover or bury them under mulch (if safe and permitted).
Layer Your Lighting
String lights don’t have to stand alone. Combine them with pathway lights, lanterns, or uplighting for depth and dimension. For example, I hang string lights along the fence, then place solar lanterns on the ground to create a “floating” effect.
You can also drape lights over nearby trees, pergolas, or railings to extend the glow beyond the fence.
Test Before You Commit
Plug in the lights before securing them permanently. Check for dim bulbs, flickering, or dead sections. It’s much easier to fix a problem while the lights are loose than after they’re clipped in place.
Also, test the on/off switch or remote (if you have smart lights) to ensure everything works as expected.
Maintaining Your Fence Lighting for Year-Round Glow
Once your lights are up, don’t just forget about them. A little maintenance keeps your setup looking great and lasting longer.
Seasonal Cleaning and Inspection
Every 3-6 months, unplug and inspect your lights. Look for frayed wires, cracked bulbs, or loose connections. Gently wipe down bulbs and wires with a dry microfiber cloth. For stubborn grime, use a damp cloth (but never submerge the lights).
Check clips, hooks, and fasteners for wear. Replace any that are cracked, rusted, or loose.
Store Properly Off-Season
If you take lights down in winter, store them correctly. Wrap the strand around a cardboard rectangle or a dedicated light reel to prevent tangling. Store in a cool, dry place—avoid damp basements or attics.
Label each strand so you know which is which next season. (Yes, I’ve spent hours untangling “mystery lights” before—don’t be me.)
Upgrade When Needed
Even the best lights eventually wear out. If your lights are dim, flickering, or have multiple dead sections, it might be time to upgrade. Newer models offer better energy efficiency, brighter LEDs, and smart features like app control or color-changing modes.
And if your fence has changed (e.g., repainted, repaired, or replaced), reassess your mounting method. What worked before might not work now.
Comparison Table: String Light Mounting Methods
| Method | Best For | Durability | Removability | Cost |
|---|---|---|---|---|
| Outdoor Light Clips | Wood, vinyl, metal fences | High (UV-resistant) | Easy to remove/reuse | $ |
| Command Outdoor Hooks | Renters, temporary setups | Medium (adhesive can weaken) | Very easy (no damage) | $$ |
| Eye Screws/Cup Hooks | Permanent installations | Very high (metal) | Hard (leaves holes) | $ |
| Zip Ties | Quick fixes, events | Medium (UV-resistant) | Moderate (cut to remove) | $ |
| Wrapping Posts | Decorative, light strands | Low (can damage wire) | Easy | $ |
Final Thoughts: Enjoy the Glow
Securing string lights to your backyard fence isn’t just about aesthetics—it’s about creating a space where memories are made. Whether it’s a family dinner under the stars, a quiet night with a glass of wine, or a spontaneous dance party with friends, those soft, golden lights set the mood.
The key to a stunning, long-lasting setup is preparation, the right tools, and a little patience. Choose quality outdoor-rated lights, prep your fence, and pick a mounting method that fits your needs. Don’t be afraid to experiment—sometimes the best ideas come from trial and error.
And remember: the goal isn’t perfection. It’s ambiance. A few gentle sags, a little asymmetry, or a strand that dips lower than the rest? That’s character. That’s charm. That’s your backyard, glowing just the way you like it.
So grab your lights, pick your favorite method, and get to work. Before you know it, you’ll be stepping into your very own illuminated oasis—one that’s not just beautiful, but built to last. Now go enjoy that stunning glow.
Frequently Asked Questions
What’s the best way to secure string lights to a backyard fence without damaging it?
Use removable hooks, adhesive clips, or zip ties designed for outdoor use to avoid drilling or stapling. These options hold lights firmly while protecting your fence from scratches or holes.
How do I keep string lights from sagging between fence posts?
Install tension wire or use adjustable zip ties to create a taut base for your lights. Space attachment points every 12–18 inches to prevent drooping, especially for longer runs.
Can I use nails or screws to secure string lights to a wooden fence?
Yes, but opt for small cup hooks or eye screws instead of nails to minimize damage. They’re easier to install, remove, and reposition if you want to change your lighting layout later.
What are the safest methods to secure string lights to a vinyl or metal fence?
For vinyl/metal fences, use outdoor-rated adhesive hooks, magnetic clips, or UV-resistant zip ties. Avoid abrasive tools that could scratch or weaken the material over time.
How do I prevent wind from pulling my string lights off the fence?
Anchor lights with double-sided outdoor tape or twist ties at multiple points, and loop excess cord around fence posts. For extra security, choose clips with locking mechanisms.
Do I need special hardware to secure string lights to a backyard fence for year-round use?
Yes—use weatherproof, rust-resistant clips, hooks, or cable raceways to ensure durability. These materials withstand rain, snow, and humidity without loosening or corroding.

