
Featured image for string light fence pole
Image source: i2.wp.com
Transform your backyard into a glowing oasis with string light fence poles—an easy, stylish way to add ambiance and extend outdoor enjoyment after dark. From DIY installations to adjustable commercial kits, these poles keep lights taut and secure, eliminating sagging and maximizing visual impact.
Key Takeaways
- Choose durable materials: Opt for weather-resistant metals or treated wood for long-lasting fence poles.
- Plan spacing carefully: Position poles 6-8 feet apart for optimal string light coverage and stability.
- Mix heights creatively: Vary pole heights to add visual interest and dimension to your lighting design.
- Secure installation matters: Use concrete footings or ground sleeves to keep poles steady in all weather.
- Layer lighting effects: Combine string lights with solar or LED spotlights for dynamic ambiance.
- Consider power sources: Plan for outlets or solar options before installing poles to avoid last-minute hassles.
📑 Table of Contents
- String Light Fence Pole Ideas to Brighten Your Outdoor Space
- Why Use String Light Fence Poles? The Benefits You Didn’t Know You Needed
- Types of String Light Fence Poles: Choosing the Right One for Your Space
- Creative String Light Fence Pole Setups to Inspire You
- How to Install String Light Fence Poles: A Step-by-Step Guide
- Top Tips for Long-Lasting, Beautiful Lighting
- String Light Fence Pole Comparison Table
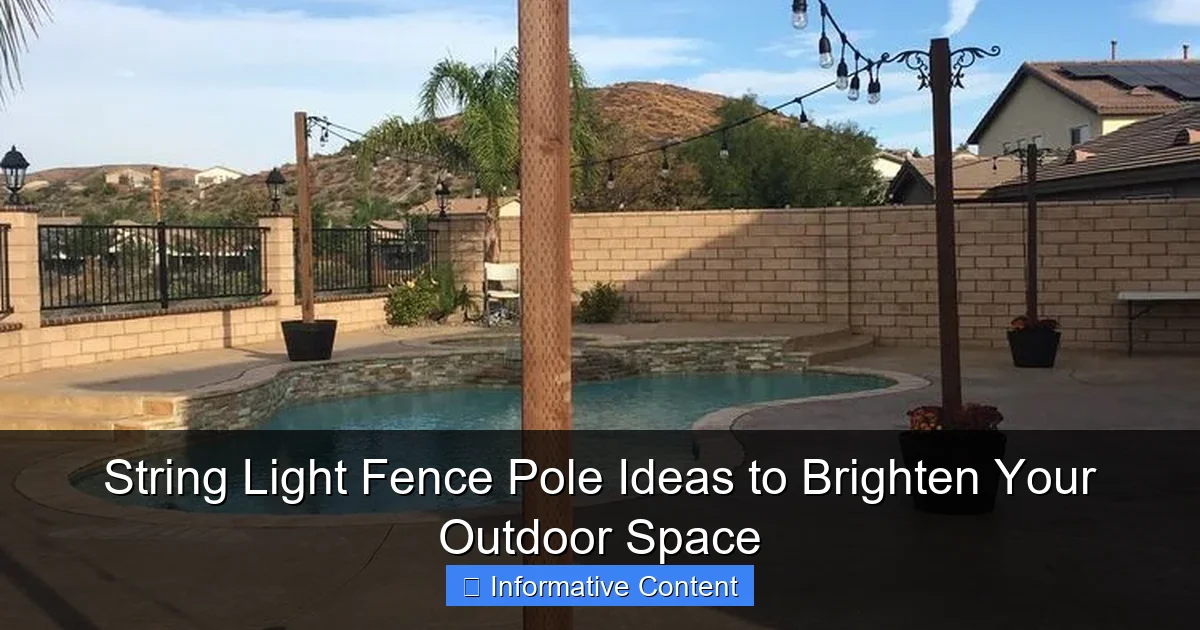
String Light Fence Pole Ideas to Brighten Your Outdoor Space
Imagine this: it’s a warm summer evening. You’re sitting in your backyard with a glass of lemonade, the sun has dipped below the horizon, and suddenly, your space transforms. Tiny glowing orbs appear along your fence line, casting a soft, inviting glow over your patio, garden, or pool area. That’s the magic of string light fence poles—simple, affordable, and instantly transformative.
Whether you’re hosting a dinner party, enjoying a quiet night with a book, or just want to make your yard feel more welcoming, string lights can do wonders. But here’s the catch: hanging them directly on a fence often leads to sagging, tangled wires, or damage to your fence. That’s where string light fence poles come in. These clever, often overlooked tools elevate your lighting game—literally and figuratively. They keep your lights taut, safe, and beautifully spaced, all while adding structure and style to your outdoor decor. In this guide, we’ll explore creative ideas, practical setups, and real-life tips to help you use string light fence poles to create a backyard you’ll never want to leave.
Why Use String Light Fence Poles? The Benefits You Didn’t Know You Needed
You might be thinking, “Can’t I just nail the lights to the fence?” Sure, you can—but you probably shouldn’t. While it might seem like a quick fix, it comes with a few hidden headaches. Let’s break down why string light fence poles are a smarter, more sustainable solution for your outdoor lighting.
Visual guide about string light fence pole
Image source: i.pinimg.com
1. Protect Your Fence from Damage
Wooden, vinyl, or composite fences aren’t built to handle constant tension from hanging lights. Nailing or stapling lights directly to the fence can cause cracks, warping, or even rot over time. Metal fences? They’re tough, but constant pressure from lights can lead to bending or rust spots where the metal is punctured. String light fence poles act as a buffer, keeping the weight and tension off your fence entirely. They’re like bodyguards for your backyard—protecting it from wear and tear.
2. Achieve a Clean, Professional Look
Ever hung string lights and ended up with a droopy, uneven mess? That’s because fences aren’t always perfectly straight or sturdy enough to hold tension. Poles, on the other hand, are designed to be vertical and strong. When you mount your lights between poles, you get a taut, even line that looks polished and intentional. Think of it like framing a picture—the poles are the frame, and the lights are the artwork.
3. Greater Flexibility in Design
Fences limit you to a single plane—usually a straight line along the edge of your yard. But with poles, you can create zigzags, curves, or even a canopy effect. Want to drape lights over a seating area? Use two poles on either side and run lights across. Want to highlight a garden path? Place poles at intervals and weave lights between them. The possibilities expand dramatically when you’re not tied to the fence.
4. Easier Installation and Maintenance
Installing lights on a fence often means climbing a ladder, hammering nails, or dealing with tangled cords. With poles, you can set them up once and leave them in place. Many models are freestanding or stake into the ground, so you don’t need to drill into your fence or dig deep holes. If a bulb burns out or a string needs replacing, you can access it easily without climbing or dismantling your entire setup.
5. Weather Resistance and Longevity
High-quality string light fence poles are made from weather-resistant materials like powder-coated steel, aluminum, or treated wood. They’re built to withstand sun, rain, wind, and snow—much better than your fence, which may not be as durable. This means your lighting setup lasts longer and looks better season after season.
Types of String Light Fence Poles: Choosing the Right One for Your Space
Not all poles are created equal. The right choice depends on your yard’s layout, your aesthetic preferences, and how permanent you want the setup to be. Let’s explore the most common types and when to use each.
Visual guide about string light fence pole
Image source: uglyducklinghouse.com
Freestanding Poles
These are the most popular and versatile option. They come with a weighted base (often filled with sand or water) and don’t require any permanent installation. Great for renters or anyone who wants to move their setup seasonally. Example: The “Garden Light Pole” by Brighten Up has a 20-pound base and stands 7 feet tall. It’s easy to assemble and disassemble, making it perfect for patios, balconies, or temporary events.
- Pros: No drilling, easy to relocate, great for small spaces
- Cons: Can tip over in strong winds if not properly weighted
- Best for: Urban balconies, small patios, renters
Stake-in-the-Ground Poles
These poles have a pointed end that you drive into the ground, usually with a rubber mallet. They’re sturdier than freestanding poles and great for grassy or soft-soil areas. Example: The “Outdoor String Light Pole Kit” includes four 8-foot steel poles with ground stakes. It’s ideal for lining a garden path or creating a canopy over a dining area.
- Pros: Very stable, no base needed, works in soft ground
- Cons: Not suitable for concrete or hard surfaces
- Best for: Backyards, gardens, grassy lawns
Wall-Mounted or Fence-Attached Poles
These are brackets or arms that attach to your existing fence or wall, extending outward to hold string lights. They keep the lights elevated and away from the fence surface. Example: The “Fence Light Arm” by LumaOutdoor clamps onto a fence post and holds a horizontal arm 12 inches away. This keeps lights off the wood and creates a floating effect.
- Pros: No ground installation, minimal footprint, good for tight spaces
- Cons: Still attaches to the fence (though less invasive)
- Best for: Narrow yards, decks, areas with limited ground space
Adjustable Height Poles
Want to change your lighting height for different events? These poles have telescoping sections that let you raise or lower them. Example: The “Telescopic Light Pole” adjusts from 5 to 10 feet. Perfect for switching from ambient evening lighting to brighter party mode.
- Pros: Customizable height, reusable for different setups
- Cons: More expensive, slightly less stable at max height
- Best for: Multi-use spaces, event planners, frequent entertainers
Decorative or Themed Poles
Some poles double as garden decor. Think solar lantern tops, birdhouse designs, or vintage-style lamp posts. These add charm and function. Example: The “Rustic Wooden Light Pole” has a lantern-style top with a built-in hook for string lights. It blends into a cottage garden or farmhouse yard.
- Pros: Aesthetic appeal, dual-purpose (decor + function)
- Cons: Limited adjustability, may not fit all light styles
- Best for: Garden paths, themed yards, vintage or rustic aesthetics
Creative String Light Fence Pole Setups to Inspire You
Now that you know the types, let’s get creative. Here are five real-world setups that show how string light fence poles can elevate your outdoor space—no matter the size or style.
1. The Cozy Canopy (Perfect for Patios)
Use two or more poles to create a “roof” of lights over your seating area. Place poles at each corner of your patio and run string lights across the top, forming a grid or crisscross pattern. Tip: Use warm white or Edison-style bulbs for a romantic, intimate feel. Add sheer curtains between poles for extra coziness.
Real-life example: Sarah from Portland used four 7-foot poles to create a canopy over her 10×12 ft patio. She hung Edison bulbs in a diamond pattern and added a few hanging plants. “It feels like an outdoor living room,” she says. “I use it every night in summer.”
2. The Garden Path Illuminator
Line a walkway or garden path with poles spaced 6–8 feet apart. Use shorter poles (5–6 ft) and drape lights between them at waist height. This creates a magical tunnel effect. Tip: Choose poles with built-in hooks or eyelets to make stringing easier. Use solar-powered lights for eco-friendly, low-maintenance glow.
Real-life example: The Thompson family in Colorado used 12 stake-in poles along their 50-foot garden path. They chose soft amber lights to complement their native wildflowers. “It’s like walking through a fairy tale,” says Mrs. Thompson. “And the kids love it at night.”
3. The Floating Fence Effect
Attach wall-mounted arms to your fence, then run lights from one arm to the next, keeping them 6–12 inches away from the fence. This creates a “floating” look, as if the lights are hanging in mid-air. Tip: Use transparent or clear hooks to keep the focus on the lights, not the hardware.
Real-life example: James in Austin used 10 fence arms along his backyard fence. He hung 100-foot string lights in a zigzag pattern. “It’s subtle but stunning,” he says. “Guests always ask how I did it.”
4. The Party Zone
Hosting a backyard bash? Set up a cluster of poles in a U-shape around your grill or bar area. Run lights between them at different heights to create depth and dimension. Add colored lights or fairy lights for a festive touch. Tip: Use poles with built-in outlets to plug in speakers or a mini-fridge.
Real-life example: The Rivera family uses six adjustable poles for their summer parties. They switch between white, blue, and purple lights depending on the event. “It’s like having a backyard nightclub,” says Mr. Rivera.
5. The Poolside Glow
Line your pool deck with poles to create a safe, beautiful perimeter. Use waterproof lights and poles with rust-resistant coatings. Run lights just above the water line for a reflective effect. Tip: Install poles at least 3 feet from the water’s edge to avoid splashes and electrical hazards.
Real-life example: The Kim family in Miami used eight stainless steel poles around their pool. They chose waterproof LED strings with a blue hue. “It’s so peaceful at night,” says Mrs. Kim. “Like swimming under the stars.”
How to Install String Light Fence Poles: A Step-by-Step Guide
Ready to set up your own string light fence poles? Don’t worry—it’s easier than it looks. Here’s a simple, foolproof method that works for most setups.
Step 1: Plan Your Layout
Grab a tape measure and sketch your space. Decide where you want poles (corners, midpoints, etc.) and how many you need. A good rule: space poles 6–10 feet apart for even lighting. Mark spots with stakes or spray paint.
Step 2: Choose Your Poles and Lights
Match your pole type to your space (see previous section). For lights, choose weatherproof, outdoor-rated strings. LED lights are best—they’re energy-efficient and last longer. Pro tip: Buy 10–20% more string length than your measured distance to allow for curves and slack.
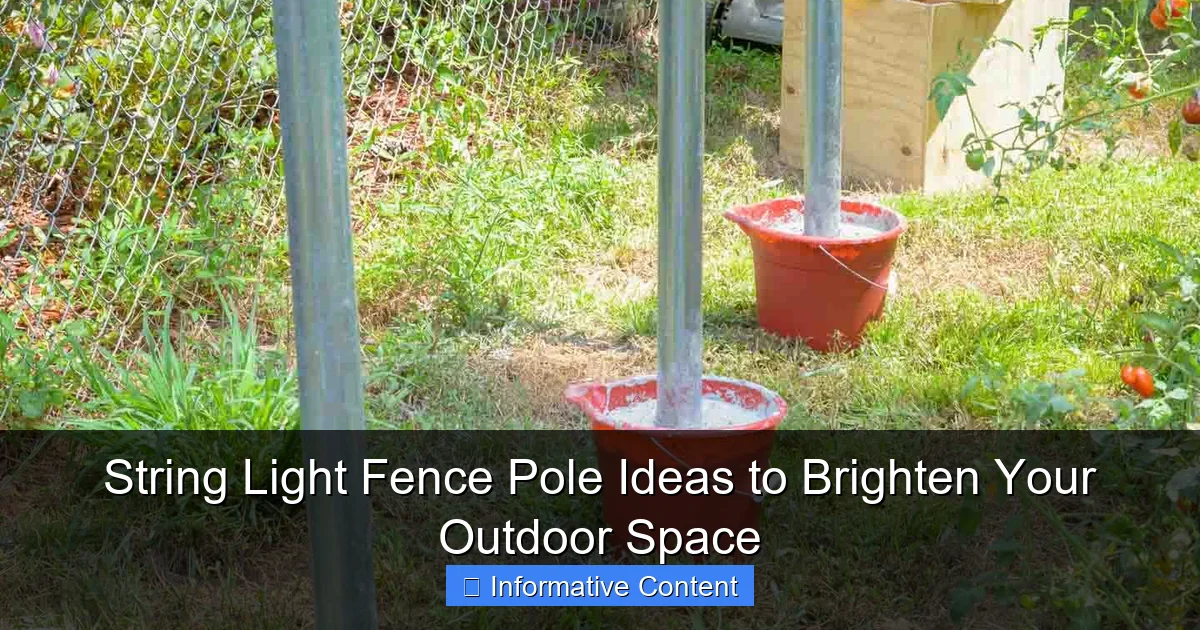
Step 3: Install the Poles
- Freestanding: Assemble the base, fill with sand or water, and place at marked spots.
- Stake-in: Use a rubber mallet to drive poles into the ground. Make sure they’re straight (use a level).
- Wall-mounted: Follow manufacturer instructions—usually involves clamps or screws.
Tip: For uneven ground, use adjustable feet or shims to keep poles vertical.
Step 4: String the Lights
Start at one end. Use S-hooks, carabiners, or built-in eyelets to attach lights to poles. Keep the string taut but not stretched. For long runs, use a second person to help feed the lights.
Trick: Use zip ties or light clips every 12–18 inches to keep strings straight and prevent sagging.
Step 5: Test and Adjust
Plug in the lights. Walk around and check for dark spots, sagging, or flickering. Adjust pole positions or add more clips as needed. If using a timer or smart plug, set it to turn on at dusk.
Step 6: Maintain Seasonally
Before winter, check for loose bulbs, frayed wires, or rust. Clean poles with mild soap and water. Store lights in a dry place if not using year-round. Replace bulbs as needed.
Top Tips for Long-Lasting, Beautiful Lighting
You’ve set up your string light fence poles—great! Now let’s make sure they look amazing for years to come. Here are insider tips from outdoor lighting pros.
Use the Right Fasteners
Don’t use nails or staples on poles. They can damage the finish and create weak points. Instead, use:
- S-hooks (for metal poles)
- Carabiners (easy to remove)
- Light clips or zip ties (for permanent setups)
- Eye screws (for wooden poles)
Bonus: Wrap lights around a pool noodle before hanging—it reduces tangling and makes storage easier.
Mind the Weather
Even “weatherproof” lights can suffer in extreme conditions. In high-wind areas, use shorter strings or add extra clips. In rainy climates, seal plug connections with electrical tape or use weatherproof covers. For snowy regions, avoid hanging lights too low—snow buildup can weigh them down.
Choose the Right Bulb Type
- Edison bulbs: Warm, vintage look—best for intimate spaces
- LED mini lights: Bright, energy-efficient—ideal for large areas
- Fairy lights: Delicate, sparkly—perfect for gardens or trees
- Colored lights: Festive, fun—great for parties or holidays
Note: Always check the wattage limit for your poles. Overloading can cause overheating.
Go Solar or Smart
Solar-powered lights charge during the day and turn on automatically at dusk—no wiring needed. Smart lights (like Philips Hue Outdoor) let you change colors, set schedules, or control via app. They’re a bit pricier but worth it for convenience.
Blend with Nature
Let your lights complement your yard, not compete with it. Use poles with natural finishes (wood, stone) in gardens. In modern spaces, sleek metal poles work best. Add greenery—wrap poles with ivy or hang potted plants nearby.
String Light Fence Pole Comparison Table
| Pole Type | Height Range | Installation | Best For | Estimated Cost (per pole) |
|---|---|---|---|---|
| Freestanding | 5–8 ft | Base assembly, no tools | Patios, balconies, renters | $30–$50 |
| Stake-in-the-Ground | 6–10 ft | Drive into soil with mallet | Gardens, lawns, paths | $25–$45 |
| Wall-Mounted Arm | Adjustable arm length | Clamp or screw to fence/wall | Narrow spaces, decks | $20–$40 |
| Adjustable Height | 5–10 ft | Telescoping sections | Multi-use, events | $50–$80 |
| Decorative | 6–7 ft | Varies (stake or base) | Garden paths, themed yards | $40–$70 |
Your outdoor space is more than just grass and fences—it’s a place for memories, relaxation, and connection. With string light fence poles, you can transform it into a glowing sanctuary that feels as good as it looks. Whether you want a cozy nook for two or a vibrant party zone, the right setup makes all the difference.
Remember: it’s not about spending the most money or using the fanciest lights. It’s about intention. A few well-placed poles, some thoughtful stringing, and a touch of creativity can turn any yard into a magical retreat. So grab your poles, pick your favorite lights, and start glowing. Your backyard is waiting.
Frequently Asked Questions
What are the best string light fence pole ideas for small yards?
For compact spaces, use slim metal poles spaced 6–8 feet apart with warm-white string lights draped in a zigzag pattern. This maximizes coverage without overwhelming the area.
Can I install string light poles directly into my existing fence?
Yes! Use fence-mounted brackets or screw-in hooks to attach poles or lights directly to wooden/metal fences—just ensure the material can support the weight.
How tall should my string light fence pole be for optimal lighting?
Poles 7–9 feet tall work best, keeping lights above head height but low enough to create intimate ambiance. Adjust based on fence height and seating areas.
Do I need special poles for uneven terrain?
Adjustable or telescoping poles help maintain even light distribution on slopes. Alternatively, install poles at varying heights for a dynamic, cascading effect.
What materials work best for DIY string light fence poles?
Durable, weather-resistant materials like powder-coated steel, aluminum, or cedar wood are ideal. Avoid untreated wood or thin PVC for long-term use.
How do I hide wires when using string light fence poles?
Route cords behind poles or fence boards, or use adhesive cable clips to secure them discreetly. For a seamless look, choose battery-powered or solar string lights.

