Featured image for string light pole fence
Image source: cdn.shopify.com
Transform your backyard into a magical retreat with string light pole fence ideas that blend ambiance and functionality. Easy to install and endlessly customizable, these setups use poles anchored to fences or ground mounts to suspend glowing strands, creating perfect lighting for entertaining or quiet evenings. Elevate your outdoor space with this simple, stylish upgrade.
Key Takeaways
- Plan spacing carefully: Ensure poles are 6-8 feet apart for optimal string light support.
- Use weatherproof materials: Choose rust-resistant poles and waterproof lights for lasting durability.
- Mix heights creatively: Vary pole heights to add depth and visual interest to your design.
- Anchor securely: Install poles with concrete or ground sleeves to withstand wind and weather.
- Layer lighting effects: Combine string lights with spotlights or lanterns for a dynamic glow.
- Hide cords neatly: Run wires through poles or along fence edges for a clean, polished look.
📑 Table of Contents
- Why String Light Pole Fences Are the Ultimate Outdoor Upgrade
- What Is a String Light Pole Fence (And Why You Need One)
- Planning Your String Light Pole Fence: Key Considerations
- Creative String Light Pole Fence Ideas (With Real Examples)
- Installation: A Step-by-Step Guide (With Pro Tips)
- Maintenance and Longevity: How to Keep Your Setup Looking Great
- Data: String Light Pole Fence Materials Comparison
- Final Thoughts: Light Up Your Life (Literally)
Why String Light Pole Fences Are the Ultimate Outdoor Upgrade
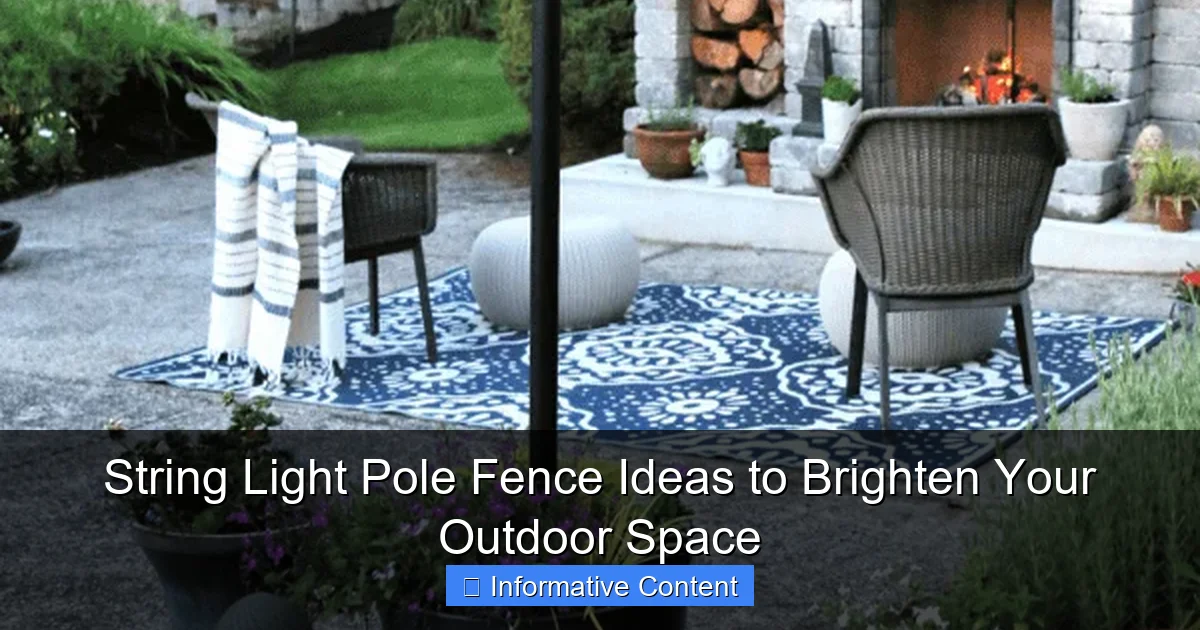
Imagine this: It’s a warm summer evening. The sun has just dipped below the horizon, and your backyard is bathed in a soft, golden glow. You’re sipping a cool drink, laughter fills the air, and the stars above are mirrored by tiny, twinkling lights strung across your fence. That’s the magic of a string light pole fence—a simple yet transformative way to elevate your outdoor space.
String lights aren’t just for holidays or weddings. When paired with a clever pole fence setup, they create a warm, inviting ambiance that’s perfect for everything from quiet family dinners to lively weekend gatherings. And the best part? You don’t need a degree in landscape design to pull it off. Whether you’re working with a tiny patio or a sprawling backyard, a string light pole fence is a flexible, affordable, and downright beautiful way to add charm and function to your outdoor area.
What Is a String Light Pole Fence (And Why You Need One)
Let’s start with the basics. A string light pole fence is a setup where vertical poles are installed along or near your existing fence (or in place of it), and string lights are hung between them to create a canopy, border, or accent lighting. It’s a hybrid solution that combines the structure of a fence with the whimsy and warmth of ambient lighting.
Visual guide about string light pole fence
Image source: todayscreativelife.com
How It Differs from Standard String Lights
Most people hang string lights from trees, eaves, or pergolas. But those options have limits: Not every yard has mature trees, and not every house has a roofline that works. A pole fence solves this. It gives you a dedicated, customizable framework to hang lights exactly where you want them. Think of it like building a “light fence” that doubles as a decorative boundary.
Benefits You Might Not Have Considered
- Year-round usability: With proper weatherproofing, these lights can stay up through all seasons, making your space usable even on crisp fall nights.
- Zoning your yard: Use the pole fence to define areas—like a dining nook, lounge, or fire pit zone—without building a full privacy fence.
- Low maintenance: Unlike plants or hedges, poles and lights don’t need watering, pruning, or pest control.
- Easy to customize: Swap out light colors, bulb styles, or pole heights to match the season or your mood.
I learned this firsthand when I redid my small backyard. My old wooden fence was sagging, and the string lights I’d tied to it kept drooping into the bushes. I replaced two sections with 7-foot metal poles spaced 6 feet apart, ran LED string lights across the top, and added a few diagonal lines for a crisscross effect. The result? A cozy, Instagram-worthy space that my neighbors still talk about.
Planning Your String Light Pole Fence: Key Considerations
Before you start drilling holes and stringing lights, take a step back and plan. A little prep goes a long way in avoiding headaches (and wasted materials).
Visual guide about string light pole fence
Image source: i.pinimg.com
1. Measure and Map Your Space
Grab a tape measure and sketch your yard. Note:
- Where existing structures (trees, sheds, patios) are located
- Where you want light coverage (e.g., along a seating area, across a pool deck)
- Any obstacles (sprinklers, power outlets, uneven ground)
For example, if your patio is 12 feet long, plan for poles every 5–6 feet. This spacing keeps lights taut and prevents sagging. If your yard slopes, stagger pole heights so the lights remain level.
2. Choose the Right Poles
Not all poles are created equal. Your options include:
- Metal (steel or aluminum): Durable and weather-resistant. Ideal for permanent setups. Look for powder-coated finishes to prevent rust.
- PVC or vinyl: Lightweight and affordable. Great for renters or temporary installations. But they can warp in extreme heat.
- Wood (cedar, redwood): Aesthetic and natural-looking. Requires sealing to prevent rot.
Pro tip: For a rustic look, repurpose old fence posts or even thick branches. Just sand and seal them first.
3. Power Source: Hardwired vs. Plug-In
- Plug-in: Easiest for beginners. Use outdoor-rated extension cords and GFCI outlets. But cords can be tripping hazards—hide them under mulch or use cord covers.
- Hardwired: Permanent and cleaner-looking. Requires an electrician to install outdoor outlets or run conduit. Best for long-term setups.
- Solar: No cords! Solar string lights charge during the day. But they’re dimmer and less reliable in cloudy climates.
I went with plug-in lights because I wanted flexibility. But I used a weatherproof outlet box (available at hardware stores) to protect the connection from rain. It’s been flawless for two years.
4. Light Types and Spacing
Match your bulbs to your vibe:
- LED: Energy-efficient, long-lasting (25,000+ hours), and cool to the touch. Available in warm white, cool white, or colors.
- Incandescent: Warmer glow, but less efficient and shorter lifespan. Best for occasional use.
- Edison bulbs: Vintage look with exposed filaments. Great for boho or industrial styles.
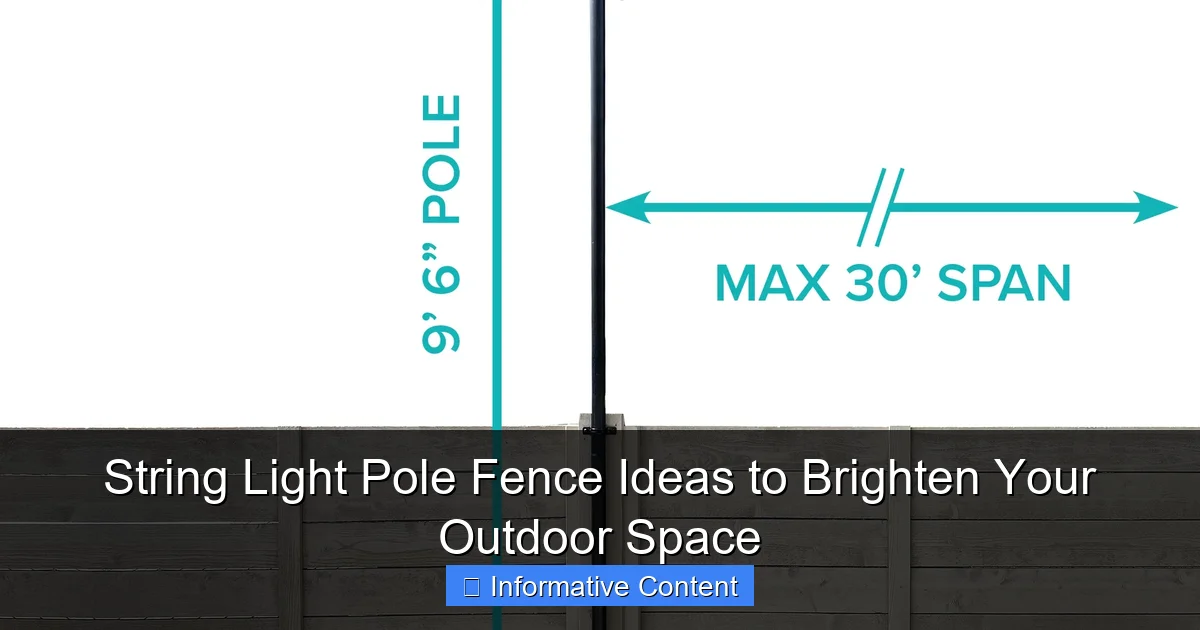
Spacing tip: For a “starry sky” effect, hang lights 12–18 inches apart. For a bold canopy, go 6–8 inches apart.
Creative String Light Pole Fence Ideas (With Real Examples)
Now for the fun part: design! Here are 6 ideas to inspire your setup, each with a real-life twist.
1. The Classic Canopy
What it is: Poles line your fence or patio edge, with lights strung horizontally across the top. Add diagonal lines for depth.
Real example: My friend Sarah has a 20-foot-long patio. She installed 4 metal poles (6 feet tall) along one side, spaced 5 feet apart. She ran warm-white LED string lights horizontally at the top, then added two diagonal lines from the outer poles to a central tree. The result? A cozy “tent” effect that’s perfect for al fresco dinners.
Pro tip: Use light clips (not nails) to attach lights to poles. They’re easier to remove and don’t damage the metal.
2. The Floating Border
What it is: Poles are placed *inside* your yard (not on the fence), creating a “floating” light border. Ideal for small spaces.
Real example: A client with a 10×10 foot courtyard used 4 PVC poles (5 feet tall) to create a square. She hung string lights at the top and halfway down, forming a “frame” for her seating area. The lights made the space feel larger and more intimate.
3. The Tiered Fence
What it is: Poles of varying heights create a cascading effect. Great for sloped yards or adding drama.
Real example: My neighbor has a terraced garden. He used 3 poles: one 8 feet tall, two 6 feet tall. He hung lights at the top of the tallest pole, then connected them to the shorter ones at staggered heights. The result looked like a waterfall of light.
4. The Privacy Screen
What it is: Combine poles with sheer curtains or fabric, then add lights behind them. Doubles as a light diffuser and privacy barrier.
Real example: A family in a busy neighborhood installed 6-foot metal poles 3 feet apart, hung white voile curtains between them, and added string lights behind the fabric. The lights glowed through the curtains, creating a soft, romantic glow—and blocking the view from the street.
5. The Garden Pathway
What it is: Use poles to line a walkway or garden path. Hang lights at waist height for a magical “glowing trail.”
Real example: My sister’s backyard has a winding stone path. She used 4-foot wooden poles (stained dark brown) every 4 feet. She attached string lights 3 feet high, so they’d illuminate the path without blinding guests. Now, her kids love “nighttime adventures” down the glowing path.
6. The Seasonal Showstopper
What it is: Use removable poles (like tent poles or shepherd’s hooks) for temporary setups. Swap light colors or patterns for holidays.
Real example: A couple in Colorado uses 5-foot shepherd’s hooks for summer parties. In winter, they switch to white lights and add faux icicles. For Halloween, they use orange and purple LEDs. Easy, festive, and no permanent installation.
Installation: A Step-by-Step Guide (With Pro Tips)
Let’s get practical. Here’s how to install your string light pole fence without breaking a sweat—or your budget.
Step 1: Gather Your Tools
You’ll need:
- Measuring tape
- Shovel or post hole digger
- Level
- Cement (for permanent poles) or sand/gravel (for temporary ones)
- Drill and screws (for attaching light clips)
- Outdoor-rated string lights
- Extension cords and GFCI outlet
Step 2: Mark and Dig
- Mark pole locations with stakes or spray paint.
- Dig holes 1/3 the pole’s height (e.g., 2 feet deep for a 6-foot pole).
- For temporary setups, use sand or gravel to stabilize poles. For permanent ones, mix quick-set cement.
Pro tip: Use a post level (not a regular level) to ensure poles are perfectly vertical. A slight tilt is hard to fix later!
Step 3: Set the Poles
- Place poles in holes. Fill with cement or gravel.
- Check level again. Adjust before the cement dries.
- Wait 24–48 hours for cement to cure.
Step 4: Attach Light Clips
- Drill small holes near the top of each pole.
- Screw in light clips (available at hardware stores). These hold lights without damaging the cord.
- For diagonal lines, add clips at mid-height.
Step 5: Hang the Lights
- Start at the power source. Unroll lights and attach them to the first clip.
- Work your way along the fence, securing lights at each clip.
- For a crisscross pattern, use a second set of lights at a 45-degree angle.
- Plug in and test. Adjust tension if lights sag.
Pro tip: Buy 10–20% extra lights. You’ll need spares for repairs or future expansions.
Step 6: Hide the Cords
No one wants to trip over cords! Try:
- Running cords under mulch or gravel
- Using cord covers (like these weatherproof sleeves)
- Attaching cords to poles with zip ties
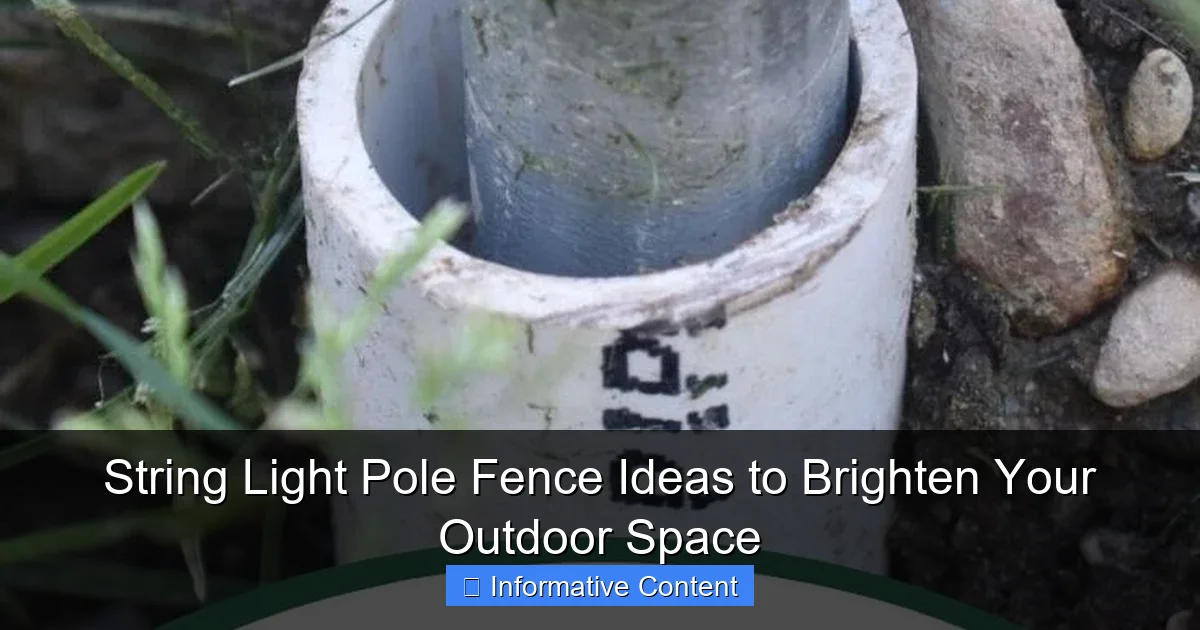
I once saw a homeowner use a hollow PVC pipe to run cords from the outlet to the first pole. It looked clean and kept everything dry.
Maintenance and Longevity: How to Keep Your Setup Looking Great
A string light pole fence isn’t “set it and forget it.” But with a little care, it can last for years.
1. Seasonal Checkups
Twice a year (spring and fall):
- Inspect poles for rust, rot, or loose fittings. Sand and repaint metal poles if needed.
- Check lights for broken bulbs or frayed cords. Replace damaged sections.
- Clean light covers with a damp cloth to remove dust and pollen.
I keep a “light repair kit” with spare bulbs, wire connectors, and electrical tape. It’s saved me more times than I can count.
2. Weatherproofing
- For rain: Use waterproof light connectors and seal outlets with silicone. Store lights in a dry place if you live in a storm-prone area.
- For snow: Brush off heavy snow to prevent pole bending. Use LED lights (they produce less heat, so snow melts faster).
- For wind: Tighten loose clips. Avoid hanging lights in areas with strong gusts.
3. Smart Upgrades
Want to take it to the next level? Try:
- Timers: Automatically turn lights on at dusk and off at bedtime.
- Smart bulbs: Control color, brightness, and patterns via an app (e.g., Philips Hue).
- Solar panels: Add a small solar array to power your lights off-grid.
My favorite upgrade? A motion sensor. Lights turn on when I step into the yard—perfect for late-night dog walks.
4. Storage Tips
If you remove lights seasonally:
- Coil cords carefully to avoid tangles. Use velcro ties.
- Store in airtight bins with silica gel packets to prevent moisture damage.
- Keep poles covered or indoors to extend their life.
Data: String Light Pole Fence Materials Comparison
| Material | Cost (per 6-ft pole) | Lifespan | Best For | Maintenance |
|---|---|---|---|---|
| Steel (powder-coated) | $25–$40 | 15–20 years | Permanent setups, windy areas | Repaint if chipped |
| Aluminum | $30–$50 | 10–15 years | Coastal areas, lightweight use | Wipe clean |
| PVC/Vinyl | $10–$20 | 5–8 years | Temporary setups, renters | Check for warping |
| Cedar Wood | $15–$30 | 8–12 years | Rustic look, small yards | Seal annually |
| Repurposed Posts | $0–$10 | Varies | Budget-friendly, DIY | Sand and seal |
Final Thoughts: Light Up Your Life (Literally)
A string light pole fence isn’t just a decor choice—it’s an invitation. An invitation to spend more time outside, to connect with loved ones, and to find joy in the little things. Like the way light dances on a summer breeze, or how a simple glow can turn an ordinary evening into something magical.
You don’t need a huge budget or a green thumb to create this magic. Start small. Maybe just two poles and a strand of lights. See how it feels. Then expand, experiment, and make it yours. Add fairy lights to your garden path. Hang lanterns from your canopy. Or keep it simple—because sometimes, the most beautiful things are the ones that feel effortless.
As I sit under my own string light pole fence tonight, with the soft hum of cicadas and the glow of warm LEDs above, I’m reminded: This is what home feels like. And if you’re reading this, I hope you’ll create that feeling too. Because everyone deserves a little light in their life.
Frequently Asked Questions
What is a string light pole fence and how does it work?
A string light pole fence is an outdoor lighting setup where poles are installed along a fence line or open space to hang string lights, creating a warm, ambient glow. The poles support the lights, eliminating the need to attach them directly to walls or trees, making them ideal for patios, gardens, or event spaces.
How do I install a string light pole fence in my backyard?
To install a string light pole fence, first plan your layout and secure sturdy poles (metal or wood) into the ground using concrete or ground sleeves. Then, attach hooks or eye bolts to the poles and string the lights tautly between them, ensuring even spacing and a clean look.
Can I use a string light pole fence for year-round lighting?
Yes, a string light pole fence works year-round if you use weather-resistant, outdoor-rated string lights and durable poles. Just ensure the lights are LED for energy efficiency and check connections regularly during extreme weather to prolong their lifespan.
What are the best spacing and height guidelines for a string light pole fence?
For balanced lighting, space poles 6–8 feet apart and install them 7–9 feet above ground. This height ensures the lights are visible but not obstructive, while the spacing prevents sagging and maintains a uniform glow across your outdoor space.
Are there solar-powered options for a string light pole fence?
Yes, solar-powered string lights work great with a string light pole fence, especially in areas without easy access to power outlets. Just ensure the solar panels are positioned to receive direct sunlight and choose lights with high-capacity batteries for longer illumination.
Can I customize my string light pole fence for different occasions?
Absolutely! Use dimmable or color-changing LED string lights and add decorative elements like sheer fabric, garlands, or lanterns to match themes for parties, holidays, or weddings. The modular design of a string light pole fence makes it easy to adapt and reconfigure.

