Featured image for string lights across low patio
Image source: cdn.homedit.com
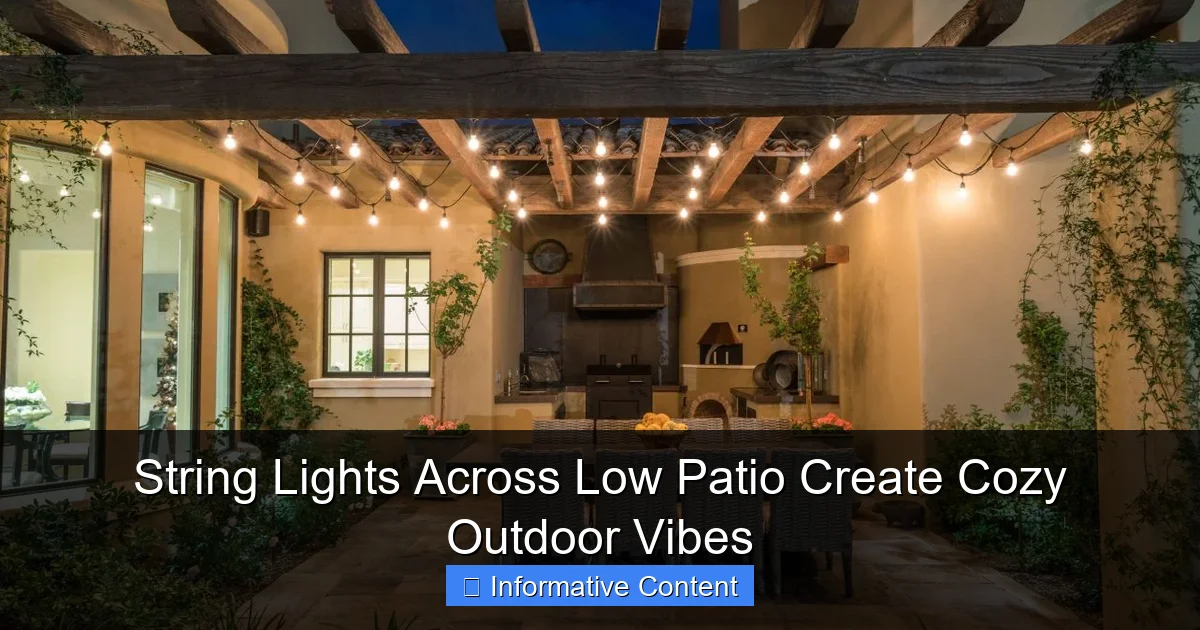
String lights across a low patio instantly transform your outdoor space into a warm, inviting retreat. Perfect for cozy gatherings or solo relaxation, these lights create a magical ambiance without overwhelming brightness, making them ideal for low-profile setups. Simple to install and endlessly versatile, they’re the ultimate hack for elevating your patio’s vibe with minimal effort.
Key Takeaways
- Hang lights low to create intimate, cozy patio vibes effortlessly.
- Use weatherproof lights for year-round durability and safety outdoors.
- Space bulbs evenly to ensure balanced, ambient lighting coverage.
- Layer with other lights like lanterns for added depth and warmth.
- Choose warm tones (2700K-3000K) for inviting, relaxing atmospheres.
- Install dimmers to adjust brightness for different moods and occasions.
📑 Table of Contents
- Why String Lights Across Low Patio Transform Your Backyard
- Choosing the Right String Lights for Your Low Patio
- Installation Tips for a Safe and Stunning Setup
- Design Ideas to Elevate Your Low Patio Ambiance
- Common Mistakes (And How to Avoid Them)
- Maintenance and Longevity: Keeping Your Lights Shining
- Final Thoughts: Your Patio, Your Sanctuary
Why String Lights Across Low Patio Transform Your Backyard
Picture this: the sun dips below the horizon, and your backyard transforms into a glowing sanctuary. The soft, golden light of string lights dances across your low patio, casting warm shadows on the walls and wrapping you in a cozy embrace. There’s something magical about the way these tiny bulbs create an intimate, inviting atmosphere—like a scene from a movie, but in your own home. Whether you’re hosting a summer barbecue, enjoying a quiet evening with your partner, or stargazing with the kids, string lights across a low patio elevate the mood instantly.
But it’s not just about aesthetics. These lights also serve practical purposes—extending your outdoor living time, improving safety, and even boosting your home’s curb appeal. And the best part? You don’t need a huge budget or professional help to pull it off. With a little creativity and some basic tools, you can turn your low patio into a dreamy retreat. In this post, we’ll walk you through everything you need to know: from choosing the right lights to installation tips, design ideas, and even common mistakes to avoid. Let’s get started!
Choosing the Right String Lights for Your Low Patio
Before you start hammering nails or climbing ladders, it’s crucial to pick the right type of string lights. Not all lights are created equal, and the wrong choice can leave you with dim illumination, short lifespans, or even safety hazards. Here’s what to consider:
Types of Bulbs: LEDs vs. Incandescent
LED string lights are the clear winner for most low patio setups. Here’s why:
- Energy efficiency: LEDs use up to 80% less energy than incandescent bulbs, which means lower electricity bills and longer battery life (if using solar or battery-powered options).
- Durability: LEDs are less likely to break, even if accidentally bumped. Plus, they generate less heat, reducing fire risks.
- Longevity: A high-quality LED string can last 25,000–50,000 hours, compared to just 1,000–2,000 hours for incandescent bulbs.
- Color options: LEDs come in warm white, cool white, and even color-changing varieties. Warm white (2700K–3000K) is ideal for a cozy, inviting glow.
That said, incandescent bulbs have a nostalgic charm—think vintage Edison-style bulbs with a soft, flickering glow. They’re great for special occasions but may not be practical for year-round use.
Power Source: Plug-In, Solar, or Battery?
- Plug-in lights: Most reliable for consistent brightness. Just make sure you have an outdoor-rated outlet nearby. Use a GFCI-protected outlet to prevent shocks.
- Solar lights: Eco-friendly and wire-free. However, they require direct sunlight during the day to charge. If your low patio is shaded, they may not shine brightly or last all night.
- Battery-powered: Portable and easy to install. Great for renters or temporary setups. Just remember to replace batteries regularly.
Pro tip: For low patios with limited outlets, consider a solar-powered hub with a battery backup. This way, you get the best of both worlds—sunlight charging during the day and stored power for cloudy days.
Length and Spacing
Measure your patio’s perimeter or the distance between anchor points (like walls, railings, or posts). Buy lights that are 10–20% longer than needed to account for slack and curves. As for bulb spacing:
- 2–3 inches between bulbs: Creates a dense, starry-night effect.
- 4–6 inches: Offers a balanced look—bright enough to see but not overwhelming.
- 8+ inches: Best for a minimalist, modern vibe.
Example: A 20-foot patio with 4-inch spacing needs about 60 bulbs (20 ft × 12 inches ÷ 4 inches = 60 bulbs).
Installation Tips for a Safe and Stunning Setup
Installing string lights across a low patio is easier than you think—but a few smart choices can make the difference between a professional-looking setup and a tangled mess. Here’s how to nail it:
Planning Your Layout
Before hanging anything, sketch your patio layout. Decide where you want the lights to go:
- Across the ceiling/overhang: Creates a canopy effect. Ideal for covered patios.
- Along railings or fences: Great for low patios with boundaries. Adds definition to the space.
- Zigzag or crisscross: Adds visual interest. Works well for larger patios.
- From wall to wall: Simple and elegant. Use hooks or eye screws on opposite walls.
Use painter’s tape to mark the path of the lights. This helps you visualize the final look and adjust before drilling holes.
Anchoring Points: Hooks, Nails, or Adhesive?
- Screw-in hooks: Most secure. Use for permanent installations. Choose stainless steel or coated hooks to resist rust.
- Adhesive hooks: Damage-free and renter-friendly. Look for outdoor-rated ones with a weight limit of at least 5 lbs.
- Nails or staples: Quick but can damage surfaces. Use only for temporary setups or soft materials like wood.
- Magnets (for metal surfaces): A creative solution for railings or metal roofs.
For low patios with stucco or brick walls, use anchors to prevent the hooks from pulling out. Drill pilot holes first to avoid cracking.
Hanging the Lights: Step-by-Step
- Start at the power source: Plug in the lights and test them before hanging.
- Work in sections: Hang one end, then the other, and adjust the middle. This prevents sagging.
- Use zip ties or clips: Secure the cord to hooks, but don’t overtighten—this can damage the wiring.
- Create gentle curves: Avoid sharp bends. A slight “S” shape between anchor points looks more natural.
- Hide the cord: Tuck excess cord behind hooks or use cord covers for a clean look.
Pro tip: For a seamless look, use clear fishing line to suspend lights between anchor points. The line disappears in the dark, making the bulbs appear to float.
Design Ideas to Elevate Your Low Patio Ambiance
String lights are just the beginning. With a few design tweaks, you can turn your low patio into a showstopper. Here are some ideas to spark your creativity:
Layered Lighting
Combine string lights with other light sources for depth:
- Fairy lights in mason jars: Place them on tables or hang from hooks. Adds a whimsical touch.
- Path lights: Line the edges of your patio to guide guests safely.
- Uplighting: Shine lights upward at trees, shrubs, or architectural features to highlight textures.
- Furniture with built-in lights: Coffee tables or benches with LED strips add a modern twist.
Example: Hang string lights overhead, place solar-powered lanterns on the ground, and use LED candles in glass vases for a multi-level glow.
Themed Setups
- Bohemian: Mix string lights with macramé hangings, colorful rugs, and floor cushions. Use warm white or amber bulbs for a boho vibe.
- Modern minimalist: Stick to cool white LEDs with geometric shapes (like hexagons or circles). Pair with sleek furniture and monochrome decor.
- Rustic farmhouse: Use Edison-style bulbs with copper wire. Add wooden crates, galvanized metal planters, and a vintage rug.
- Tropical paradise: Hang lights over a tiki bar or poolside area. Use green, blue, or pink bulbs for a fun, festive feel.
Seasonal Decor
Switch up your lights with the seasons:
- Spring: Add pastel-colored bulbs or floral garlands.
- Summer: Use bright white lights with citronella candles to deter bugs.
- Fall: Pair warm lights with pumpkins, hay bales, and cornstalks.
- Winter: Create a “frozen” effect with blue-white lights and snowflake ornaments.
Bonus: For holidays, use color-changing LEDs to switch between red/green (Christmas) or orange/black (Halloween) with the push of a button.
Common Mistakes (And How to Avoid Them)
Even the best-laid plans can go sideways. Here are pitfalls to watch out for—and how to fix them:
Overloading Circuits
Too many lights on one outlet can trip breakers or cause fires. To prevent this:
- Check the wattage of your lights. Most LED strings use 2–5 watts per bulb.
- Add up the total wattage and compare it to your outlet’s capacity (usually 1,500–1,800 watts).
- Use a power strip with overload protection.
- For large setups, run multiple strings from different outlets.
Example: A 50-bulb LED string (4 watts each) uses 200 watts—well under the limit. But 10 of these strings (2,000 watts) could overload a standard outlet.
Improper Waterproofing
Outdoor lights must withstand rain, snow, and humidity. Avoid:
- Using indoor-rated lights outdoors.
- Leaving plugs exposed to rain. Use weatherproof outlet covers or a waterproof extension box.
- Stretching lights too tightly—this can damage seals and let moisture in.
Pro tip: Apply silicone sealant around bulb sockets and plugs for extra protection.
Uneven Hanging
Sagging or lopsided lights ruin the look. Fix this by:
- Using tension cables or fishing line to support long runs.
- Adding extra anchor points in the middle of spans.
- Hanging lights during daylight to spot imperfections.
Ignoring Safety
Always prioritize safety:
- Turn off lights when not in use (use a timer for convenience).
- Keep cords away from high-traffic areas to prevent tripping.
- Inspect lights annually for frayed wires or loose connections.
Maintenance and Longevity: Keeping Your Lights Shining
With proper care, your string lights can last for years. Here’s how to keep them in top shape:
Cleaning and Storage
- Clean bulbs: Wipe them with a dry cloth or mild soapy water (unplug first!). Avoid harsh chemicals.
- Remove debris: Use a soft brush to clear leaves, dust, or cobwebs from sockets.
- Store properly: Coil lights loosely and store them in a dry, temperature-controlled space. Use a cord organizer to prevent tangles.
For permanent installations, clean lights every 6–12 months. For seasonal setups, clean before storing.
Troubleshooting Common Issues
| Issue | Cause | Solution |
|---|---|---|
| Flickering lights | Loose bulb, faulty socket, or voltage drop | Check bulbs, tighten connections, or shorten the run |
| Dim lights | Old bulbs, low battery, or too many lights on one circuit | Replace bulbs, charge batteries, or split the load |
| Water damage | Cracked seals, improper waterproofing | Replace damaged sections or reseal with silicone |
| Short lifespan | Low-quality lights, extreme weather | Invest in weatherproof, commercial-grade lights |
Upgrades for the Future
- Smart lights: Control color, brightness, and timing with an app or voice assistant (e.g., Alexa, Google Home).
- Remote timers: Set lights to turn on at sunset and off at bedtime automatically.
- Motion sensors: Lights turn on when you enter the patio—great for security.
Example: A smart LED string lets you create custom scenes—like “Movie Night” (dim, warm light) or “Party Mode” (color-changing, pulsing).
Final Thoughts: Your Patio, Your Sanctuary
String lights across a low patio aren’t just decor—they’re an invitation to slow down, breathe deeply, and savor the moment. Whether you’re sipping wine under the stars or watching fireflies dance, the soft glow of these lights creates a backdrop for memories. And the best part? You don’t need a designer’s eye or a contractor’s budget to achieve it. With a little planning, the right lights, and a few clever tricks, you can transform your outdoor space into a cozy retreat that feels like home.
Remember, the goal isn’t perfection—it’s personality. Mix and match styles, experiment with layouts, and let your creativity shine (pun intended). After all, your patio is an extension of your home, and it should reflect *you*. So go ahead: string up those lights, grab a blanket, and enjoy the magic of your very own outdoor oasis. The world feels a little brighter when you’re wrapped in golden light—and isn’t that what life’s all about?
Frequently Asked Questions
How do I hang string lights across a low patio without drilling holes?
Use adhesive hooks, tension rods, or freestanding poles designed for outdoor use. These options securely hold string lights across a low patio while protecting your walls or railings.
What type of string lights work best for a low patio?
LED Edison-style or globe string lights are ideal—they’re weather-resistant, energy-efficient, and emit a warm glow. Opt for dimmable models to adjust ambiance for different moods.
Can I leave string lights across my low patio up year-round?
Yes, if you choose commercial-grade, weatherproof lights with UV-resistant cords. Check manufacturer guidelines and inspect connections seasonally to ensure safety and longevity.
How do I power string lights on a low patio without nearby outlets?
Use solar-powered lights or a heavy-duty outdoor extension cord routed safely along edges. For a seamless look, hide cords under rugs or with cord covers.
What’s the ideal spacing for string lights across a low patio?
Space bulbs 6–12 inches apart for balanced illumination. For a draped effect, hang lights 12–18 inches lower at the center, ensuring they don’t obstruct pathways.
How can I style string lights across a low patio for a cozy vibe?
Layer lights with sheer curtains, plants, or lanterns to soften the space. Weave them through railings or trees to create depth and intimacy in your outdoor area.

