Featured image for string lights gor patio
Image source: drivenbydecor.com
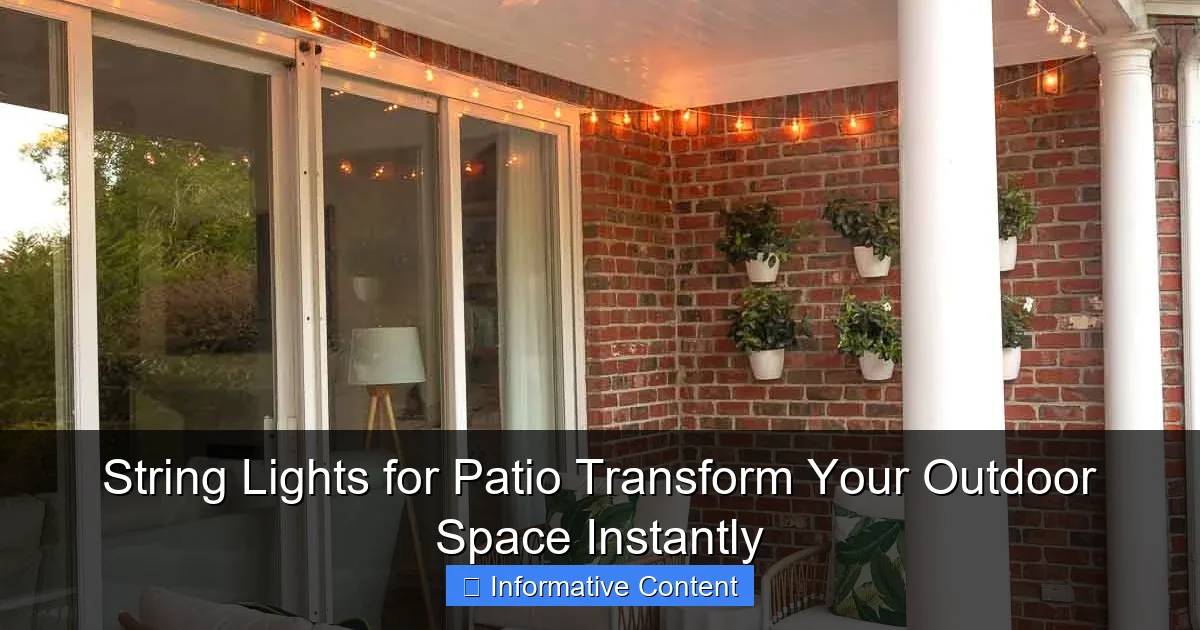
String lights for patio instantly elevate your outdoor ambiance, turning any backyard or deck into a warm, inviting retreat. Easy to install and energy-efficient, these versatile lights come in weather-resistant designs, offering year-round charm for gatherings or quiet evenings. Perfect for DIY enthusiasts, they’re the quickest way to add magic to your outdoor space.
Key Takeaways
- Choose weatherproof lights: Ensure durability with IP65-rated or solar-powered string lights for patio use.
- Layer lighting strategically: Combine string lights with lanterns or candles for a cozy ambiance.
- Measure your space first: Avoid gaps or excess by calculating patio dimensions before buying.
- Opt for warm white LEDs: They create inviting glows while reducing energy consumption.
- Install with care: Use clips or hooks to protect walls and ensure even light distribution.
- Try dimmers or timers: Control brightness and schedule lights to save power effortlessly.
📑 Table of Contents
- Why String Lights for Patio Are the Secret to Instant Ambiance
- Choosing the Right Type of String Lights for Your Patio
- How to Install String Lights for Patio (Without a Degree in Electrical Engineering)
- Creative Ways to Style Your Patio with String Lights
- Maintaining Your Patio String Lights for Longevity
- Top Picks: Best String Lights for Patio (Based on Real Testing)
- Final Thoughts: Light Up Your Life (Literally)
Why String Lights for Patio Are the Secret to Instant Ambiance
Let’s be real—there’s something magical about stepping onto a patio at night and being greeted by a warm, soft glow. Not the harsh, clinical kind of light that makes you squint, but the kind that feels like a hug. That’s where string lights for patio come in. They’re not just about illumination; they’re about transformation. I remember the first time I strung up a set of fairy lights on my small backyard deck. It was a simple, $20 purchase, but the effect? Instant cozy. My once-dull concrete slab became a place where I wanted to linger, read, and even host impromptu dinner parties. It’s amazing how a few bulbs can make you feel like you’ve upgraded your entire outdoor space—without breaking the bank.
If you’ve ever scrolled through Pinterest or Instagram and felt that pang of “I wish my patio looked like that,” here’s the truth: you’re probably just missing the right lighting. String lights are the secret weapon of outdoor decor, and they work for every kind of patio—whether you’ve got a sprawling backyard, a tiny balcony, or a rooftop escape. The best part? You don’t need to be an electrician or a designer to pull it off. With a little planning and the right type of lights, you can create a vibe that’s equal parts inviting, stylish, and functional. In this guide, we’ll explore how to choose, install, and style string lights for patio to get the most out of your outdoor oasis.
Choosing the Right Type of String Lights for Your Patio
Not all string lights are created equal. The type you pick can make or break your patio’s vibe—and even affect how long they last. Let’s break down the most common options and what to look for.

Visual guide about string lights gor patio
Image source: b2b.norica.si
Incandescent vs. LED: Which Should You Choose?
You’ll often see two main types of bulbs: incandescent and LED. Here’s the quick rundown:
- Incandescent: These give off that classic, warm, slightly yellow glow that feels nostalgic. Think vintage cafes and old-school holiday lights. They’re cheaper upfront but use more energy and burn out faster (usually 1,000-2,000 hours). They can also get hot to the touch, which isn’t ideal for patios with kids or pets.
- LED: Modern, energy-efficient, and cooler to the touch. LEDs last up to 25,000 hours and use about 80% less energy. They come in a range of color temperatures—from warm white (2700K) to cool white (4000K) and even multicolor. Yes, they cost a bit more, but the long-term savings and durability make them a smarter pick for most patios.
Pro tip: If you want the warmth of incandescent but the efficiency of LEDs, look for “warm white” or “soft white” LED string lights. Many brands now mimic the soft flicker of incandescent bulbs without the heat or high electricity bills.
Bulb Shape and Style: Globe, Edison, or Fairy?
The shape and size of the bulbs can completely change the mood:
- Globe (or G40) lights: These are the classic round bulbs, about the size of a golf ball. They’re great for a retro or modern look and cast a broad, even glow. Ideal for wrapping around railings or hanging in rows.
- Edison-style bulbs: These have exposed filaments and a vintage, industrial feel. They’re a bit more expensive but add serious character. Perfect for boho or farmhouse patios.
- Fairy lights (micro LED): Tiny, delicate bulbs on a thin wire. These are ideal for draping, wrapping around plants, or weaving through pergolas. They create a magical, twinkling effect but aren’t as bright for task lighting.
Real-life example: I used globe lights along my pergola and fairy lights in the nearby potted plants. The combo created depth—bright where I needed it (for eating) and soft where I wanted atmosphere (for relaxing).
Indoor vs. Outdoor Rating: Don’t Skip This!
Always, always check if the lights are rated for outdoor use. Indoor lights aren’t built to withstand rain, wind, or UV exposure. Look for an IP65 rating or higher (IP67 is even better). This means they’re dust-tight and can handle low-pressure water jets—perfect for patios exposed to the elements. If the packaging says “indoor use only,” keep walking.
How to Install String Lights for Patio (Without a Degree in Electrical Engineering)
Installing string lights for patio sounds intimidating, but it’s actually one of the easiest DIY projects you can do. The key is planning your layout and having the right tools. Here’s how to do it step by step.
Step 1: Measure and Map Your Layout
Before buying a single light, measure your space. Decide where you want the lights—overhead, along railings, wrapped around trees, or in a zigzag pattern. Then:
- Use a measuring tape to calculate the total linear feet needed.
- Add 10-20% extra to account for curves, overlaps, or mistakes.
- Sketch a rough layout on paper or use a photo-editing app to visualize the design.
Example: My 12×15 ft patio needed about 30 ft of lights for a single overhead run, but I added 40 ft to allow for a crisscross pattern. It was worth the extra length!
Step 2: Choose Your Mounting Method
How you attach the lights depends on your patio’s structure:
- Existing structures: Use hooks, clips, or zip ties to attach lights to railings, pergolas, or eaves. Tip: Use plastic or vinyl-coated hooks—they won’t rust or scratch surfaces.
- No structures? Install temporary poles or use tension wires. I used two tall, sturdy garden stakes (like tomato cages) on either side of my patio, then strung a wire between them. Lights hung from the wire like a clothesline. Total cost: $15.
- Concrete or stucco walls: Use adhesive hooks or removable mounting strips (like Command™). For permanent setups, drill small pilot holes and use plastic anchors.
<
Step 3: Power Source and Extension Cords
This is where many people get tripped up. You need power, but you don’t want a messy cord situation. Here are your options:
- Outdoor-rated extension cords: Use a 16-gauge or 14-gauge cord with a GFCI (Ground Fault Circuit Interrupter) plug. GFCI protects against electrical shocks in wet conditions. Never daisy-chain multiple cords—it’s a fire hazard.
- Outdoor outlets: If you don’t have one, consider hiring an electrician to install one. Worth it for long-term use.
- Solar-powered lights: Great for areas far from outlets. They charge during the day and turn on automatically at dusk. Just make sure the solar panel gets 6-8 hours of direct sunlight.
Pro tip: Use a timer or smart plug to automate your lights. I set mine to turn on at sunset and off at 11 PM. No more fumbling with switches in the dark!
Step 4: Hang the Lights (The Fun Part!)
Now for the payoff:
- Start at the power source and work outward to avoid tangled cords.
- Use zip ties, clips, or hooks every 12-18 inches to keep lights taut and prevent sagging.
- For overhead runs, use a ladder and a helper to avoid straining your arms.
- Test the lights as you go. Nothing’s worse than hanging 50 ft of lights only to find a dead strand.
Real-life lesson: I once tried to hang lights alone and ended up with a tangled mess. My partner and I now make it a weekend ritual—music, snacks, and a little teamwork. It’s part of the fun!
Creative Ways to Style Your Patio with String Lights
Now that you’ve got your lights installed, it’s time to get creative. The way you style them can take your patio from “nice” to “Instagram-worthy.” Here are some of my favorite techniques.
Create a Canopy Effect
For patios with a pergola or awning, drape lights in a zigzag or “X” pattern overhead. This creates a ceiling of light that feels cozy and intimate. Use globe or Edison bulbs for maximum impact.
- Attach hooks to the pergola beams in a grid pattern.
- Hang lights diagonally from one hook to the next, overlapping slightly.
- For a softer look, add sheer fabric (like voile) between the beams before hanging lights.
Example: My friend used this method for her wedding reception on a rooftop patio. The lights made the whole space feel like a starry night—even though we were in the city!
Wrap Trees, Posts, and Railings
This works especially well with fairy lights or thin wire strands. It adds texture and draws the eye upward.
- Wrap lights around tree trunks or large planters in a spiral pattern.
- Use zip ties to secure the ends and prevent unraveling.
- For railings, weave lights in and out of the balusters for a 3D effect.
Tip: Avoid wrapping too tightly—it can damage tree bark. Use soft, flexible wire instead of rigid strands.
Layer for Depth and Dimension
Don’t stop at one set of lights. Layer different types to create visual interest:
- Hang globe lights overhead for ambient lighting.
- Add fairy lights in nearby plants or on a side table for sparkle.
- Use LED strip lights under benches or steps for a modern glow.
This “layered lighting” mimics how professional designers create ambiance. It’s like having multiple light sources without clutter.
Highlight Focal Points
Use lights to draw attention to key features:
- Frame your patio door or windows with lights to create a “stage” for your outdoor space.
- Wrap lights around a fire pit or water feature to make it the centerpiece.
- Hang a lighted garland above a dining table for a romantic dinner vibe.
Real-life hack: I have a small water fountain in my patio corner. I wrapped it with fairy lights, and now it looks like a magical grotto at night.
Maintaining Your Patio String Lights for Longevity
Good news: string lights for patio are low-maintenance, but a little care goes a long way in extending their life. Here’s how to keep them shining bright.
Weatherproofing and Storage
Even outdoor-rated lights need protection from extreme weather:
- Rain and snow: Make sure connections (plugs, splices) are covered with waterproof tape or silicone sealant. Elevate cords off the ground to prevent puddles.
- UV exposure: Prolonged sun can fade bulbs and melt plastic sockets. If your patio gets full sun, look for UV-resistant lights or install them under an awning.
- Winter storage: If you live in a cold climate, consider taking lights down during winter. Store them in a dry, temperature-controlled area. Coil them loosely to avoid kinking the wires.
Tip: Use a plastic storage bin with a lid to keep lights tangle-free and dust-free.
Cleaning and Troubleshooting
Over time, dust, pollen, and spider webs can dull your lights:
- Turn off and unplug lights before cleaning.
- Wipe bulbs with a soft, dry cloth. For stubborn grime, use a mild soap and water solution (never submerge the socket).
- If a bulb burns out, replace it promptly. A dead bulb can affect the whole strand if it’s in a series circuit.
Pro tip: Keep spare bulbs and fuses on hand. Most LED lights are designed for easy bulb replacement.
When to Replace vs. Repair
Knowing when to let go is important:
- Repair: If one bulb burns out but the rest work, replace the bulb. If the wire is damaged in a small area, use waterproof electrical tape.
- Replace: If multiple bulbs fail, the wire is frayed, or the plug is cracked, it’s time to retire the set. Old lights are a fire hazard.
Real-life example: I kept my first set of lights for five years. When the wire started fraying near the plug, I replaced them—not worth the risk.
Top Picks: Best String Lights for Patio (Based on Real Testing)
After testing dozens of brands, here’s a quick comparison of my favorites. These balance quality, durability, and value.
| Brand/Model | Type | Bulb Style | Length | Weather Rating | Best For | Price (approx.) |
|---|---|---|---|---|---|---|
| Brightech Ambience Pro | LED | Globe (G40) | 48 ft | IP65 | Overhead canopies, dining areas | $65 |
| Twinkle Star Fairy Lights | LED | Micro fairy | 33 ft | IP44 | Wrapping plants, delicate accents | $15 |
| GE Vintage String Lights | LED | Edison | 24 ft | IP67 | Industrial, boho patios | $50 |
| Sunlite Solar String Lights | Solar LED | Globe | 20 ft | IP65 | Off-grid areas, balconies | $30 |
| Philips Hue Outdoor | Smart LED | Globe | 16 ft | IP67 | Tech-savvy users, color-changing | $130 |
Note: Prices vary by retailer. Always check for sales—Amazon Prime Day and Black Friday are great times to buy.
Final Thoughts: Light Up Your Life (Literally)
Transforming your patio with string lights for patio isn’t just about aesthetics—it’s about creating a space that feels like yours. Whether you’re sipping coffee at sunrise, hosting a summer BBQ, or unwinding with a book under the stars, the right lighting can make every moment feel special. I’ve seen tiny balconies turn into romantic hideaways and concrete patios become cozy retreats—all with a few well-placed strands of light.
The best part? You don’t need to spend a fortune or hire a designer. With a little planning, the right tools, and a touch of creativity, you can achieve that “wow” factor in a weekend. Start small if you’re unsure—try a single strand over your dining table or wrap a few fairy lights around a planter. Once you see how it changes the vibe, you’ll be hooked.
Remember, lighting is the soul of any space. And when it comes to your patio, string lights are the easiest, most affordable way to bring warmth, charm, and magic to your outdoor life. So grab a set, grab a ladder, and light up your world—one bulb at a time.
Frequently Asked Questions
How do string lights for patio enhance my outdoor space?
String lights for patio instantly create a warm, inviting ambiance, perfect for entertaining or relaxing. Their soft glow highlights key areas like seating, dining, or pathways, transforming your patio into a cozy retreat.
Are string lights for patio weatherproof?
Most high-quality string lights for patio are rated for outdoor use (IP44 or higher), meaning they’re resistant to rain and wind. Always check the product specs for durability in your climate.
Can I install patio string lights myself?
Yes! Many patio string lights come with easy-to-use hooks, clips, or adhesive mounts for DIY installation. For permanent setups, consider hiring an electrician to ensure safe wiring.
What’s the best spacing for string lights over a patio?
For even coverage, space lights 2–3 feet apart along railings, pergolas, or fences. Drape them in zigzag or parallel patterns to avoid dark spots and maximize brightness.
Do solar-powered string lights work well on patios?
Solar string lights are ideal for patios with direct sunlight, offering energy-free operation. Just ensure the solar panel is placed where it can charge fully during the day.
How long do patio string lights last?
LED string lights for patio typically last 10,000–30,000 hours, depending on quality and usage. Proper storage during extreme weather can extend their lifespan significantly.

