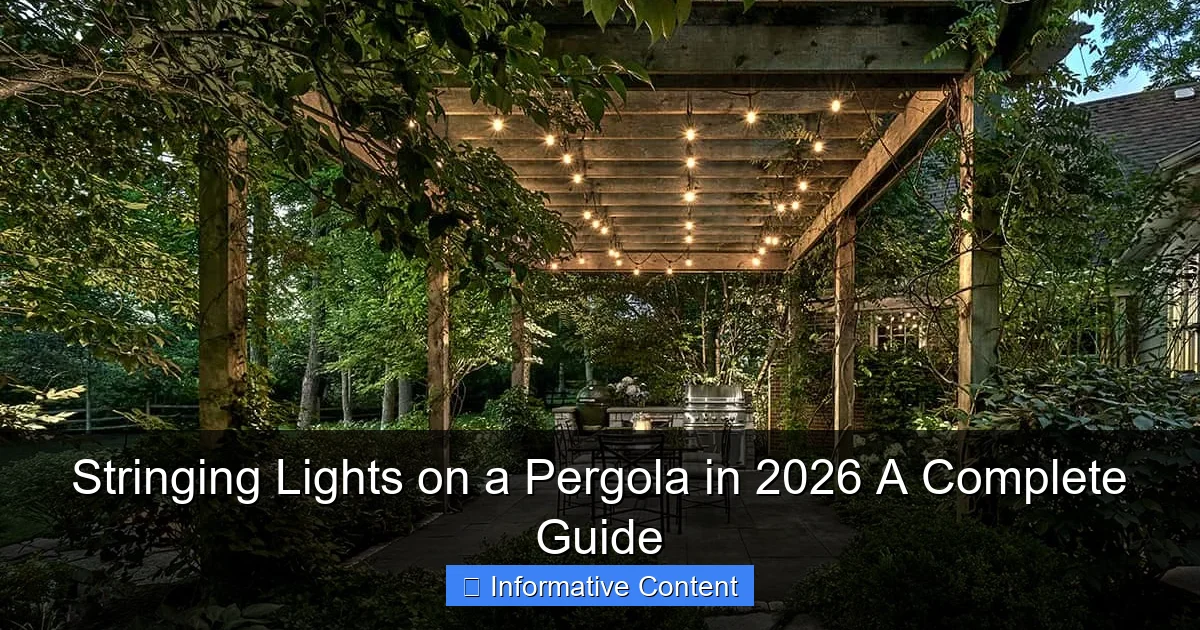
Featured image for stringing lights on a pergola
Image source: vanzelst.com
Transform your pergola into a stunning nighttime retreat by strategically stringing lights for ambiance, safety, and style in 2026. Choose weather-resistant, energy-efficient LED string lights and follow a clean layout plan—along beams, overhead grids, or cascading vines—for a professional, enchanting glow all season long.
Key Takeaways
- Plan spacing first: Measure and mark light placement for even, balanced coverage.
- Use weatherproof lights: Choose IP65-rated or higher for year-round durability.
- Secure with clips: Use pergola-specific hooks to avoid damage and sagging.
- Test before installing: Check lights for defects to avoid mid-installation failures.
- Hide cords safely: Route wires along beams using UV-resistant zip ties.
- Layer lighting: Combine string lights with spotlights for functional ambiance.
📑 Table of Contents
Why Stringing Lights on a Pergola Is the Ultimate Outdoor Upgrade
Picture this: it’s a warm summer evening. The sun has just dipped below the horizon, painting the sky in soft hues of orange and purple. You’re sitting under your pergola with a cold drink, surrounded by friends or family, and suddenly—the space transforms. Twinkling lights drape gracefully overhead, casting a soft, inviting glow. It’s not magic; it’s stringing lights on a pergola, one of the simplest yet most impactful upgrades you can make to your outdoor living area.
Whether you’re hosting a backyard barbecue, enjoying a quiet night with your partner, or creating a cozy reading nook, lighting sets the mood. And a pergola—those elegant open-roofed structures—is the perfect canvas for creative illumination. In 2026, with smart tech, energy-efficient LEDs, and more design options than ever, there’s never been a better time to tackle this project. But where do you start? How do you avoid tangled cords, sagging wires, or lights that look more “college dorm” than “luxury retreat”? This guide will walk you through every step, from planning to plugging in, so you can create a space that feels magical—without the stress.
Planning Your Pergola Lighting Project
Before you grab a ladder and a box of fairy lights, take a breath. A successful lighting setup starts with thoughtful planning. Rushing in can lead to costly mistakes, uneven lighting, or even safety hazards. Let’s break it down into manageable steps.
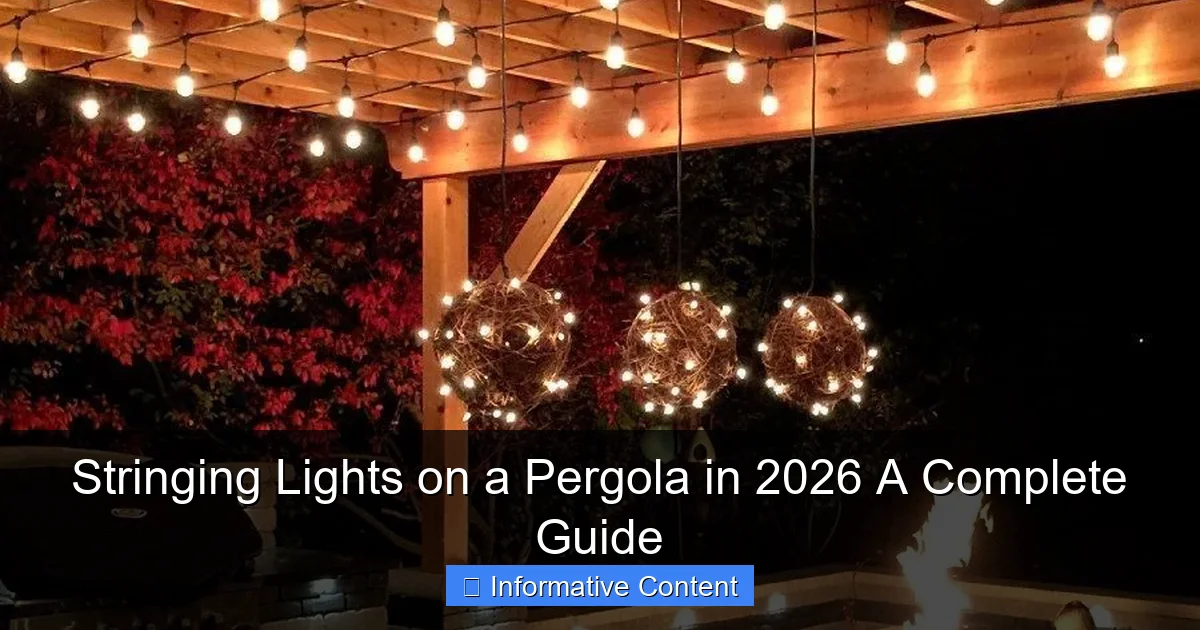
Visual guide about stringing lights on a pergola
Image source: i.pinimg.com
Assess Your Pergola’s Structure
Not all pergolas are created equal. Some are freestanding, others attached to your home. Some have solid beams, others open slats. The structure will influence how and where you install lights.
- Wooden pergolas: Ideal for stapling, screwing, or using adhesive hooks. Just avoid over-tightening to prevent splitting.
- Metal pergolas: Use magnetic clips or non-conductive hooks to avoid grounding issues. Never staple into metal—corrosion and electrical risks are real.
- Vinyl or PVC pergolas: These are lightweight. Avoid heavy fixtures or excessive tension. Adhesive clips work best.
Pro tip: Walk around your pergola at night with a flashlight. Note where shadows fall and where you’d like more light. This “shadow test” helps you plan light placement.
Determine Your Lighting Goals
Ask yourself: What do you want the lights to do? Different goals call for different approaches.
- Ambiance: Warm, soft, and diffuse. Think string lights in warm white (2700K–3000K).
- Task lighting: For grilling, dining, or reading. Use brighter, directional lights or add under-beam fixtures.
- Accent lighting: Highlight architectural details. Use spotlights or uplights on columns.
- Smart features: Want color-changing, voice control, or app scheduling? Plan for smart bulbs or systems early.
Example: Sarah, a reader from Colorado, wanted ambiance for her evening wine nights. She chose 50-foot warm-white string lights with Edison bulbs—simple, elegant, and just bright enough to see her wine glass without harsh glare.
Measure and Calculate
Grab a measuring tape and calculate:
- Total linear feet of beams and rafters where lights will hang.
- Distance from the pergola to your power source (outlet or transformer).
- Number of outlets or extension cords needed.
Rule of thumb: Add 20% extra to your measurements for drape, slack, and future adjustments. A 10-foot beam might need 12 feet of lights for a gentle curve.
Choosing the Right Lights for Your Pergola
The market is flooded with options—LEDs, incandescent, solar, smart, vintage. How do you pick? It’s not just about looks; it’s about durability, energy use, and ease of use.
LED vs. Incandescent: The Clear Winner
LEDs dominate for a reason:
- Energy efficiency: Use up to 80% less power than incandescent.
- Longevity: Last 25,000–50,000 hours (vs. 1,000–2,000 for incandescent).
- Low heat: Safer for wood and fabric; won’t scorch nearby plants.
- Color options: From warm white to RGB color-changing.
Incandescents? They’re nostalgic but inefficient and fragile. Save them for indoor holiday decor.
String Lights: Types and Styles
Here’s a breakdown of popular string light types:
| Light Type | Best For | Pros | Cons |
|---|---|---|---|
| Standard LED String Lights | Ambiance, year-round use | Durable, affordable, low power | Limited brightness for task areas |
| Edison Bulb Strings | Rustic, vintage charm | Warm glow, stylish filament | Higher cost, fragile glass bulbs |
| Net Lights | Covering large areas quickly | Even coverage, easy to drape | Less customizable placement |
| Smart LED Strips | Tech-savvy users | Color control, app scheduling, voice integration | Higher price, requires Wi-Fi/Bluetooth |
| Solar String Lights | No outlet nearby | No wiring, eco-friendly | Less bright, battery-dependent, weather-sensitive |
Real-world example: Mike in Oregon installed solar net lights on his freestanding pergola. Great for summer, but in winter, shorter days meant dimmer lights. He added a plug-in backup string for darker months—smart compromise.
Smart Features: Worth the Hype?
In 2026, smart lighting is more accessible than ever. Consider:
- Voice control: “Hey Google, dim the pergola lights to 30%.”
- App scheduling: Turn on at sunset, off at 11 p.m.
- Color changing: Perfect for parties or mood shifts.
- Integration: Works with Alexa, Google Home, Apple HomeKit.
But—don’t overcomplicate it. If you just want warm, steady light, a $20 non-smart set works perfectly. Save smart features for when you’ll actually use them.
Tools and Materials You’ll Need
You don’t need a full workshop, but having the right tools saves time and frustration. Here’s your checklist:
Essential Tools
- Ladder: A sturdy 6–8 ft. extension ladder (for safety, never stand on the top two rungs).
- Measuring tape: For accurate spacing.
- Staple gun or cordless drill: For wood/metal pergolas. Use 1/4” staples or small screws with washers.
- Scissors or utility knife: To cut zip ties, tape, or excess cord.
- Voltage tester: If using outdoor outlets, ensure they’re GFCI-protected.
Installation Hardware
- Adhesive hooks or clips: For vinyl, PVC, or delicate surfaces. Look for outdoor-rated, UV-resistant options.
- Magnetic clips: For metal pergolas. Test strength before hanging heavy lights.
- Zip ties: Use UV-resistant, black or brown ties to blend in.
- Extension cords: Outdoor-rated, 14–16 gauge. Avoid daisy-chaining more than two.
- Weatherproof outlet covers: Keep plugs dry in rain.
Optional (But Helpful)
- Light clips with adhesive backing: No drilling needed.
- Light hangers with hooks: Reusable, easy to adjust.
- Smart plug or timer: Automate on/off times.
- Light diffuser sleeves: Soften harsh LED glare.
Pro tip: Buy a few extra clips and zip ties. You’ll always need more than you think—especially when adjusting for drape or fixing a snag.
Step-by-Step Installation Guide
Now for the fun part: putting it all together. Follow these steps for a clean, professional look.
Step 1: Test Your Lights
Before hanging, plug in each string to check for dead bulbs or frayed wires. Replace faulty sets—don’t risk a mid-installation failure.
Step 2: Plan Your Layout
Decide on a pattern:
- Straight lines: Along beams. Clean, modern.
- Crisscross (X-pattern): Across rafters. Cozy, cottage-style.
- Hanging loops: Drape in gentle curves. Romantic, bistro feel.
- Grid pattern: For large pergolas. Use multiple strings.
Sketch your design on paper or use a photo editing app to visualize.
Step 3: Install Mounting Hardware
Start at the highest point. For wooden beams:
- Use a staple gun every 12–18 inches.
- Angle staples at 45 degrees to grip better.
- Place staples just above the light socket to hide them.
For metal or vinyl:
- Press adhesive clips into place. Wait 24 hours before hanging (per manufacturer).
- Use magnetic clips every 18 inches.
Tip: Leave 6–12 inches of slack at connection points for future adjustments.
Step 4: Hang the Lights
- Start at the power source and work outward.
- Clip or staple the first socket, then drape the string to the next point.
- Keep tension even—too tight causes sagging; too loose looks messy.
- For loops, hang every 2–3 sockets to create gentle curves.
Example: For a 12-foot beam, hang clips at 0, 3, 6, 9, and 12 feet. Drape the string in a soft arc between each.
Step 5: Connect and Power Up
- Use outdoor-rated extension cords. Keep connections off the ground.
- Plug into a GFCI outlet. Test with a voltage tester.
- If using a smart plug or timer, set your schedule.
Safety note: Never run cords across walkways. Use cord covers or bury them in mulch if needed.
Step 6: Adjust and Refine
Turn on the lights and step back. Look for:
- Uneven drape? Add or remove clips.
- Glare? Use diffuser sleeves or reposition bulbs.
- Dark spots? Add a second string or spotlight.
It’s okay to tweak—great lighting is iterative.
Maintenance, Safety, and Long-Term Care
Good lighting isn’t a “set it and forget it” project. A little maintenance keeps it safe and stunning for years.
Seasonal Care
- Spring: Inspect for winter damage. Replace broken bulbs. Clean dust and cobwebs.
- Summer: Check for overheating. Ensure cords aren’t in direct sun (UV degrades plastic).
- Fall: Clear leaves from lights. Prevent moisture buildup.
- Winter: In harsh climates, consider taking down non-weatherproof lights. Or use all-weather sets with IP65+ ratings.
Safety First
- Weatherproofing: Use lights rated for “wet locations” (look for UL Wet Listed). Cover outlets with weatherproof covers.
- Electrical safety: Never overload circuits. A standard outlet can handle 1,500 watts—check your lights’ wattage.
- Fire risk: Don’t cover lights with flammable materials. Keep cords away from heat sources.
- Child/pet safety: Secure cords to prevent tripping. Use low-voltage options (12V) if concerned.
Troubleshooting Common Issues
- Flickering lights: Loose bulb, faulty connection, or voltage drop. Check connections and use shorter extension cords.
- Sagging strings: Add more clips or use heavier-duty hardware.
- Dead sections: Test bulbs with a voltage checker. Replace faulty sockets.
- Glare: Use diffusers, reposition lights, or switch to warmer color temps.
Real talk: After a windstorm, my neighbor’s lights were dangling like spaghetti. I helped him re-clip them—took 20 minutes. A little maintenance prevents big headaches.
Final Thoughts: Your Pergola, Your Oasis
Stringing lights on a pergola isn’t just about adding light—it’s about crafting an experience. It’s about turning a simple structure into a sanctuary where memories are made. Whether you go for a minimalist glow or a dazzling display, the process is part of the joy. You’re not just installing lights; you’re designing a mood, a moment, a feeling.
In 2026, with so many options—smart tech, solar power, energy efficiency—you can tailor your setup to fit your lifestyle, budget, and aesthetic. And the best part? It’s a project anyone can tackle with a little planning, the right tools, and patience.
So grab your lights, climb that ladder, and start stringing. When the first bulb flickers to life, and the space around you softens into a warm, inviting glow, you’ll know it was worth it. Your pergola isn’t just a backyard feature anymore. It’s your personal retreat—a place to unwind, connect, and celebrate the simple magic of light. And that, my friend, is the true beauty of stringing lights on a pergola.
Frequently Asked Questions
How do I choose the right type of lights for stringing on a pergola?
For **stringing lights on a pergola**, opt for weather-resistant LED string lights or commercial-grade festoon lights. Consider spacing, bulb style (e.g., Edison, globe), and power source (solar, plug-in, or battery-operated) based on your pergola’s design and location.
What’s the best way to hang lights securely on a pergola without damaging it?
Use non-invasive methods like zip ties, adhesive hooks, or stainless steel cables to avoid drilling into wood or metal. For a polished look, run lights along the pergola’s beams or rafters, ensuring clips or ties are tight enough to withstand wind.
Can I install pergola string lights myself, or should I hire a professional?
Most DIY-friendly **stringing lights on a pergola** projects can be completed in a few hours with basic tools. However, for complex layouts, high-voltage systems, or multi-level pergolas, an electrician or installer may be needed for safety and code compliance.
How many strands of lights do I need to cover my pergola effectively?
Measure your pergola’s perimeter and rafter length to determine the total linear feet required. Add 10-15% extra for draping or overlapping, and check the max wattage per outlet if connecting multiple strands.
Are solar-powered lights a good option for pergolas in shaded areas?
Solar lights work best with direct sunlight, so they may not be ideal for shaded pergolas unless you use a remote solar panel. Alternatively, choose low-voltage plug-in or battery-powered lights for consistent brightness in low-light settings.
How do I maintain and store pergola lights after the season?
Clean bulbs and wires gently with a dry cloth, check for damage, and store lights in a cool, dry place. Use cord organizers or reels to prevent tangling and prolong the lifespan of your **pergola string lights**.

