Featured image for ways to hang string lights patio
Image source: i.pinimg.com
Transform your patio into a mesmerizing retreat by exploring 10 creative ways to hang string lights, from draping them along railings and pergolas to weaving through trees or framing outdoor seating with geometric patterns. Maximize ambiance with strategic placement—use adhesive hooks, poles, or existing structures for a professional look that’s easy to install and customize. Elevate your outdoor space with lighting that blends function, flair, and unforgettable atmosphere.
Key Takeaways
- Plan your layout first: Sketch light placement to avoid gaps and ensure even coverage.
- Use tension wires: Stretch cables between posts for a taut, professional-looking installation.
- Mix mounting heights: Vary light levels to add depth and visual interest to your space.
- Try non-traditional anchors: Hang lights on trees, railings, or fences for unique effects.
- Choose weather-resistant gear: Opt for outdoor-rated lights and hardware for lasting durability.
- Layer with other lights: Combine string lights with spotlights for dynamic ambiance.
📑 Table of Contents
- 10 Creative Ways to Hang String Lights Patio for Stunning Ambiance
- 1. Create a Canopy with Overhead String Light Installation
- 2. Wrap Trees, Posts, and Columns for a Natural Glow
- 3. Use a Tension Cable System for a Sleek, Modern Look
- 4. Drape Lights Over Fences, Railings, and Trellises
- 5. Hang String Lights from Freestanding Structures
- 6. Combine Lighting with Decor: Layered Ambiance
- Final Thoughts: Light Up Your Life
10 Creative Ways to Hang String Lights Patio for Stunning Ambiance
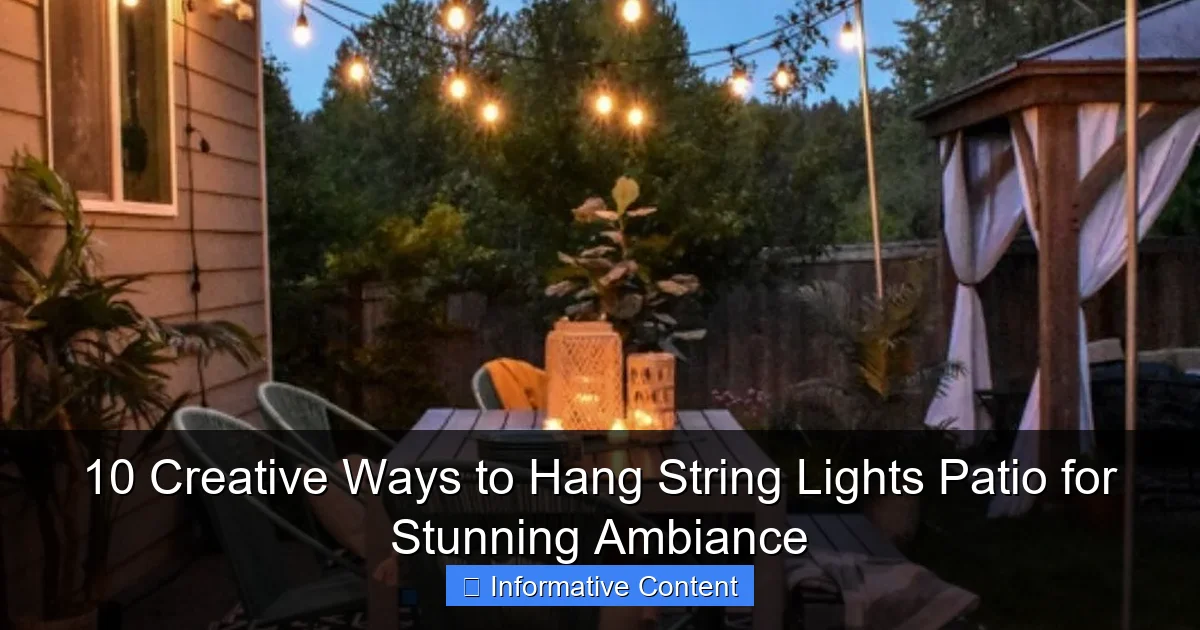
Picture this: it’s a warm summer evening, the sun has dipped below the horizon, and your backyard transforms into a cozy, glowing sanctuary. The air is soft, the laughter is light, and above you, a canopy of string lights twinkles like stars. That’s the magic of hanging string lights patio style. Whether you’re hosting a dinner party, enjoying a quiet night with a book, or just want to elevate your outdoor space, string lights add instant charm and ambiance. I remember the first time I strung up lights in my own patio—I felt like I’d created a personal retreat, a little slice of magic right outside my back door.
But here’s the thing: hanging string lights patio isn’t just about draping a few bulbs across a fence and calling it a day. Done right, it’s an art form. The placement, spacing, height, and method all play a role in how the space feels. Too low? You’ll be ducking. Too sparse? It’s just sad. And don’t even get me started on tangled cords and sagging wires. After years of trial, error, and a few “why didn’t I think of that?” moments, I’ve gathered 10 creative, practical, and downright beautiful ways to hang your string lights. These aren’t just ideas—they’re tested, lived-in solutions that balance beauty, function, and ease. So let’s turn your patio into a glowing oasis, one creative idea at a time.
1. Create a Canopy with Overhead String Light Installation
One of the most popular and visually stunning ways to hang string lights on a patio is by creating a canopy effect. This method mimics the feeling of being under a starry sky and works beautifully in open or semi-covered patios. It’s especially effective in larger spaces where you want to define the area and create intimacy.
How to Install a String Light Canopy
- Anchor Points: Identify four or more anchor points around your patio—these could be the corners of a pergola, the eaves of your house, or sturdy trees. If you don’t have natural structures, install outdoor-rated eye hooks into wood or masonry (use plastic anchors for brick or concrete).
- Spacing: For a dense, starry look, space the lights 12–18 inches apart. For a more subtle glow, go up to 24 inches.
- Height: Aim for 8–10 feet above the ground. This gives enough clearance for tall guests while keeping the light low enough to feel cozy.
- Pattern: Use a crisscross (X-pattern), parallel lines, or a grid. The X-pattern is great for visual interest and even light distribution.
- Tools: Use light clips or zip ties designed for outdoor use. Avoid staples—they damage cords and aren’t weatherproof.
Pro tip: If your patio is large, consider using extension hooks or pulley systems to make it easier to take down and restring lights seasonally. I once tried to string a 20-foot canopy by myself—lesson learned: use a ladder with a helper or a telescoping pole with a hook attachment.
Best for: Open patios, pergolas, and large outdoor dining areas
This method shines when you have vertical structures to anchor to. If your patio is open on all sides, consider installing freestanding metal poles (like those used for market tents) at the corners. Paint them black or bronze to blend in, and you’ve got a permanent, elegant solution.
Common Mistakes to Avoid
- Using indoor-rated lights—always choose outdoor-rated string lights with weatherproof bulbs and cords.
- Overloading circuits—check the wattage limit on your extension cords and outlets. Most outdoor circuits can handle 1,800 watts max.
- Ignoring sag—lights will droop over time. Use support cables (like thin steel wire) beneath the lights to reduce sagging and add durability.
2. Wrap Trees, Posts, and Columns for a Natural Glow
Sometimes the most beautiful lighting comes from working with nature. Wrapping string lights around trees, wooden posts, or stone columns adds a soft, organic glow that feels both whimsical and grounded. I used this method in my own backyard by wrapping lights around two mature maple trees flanking my patio—the effect was like a fairy tale.
Choosing the Right Trees or Posts
- Tree Type: Opt for sturdy, healthy trees with smooth bark (like maples, oaks, or pines). Avoid wrapping too tightly—use flexible light clips or fabric ties that won’t damage bark.
- Post Material: Wood, metal, and stone posts work well. For metal, use magnetic clips or wrap-around hooks. For wood, screw-in eye hooks are ideal.
- Height: Wrap from 3–4 feet up to 8–10 feet, depending on tree size. For posts, go from ground level to the top.
Creative Wrapping Techniques
- Spiral Wrap: Wrap the lights diagonally up the trunk or post. This creates a dynamic, flowing look and hides the cord better.
- Vertical Lines: For a more modern feel, run straight vertical lines with small gaps. Use clips every 12 inches to keep them straight.
- Layered Effect: Combine vertical and spiral wraps on the same post for texture. I did this on my pergola posts and loved the depth it added.
Tips for Longevity and Safety
- Use LED string lights—they generate less heat and are safer around trees.
- Inspect trees annually for signs of stress (cracking, oozing sap). Remove lights in winter if you live in a cold climate.
- For stone columns, use adhesive hooks rated for masonry. Avoid drilling unless necessary.
One thing I learned the hard way: don’t wrap lights around young or thin trees. I once did this on a sapling—by spring, the bark had cracked. Now I only wrap mature trees and always leave a little slack.
3. Use a Tension Cable System for a Sleek, Modern Look
If you want a clean, professional look without visible hooks or clips, a tension cable system is your best friend. This method uses a strong steel cable stretched between two anchor points (walls, posts, or trees), with string lights attached to the cable using small clips or hooks. It’s perfect for modern patios, minimalist designs, or spaces where you want the lights to feel “floating.”
How to Set Up a Tension Cable
- Choose the Cable: Use stainless steel aircraft cable (1/8 inch thick is ideal). It’s strong, weather-resistant, and nearly invisible from a distance.
- Install Anchors: Attach turnbuckles to eye hooks on each end. Turnbuckles let you adjust tension—crucial for preventing sagging.
- String the Cable: Run the cable between anchor points. Use a level to ensure it’s straight. Tighten gradually with the turnbuckles.
- Attach Lights: Use light clips with a hook** or **S-hooks** to hang the string lights from the cable. Space them evenly.
Why This Method Works
- No Sag: The cable supports the weight, so lights stay taut and level.
- Flexible Layout: You can create straight lines, zigzags, or even a web pattern.
- Low Visibility: The cable disappears at night, making the lights appear to float.
Best for: Modern patios, small spaces, and rental properties
Since this system doesn’t require drilling (if using removable hooks), it’s ideal for renters or temporary setups. I used it in a friend’s apartment patio—she didn’t want to damage the stucco walls, and the tension system was perfect. Just make sure the anchor points are secure. A loose cable can snap under wind or weight.
One caveat: this method requires a bit more setup than others. But once it’s installed, it’s incredibly durable and low-maintenance. Just wipe down the cable annually to remove grime.
4. Drape Lights Over Fences, Railings, and Trellises
Got a fence? A railing? A garden trellis? You’ve got instant string light real estate. Draping lights over these structures is one of the easiest and most effective ways to add ambiance—especially if your patio is small or lacks vertical space.
Fence Draping Techniques
- Straight Drape: Run lights horizontally along the top of the fence. Use fence clips or zip ties to secure them.
- Zigzag Pattern: Create a zigzag by alternating high and low attachment points. This adds visual interest and covers more area.
- Vertical Swags: Hang lights from the top to the bottom in a gentle arc. Great for privacy screens or tall fences.
Railings and Trellises
- Railings: Wrap lights vertically or horizontally around balusters. Use flexible light clips to avoid damaging wood.
- Trellises: If you have a climbing plant (like jasmine or ivy), weave lights through the structure. The plants will grow around them, creating a living light display.
Pro Tips for Fence and Railing Lights
- Use outdoor-rated extension cords to connect to power. Route cords along the ground or under furniture to avoid tripping.
- For privacy, add sheer curtains or fabric panels** behind the lights. The glow will diffuse beautifully.
- If your fence is metal, use magnetic hooks for easy removal and repositioning.
I once draped lights over a bamboo privacy fence—the result was so cozy, my neighbor asked me to help with theirs. The key? Don’t overdo it. A few well-placed strands go a long way.
5. Hang String Lights from Freestanding Structures
No pergola? No problem. Freestanding structures like light poles**, **canopies**, or **DIY arches** let you hang string lights without relying on your house or trees. These are perfect for open patios, rental properties, or spaces where permanent installation isn’t allowed.
Types of Freestanding Structures
- Light Poles: Use metal or wooden poles (4–6 inches in diameter) set in concrete or weighted bases. Attach eye hooks near the top.
- Canopies & Tents: Market tents, pop-up canopies, or even a permanent fabric canopy provide overhead space for lights.
- DIY Arches: Build a simple arch using PVC pipes (for temporary use) or wood/metal (for permanent). String lights across the top and down the sides.
- Hammock Frames: If you have a hammock stand, wrap lights around the frame for a bohemian vibe.
Installation Tips
- For poles, use concrete footings or weighted bases** (like sandbags) to prevent tipping.
- For canopies, check the manufacturer’s guidelines for weight limits. Most can support string lights, but avoid heavy chandeliers.
- For DIY arches, use galvanized pipe fittings or wooden joints** for stability.
Creative Ideas
- Create a light tunnel** by placing two arches parallel and stringing lights between them.
- Use color-changing LEDs** on a canopy for parties or holidays.
- Hang lanterns** from the structure for a layered effect.
I built a simple wooden arch in my garden using scrap lumber and eye hooks. It cost under $50 and became the centerpiece of my outdoor space. The best part? I can take it down in winter.
6. Combine Lighting with Decor: Layered Ambiance
The secret to truly stunning patio lighting? Layering. String lights are just one piece of the puzzle. Combine them with other light sources and decor elements for a rich, multi-dimensional ambiance.
Layering Techniques
- Overhead + Ambient: Hang string lights overhead, then add floor lamps**, **candles**, or **solar path lights** at ground level.
- Task Lighting: Use plug-in sconces** or battery-powered lights** near seating or dining areas for functionality.
- Decorative Accents: Hang glass lanterns**, **mason jars**, or **fairy lights** in trees or on tables.
Color and Bulb Choices
- Warm White (2700K): Classic, cozy, and flattering for skin tones. Best for dining and relaxation.
- Cool White (4000K): Crisp and modern. Good for task lighting.
- Color-Changing: Use sparingly—great for parties, but can feel gimmicky if overused.
- Bulb Shape: Globe bulbs** add a vintage feel; **candle bulbs** mimic real flames; **edison bulbs** give industrial charm.
Data: String Light Placement & Ambiance Impact
| Placement | Height (ft) | Spacing (in) | Best For | Visual Impact |
|---|---|---|---|---|
| Canopy (overhead) | 8–10 | 12–18 | Large patios, dining | High (starry sky) |
| Tree/Post Wrap | 3–10 | 6–12 (wrap) | Natural settings | Medium (organic glow) |
| Tension Cable | 7–9 | 12–24 | Modern spaces | High (floating effect) |
| Fence/Railing | 3–5 | 12–18 | Small patios | Low (cozy boundary) |
| Freestanding | 7–10 | 12–18 | Open areas | Medium (focal point) |
I’ve found that combining overhead string lights with fairy lights in glass jars** on the table creates a magical, intimate feel. Add a few outdoor candles** for flicker, and you’ve got a space that feels both inviting and enchanting.
Final Thoughts: Light Up Your Life
Hanging string lights on your patio isn’t just about illumination—it’s about creating a mood, a moment, a memory. Whether you’re going for a starry canopy, a rustic tree wrap, or a sleek tension cable setup, the key is to work with your space**, not against it. Use what you have—fences, trees, railings—and don’t be afraid to get creative.
Remember, the best lighting feels natural, not forced. It guides the eye, defines the space, and invites people to linger. And with the 10 methods we’ve explored—from canopies to freestanding structures—you’ve got plenty of options to suit your style, budget, and skill level.
So grab your lights, a ladder, and a friend. Turn on the music, pour a drink, and start stringing. Because when the sun goes down and those first bulbs flicker to life, you’ll know: this isn’t just a patio. It’s your personal paradise.
Frequently Asked Questions
What are the best ways to hang string lights patio without drilling holes?
Use adhesive hooks, tension rods, or clamp-on fixtures to avoid damaging walls or ceilings. These methods work well for renters or temporary setups while still creating a stunning ambiance.
How do I hang string lights on a patio with no overhead structures?
Install freestanding poles, shepherd’s hooks, or attach lights to tall planters or railings. This approach is a popular “way to hang string lights patio” when roofs or beams aren’t available.
Can I use string lights to define zones on my patio?
Yes! Drape lights above seating, dining, or cooking areas to create distinct zones. This creative “way to hang string lights patio” enhances functionality and visual appeal.
What’s the safest way to hang string lights on a wooden fence?
Use cup hooks or zip ties spaced evenly along the fence for secure, even lighting. Always check the weight capacity to prevent sagging or damage.
How do I hang string lights on a sloped patio?
Adjustable cables or staggered poles help maintain even light distribution on uneven surfaces. This ensures a balanced, professional look for your patio setup.
Are there solar-powered options for hanging string lights on a patio?
Absolutely! Solar-powered string lights eliminate the need for outlets and are ideal for remote areas. Pair them with reflective surfaces to maximize brightness.

